
The Cisco 300 Series switches fall into the Small Business series product line of network solutions and is an affordable managed switches series that gives a reliable foundation for your business network. These series switches provide a lot of features that you need to improve the availability of your business applications, protect sensitive information, and enhance network bandwidth to deliver information and applications more effectively. Easy to set up and use through GUI and provides the supreme combination of affordability and capabilities for small businesses, and helps you create a more effective, better-connected workforce.
In this post, I will cover the step-by-step procedures to upgrade the Cisco SG300 Series Switches Boot Code & Firmware Image. By upgrading the firmware on your device can provide enhanced security, new features, bug fixes, and performance upgrades.
Before starting the upgrade process, you have to verify the following requirements.
- Take the backup of existing firmware, boot code, and configuration file.
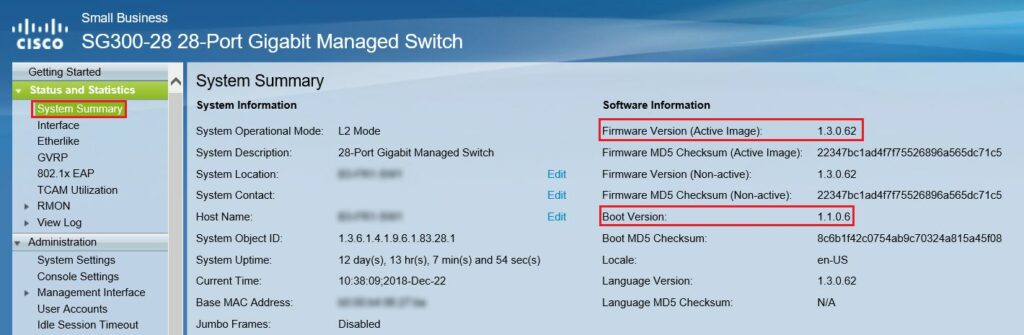
- Verify the existing firmware version on the switch and take a screenshot.
Log into the web interface for the switch to be updated. Go to Status and Statistics –> System Summary.
If your firmware version is < 1.3.7.18 and if you directly upgrade to the latest firmware image version 1.4.9.4, you may encounter the error message, “SW code file is over sized” or “Illegal software format”.
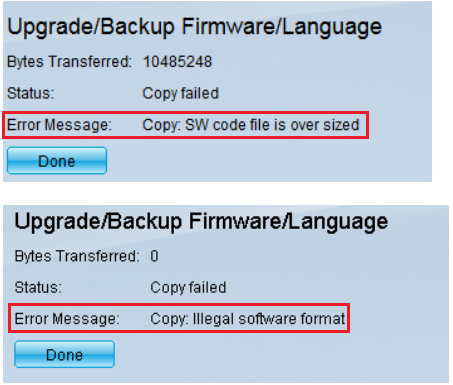
In order to overcome this error, you must upgrade to an intermediary Firmware and upgrade to the latest Boot Code before upgrading to the latest Firmware. Follow the steps in this article for detailed instructions.
Preparing for the upgrade
Here are the latest versions I used, which were the latest and greatest and the time:
Here you can download the latest firmware and relevant boot code from the following download path.
https://software.cisco.com/download/home/283019617/type/282463181/release/1.3.7.18?i=!pp
If you are upgrading from a version prior to 1.3.5, make sure to download 1.3.5 or 1.3.7 as well.
- Latest Firmware Image version 1.4.9.4 (sx300_fw-1494.ros)
- Boot Code version 1.3.5.06 (Extract Sx300_FW_Boot_1.3.5.58.zip and get sx300_boot-13506.rfb)
- Intermediary Firmware Image Version 1.3.7.18 (sx300_fw_1.3.7.18.ros)
Once you download the required files, then spin up the TFTP Server on your local computer or remote server and copy all downloaded firmware images and Boot code to the root directory of the TFTP server.
Once you arrange the above requirements, you can start the upgrade process.
Let’s start the upgrade
Before upgrading to the latest version from a version prior to 1.3.5, you first need to upgrade the device image to image version 1.3.5 or 1.3.7 and the latest boot file (1.3.5.06). After the device is upgraded to 1.3.5/1.3.7 and to the latest boot file (1.3.5.06), you can upgrade the device to version 1.4.9.4.
Step 1 – Upgrade the firmware to the intermediate version
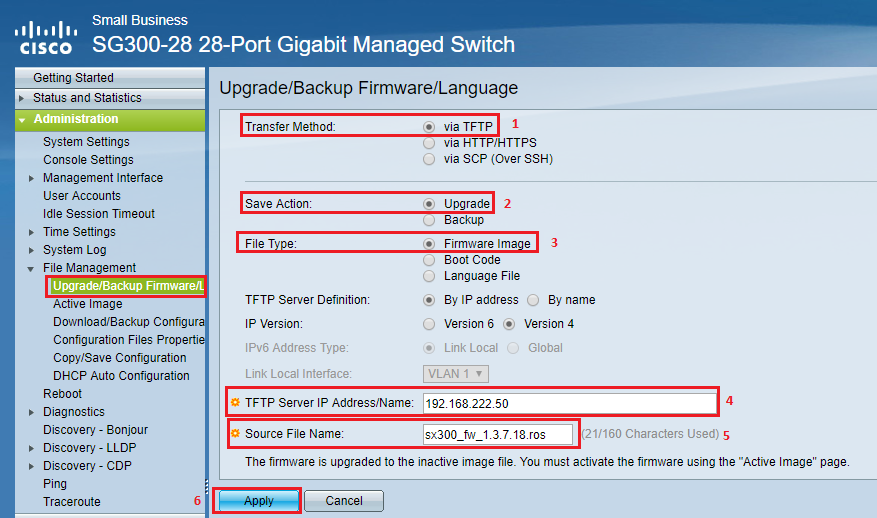
Log in to the web interface of the switch and select Administration > File Management > Upgrade/Backup Firmware/Language.
From there:
- Select TFTP.
- Click Upgrade.
- Select Firmware Image.
- Enter your TFTP server IP (mine just ran on my computer)
- Enter the intermediate firmware image file name (sx300_fw_1.3.7.18.ros)
- Click Apply.
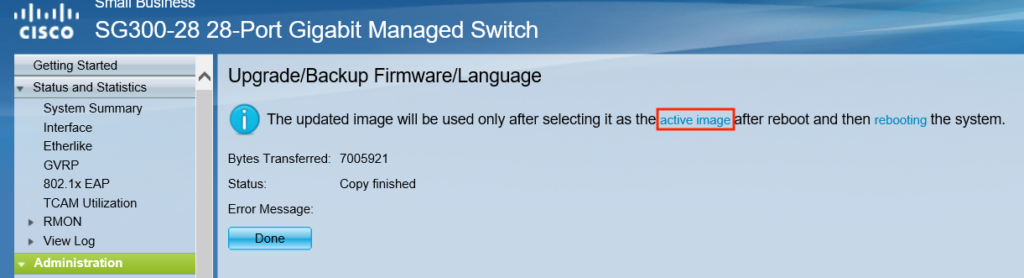
A progress bar appears for several minutes and by that time you can see upload is going through the TFTP server.
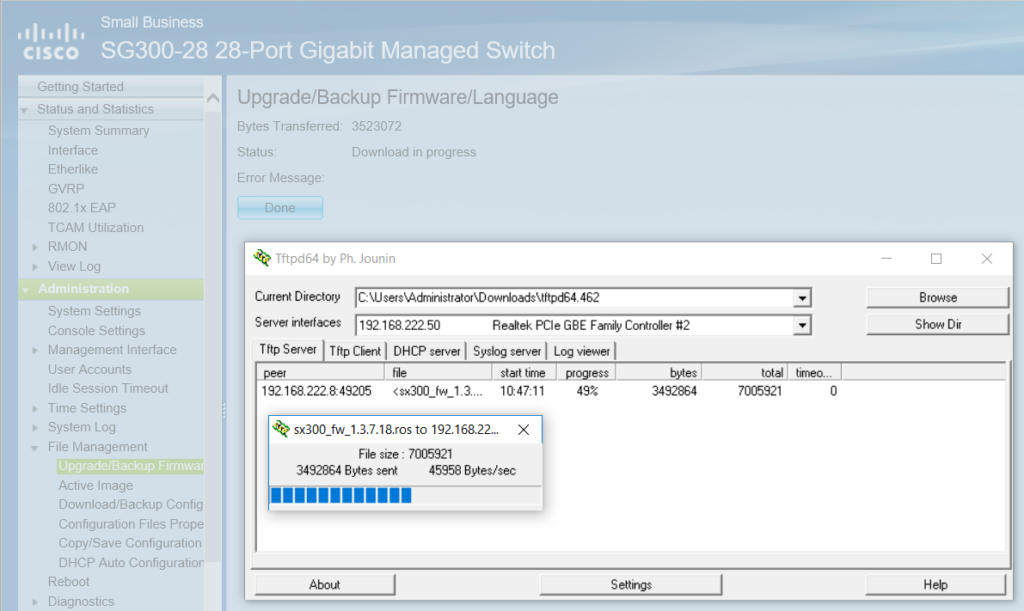
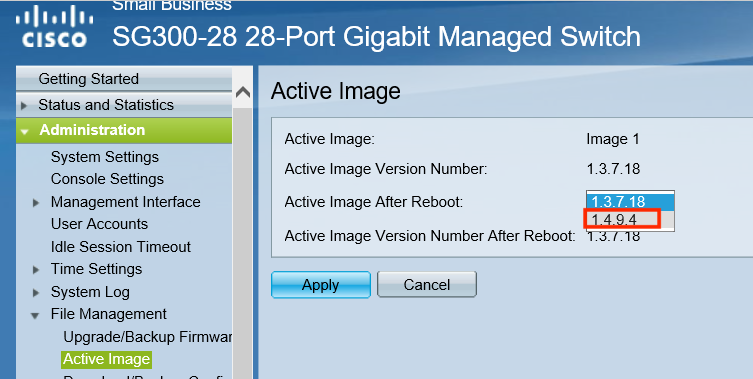
Once the transfer completes, the progress bar disappears. If the transfer was successful and click the active image hyperlink, or navigate to Administration > File Management > Active Image.
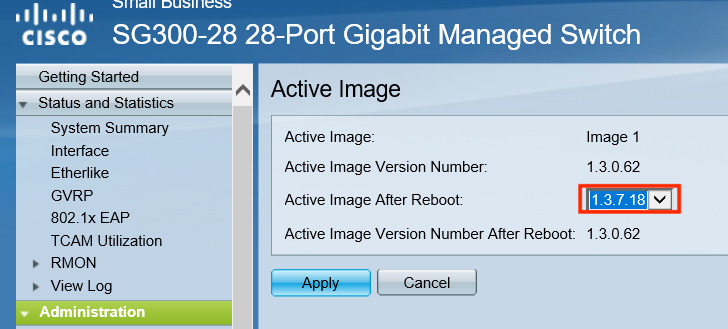
From the Active Image After Reboot drop-down list, select the updated firmware version and click Apply.
A success message appears and the “Active Image Version Number After Reboot” field is get updated.
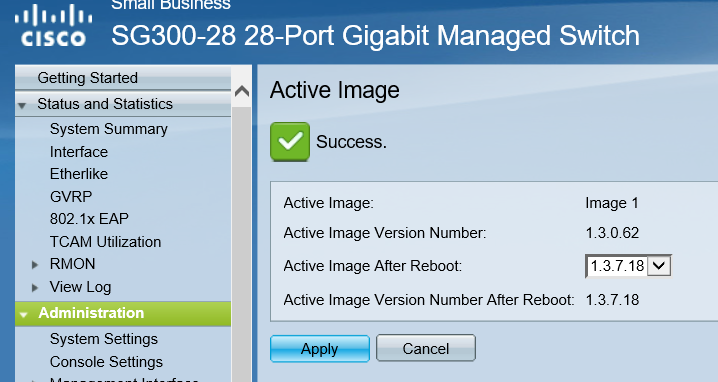
Now reboot the switch so that the firmware upgrade will take effect. Navigate to Administration > Reboot, and then click the Reboot button. Or else you can also power cycle the switch to reboot by disconnecting and reconnecting the power cord behind the switch.
Step 2- Upgrade the Boot Code to the latest
The Boot Code file is an RFB file type and can be found in the zip file that you downloaded.
Same as previously, log in through the web UI and choose Administration > File Management > Upgrade/Backup Firmware.
- Select the via TFTP radio button in the Transfer Method field.
- Click the Upgrade radio button in the Save Action field.
- Click the Boot Code radio button in the File Type field.
- In the TFTP Server IP Address/Name field, give the IP address of the computer that runs the TFTP Server application.
- Enter the filename of the Boot Code (sx300_boot-13506.rfb) file in the Source File Name field.
A progress bar appears for several minutes and after that Statistics and any errors from the transfer appear. Then click done and reboot the switch again to boot with the new boot code.
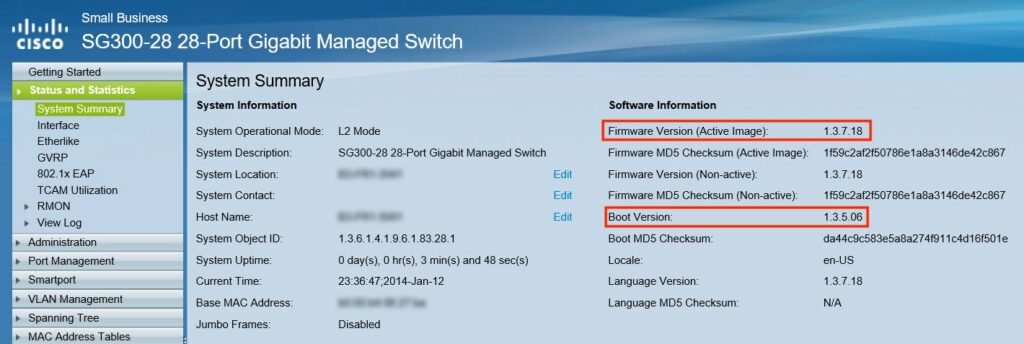
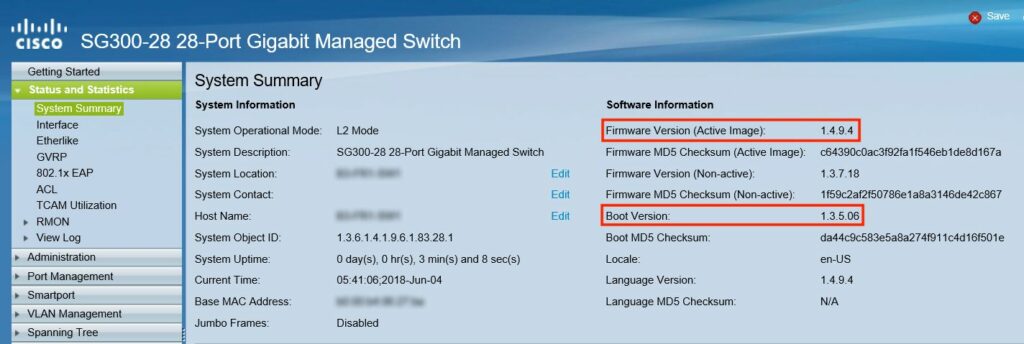
Once the switch is powered up, log in to the web configuration utility and choose Status and Statistics > System Summary to view the Software Information in order to confirm the firmware version has upgraded.
Step 3 – Upgrade to the latest firmware
Again log in through the web UI and choose Administration > File Management > Upgrade/Backup Firmware and do the following steps as previously.
- Select the via TFTP radio button in the Transfer Method field.
- Click the Upgrade radio button in the Save Action field.
- Click the Firmware Image radio button in the File Type field.
- In the TFTP Server IP Address/Name field, give the IP address of the computer that runs the TFTP Server application.
- Enter the filename of the Latest Firmware Image (sx300_fw-1494.ros) file in the Source File Name field.
A progress bar appears for several minutes and after that Statistics and any errors from the transfer appear. Go to the Active Images and change the active image to the latest uploaded firmware image. Then click Apply and reboot the switch again to boot with the latest firmware.
Once the reboot is done, Log in to the web configuration utility and choose Status and Statistics > System Summary to view the Software Information in order to confirm the firmware version has upgraded.
2 comments
any chance you have the files still somewhere?
Cisco retired the SG switches in 2023, and now i cant update anymore. currently running 1.3.x with a 1.1 bootloader. i did manage to find the 1.4.x ros file, but cant update without updating the bootloader first.
Excellent article, sadly Cisco has taken the firmware archive offline 🙁 does anyone have the last released version?