
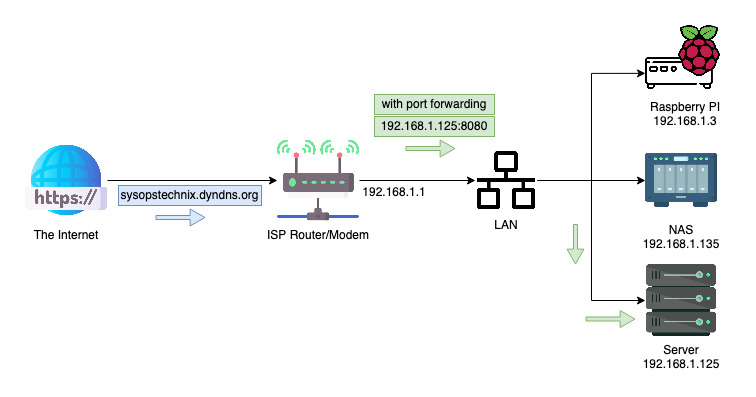
Exposing locally hosted services in your home network is a nightmare. Assume in your home network you may have several network-connected devices and if you want to access home network remotely, the traditional method is something like follows right?
- Configure a Dynamic DNS since I do not have a static IP.
- Add a script to update the DDNS entry in case my IP changes.
- Port-forward to the server’s local IP address by punching holes through your router.
- Set up certificates to support HTTPS.
- Implement the security practices separately.
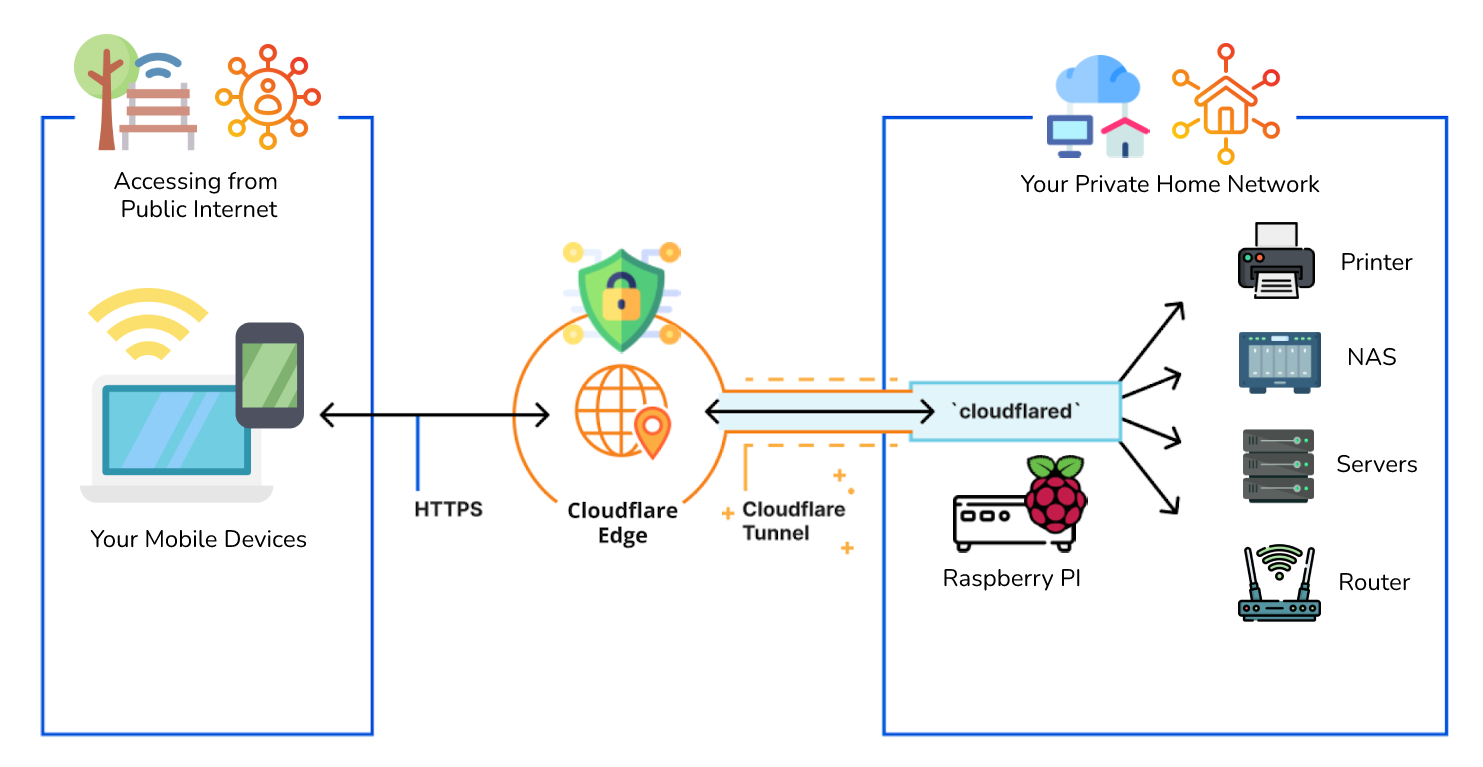
But, In this article, I’m going to expose home network resources to the Internet in a few clicks. Now don’t be afraid. This is entirely secure and crazy actually because we’re not punching holes through your firewall, which is what you might do with the traffic forwarding and exposing ports, no we’re not doing that. Instead, we’re creating a tunnel. With this tunnel, we can securely expose anything on your home network to the Internet. Everything you expose will have its own subdomain and SSL Cert, even if you only have HTTP or a self-signed Cert.
Brief about Cloudflare Tunnel
Cloudflare Tunnels is a feature provided by Cloudflare and it will create an encrypted tunnel between your server and the Cloudflare network using the cloudflared daemon. Because of this, external users won’t directly connect to your server, instead, they will connect via proxy through Cloudflare’s network.
This is a totally free service that allows you to securely access home network remotely from anywhere. And it doesn’t matter what kind of home network you have. Setting this up is super simple, see the following diagram to get an overview of how it works.
Benefits of using Cloudflare Tunnel
- No need to punch holes through your router to open any ports on your network.
- No need to create, buy or manage TLS certificates as
cloudflaredhandles everything for you and it is very secure. - Cloudflare uses intelligent routing to reduce traffic latency. They avoid congested networks and areas with high latency by routing traffic through their edge network.
- You get a WAF and DDOS protection built in.
Prerequisites to Access Home Network Remotely
Here’s what you need, First, you will need a domain name. It cost between $10 and $20 per year or else you can use any free domain provider. Second, you’ll need a computer or server inside your home network and this can be running pretty much any OS (make sure that the computer/server should be able to access your home network resources). I think you might have at least one, right? And it’s on this computer or server that will install Cloudflare Tunnel. And then it will tunnel out to Cloudflare and it’s through that tunnel that we can tell Cloudflare to route any subdomain to anything inside your home network.
Setup a Cloudflare Account
You can head out to CloudFlare.com. Click on Sign up. Here you will find more details on how to set up a Cloudflare account in a few clicks. Create a Cloudflare account
Once you create the account add a new site. So what you need to do is put your domain and get the name servers from Cloudflare and update it in your domain registrar. For more details refer Add a Cloudflare site.
Let’s Create the Cloudflare Tunnel
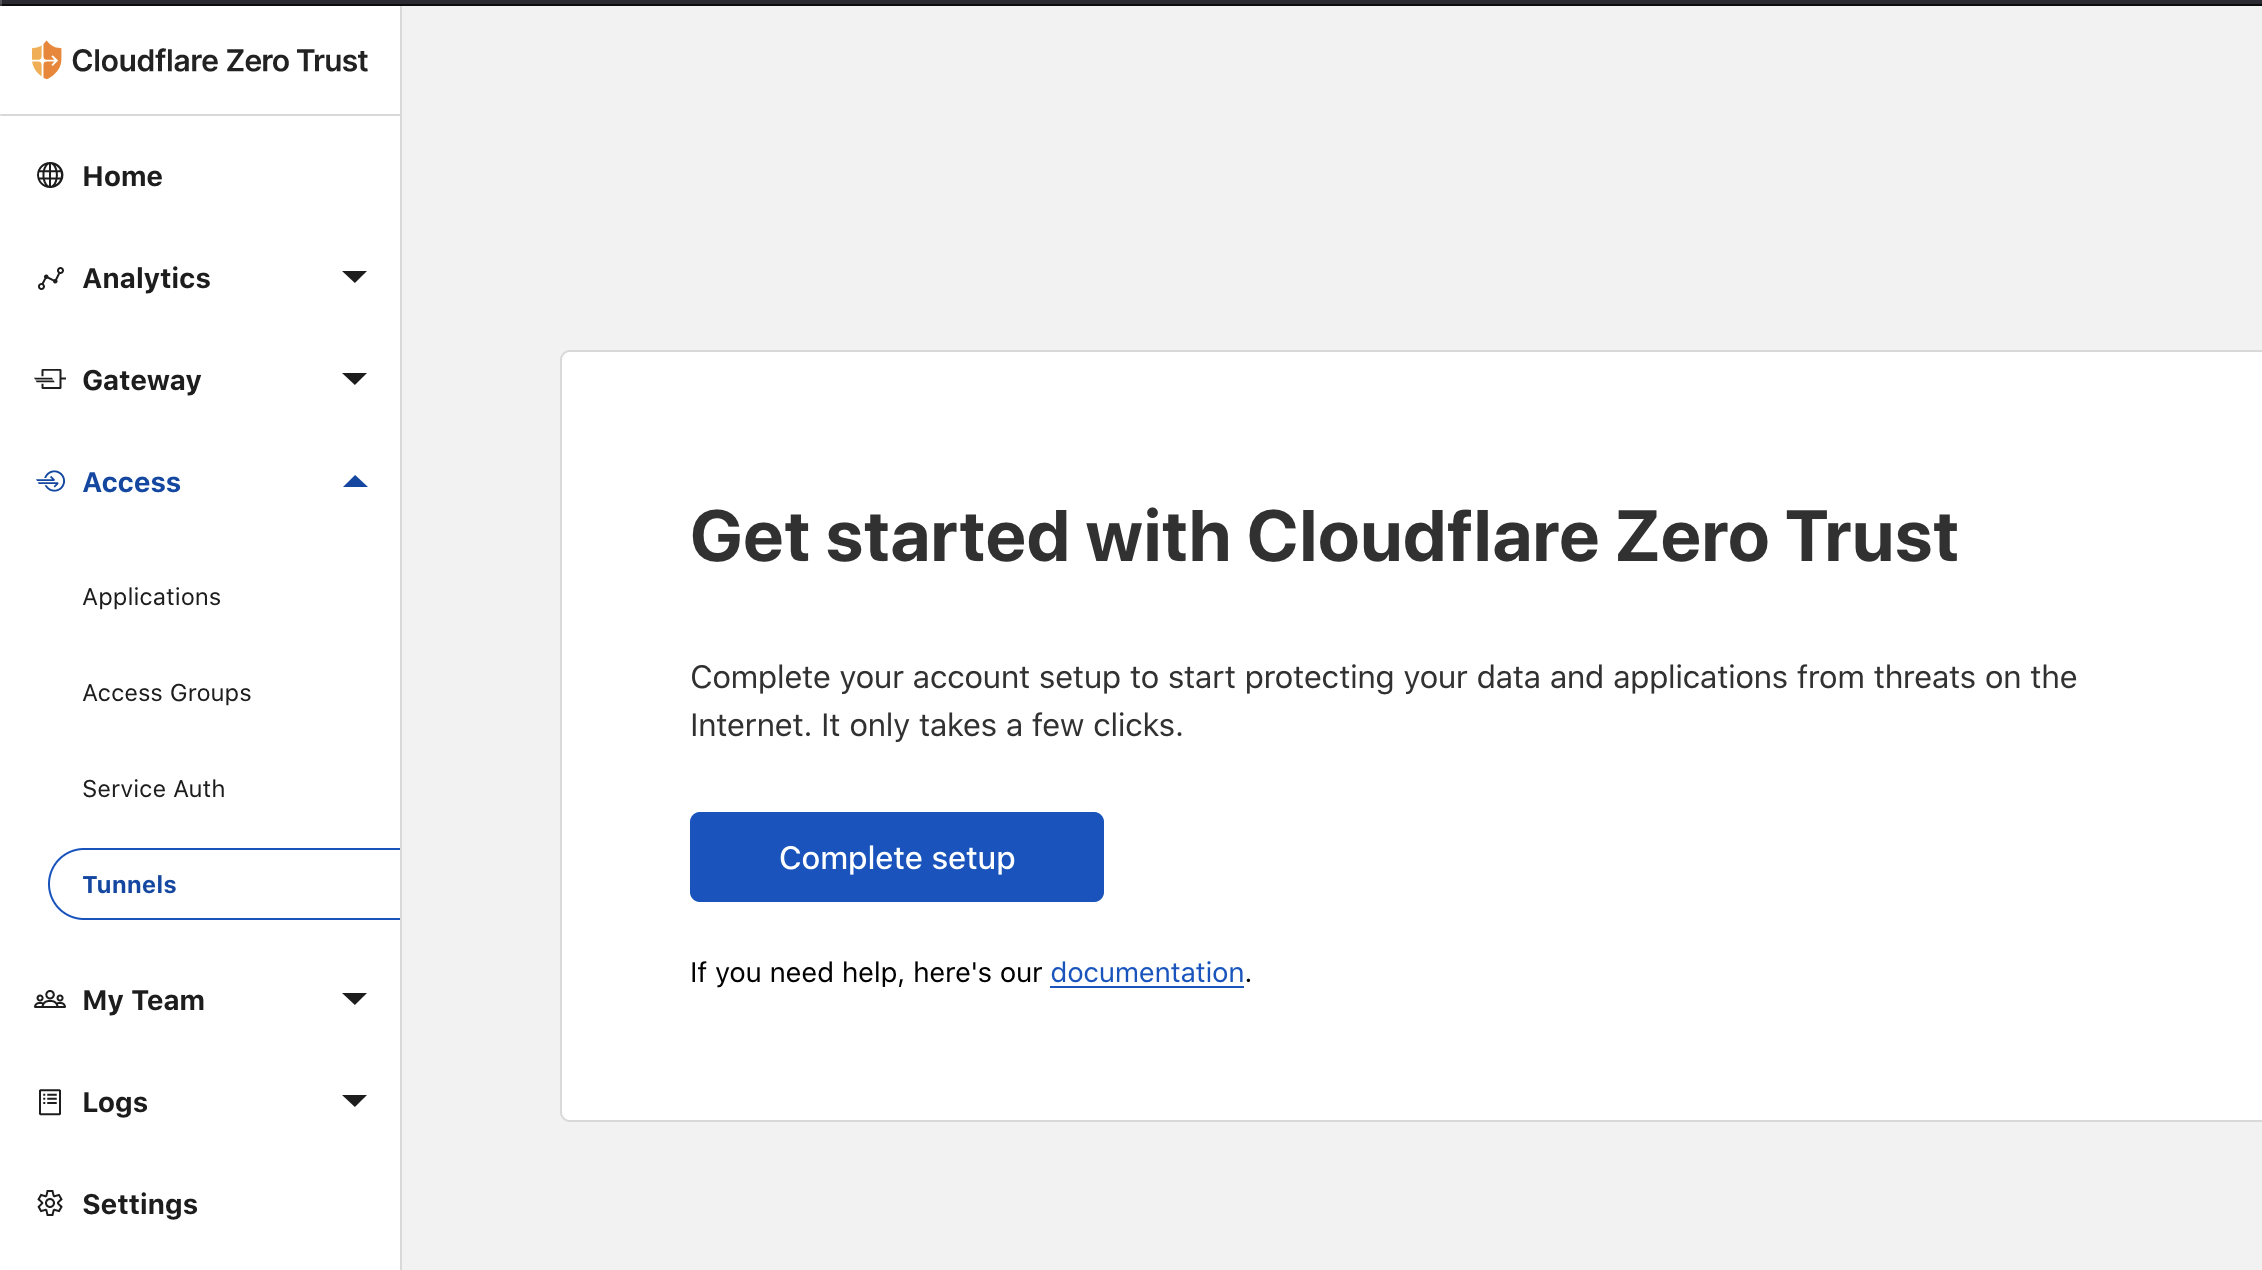
Step 1: Enable the Cloudflare Zero Trust Account
Once your Cloudflare account is ready, go to the Cloudflare dashboard and click on Zero Trust from the left panel. Then navigate to Access >Tunnels from the left side panel.
Click on Complete Setup and click on Next.
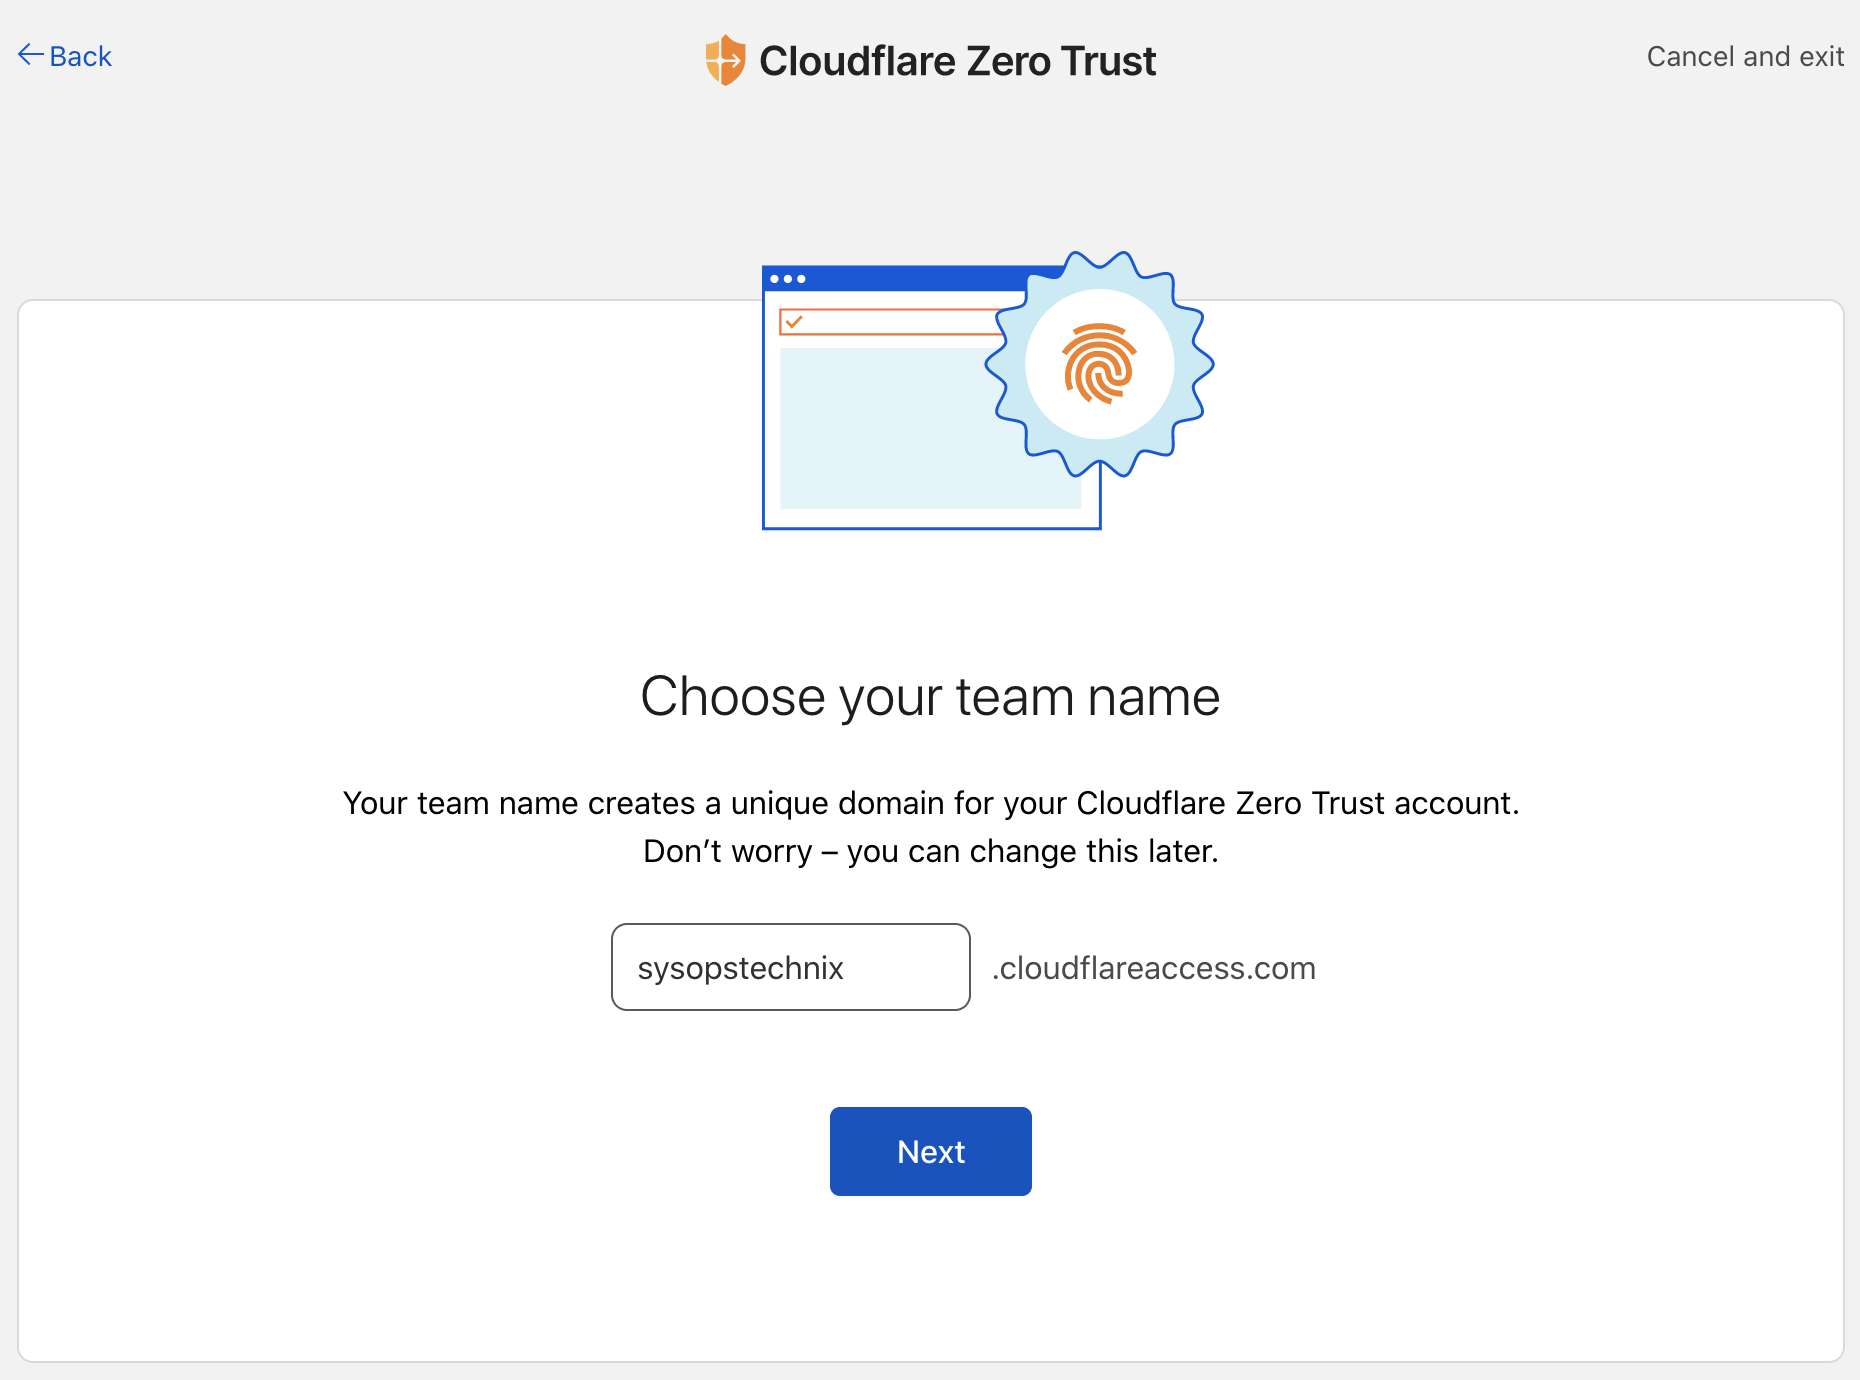
Give a unique name to your Cloudflare Zero Trust account.
Step 2: Create a Tunnel
Now it is time to set up the Cloudflare tunnel. Once you are done with the $0 payment and enable the Zero Trust account, again navigate to Access > Tunnels, and let’s create our first tunnel by giving a name for the tunnel.
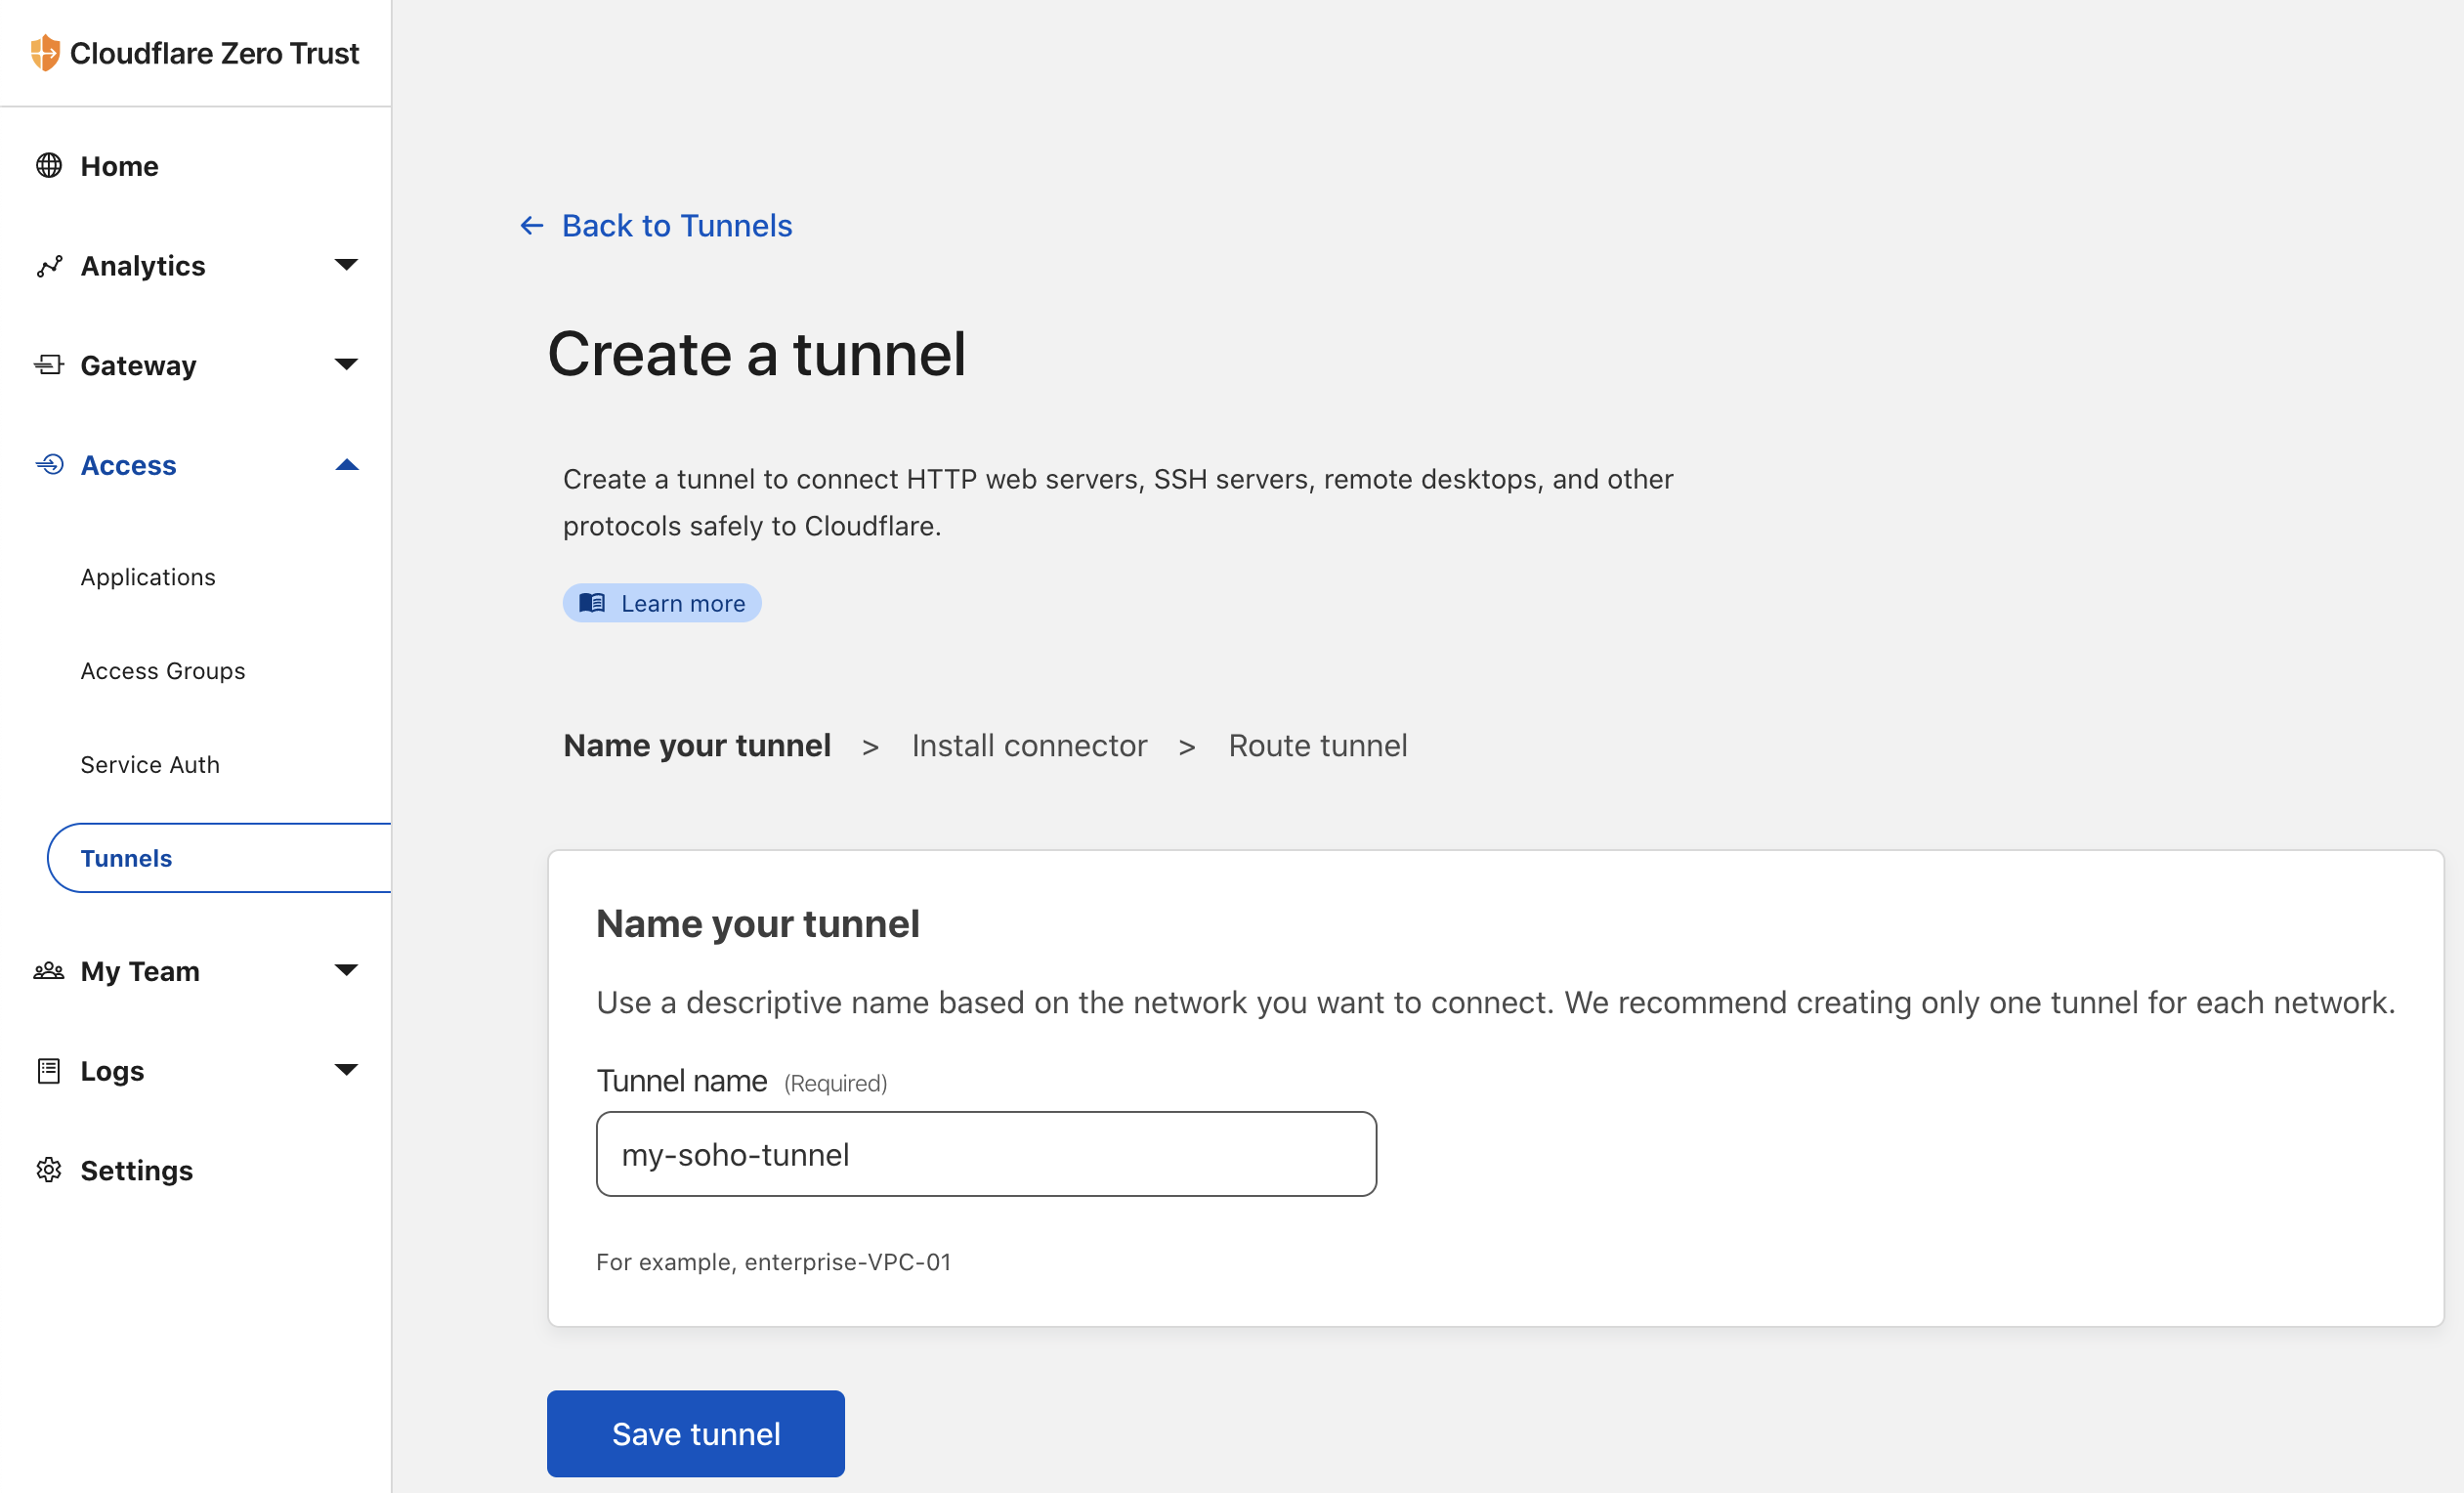
Then you will move to the tunnel configuration page. As I told you you could pretty much install this anywhere. They have all the flavors. So I’m going to use the Debian version with arm64 process architecture because I’m planning to install this on my Raspberry PI.
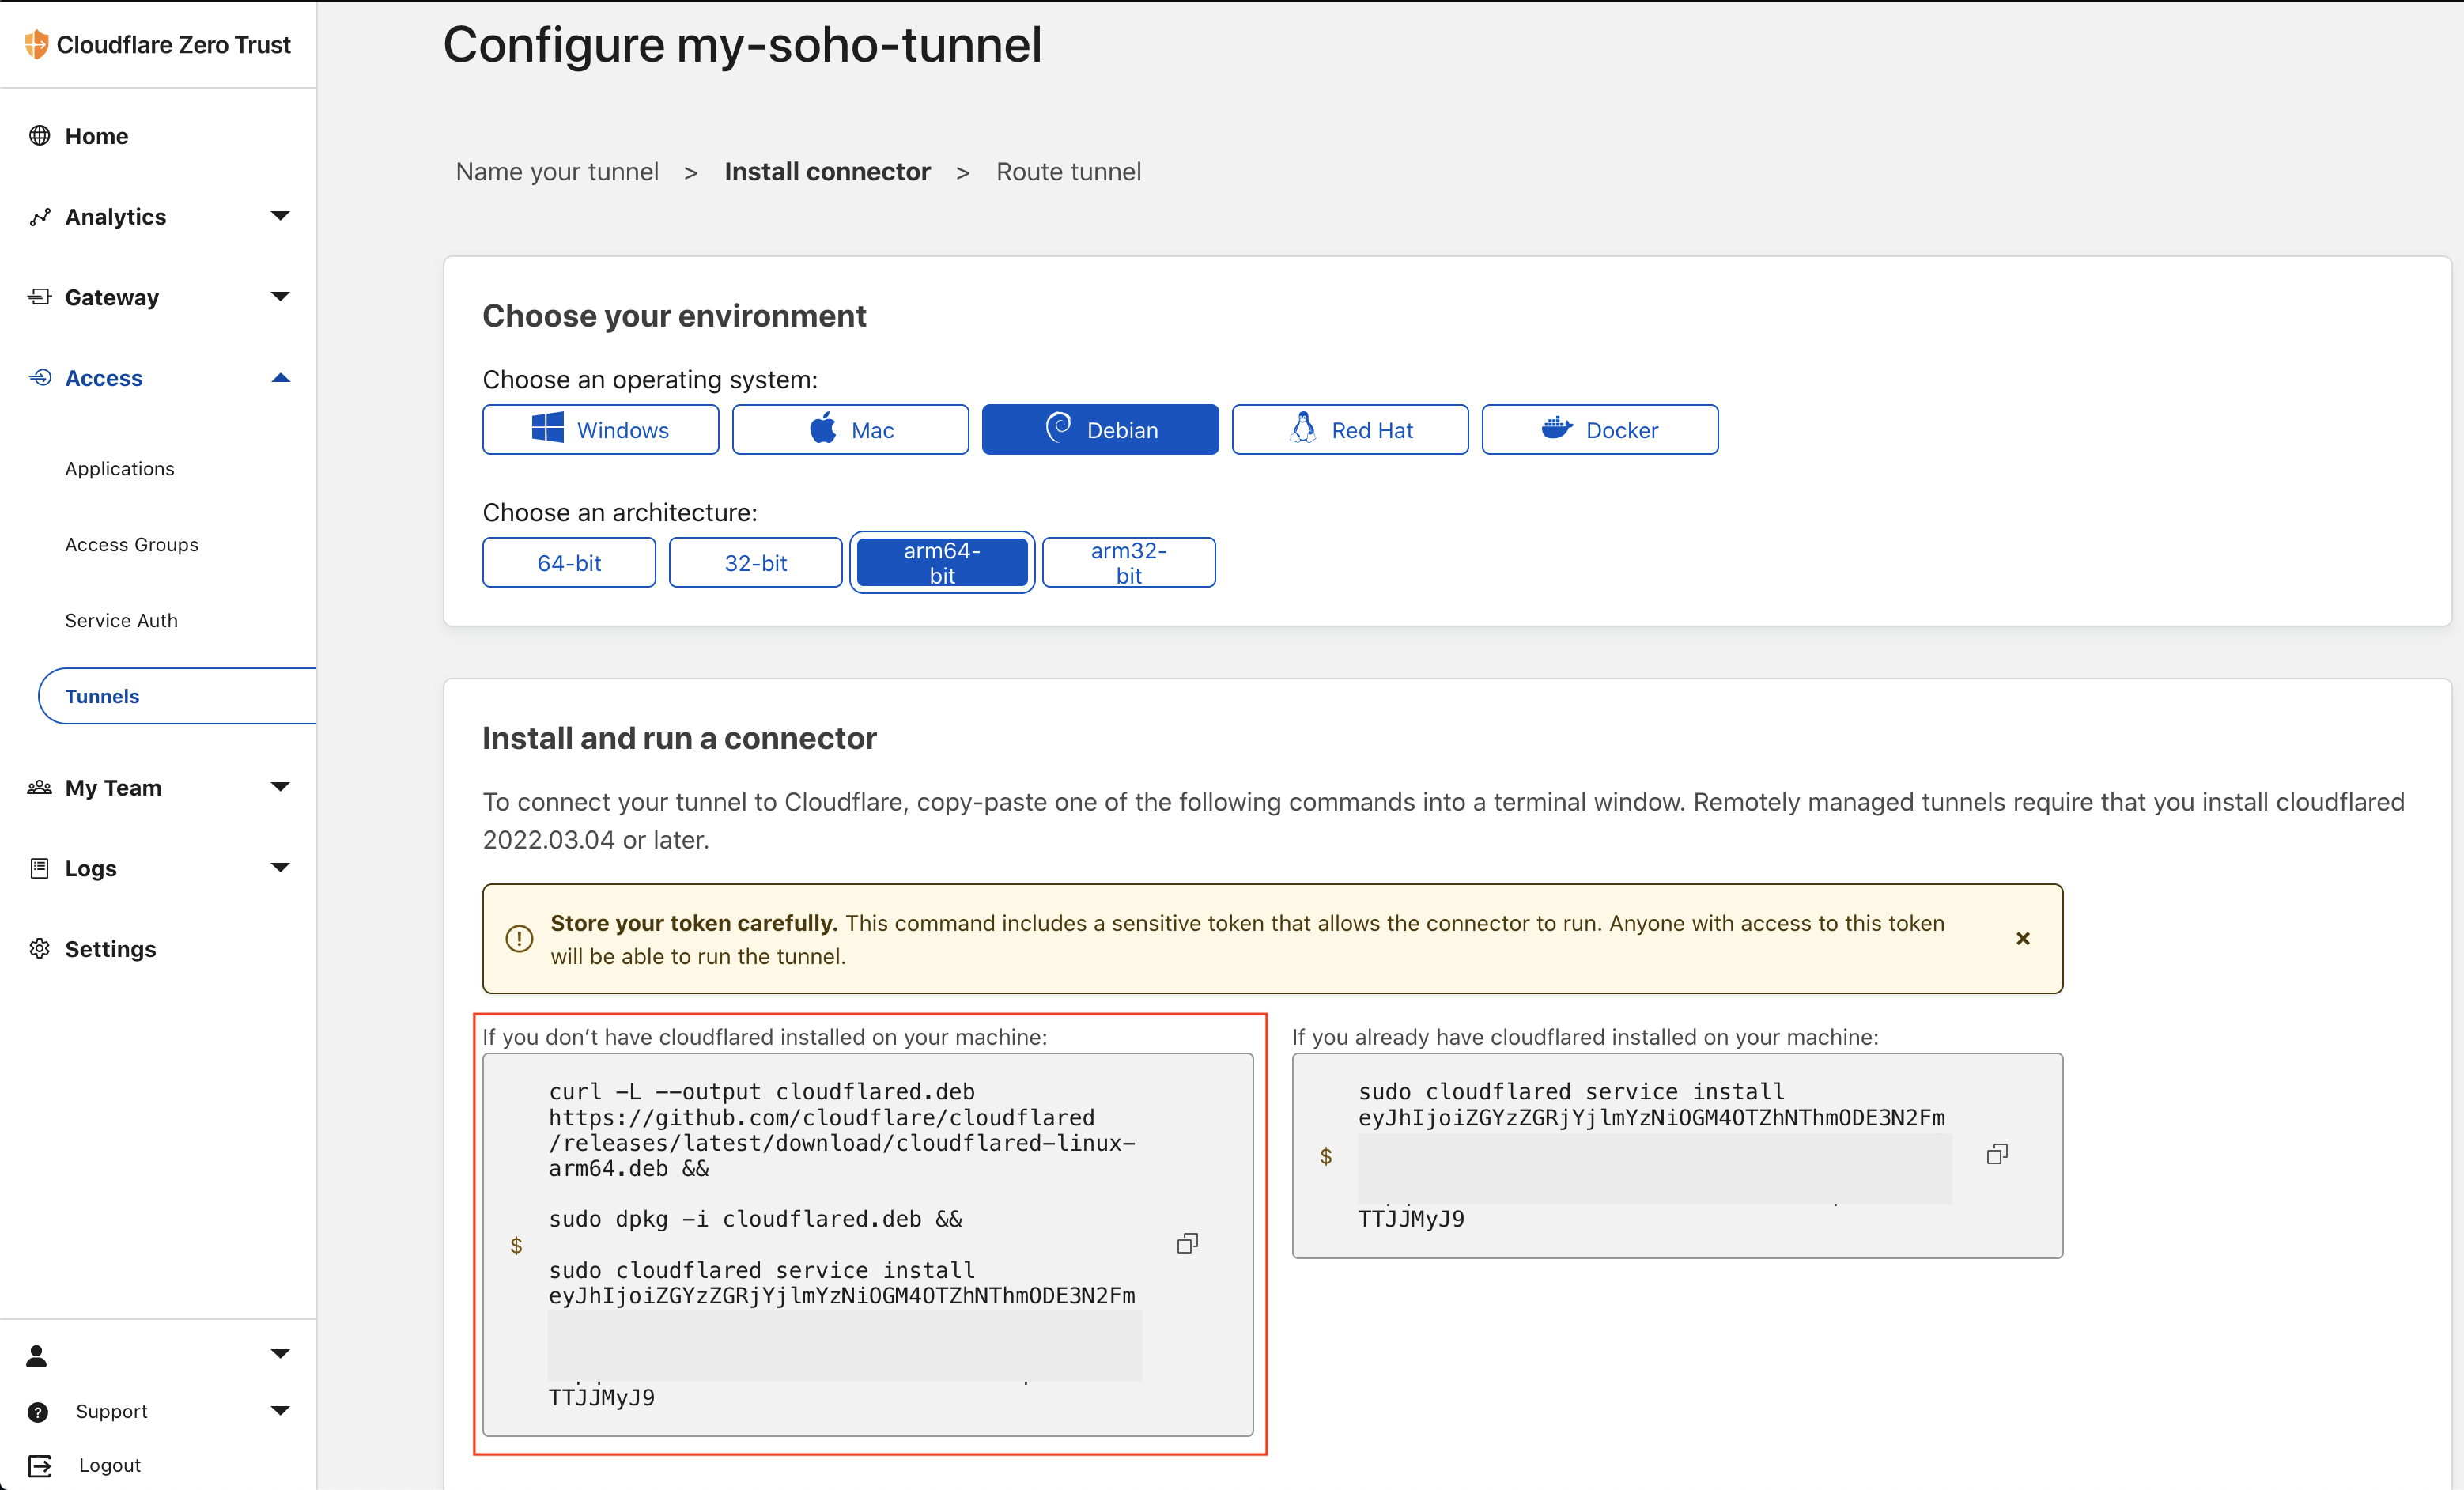
Step 3: Install configured Deamon
I’ll copy this snippet of code right here and paste it on my Raspberry PI machine.
sudo apt update

curl -L --output cloudflared.deb https://github.com/cloudflare/cloudflared/releases/latest/download/cloudflared-linux-arm64.deb

sudo dpkg -i cloudflared.deb

sudo cloudflared service install <Your Tunnel Token >
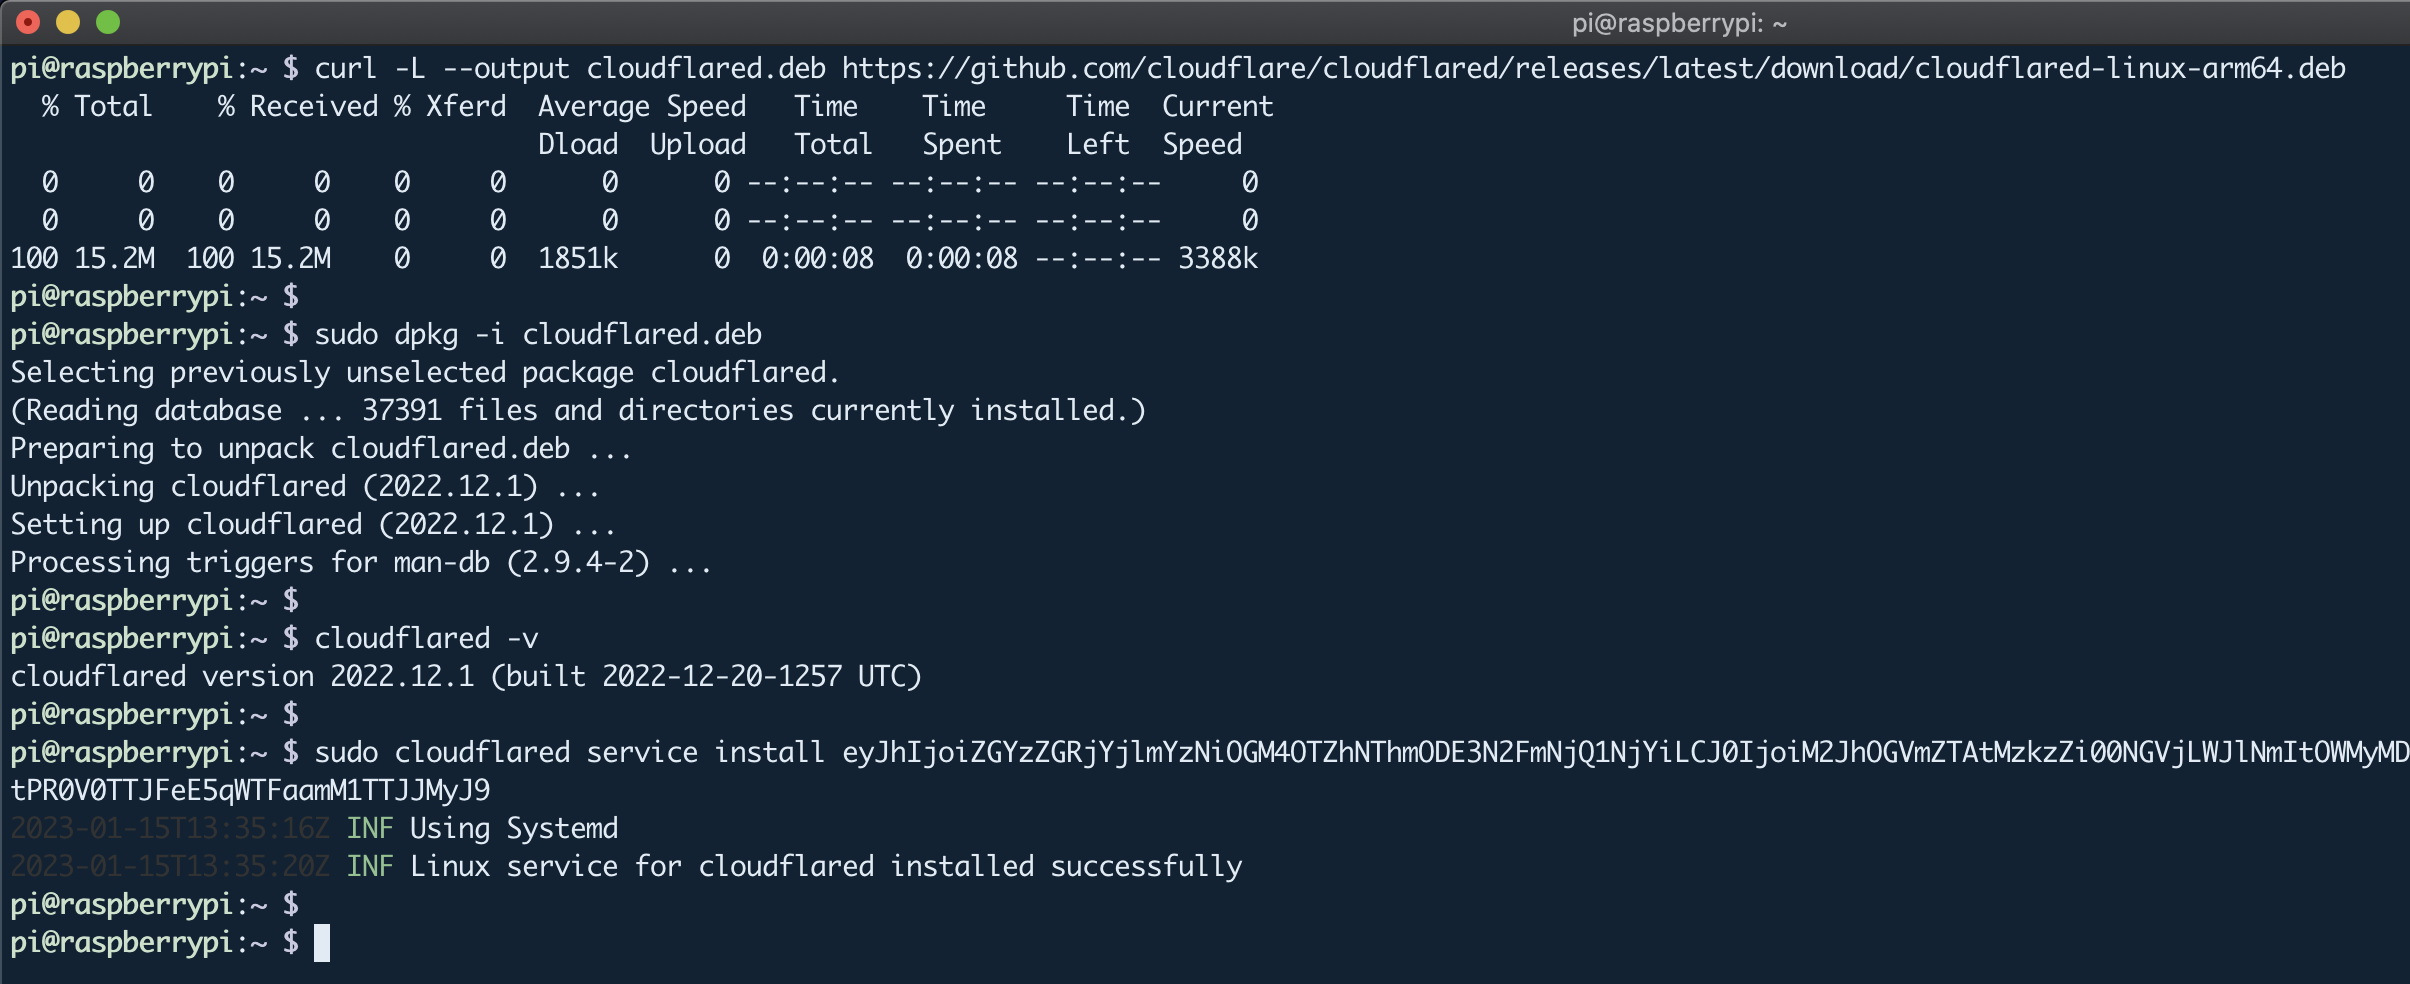
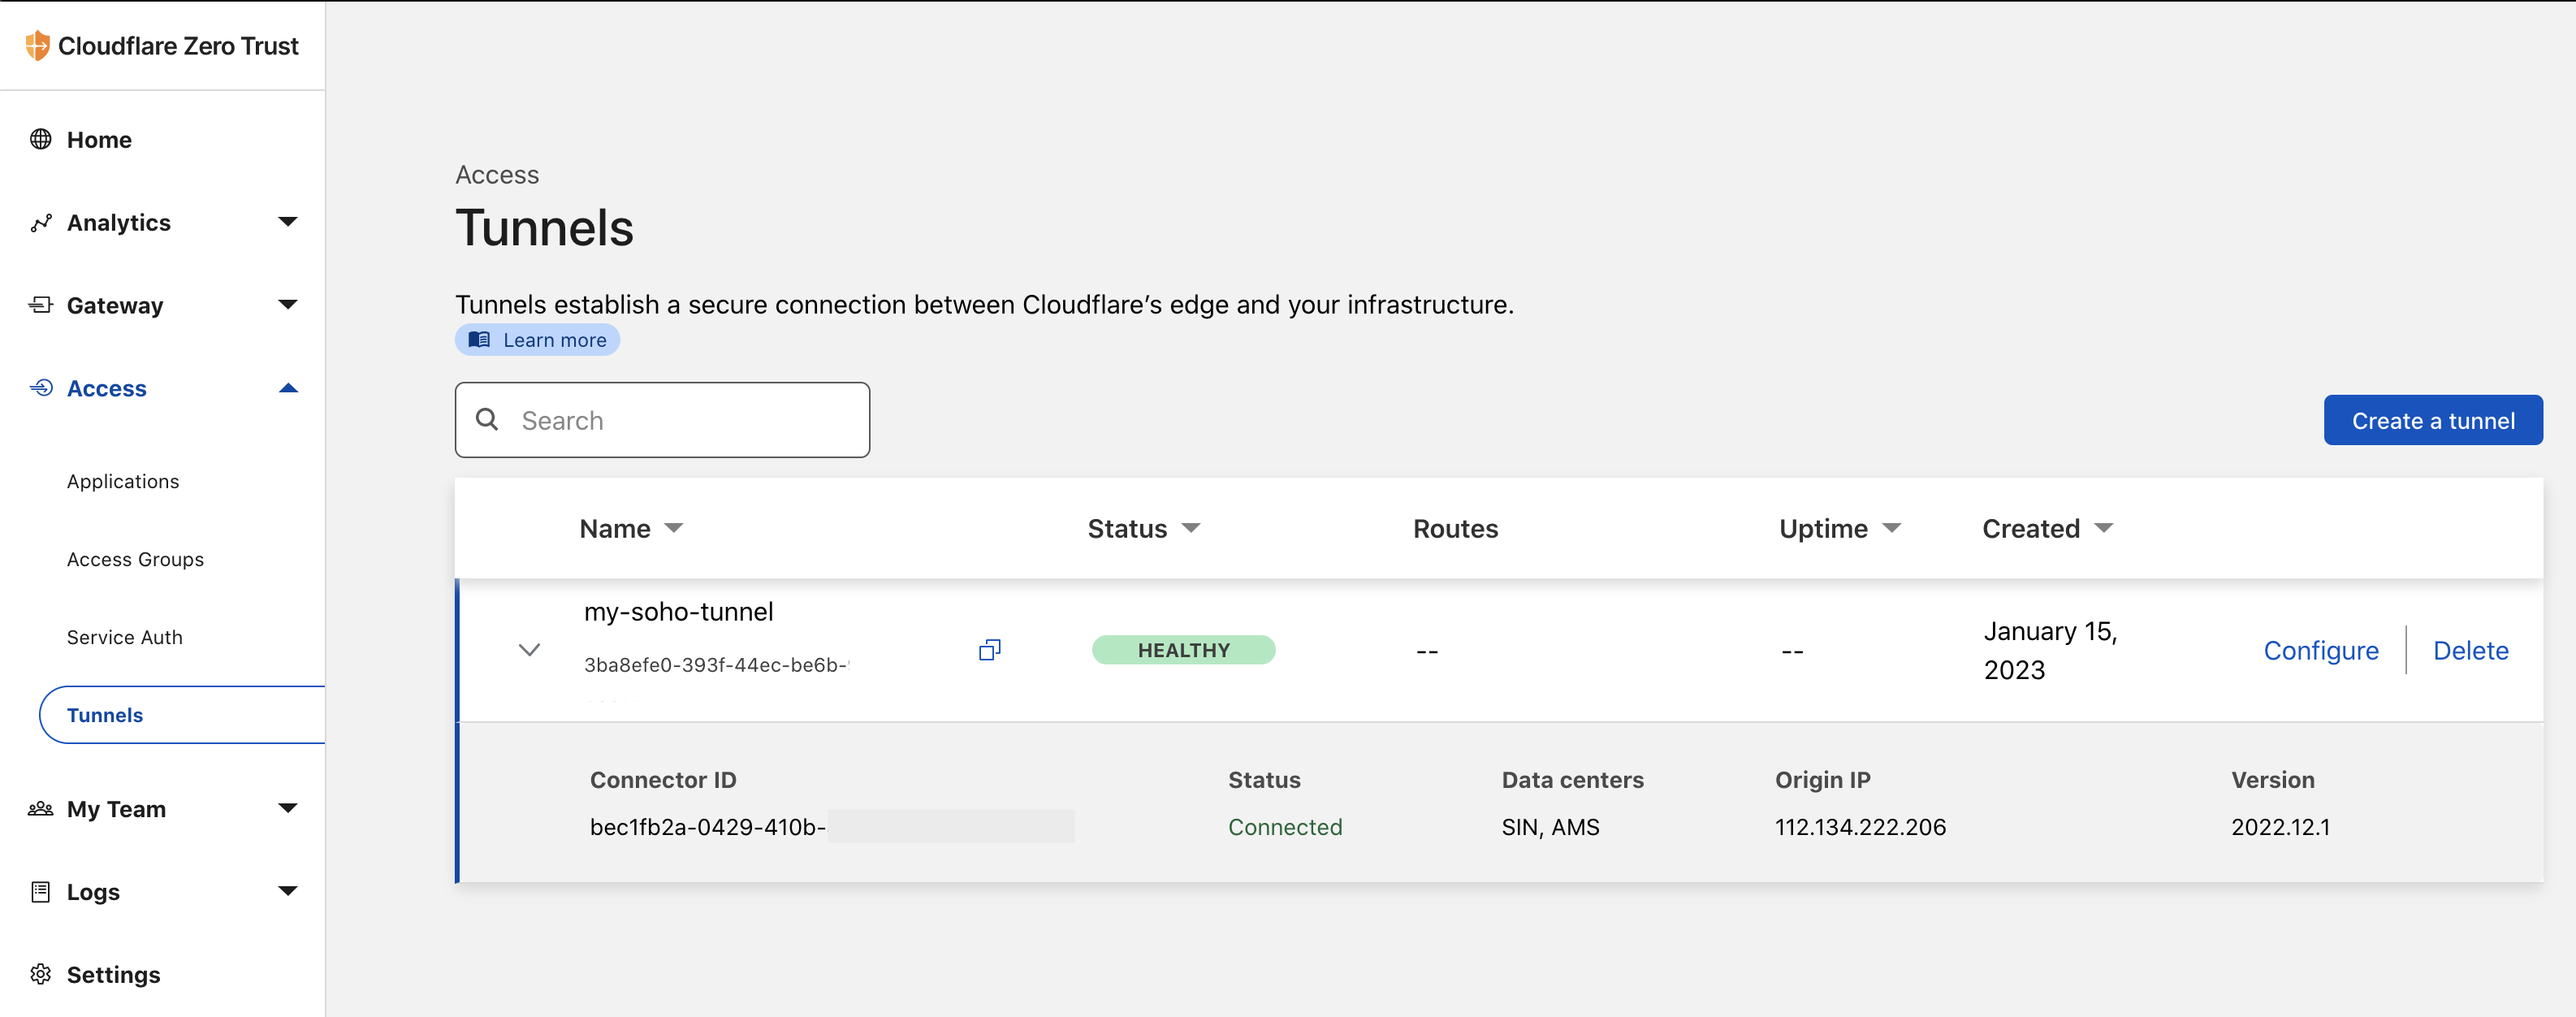
Done. It’s running. Now if you get back to the tunnels section, you can see your tunnel status is healthy. That means that whatever I did on my raspberry pi, it’s working. We’re connected. You didn’t have to do anything to my home router.
So now it is time to route my services. I’ll do my NAS first. Navigate to the tunnel configurations and click the Public Hostname tab and click the Add a public hostname. Then I’ll add my service details as follows.
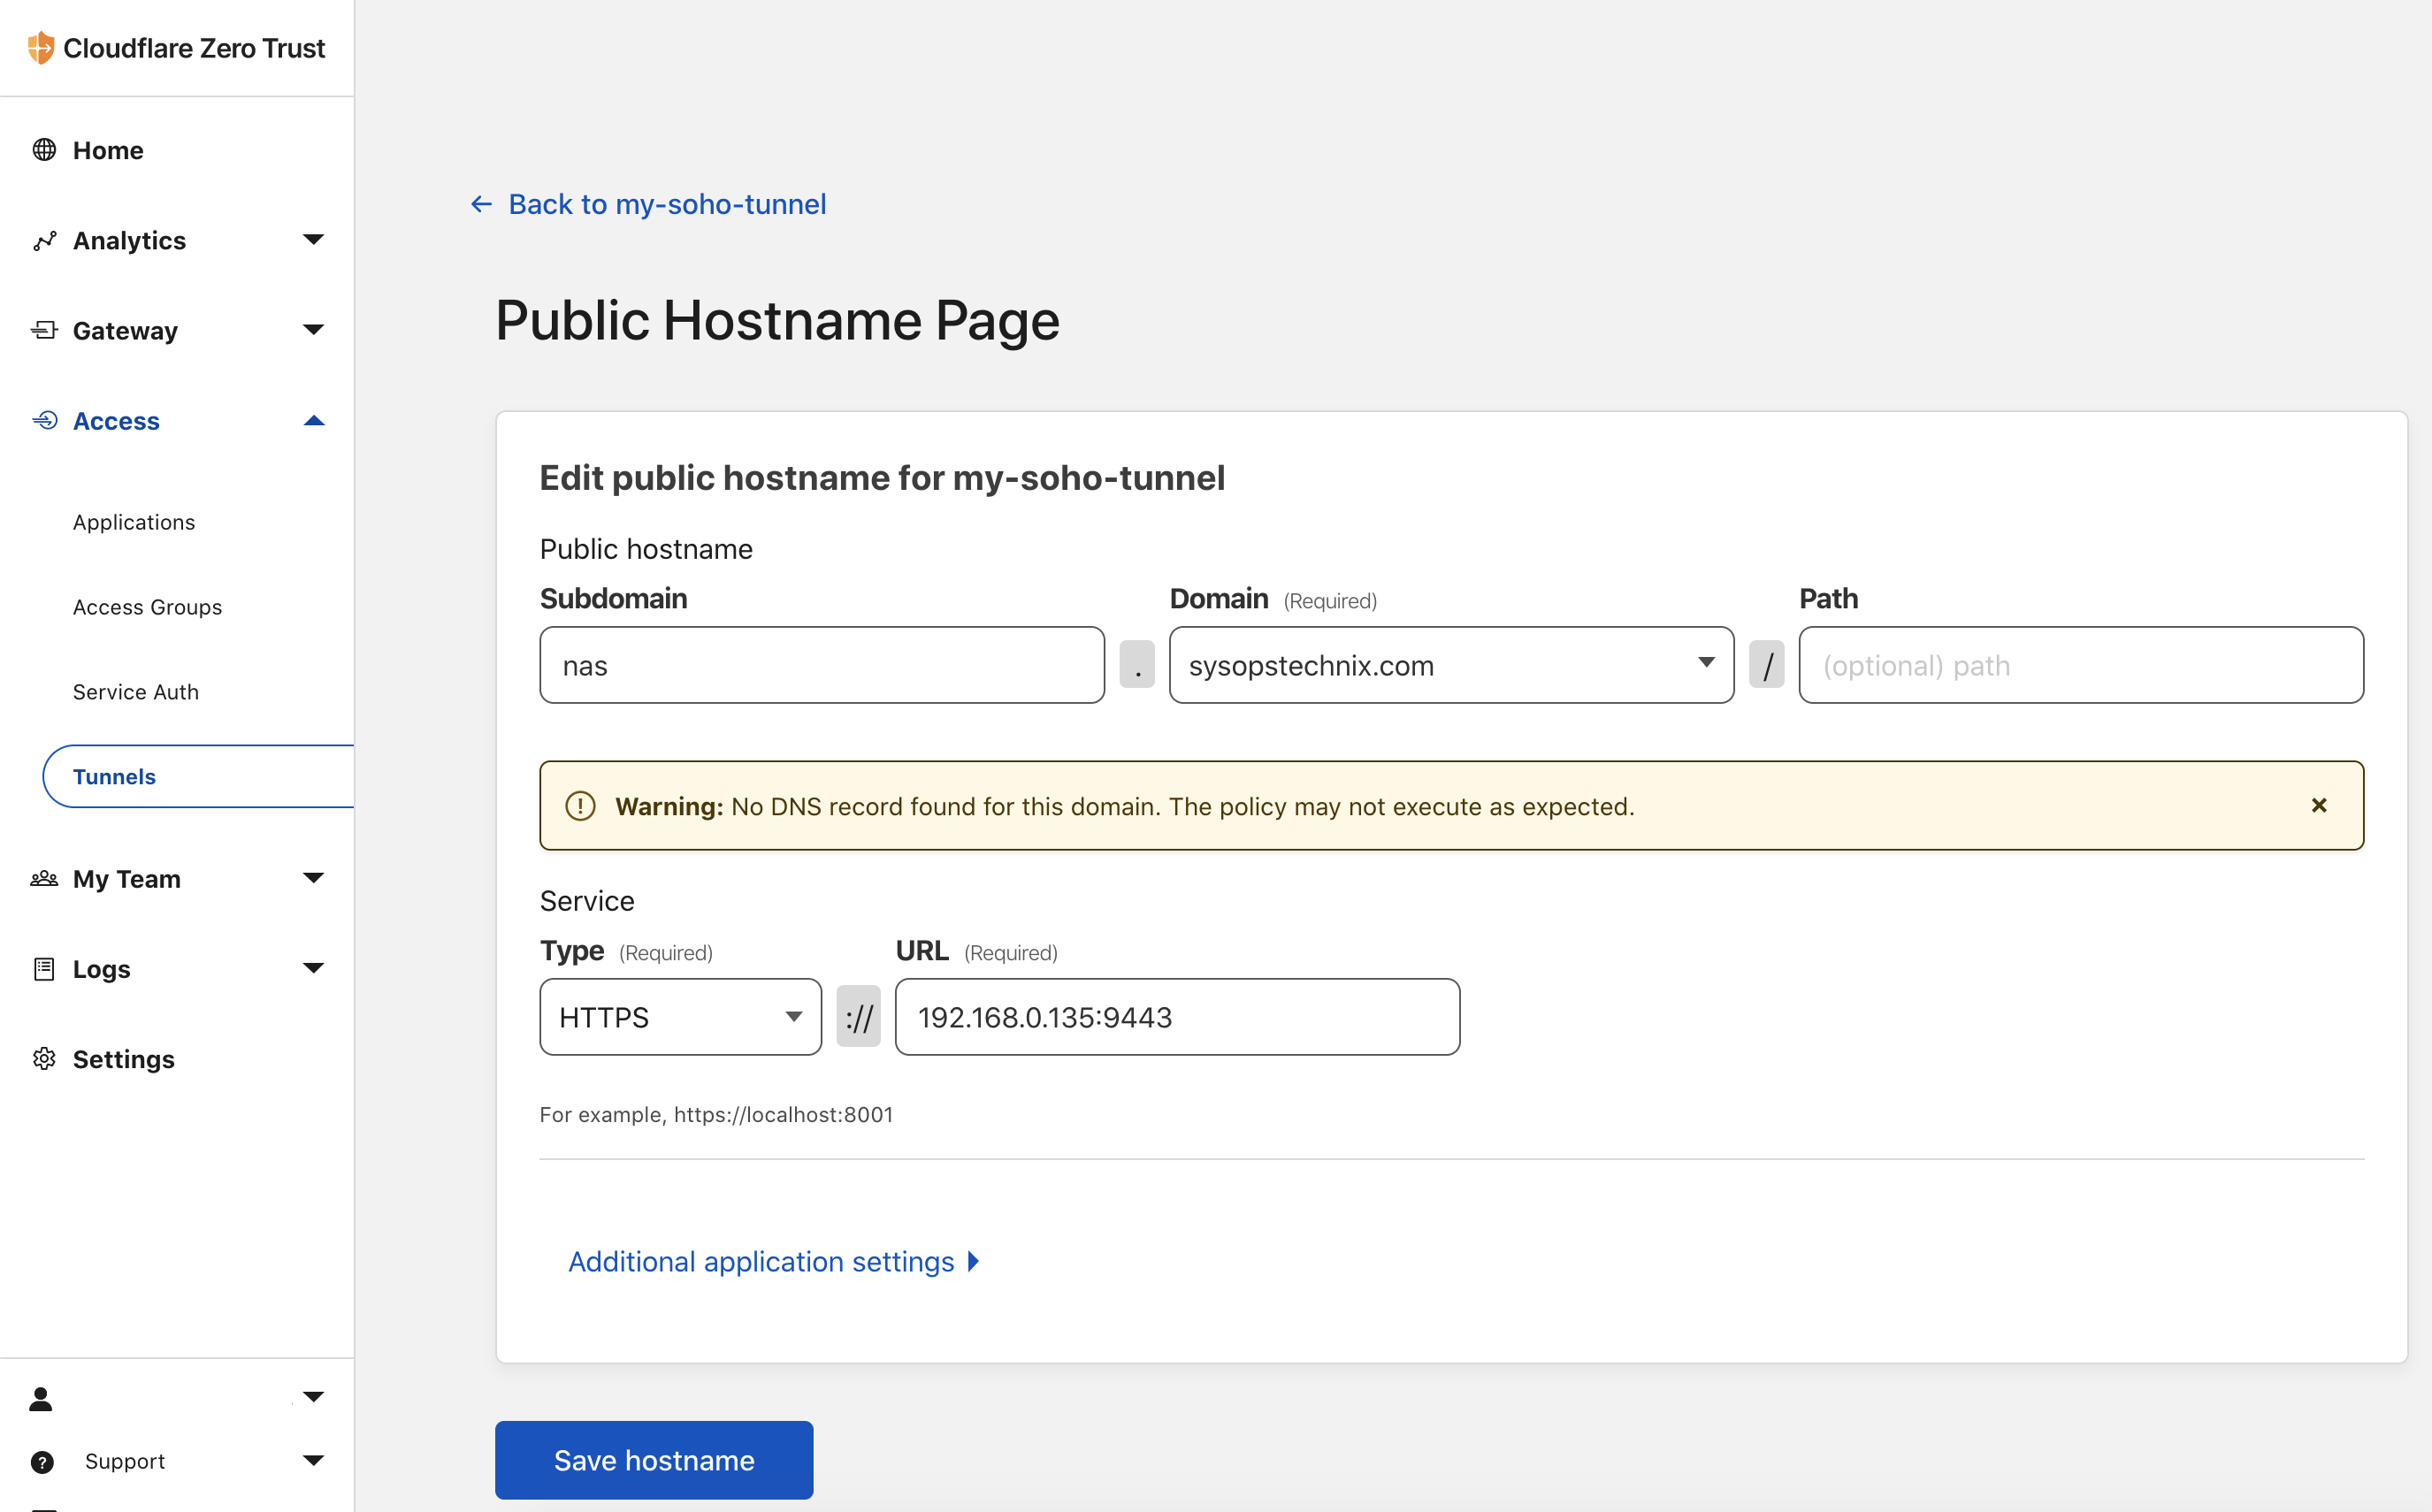
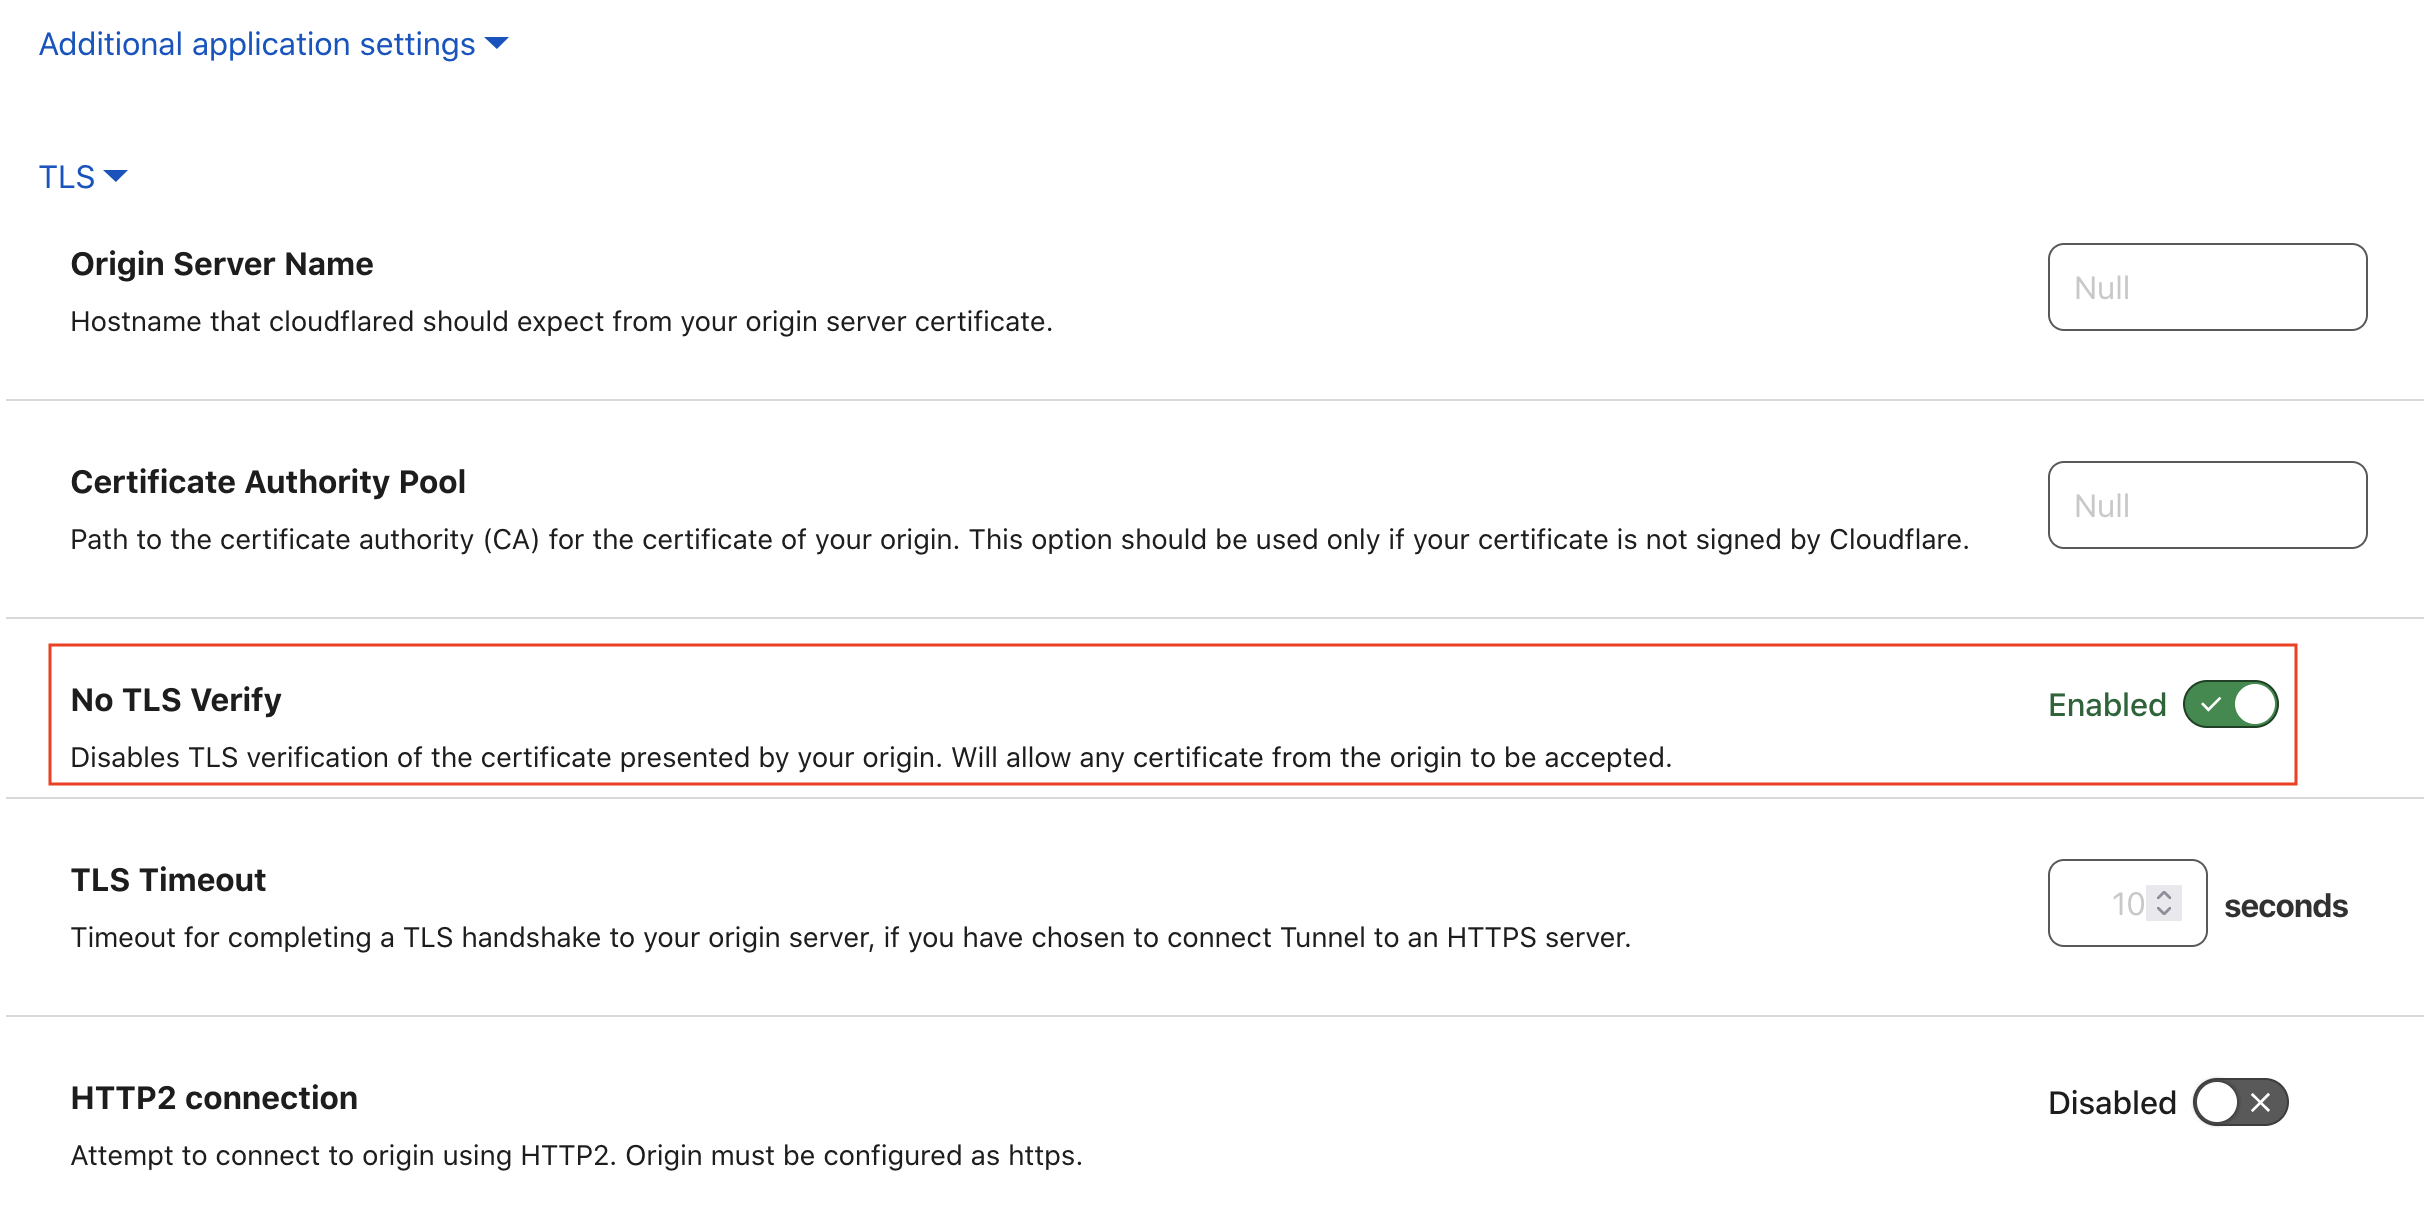
As you know most of the service’s built-in has a self-signed certificate, but I want to click on Additional application settings, and under TLS, I can say no TLS Verify, so it’ll be okay with that.
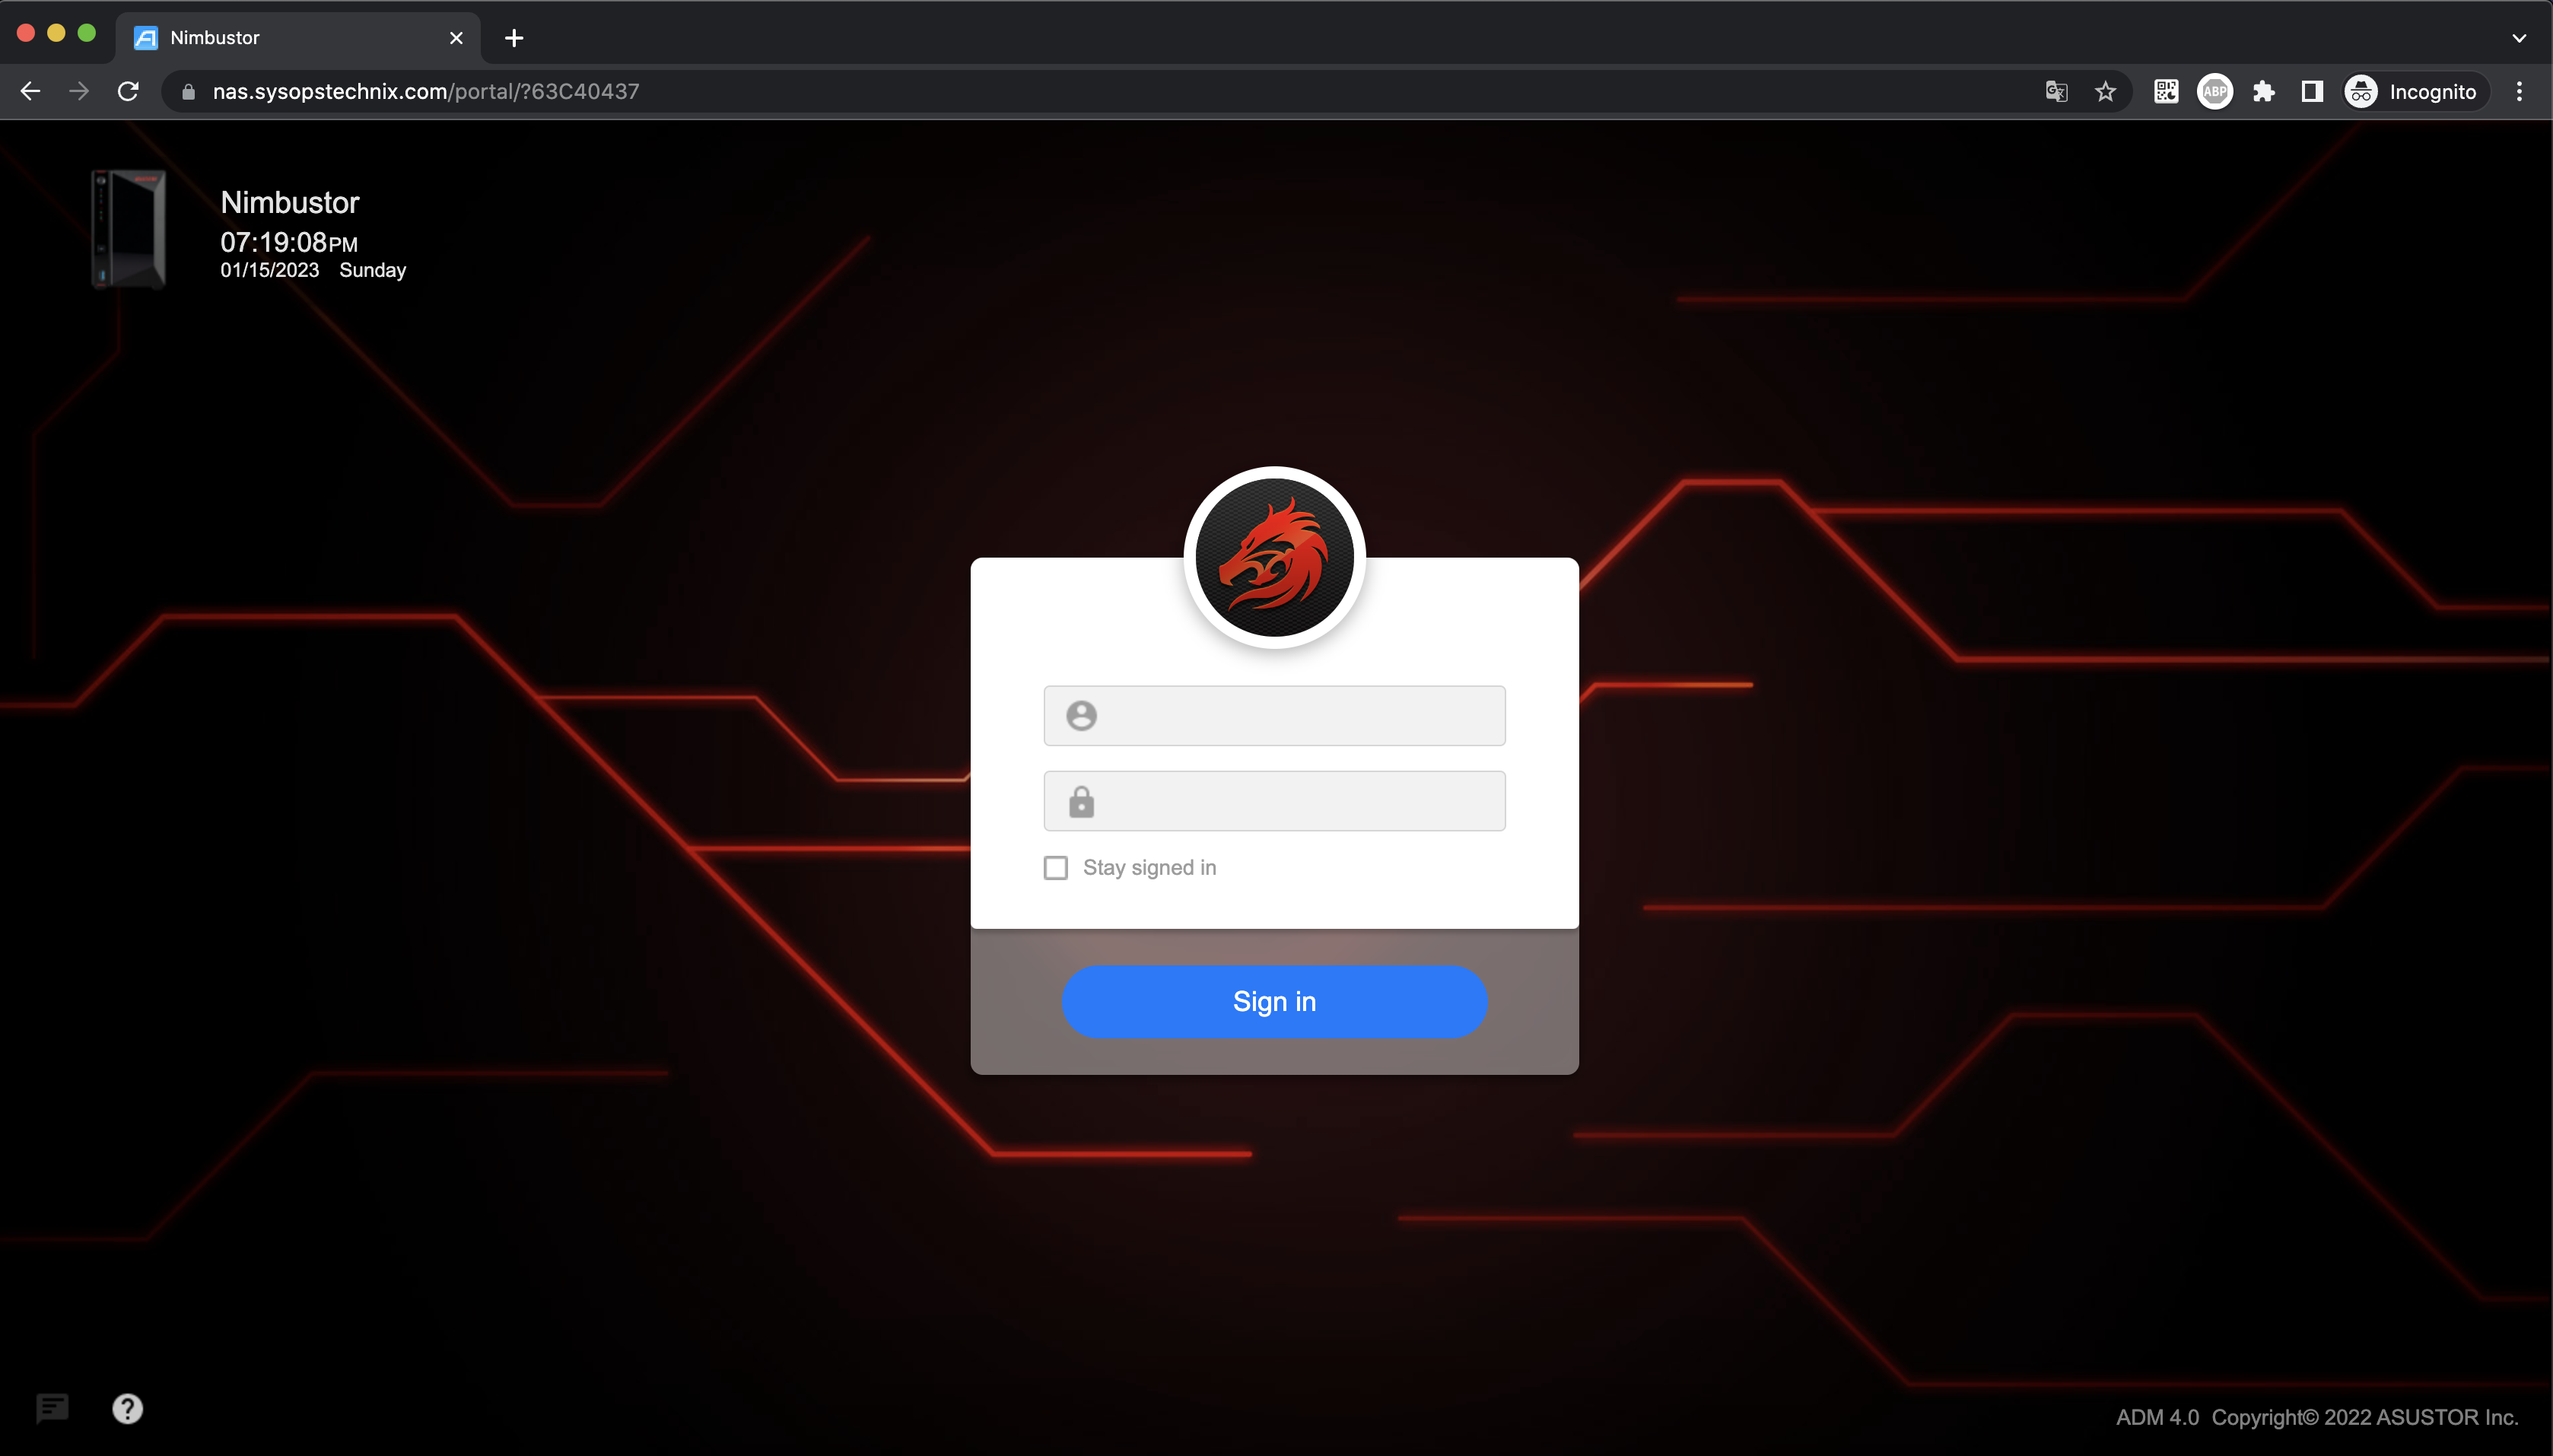
Step 4: Let’s Test it
So let’s test it out. I’m going to navigate out to nas.sysopstechnix.com from the web browser, and it’s working. How cool is that?
Now, looking back at Cloudflare, all we need is that one tunnel for everything. So if I click on Configure, I can add more public hostnames.
Conclusion
Successfully established a secure Cloudflare Tunnel that exposes locally hosted home network resources to Cloudflare’s network without requiring any public IP address, port-forwarding, or punching through a home router.
So, I hope that’s the easiest way you’ve seen to securely access home network remotely from anywhere. I mean, just a few clicks and you can expose your services inside your home network, no matter what type of network you have, and you can securely access it from anywhere.
1 comment
Hello. Thanks a lot for this useful post.
I am travelling to a country where the internet is under massive censorship (including YouTube, …!!!)
I would like to connect to my home internet and bypass this censorship through Cloudflare. I have a PC at home and I have set up my cloudshare site and tunnel and all seems healthy. The public hostname of this Tunnel uses the IP address of this PC at home with an open port through HTTPS (let’s say 192.168.2.42:8080).
I still cant connect to my home network and I cannot access my router (192.168.1.1).
Do you have any idea how i can resolve this issue?