
In most organizations, Wi-Fi is a critical part of the business today. With the popularity of wireless devices in past years and the BYOD trend, a large amount of sensitive information is transferred inside the organization’s wireless network. But most organizations still use Wi-Fi security with WPA2 or WPA2-Personal mode which has extremely less security. To protect sensitive data traversal within the organization’s wireless network, organizations should be using WPA2 Enterprise security. In this article, we will see simply deploy WPA2-Enterprise security on your existing wireless network.
What Is WPA2?
WPA (Wi-Fi Protected Access) is a security standard designed for wireless devices which became available in the year 2003 to improve security flaws found in WEP (Wired Equivalent Privacy). Since there are some security weaknesses in the WPA, Wi-Fi Alliance launched WPA2 in the year 2004 and which is an upgraded version of the WPA. WPA2 is more secure than its predecessor, WPA, and is commonly used in nowadays wireless networks. Most wireless routers support multiple security standards to secure wireless networks, including WEP, WPA, and WPA2.
WPA2-Personal vs WPA2-Enterprise
Having various Wi-Fi Security protocols, WPA2 is the most common and popular security protocol nowadays. There are two variations of WPA2 is WPA2-Personal and WPA2-Enterprise. Both these use a strong encryption method called AES-CCMP to encrypt the data and transmit it over the wireless network. But the main difference between these two modes is the method of authentication they are using. WPA2-Enterprise uses IEEE 802.1x authentication standards which give enterprise-level authentication and is specifically designed for organizations and WPA2-Personal uses pre-shared keys (PSK) that are designed for home use.
Also, there is another key difference is WPA2-Personal, which does not use an authentication server for authentication or we can simply say it does not require big infrastructure but WPA2-Enterprise requires an authentication server that provides secure EAP (Extensible Authentication Protocol) to ensure information is sent to the authentication server is protected and also it required an infrastructure.
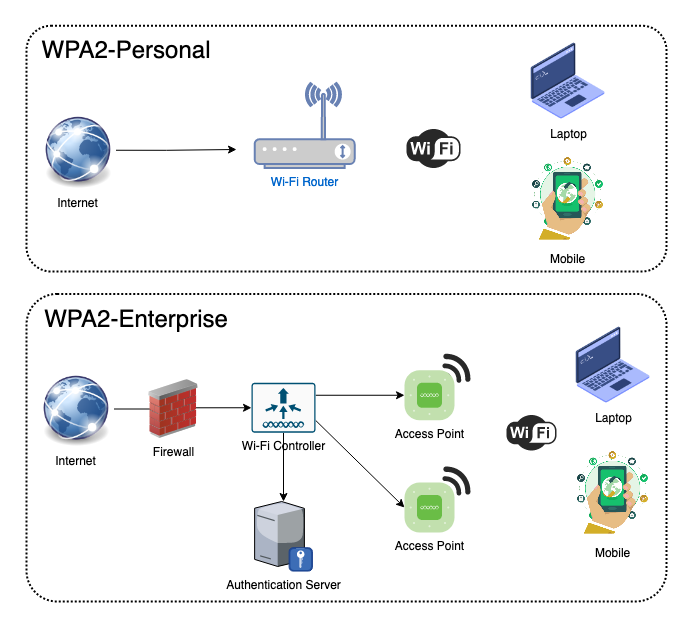
By comparing the above two methods, you will find that the WPA2-Enterprise is far more secure than the WPA2-Personal since WPA2-Personal uses a single password and if the password is lost or steal, anyone who can access it can gain access to your wireless network.
On the other hand, WPA2-Enterprise requires each user to have a password unique to them that will provide the ability to integrate the existing directory service to the authentication server. If the organization users are following strong password policies, it will be a challenge for any outside attacker to obtain network access. Additionally, if a user’s password is compromised, it can just be reset, while WPA2-Personal would require you to reset the pre-shared key and re-authenticate on every device connected to the network.
What is IEEE 802.1x?
Basically, 802.1X is an IEEE Standard for port-based Network Access Control that provides an authentication mechanism to wireless client devices for secure network access. This was originally designed for the IEEE 802.3 Ethernet standard but it was clarified to suit other IEEE 802 LAN technologies such as wireless (IEEE 802.11) and other fiber networks.
How does 802.1X work?
802.1X opens ports for network access when an authentication server authenticates a user’s identity and authorizes them for the allowed network resources. The user’s identity is determined based on their domain credentials or certificate-based, which is confirmed by the authentication server. The authentication server is able to do this by communicating with the organization’s directory services like OpenLDAP or Active Directory.
Extensible Authentication Protocol Types
- LEAP (Lightweight Extensible Authentication Protocol)
- EAP-FAST (Flexible Authentication via Secure Tunneling)
- PEAP (Protected Extensible Authentication Protocol)
- EAP-TLS (Transport Layer Security)
- EAP-TTLS (Tunneled Transport Layer Security)
| EAP Types / Features | LEAP | EAP-FAST | PEAP | EAP-TLS | EAP-TTLS |
|---|---|---|---|---|---|
| Provider | Cisco | Cisco | Microsoft | Microsoft | Funk |
| Security | High (with strong passwords) | High | High | Very High | High |
| Client-side certificate required | No | No | No | Yes | No |
| Server-side certificate required | No | No | Yes | Yes | Yes |
| WEP key management | Yes | Yes | Yes | Yes | Yes |
| Authentication Attributes | Mutual | Mutual | Mutual | Mutual | Mutual |
| Deployment Difficulty | Moderate | Moderate | Moderate | Difficult (required PKI) | Moderate |
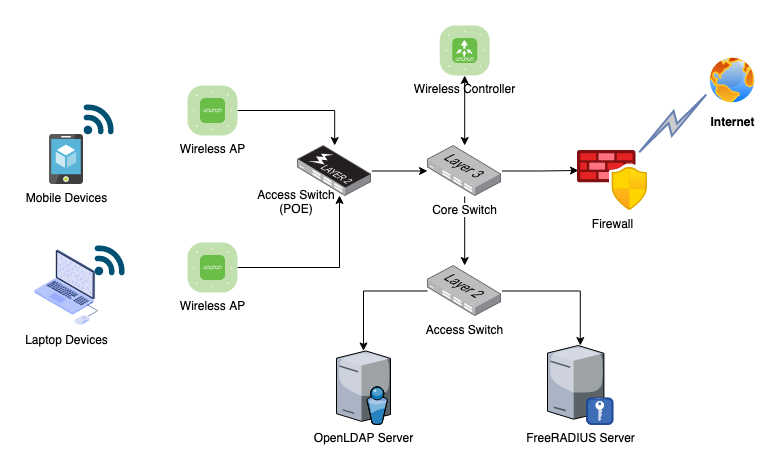
Deploying WPA2-Enterprise/802.1x Architecture
There are some basic components that need to be implemented in the WPA2-Enterprise/802.1x architecture to work.
- Client / Supplicant – In order to connect to the wireless network and initiate 802.1x authentication requests, it must have a piece of software called supplicant that runs on a wireless client device. Actually what it does is it will initially negotiate the EAP transaction with the authenticator and package up the user credentials in a manner compliant with 802.1x standard.
- Authenticator – The authenticator is a device (Wireless Controller/ Access Point) that provides the data link between the supplicant and the rest of the network. When a supplicant connects to the network, the authenticator initiates sending an EAPOL-Start packet to the supplicant. Also, forwarded the supplicant responses to the authentication server based on its settings.
- Authentication Server – An authentication server is a trusted server that can receive and respond to authentication requests and tell the authenticator if the connection is to be allowed or not. (Ex: FreeRADIUS)
Let’s Start the Implementation of EAP-TTLS for FreeRADIUS
In this demonstration, I’m using the OpenLDAP server as my enterprise user store and connecting with the FreeRADIUS server. The following diagram shows the enterprise network architecture of this implementation.
Install & Configure OpenLDAP Server
Change the OpenLDAP server hostname.
hostnamectl set-hostname demo-openldap.sysopstechnix.com
vim /etc/hosts
192.168.56.12 demo-openldap.sysopstechnix.com
Update the repositories and install the OpenLDAP. During the installation, you will prompt to enter the admin password for the LDAP directory.
#Update Repositories
apt update
apt upgrade

#Install LDAP and reqired Utils
apt install slapd ldap-utils
Generate password hash for the directory users and include it in the create_ldap_objects.ldif file for each user.
root@demo-openldap:~# slappasswd
New password:
Re-enter new password:

{SSHA}jFQAulicFL0des89xJCDVkyrLlq3dAT3
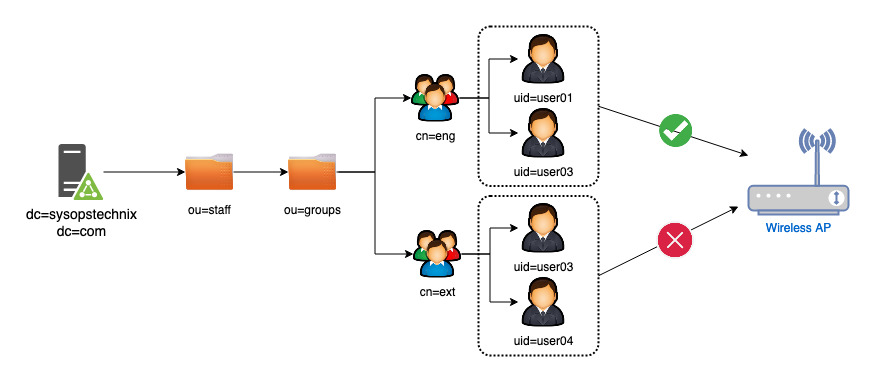
In this scenario, I’m creating a couple of users and groups in the LDAP using the following LDIF file. The purpose of creating these users and groups is to allow FreeRADIUS to authorize specific users to connect to the corporate WIFI network.
vim create_ldap_objects.ldif

#Create organizational Units

dn: ou=staff,dc=sysopstechnix,dc=com
objectClass: organizationalUnit
ou: staff

dn: ou=groups,ou=staff,dc=sysopstechnix,dc=com
objectClass: organizationalUnit
ou: groups

#Create LDAP Users

dn: uid=user01,ou=staff,dc=sysopstechnix,dc=com
objectClass: inetOrgPerson
objectClass: organizationalPerson
objectClass: top
cn: Demo User01
sn: User01
displayName: Demo User01
givenName: Demo
mail: [email protected]
userPassword: {SSHA}jFQAulicFL0des89xJCDVkyrLlq3dAT3

dn: uid=user02,ou=staff,dc=sysopstechnix,dc=com
objectClass: inetOrgPerson
objectClass: organizationalPerson
objectClass: top
cn: Demo User02
sn: User02
displayName: Demo User02
givenName: Demo
mail: [email protected]
userPassword: {SSHA}jFQAulicFL0des89xJCDVkyrLlq3dAT3

dn: uid=user03,ou=staff,dc=sysopstechnix,dc=com
objectClass: inetOrgPerson
objectClass: organizationalPerson
objectClass: top
cn: Demo User03
sn: User03
displayName: Demo User03
givenName: Demo
mail: [email protected]
userPassword: {SSHA}jFQAulicFL0des89xJCDVkyrLlq3dAT3

dn: uid=user04,ou=staff,dc=sysopstechnix,dc=com
objectClass: inetOrgPerson
objectClass: organizationalPerson
objectClass: top
cn: Demo User04
sn: User04
displayName: Demo User04
givenName: Demo
mail: [email protected]
userPassword: {SSHA}jFQAulicFL0des89xJCDVkyrLlq3dAT3

#Create two Groups

dn: cn=eng,ou=groups,ou=staff,dc=sysopstechnix,dc=com
objectClass: groupOfNames
objectClass: top
cn: eng
member: uid=user01,ou=staff,dc=sysopstechnix,dc=com
member: uid=user02,ou=staff,dc=sysopstechnix,dc=com

dn: cn=ext,ou=groups,ou=staff,dc=sysopstechnix,dc=com
objectClass: groupOfNames
objectClass: top
cn: sales
member: uid=user03,ou=staff,dc=sysopstechnix,dc=com
member: uid=user04,ou=staff,dc=sysopstechnix,dc=com
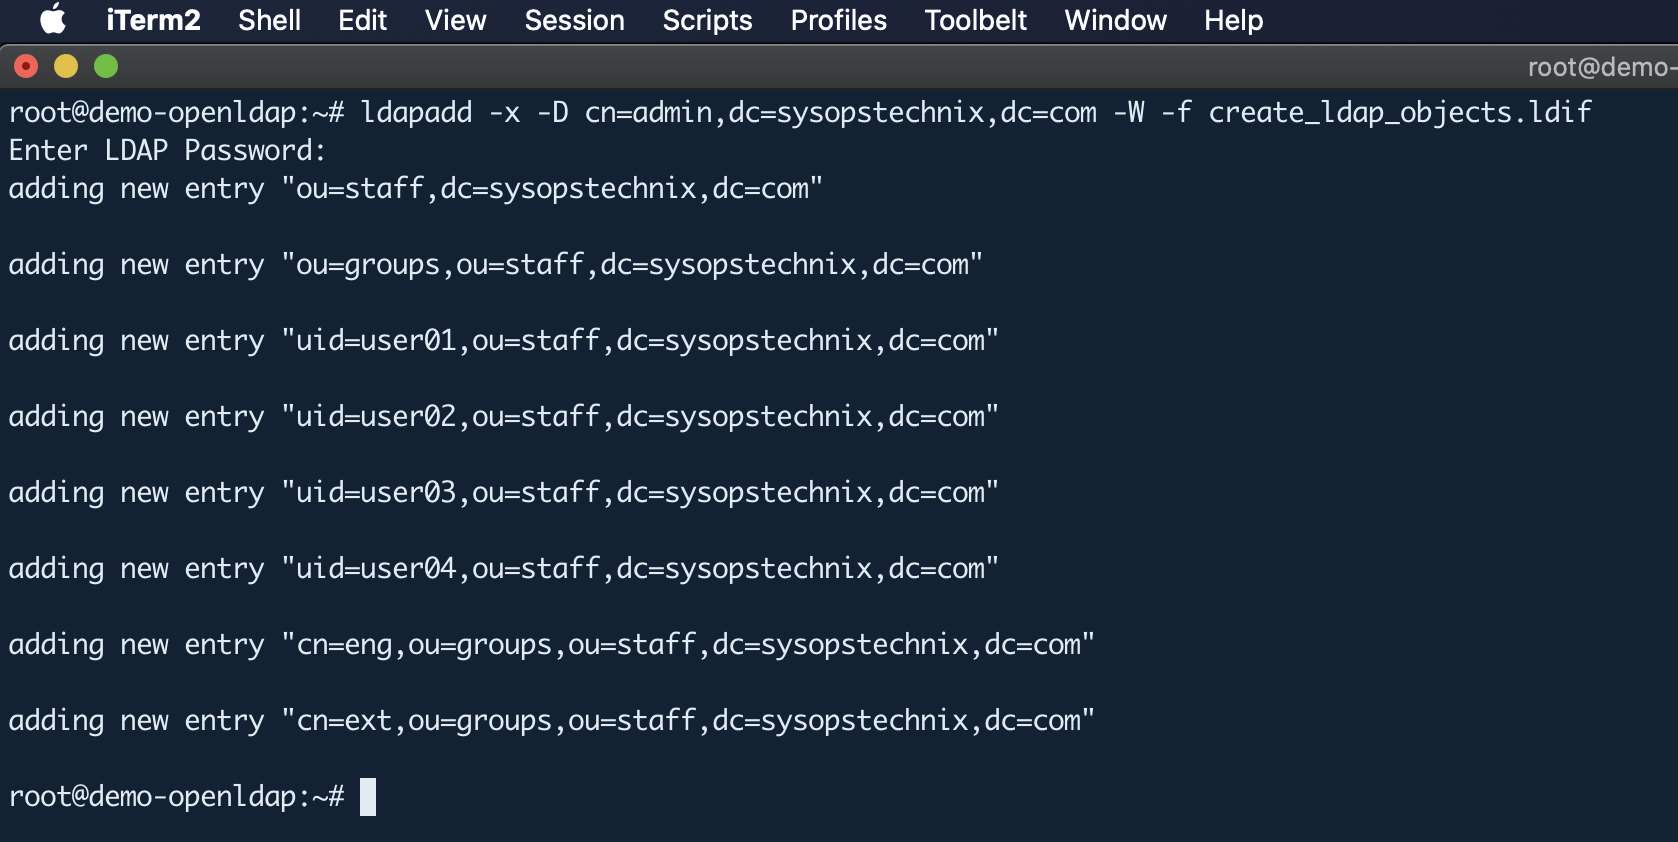
Once you prepare the above LDIF file, add it to the LDAP server using the following command.
ldapadd -x -D cn=admin,dc=sysopstechnix,dc=com -W -f create_ldap_objects.ldif
Install & Configure FreeRADIUS as an AAA Server
FreeRADIUS installation & basic configuration
Install FreeRADIUS and required utilities for LDAP integration
apt install freeradius freeradius-ldap freeradius-utils
Add the radius clients as a wireless controller or access point to the /etc/freeradius/3.0/clients.conf file. But in this case, I’m testing this in another Linux instance and using the client as it.
vim /etc/freeradius/3.0/clients.conf

client demo-client {
        ipaddr = 192.168.56.15
        secret = testing123
}
Integrate FreeRADIUS with LDAP (for Authentication)
Edit the radius LDAP module located in /etc/freeradius/3.0/mods-enabled/ldap with LDAP server details and enable the module.
#Add the LDAP server domain name to hosts file
vim /etc/hosts
192.168.56.12 demo-openldap.sysopstechnix.com

#Configure LDAP module with LDAP server details
/etc/freeradius/3.0/mods-available/ldap

server = 'demo-openldap.sysopstechnix.com'
base_dn = 'ou=staff,dc=sysopstechnix,dc=com'
identity = 'cn=admin,dc=sysopstechnix,dc=com'
password = abc123

user {
    base_dn = "ou=staff,dc=sysopstechnix,dc=com"
    #I'm using user's mail id as a username.
    filter = "(mail=%{%{Stripped-User-Name}:-%{User-Name}})"
}

group {
    base_dn = "ou=groups,ou=staff,dc=sysopstechnix,dc=com"
    filter = '(objectClass=GroupOfNames)'
    membership_filter = "(|(&(objectClass=GroupOfNames)(member=%{control:Ldap-UserDn}))(&(objectClass=GroupOfNames)(member=%{control:Ldap-UserDn})))"
    membership_attribute = 'member'
}

#Enable the LDAP module
cd /etc/freeradius/3.0/mods-enabled/
ln -s ../mods-available/ldap .
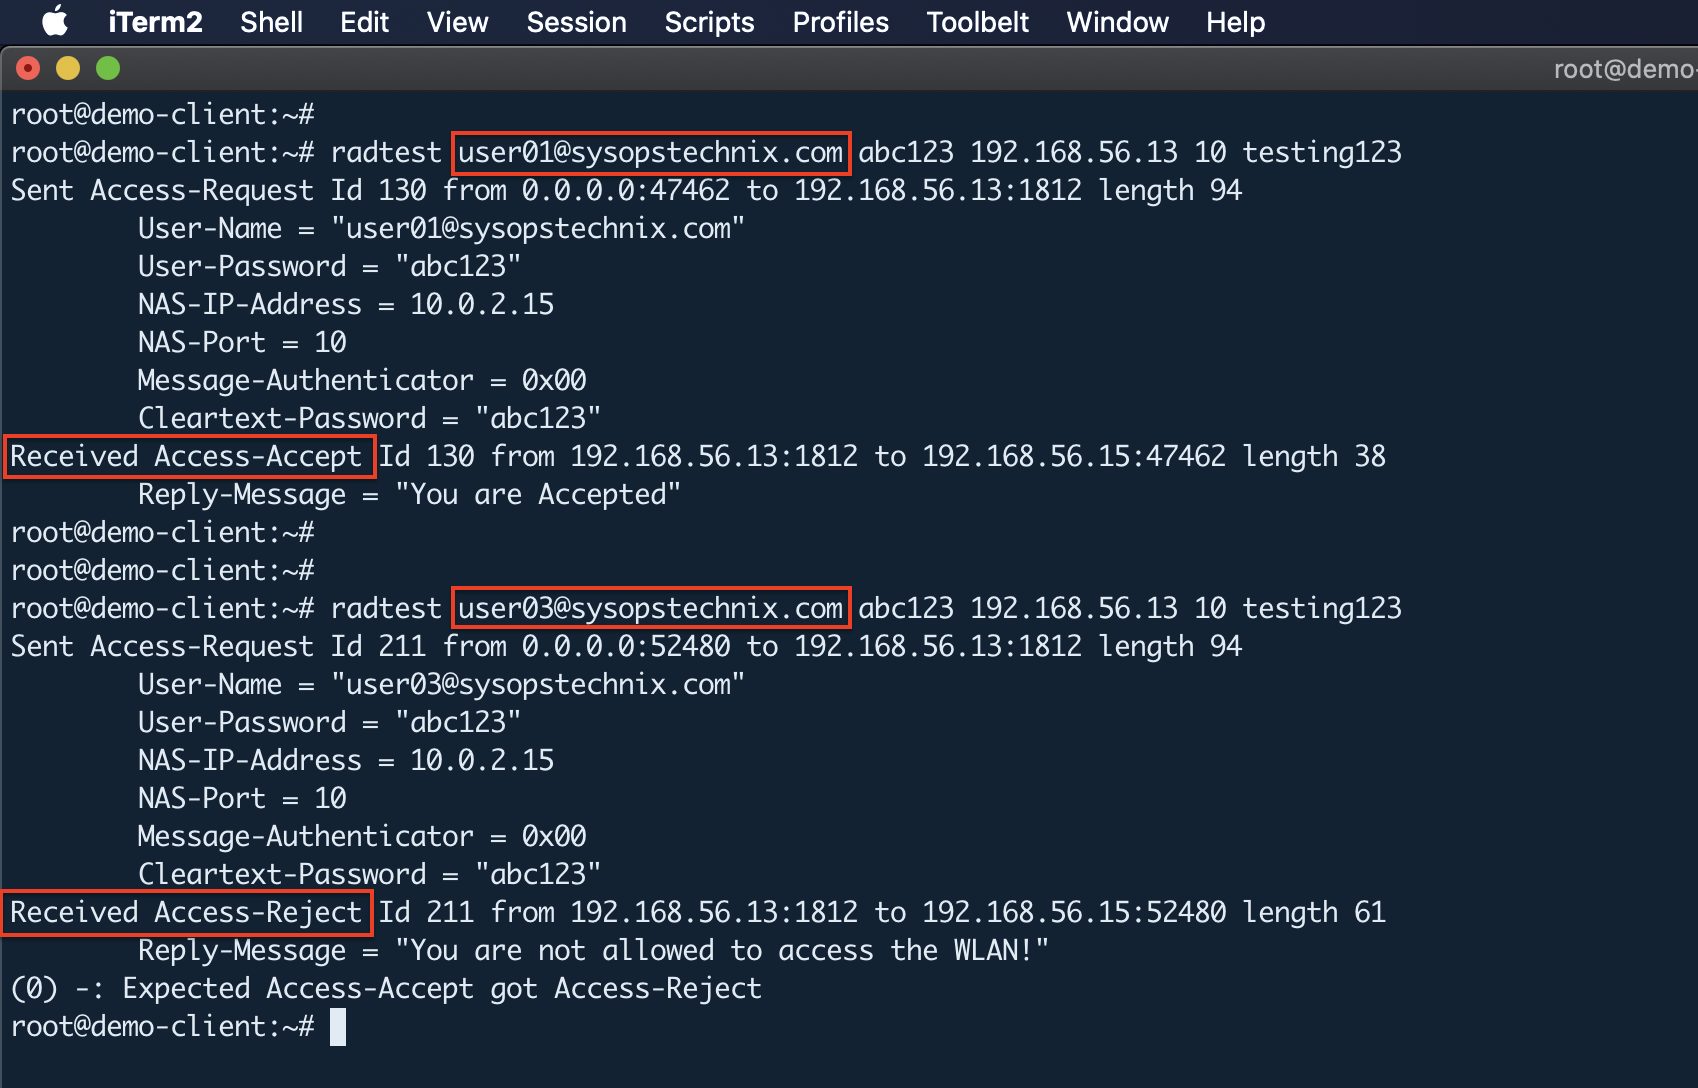
Restricting access to a specific LDAP group (for Authorization)
Let’s assume you want to allow WLAN access only to a set of employees who are in the “eng” LDAP group. So far our configured RADIUS server is having WLAN access to all users inside the “ou=staff,dc=sysopstechnix,dc=com” organizational unit. To restrict access, we need to add the following lines to the file /etc/freeradius/3.0/users.
DEFAULT Ldap-Group == "cn=eng,ou=groups,ou=staff,dc=sysopstechnix,dc=com"
	Reply-Message = "You are Accepted"
DEFAULT Auth-Type := Reject
    Reply-Message = "You are not allowed to access the WLAN!"
Testing the LDAP Connectivity
Before testing, make sure that all necessary ports for communication between the FreeRADIUS server and the OpenLDAP server are open.
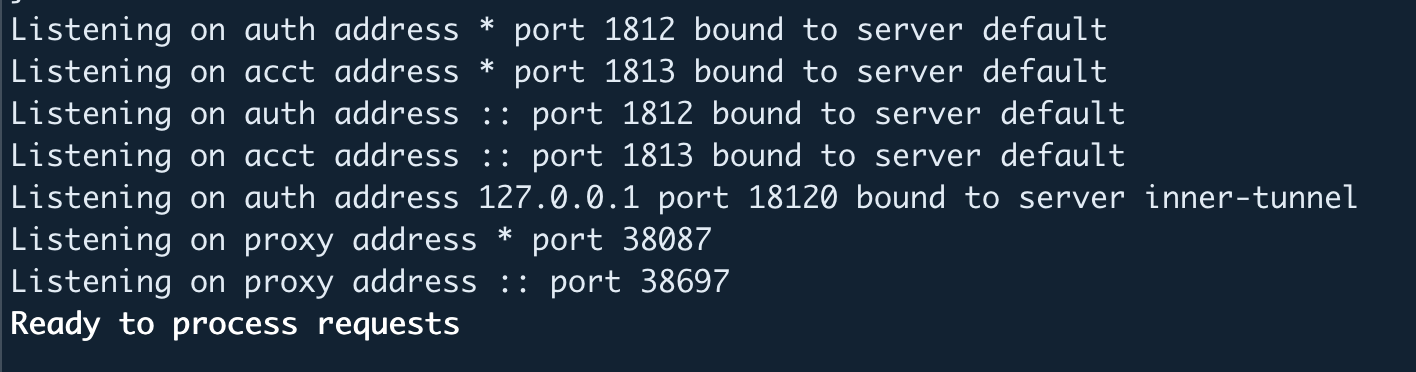
Once the above steps are completed, now we can start our initial test. Therefore we stop the FreeRADIUS service and restart it manually in debug mode:
systemctl stop freeradius.service
freeradius -X
If the debug mode is started successfully you can see “Ready to process requests” at the bottom of the terminal.
Next, move to the radius client instance to check whether LDAP users are able to authenticate on the FreeRADIUS server.
#Install radtest tools on Client Instance
apt install freeradius-utils

radtest [email protected] abc123 192.168.56.13 10 testing123
If everything is OK, you should get the following answer on the client instance. Also, from the radius server side, you can see more details about how this authentication works.
By default, the FreeRADIUS server is enabled with the following authentication procedures and now let’s see how to configure it with EAP-TTLS.
- PAP
- CHAP
- MS-CHAPv1/v2
- PEAP
- EAP-TTLS
- EAP-GTC
- EAP-MD5
- EAP-MSCHAPv2
Setup FreeRADIUS for EAP-TTLS
By default FreeRADIUS ships with some certificates so-called “Snake-Oil certificates” which are actually not for production use. Hence we need to create our own new root CA and a server certificate mentioned in the following steps. If you already have a PKI in your organization you can use that to generate certificates.
Generate the required Certificates
First, you have to define a private key for the certificate (generate whatever key string). Therefore you need to edit /etc/freeradius/3.0/mods-enabled/eap file as follows.
tls-config tls-common {
    private_key_password = kB2vmw5YEHGLAJF3JhNpuasDZuhmX7tq
}
You can find all default certificates that come with FreeRADIUS by default, inside the /etc/freeradius/3.0/certs directory. Also in the same directory, you can find the ca.cnf and server.cnf certificate configuration files that you need to modify as follows to generate your own certs.
vim ca.cnf
==========

[ CA_default ]
default_days            = 36500

[ req ]
input_password          = kB2vmw5YEHGLAJF3JhNpuasDZuhmX7tq
output_password         = kB2vmw5YEHGLAJF3JhNpuasDZuhmX7tq

[certificate_authority]
countryName             = LK
stateOrProvinceName     = Western
localityName            = Colombo
organizationName        = sysopstechnix
emailAddress            = [email protected]
commonName              = "sysopstechnix Certificate Authority"
vim server.cnf
==============

[ CA_default ]
default_days            = 1095

[ req ]
input_password          = kB2vmw5YEHGLAJF3JhNpuasDZuhmX7tq
output_password         = kB2vmw5YEHGLAJF3JhNpuasDZuhmX7tq

[server]
countryName             = LK
stateOrProvinceName     = Western
localityName            = Colombo
organizationName        = sysopstechnix
emailAddress            = [email protected]
commonName              = "sysopstechnix Server Certificate"

[alt_names]
DNS.1 = demo-freeradius.sysopstechnix.com
Once give the certificate details you can start to generate it.
cd /etc/freeradius/3.0/certs/
make
During the certificate generation, if you get an error like follows just ignore it because in EAP-TTLS we are not going to use any client-side certificates.
The countryName field is different between
CA certificate (LK) and the request (FR)
make: *** [Makefile:120: client.crt] Error 1
Change the certificate ownership accordingly.
chown freerad:freerad *
Configure the Certificates on FreeRADIUS
Once the CA and Server certificates are generated, configure the EAP to use it inside the EAP module. Modify the /etc/freeradius/3.0/mods-enabled/eap as follows.
eap{
    default_eap_type = ttls

    tls-config tls-common {
        private_key_file = ${certdir}/server.key
        certificate_file = ${certdir}/server.pem
        ca_file = ${cadir}/ca.pem
    }
}
Start the FreeRadius server on debug mode.
freeradius -X
Test EAP-TTLS Authentication
The FreeRADIUS does not provide any tool to test the EAP-TTLS authentication out of the box and “radtest” tool does not support EAP kind of authentication protocols. Therefore we need to get help from a third-party tool called “eapol_test” which is part of the wpa_supplicant package. Unfortunately, there is no pre-build solution so we have to get the source code and are required to build it by ourselves.
Build epol_test tool
I’m going to build this on the client instance.
wget https://w1.fi/releases/wpa_supplicant-2.7.tar.gz

tar -xzvf wpa_supplicant-2.7.tar.gz

#Install some additional libraries for the build process
apt install build-essential pkg-config libnl-3-dev libssl-dev libnl-genl-3-dev

cd wpa_supplicant-2.7/wpa_supplicant

cp defconfig .config

#Open the .config file and uncomment following line and save & exit.
vim .config
CONFIG_EAPOL_TEST=y

make eapol_test

#Once build was sucessful, copy the binaries to /usr/local/bin/
cp eapol_test /usr/local/bin/
Now, create the small configuration file “eapol_test.conf” as follows which is required for the “eapol_test” tool. Also, copy the ca.pem file which is generated in the earlier step to this client machine.
network={
    ssid="example"
    key_mgmt=WPA-EAP
    eap=TTLS
    ca_cert="ca.pem"
    identity="[email protected]"
    password="abc123"
    phase2="auth=PAP"
}
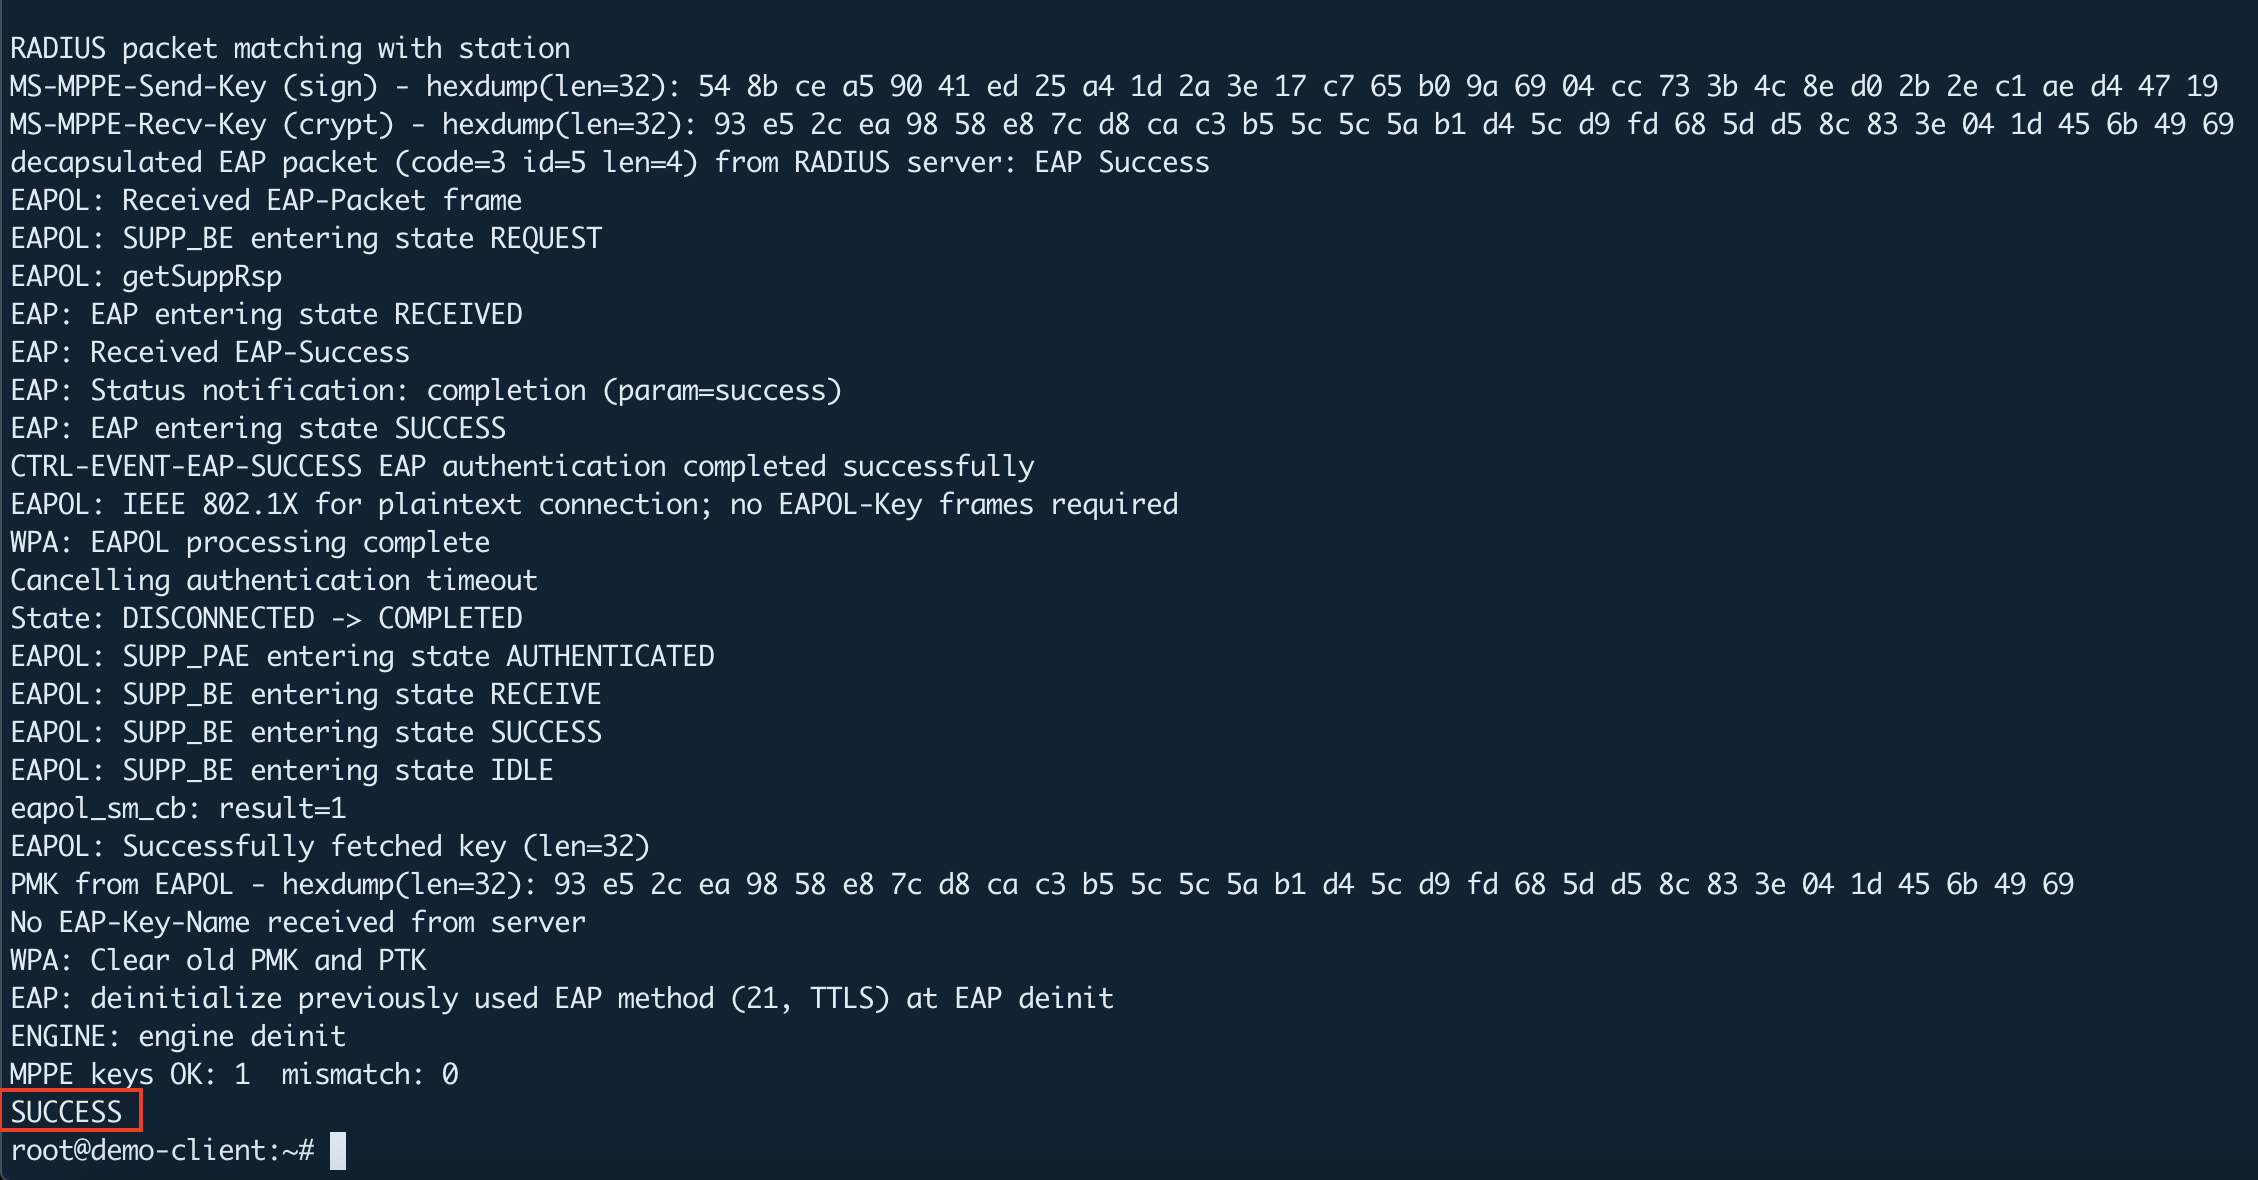
eapol_test -c eapol_test.conf -a 192.168.56.13 -p 1812 -s testing123
Once execute the above command and if you get the following output at the end, everything was successful:
Conclusion
This article has taken a brief look at how to secure your enterprise Wi-Fi network by using WPA2- Enterprise with FreeRadius server. We have seen the importance of securing your organization’s Wi-Fi network with proper access control and the benefits that come with WPA2-Enterprise wireless network solutions that will allow your organization to efficiently scale upwards.
Useful links: https://networkradius.com/technology/freeradius/