Nowadays with the COVID-19 pandemic, most companies have employees working from home. With the technological improvements and growth of businesses, a remote workforce can help a company to utilize its employees, contractors, and customers in ways that were not possible before. However, the only risk involved when accessing company or customer sensitive data and assets being accessed over the public internet. Having the ideal VPN solution can help to mitigate security risks and enhance the productivity of the company.
Here are some reasons why employees need a VPN connection while they WFH.
- Better control over the company’s private and sensitive data.
- Protect company-owned devices from viruses and other attacks.
- Allow access to on-premiss systems.
- Reduce liabilities by preventing data from being lost, stolen, or compromised by third parties.
What is a VPN?
VPN stands for “Virtual Private Network” and it allows you to create a secure private connection (tunnel) between your own site and a remote site over the public internet. All the data transferred through the tunnel is end-to-end encrypted, which means intruders can not see the transferring data since it is in an encrypted format.
Is it easy to set up a VPN?
Absolutely yes, setting up a VPN is a straightforward process nowadays and this article shows you step by step to install and configure the OpenVPN Community server On a Windows environment.
About OpenVPN
OpenVPN is a well-known protocol in the open-source networking space. It supports all the major operating systems, including all desktop and mobile platforms such as Windows, macOS, Linux, Android, and iOS. The OpenVPN protocol provides excellent security and is highly adaptable to third-party software. It includes 256-bit encryption via OpenSSL, a widely used software library to secure connections across different networks.
OpenVPN has two major server versions OpenVPN Community Edition (Open Source) and OpenVPN Access Server (The Enterprise Product). The following table shows the comparison between both editions.
| Features | OpenVPN Access Server | OpenVPN Community Edition |
|---|---|---|
| Customer Support | ||
| Configurable encryption ciphers | ||
| Integrated, out-of-the-box LDAP & RADIUS support | Available as a Plugin | |
| Integrated Google Authenticator 2FA support | Available as a Plugin | |
| Post-authentication script support | ||
| Authenticate with pre-shared keys | ||
| Authenticate with certificate and username/password and 2FA | ||
| Administration web interface for server configuration | ||
| Command Line Interface (CLI) | ||
| Easy deployment | ||
| Free to use | Limited to 2 VPN Connections |
Configuration Overview and Prerequisites
Before beginning the configuration, we need to achieve some prerequisites.
- Windows machine or VM with the latest Server or desktop OS. Here I’m using Windows Server 2016 OS.
- Download the latest and most stable version of the OpenVPN Community server installation file. (You can download it from here)
- A static public IP. If your public IP is dynamic, you will need to register freely available Dynamic DNS services like NoIP or Dynu so that your server has a constant DNS name.
- Required gateway router/firewall access to add a port forwarding (with required OpenVPN ports) to the Windows machine that runs the OpenVPN community server. Or else you can attach public IP directly to the Windows machine/VM if possible.
- If you are using a desktop OS, you need to change a power plan that prevents the machine from going to sleep.
- Install a text editor to edit the configuration files if required. I’m Using Notepad++.
Downloading and Installing OpenVPN
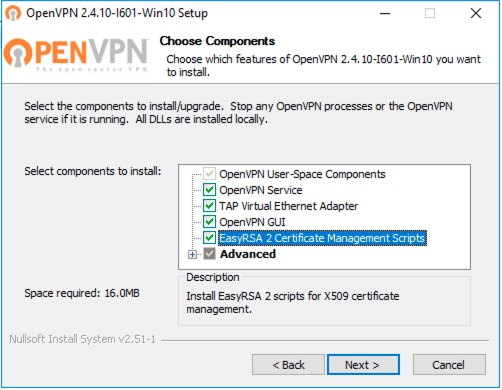
The installation is straightforward, accept all the defaults, and when asked to choose components to install, Make sure you check the box for the EasyRSA 2 Certificate Management Scripts.
The installation will create a new Local Area Connection on the client system for the OpenVPN TAP adapter. This interface will appear connected when the VPN is established and will otherwise show as disconnected.
Generate Certificates and Keys
Prepare the variables
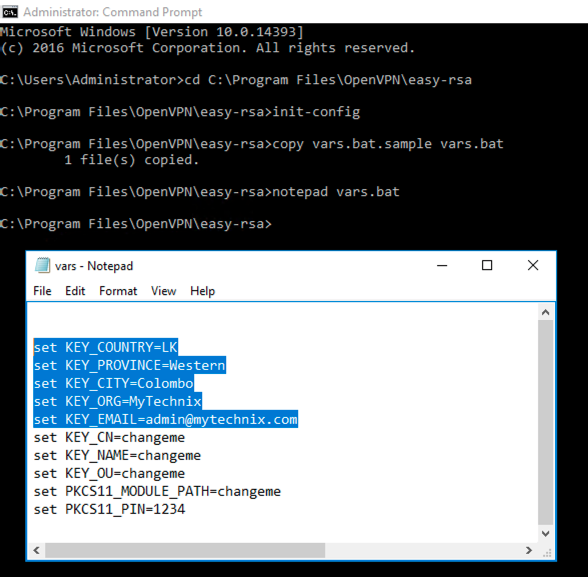
The EasyRSA scripts are installed in C:\Program Files\OpenVPN\easy-rsa. Open the command prompt Run as Administrator and navigate to the easy-rsa directory.
cd C:\Program Files\OpenVPN\easy-rsa
Now run init-config once and it copies vars.bar.sample to vars.bat.
init-config
Open the “vars.bat” file in the notepad text editor.
notepad vars.bat
#Change the following lines accordingly.

set KEY_COUNTRY=US
set KEY_PROVINCE=CA
set KEY_CITY=SanFrancisco
set KEY_ORG=OpenVPN
set [email protected]
Set the variables and run the cleanup script.
vars
clean-all

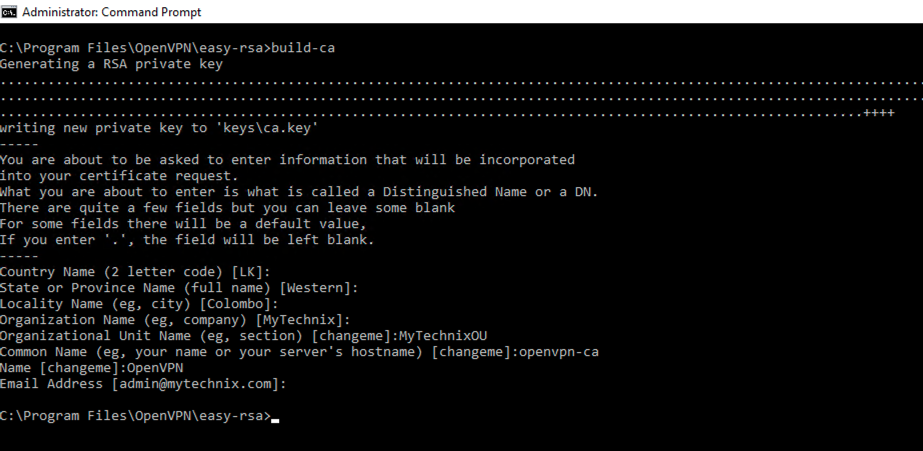
Build CA Certificate and key
In your Command Prompt window, run the command:
build-ca
When prompted, enter your country, etc. These will have default values, which appear in brackets. You can hit enter to keep default values.
- For “Organizational Unit” can be set to whatever if there isn’t a requirement for it.
- For the “Common Name” attribute, give a unique name
- Leave the challenge password blank.
- Leave the optional company name blank if required.
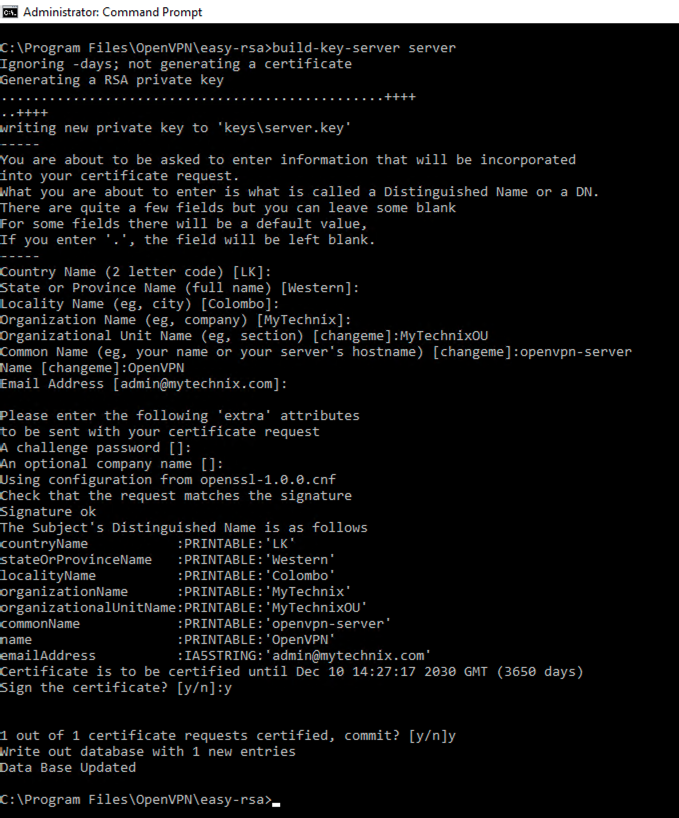
Build Server Certificate and Key
In your Command Prompt window, run the command:
build-key-server server
- The “server” is just an example of a server name. Substitute in your own choice of name for the server instead of “server”.
- For the Common Name attribute, give a unique name
- Leave the challenge password blank.
- Leave the optional company name blank if required.
When asked if you want to sign the certificate, enter y for Yes. When asked if you want to commit the certificate, enter y for Yes.
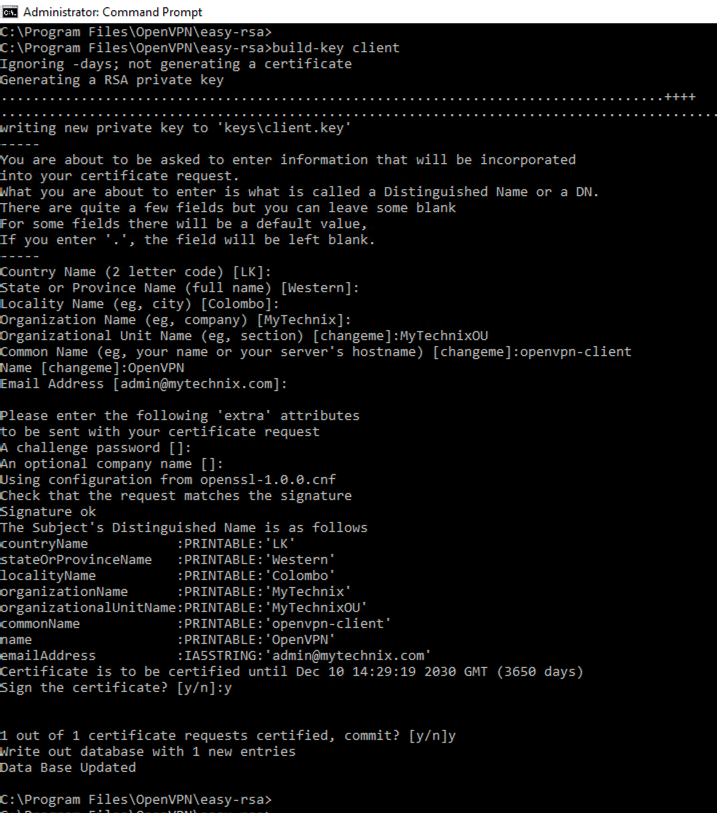
Build Client Certificate and Key
In your Command Prompt window, run the command:
build-key client
- The “client” is just an example of a client name. Substitute in your own choice of name for the server instead of “client”.
- For the Common Name attribute, give a unique name
- Leave the challenge password blank.
- Leave the optional company name blank if required.
When asked if you want to sign the certificate, enter y for Yes. When asked if you want to commit the certificate, enter y for Yes.
Build Diffie-Hellman (DH) Parameters
In your Command Prompt window, run the command:
build-dh

Build TLS Encryption Key
In your Command Prompt window, run the command: (This is required when using tls-auth)
"C:\Program Files\OpenVPN\bin\openvpn.exe" --genkey --secret "C:\Program Files\OpenVPN\easy-rsa\keys\ta.key"
Setup the Server and Client Configuration files
Copying the Server Configuration Files to Appropriate Directory
The sample server configuration file is located under C:\Program Files\OpenVPN\sample-config and copy it to the OpenVPN\config folder. Also, copy ca.crt, ta.key, dh2048.pem, server.crt, server.key and server.ovpn files from C:\Program Files\OpenVPN\easy-rsa\keys\ to C:\Program Files\OpenVPN\config\ on the server:
robocopy "C:\Program Files\OpenVPN\sample-config\ " "C:\Program Files\OpenVPN\config\ " server.ovpn

robocopy "C:\Program Files\OpenVPN\easy-rsa\keys\ " "C:\Program Files\OpenVPN\config\ " ca.crt ta.key dh2048.pem server.crt server.key
Edit the Server Configuration File
Open the server.ovpn located on C:\Program Files\OpenVPN\easy-rsa\keys\server.ovpn. Keep the default settings as it is and edit only the following setting accordingly.
# SSL/TLS root certificate (ca), certificate
ca "C:\\Program Files\\OpenVPN\\config\\ca.crt"
cert "C:\\Program Files\\OpenVPN\\config\\server.crt"
key "C:\\Program Files\\OpenVPN\\config\\server.key"  # This file should be kept secret

# Diffie hellman parameters.
dh "C:\\Program Files\\OpenVPN\\config\\dh2048.pem"

# Configure VPN subnet
# The default subnet is 10.8.0.0/24 but if any clashes with your existing network, you can change this.
server 10.8.0.0 255.255.255.0

# Maintain a record of client <-> virtual IP address
# If OpenVPN goes down/restarted, reconnecting clients can be assigned the same virtual IP address that was previously assigned.
ifconfig-pool-persist ipp.txt

# Push routes to the client to allow it to reach other private subnets behind the server.
push "route 192.168.55.0 255.255.255.0"
push "route 104.18.232.222 255.255.255.255"

# If enabled, all the VPN traffic and internet traffic go through the OpenVPN server. (aka FUll Tunneling mode)
# If disabled, Only VPN traffic goes through the OpenVPN server. (aka Split Tunneling mode)
push "redirect-gateway def1"

# You can provide a remote site DNS server address to do the DNS resolution.
push "dhcp-option DNS 8.8.8.8"

# Uncomment this directive if multiple clients might connect with the same certificate/key files or common names. (Only for Testing)
# For production use, each client should have its own certificate/key pair.
duplicate-cn

# For extra security beyond that provided by SSL/TLS, create an "HMAC firewall" to help block DoS attacks and UDP port flooding.
# The server and each client must have a copy of this key.
# The second parameter should be '0' on the server and '1' on the clients.
tls-auth "C:\\Program Files\\OpenVPN\\config\\ta.key" 0 # This file is secret

# Enable compression on the VPN link and push the
# option to the client (v2.4+ only, for earlier versions, see below)
;compress lz4-v2
;push "compress lz4-v2"

# For compression compatible with older clients use comp-lzo
# If you enable it here, you must also enable it in the client config file.
comp-lzo

# The maximum number of concurrently connected
max-clients 30

# Output a short status file showing
# current connections, truncated
# and rewritten every minute.
status openvpn-status.log

# On Windows, if running as a service, logs are in the "\Program Files\OpenVPN\log" directory.
# "log" will truncate the log file on OpenVPN startup,
# "log-append" will append to it.
# Use one not both.
;log         openvpn.log
log-append  openvpn.log

# Set the appropriate level of log file verbosity.
# 0 is silent, except for fatal errors
# 4 is reasonable for general usage
# 5 and 6 can help to debug connection problems
# 9 is extremely verbose
verb 3

# Notify the client that when the server restarts so it can automatically reconnect.
explicit-exit-notify 1
Copying the Client Configuration Files to the Client Machine
The sample server configuration file is located under C:\Program Files\OpenVPN\sample-config and copy it to the client machine where you connect to the OpenVPN server.
Edit the Server Configuration File
Open the client.ovpn located on C:\Program Files\OpenVPN\easy-rsa\keys\client.ovpn. Keep the default settings as it is and edit only the following setting accordingly.
# The public hostname/IP and port of the OpenVPN server.
remote 123.45.6.78 1194

# SSL/TLS parms.
# Add cert & key contents as follows.

<ca>
-----BEGIN CERTIFICATE-----

-----END CERTIFICATE-----
</ca>

#Client Cert
<cert>
-----BEGIN CERTIFICATE-----

-----END CERTIFICATE-----
</cert>

#Client Key
<key>
-----BEGIN PRIVATE KEY-----

-----END PRIVATE KEY-----
</key>

# If a tls-auth key is used on the server then every client must also have the key.
tls-auth ta.key 1

# Select a cryptographic cipher.
# If the cipher option is used on the server then you must also specify it here.
cipher AES-256-CBC

# Enable compression on the VPN link.
comp-lzo

# Set log file verbosity.
verb 3
Once you make the changes on client.ovpn file, copy that file into your client machine where connect from.
Enable IP Forwarding on the OpenVPN Server
Open Control Panel > Network and Internet > Network and Sharing Center > Change adapter settings.
You will see that OpenVPN has created a new network adapter called “TAP-Windows Adapter V9“. It will have a name such as Ethernet 2 or Local Area Connection 2.

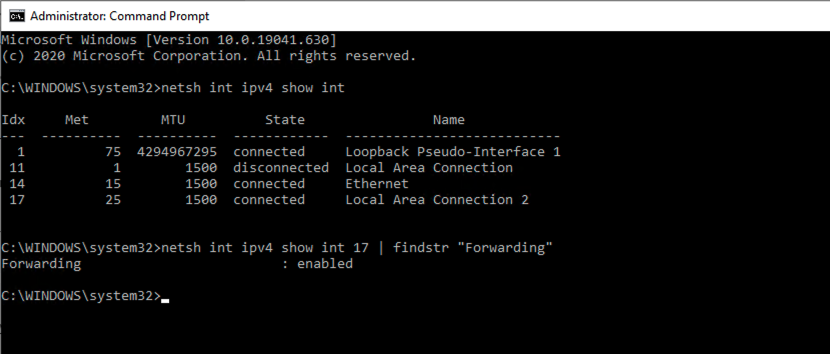
- Now open a Command Prompt window running as administrator and type the following command to determine the interface number of Local Area Connection 2 (or whatever name applies in your case).
netsh int ipv4 show int
- Note down the interface index number of Local Area Connection 2 (in my example 17) and see if forwarding is enabled.
netsh int ipv4 show int 10 | findstr "Forwarding"
- If Forwarding is disabled, then enable Forwarding by issuing the command:
netsh int ipv4 set int 10 Forwarding="enabled"
Enable IP Routing
Enabling the IP routing makes it so that your VPN sends all traffic through it.
- Open the Registry Editor by searching “regedit” on the start menu and navigate through the following path.
HKEY_LOCAL_MACHINE\SYSTEM\CurrentControlSet\Services\Tcpip\Parameters
- Find the “IPEnabledRouter” of type REG_DWORD and enter the value data as “1”.

- Now open “run” and enter “services.msc”.
- Find “Routing and Remote Access”, right-click it, go into properties and change the “Startup type” to “Automatic”.

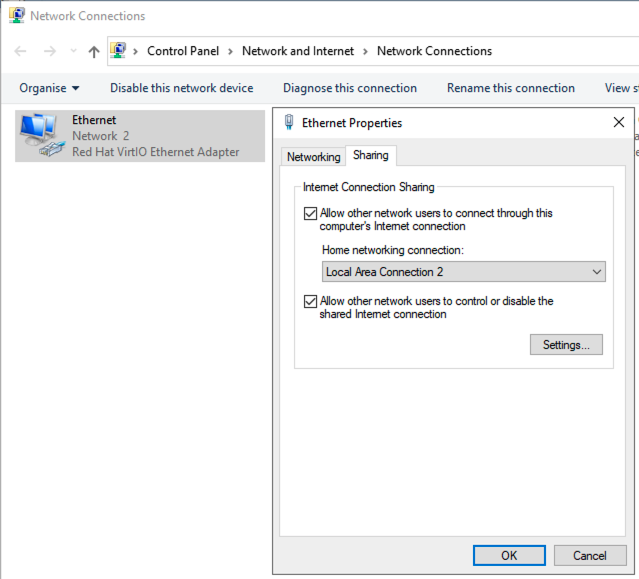
- Now go into Control Panel and navigate to “Network and Sharing Center” then click “Change Adapter Settings” on the left.
- The physical network interface card, (in my case on the Ethernet adapter) right-click, and select Properties.
- Select “Sharing” at the top and check the box for “Allow other network users to connect through this computer’s internet connection” and select Home networking connection as your TAP-Windows Adapter V9 (Local Area Connection 2).
- Click OK.
Start the OpenVPN server
From here, that should be it. You may need to reboot your server for it to work.
Start the ‘OpenVPN GUI‘ with administration rights. Note that some OpenVPN versions require administrator rights in order to run properly. To enable this, select ‘Run program as administrator‘ in the Properties menu of the OpenVPN application.
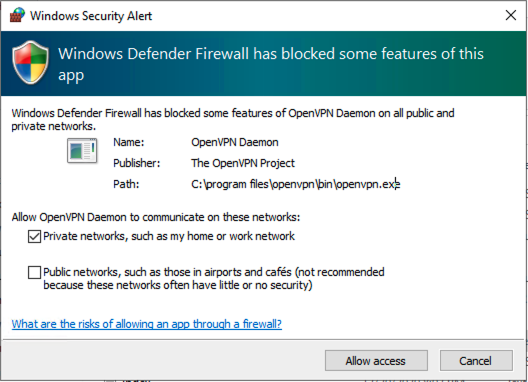
During the initial start, you will get the following dialog box to allow the OpenVPN app through the Windows firewall. Click Allow access to proceed.
After OpenVPN starts you can locate its icon in the system tray. Right-click on that icon, and click on ‘Connect’.
On successful connect, a notification appears to say you are now connected and the OpenVPN icon in the system tray turns green.
Content through the OpenVPN Client
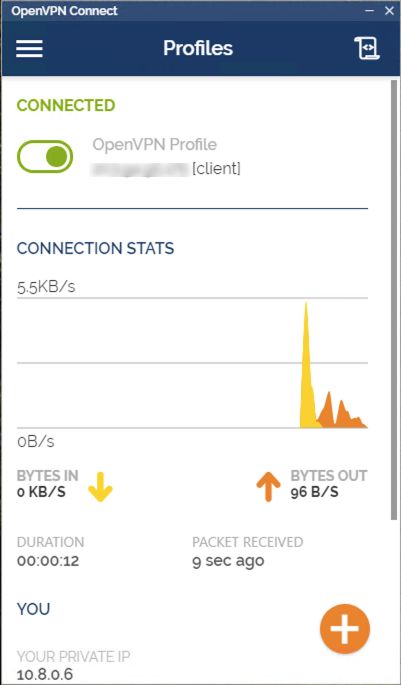
- Now in the client machine, download and install the OpenVPN Connect tool to connect to the OpenVPN server.
- Then import the client.ovpn configuration file which we prepare in an earlier step to the OpenVPN Connect tool and toggle the switch to connect it.