
SNMP protocol is one of the most common protocols used for network management. Usually, it is used to exchange management information between network-connected devices such as routers, switches, servers, printers, and uninterruptible power supplies (UPSs). SNMP is part of the TCP/IP suite which uses UDP port 161/162 port numbers to communicate between managers and agents.
Why do we need SNMP Monitoring Tool?
System administrators generally manage a large number of network-connected devices and it is very hard to get clear visibility of devices’ health and performance by login into each device separately. The SNMP monitoring tools help administrators in the following ways.
- Automatically discover, monitor, and manage network devices.
- Monitor the performance statistics at the device itself and interface level.
- Visualize and keep historic data for complete visibility and granularity into the performance of network devices.
- Set up threshold limits and trigger alerts in case of anomalies.
- Helps IT admins get a complete picture of the entire network.
Components of SNMP
- SNMP Manager – SNMP manager (aka Network Management Station (NMS)) is the central system used to monitor the network and it is responsible for communicating with the SNMP-agent enabled network devices. The manager queries the agents, gets responses, sets variables in them, and acknowledges events from them.
- SNMP Agent – SNMP agent is an application process that responds to SNMP queries to provide status and statistics about a particular network node. The agent associated with SNMP enabled devices locally and collect, store, and transmit monitoring data to the SNMP manager.
- SNMP MIB – SNMP MIB (Management Information Base) is a structure that defines the format of information exchange in an SNMP system. Every SNMP agent maintains MIB describing the parameters of the device it manages. SNMP managers store collected data in a MIB as a commonly shared database between the agent and the manager. The managed objects in a MIB are called object identifiers (object IDs or OIDs).
- SNMP OID – Object Identifiers (OIDs) are identifiable by strings of numbers separated by dots. MIBs organize OIDs hierarchically, which can be represented in a tree structure that has individual variable identifiers for each OID.
SNMP Versions
SNMP Version 1 (SNMPv1)
SNMPv1 is the initial version of the SNMP protocol. The security of this protocol is based on communities, which are nothing more than passwords. A plain text string (community string) that allows an SNMP-based application that knows the string to gain access to the device information. Typically, there are three communities (read-only, read-write & trap) in SNMPv1.
SNMP Version 2 (SNMPv2)
SNMPv2 is a revised version with enhanced protocol packet types, transport mappings, and MIB structure elements and is technically called SNMPv2c. This version also uses the same SNMPv1 security mechanism (community-based).
SNMP Version 3 (SNMPv3)
SNMPv3 made with greater step to securing the protocol suite by implementing user-based security. This security feature allows you to set authentication based on the user requirements. There are 3 levels of authentication methods as follows:
- NoAuthNoPriv: The user account should have No Authentication and No privacy when they send/receive messages.
- AuthNoPriv: This requires the user to Authenticate, but will not Encrypt Sent/Received Messages.
- AuthPriv: Authentication is Required and Sent/Received Messages are Encrypted (the most secure level).
Version 3 of this protocol is the most secure because it added security and encryption, but bit more complex when set up and configurations.
SNMP Community String
The SNMP Community String is like a password that allows access to SNMP-managed devices and is sent along with SNMP GET requests. In most cases, the default community string is public. There are 3 types of community strings.
| Type | Purpose |
| Read-only community string | Query only read-only information (Default: public) |
| Read-write community string | Query data as well as edit the device configuration (Default: private) |
| SNMP trap community string | Receive SNMP traps from the device |
Let’s see how to configure the SNMP on typical Linux servers located in a normal network and servers behind the NAT gateways.
Install & Configure SNMP Version 2c
Install SNMP on Debian-based Distributions
Enter the following command as root to install SNMP:
apt-get update
apt-get install snmp snmpd libsnmp-dev
Since SNMP doesn’t ship with a full set of management information bases (MIBs), you have to install it manually.
apt-get install snmp-mibs-downloader
download-mibs
Configuring SNMP on Debian-based Distributions
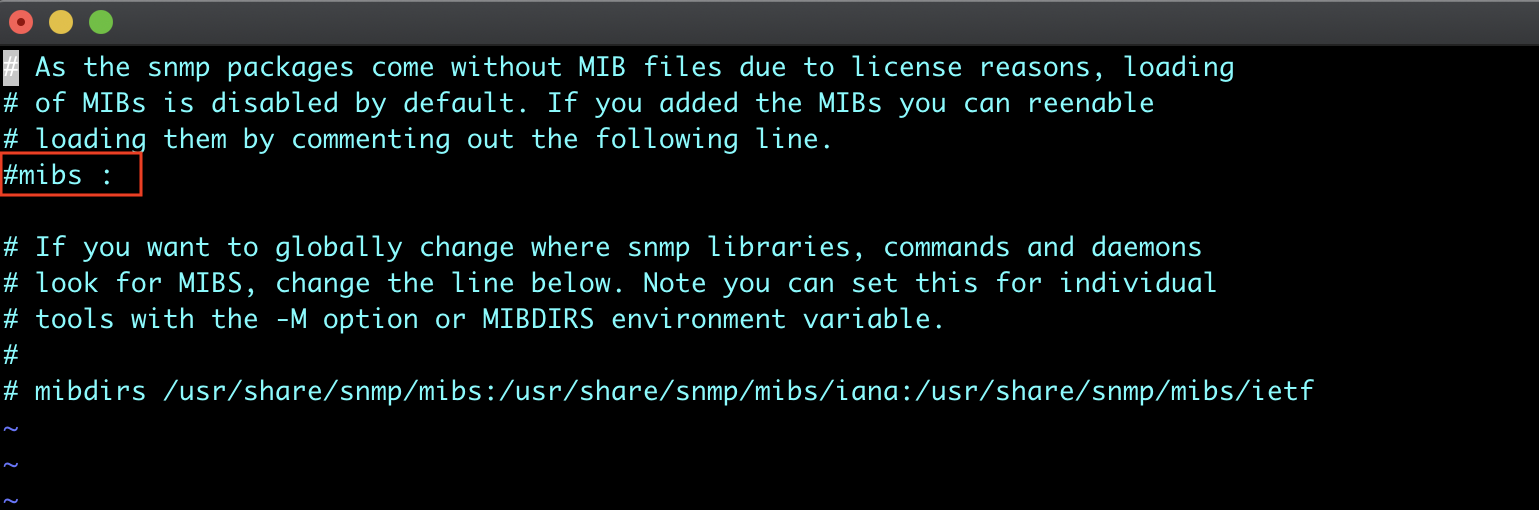
Loading of MIBs is disabled by default. If you added the MIBs you can reenable loading them by commenting out the “mibs :” line from /etc/snmp/snmp.conf file.
By default in SNMP default configuration, allows only connections originating from the local computer. We need to comment out the current line, and uncomment the line underneath to allow all connections.
Edit /etc/snmp/snmpd.conf as follows:
# Listen for connections from the local system only
#agentAddress udp:127.0.0.1:161
# Listen for connections on all interfaces (both IPv4 *and* IPv6)
agentAddress udp:161,udp6:[::1]:161

# A read only community 'MyComString' and the source network where the management server locate.
rocommunity MyComString 172.17.1.0/16

# You can add the physical location of your server located and a contact email address if required. These may be helpful for distinguishing machines if you are monitoring a large number servers.

sysLocation AWS_DC
sysContact [email protected]
Allowing SNMP ports in Firewall (If Firewall Enabled)
Include your SNMP manager’s IP (NMS IP) address as a from.
ufw allow from 192.168.1.3 to any port 161 proto udp
ufw allow from 192.168.1.3 to any port 162 proto udp
Install SNMP on RedHat-based Distributions
yum update
yum -y install net-snmp net-snmp-utils
Configuring SNMP on RedHat-based Distributions
Set the community string and allow access from the NMS server.
echo -e "# SNMP version 2c community\nrocommunity RHELComStr 3.85.38.156" >> /etc/snmp/snmpd.conf
In the RedHat based distributions default SNMP configuration is allow SNMP traffic from any interface. If required, allow SNMP traffic only from specific interface or loopback interface, you have to edit the snmpd start up script /lib/systemd/system/snmpd.service file “ExecStart” line as follows.
[Unit]
Description=Simple Network Management Protocol (SNMP) Daemon.
After=syslog.target network.target

[Service]
Type=notify
Environment=OPTIONS="-LS0-6d"
EnvironmentFile=-/etc/sysconfig/snmpd
ExecStart=/usr/sbin/snmpd $OPTIONS -f udp:127.0.0.1:161 udp:172.31.91.197:161
ExecReload=/bin/kill -HUP $MAINPID

[Install]
WantedBy=multi-user.target
Allowing SNMP ports in Firewall (If Firewall Enabled)
Execute the following commands to allow necessary ports:
firewall-cmd --zone=public --add-port=161/udp --permanent
firewall-cmd --zone=public --add-port=162/udp --permanent
firewall-cmd --reload
Configure SNMP Version 3
SNMP v3 needs additional attributes like a username, permission, security level, authentication, and privacy passphrases to allow access. Therefore, you need to create a user for authentication. Once the user is created it automatically added to the configuration files /etc/snmp/snmpd.conf.
Create SNMP v3 Authentication User
Create a read-only authentication user using the net-snmp-create-v3-user command.
#You must stop snmpd in order to use following command.
systemctl stop snmpd.service

# Command Syntax
net-snmp-create-v3-user [-ro] [-A authpass] [-a MD5|SHA] [-X privpass][-x DES|AES] [username]

# Actual command
net-snmp-create-v3-user -ro -A STrP@SSWRD -a SHA -X STr0ngP@SSWRD -x AES snmpadmin
After you are done with your modifications, save the file, exit and restart the snmpd service.
systemctl restart snmpd

# Configure the snmpd service to start on system startup
systemctl enable snmpd
Test the SNMP Configuration
Note: You may have to change your Linux host’s firewall rules to permit SNMP (UDP 161/162) packet flow between your NMS and Linux host.
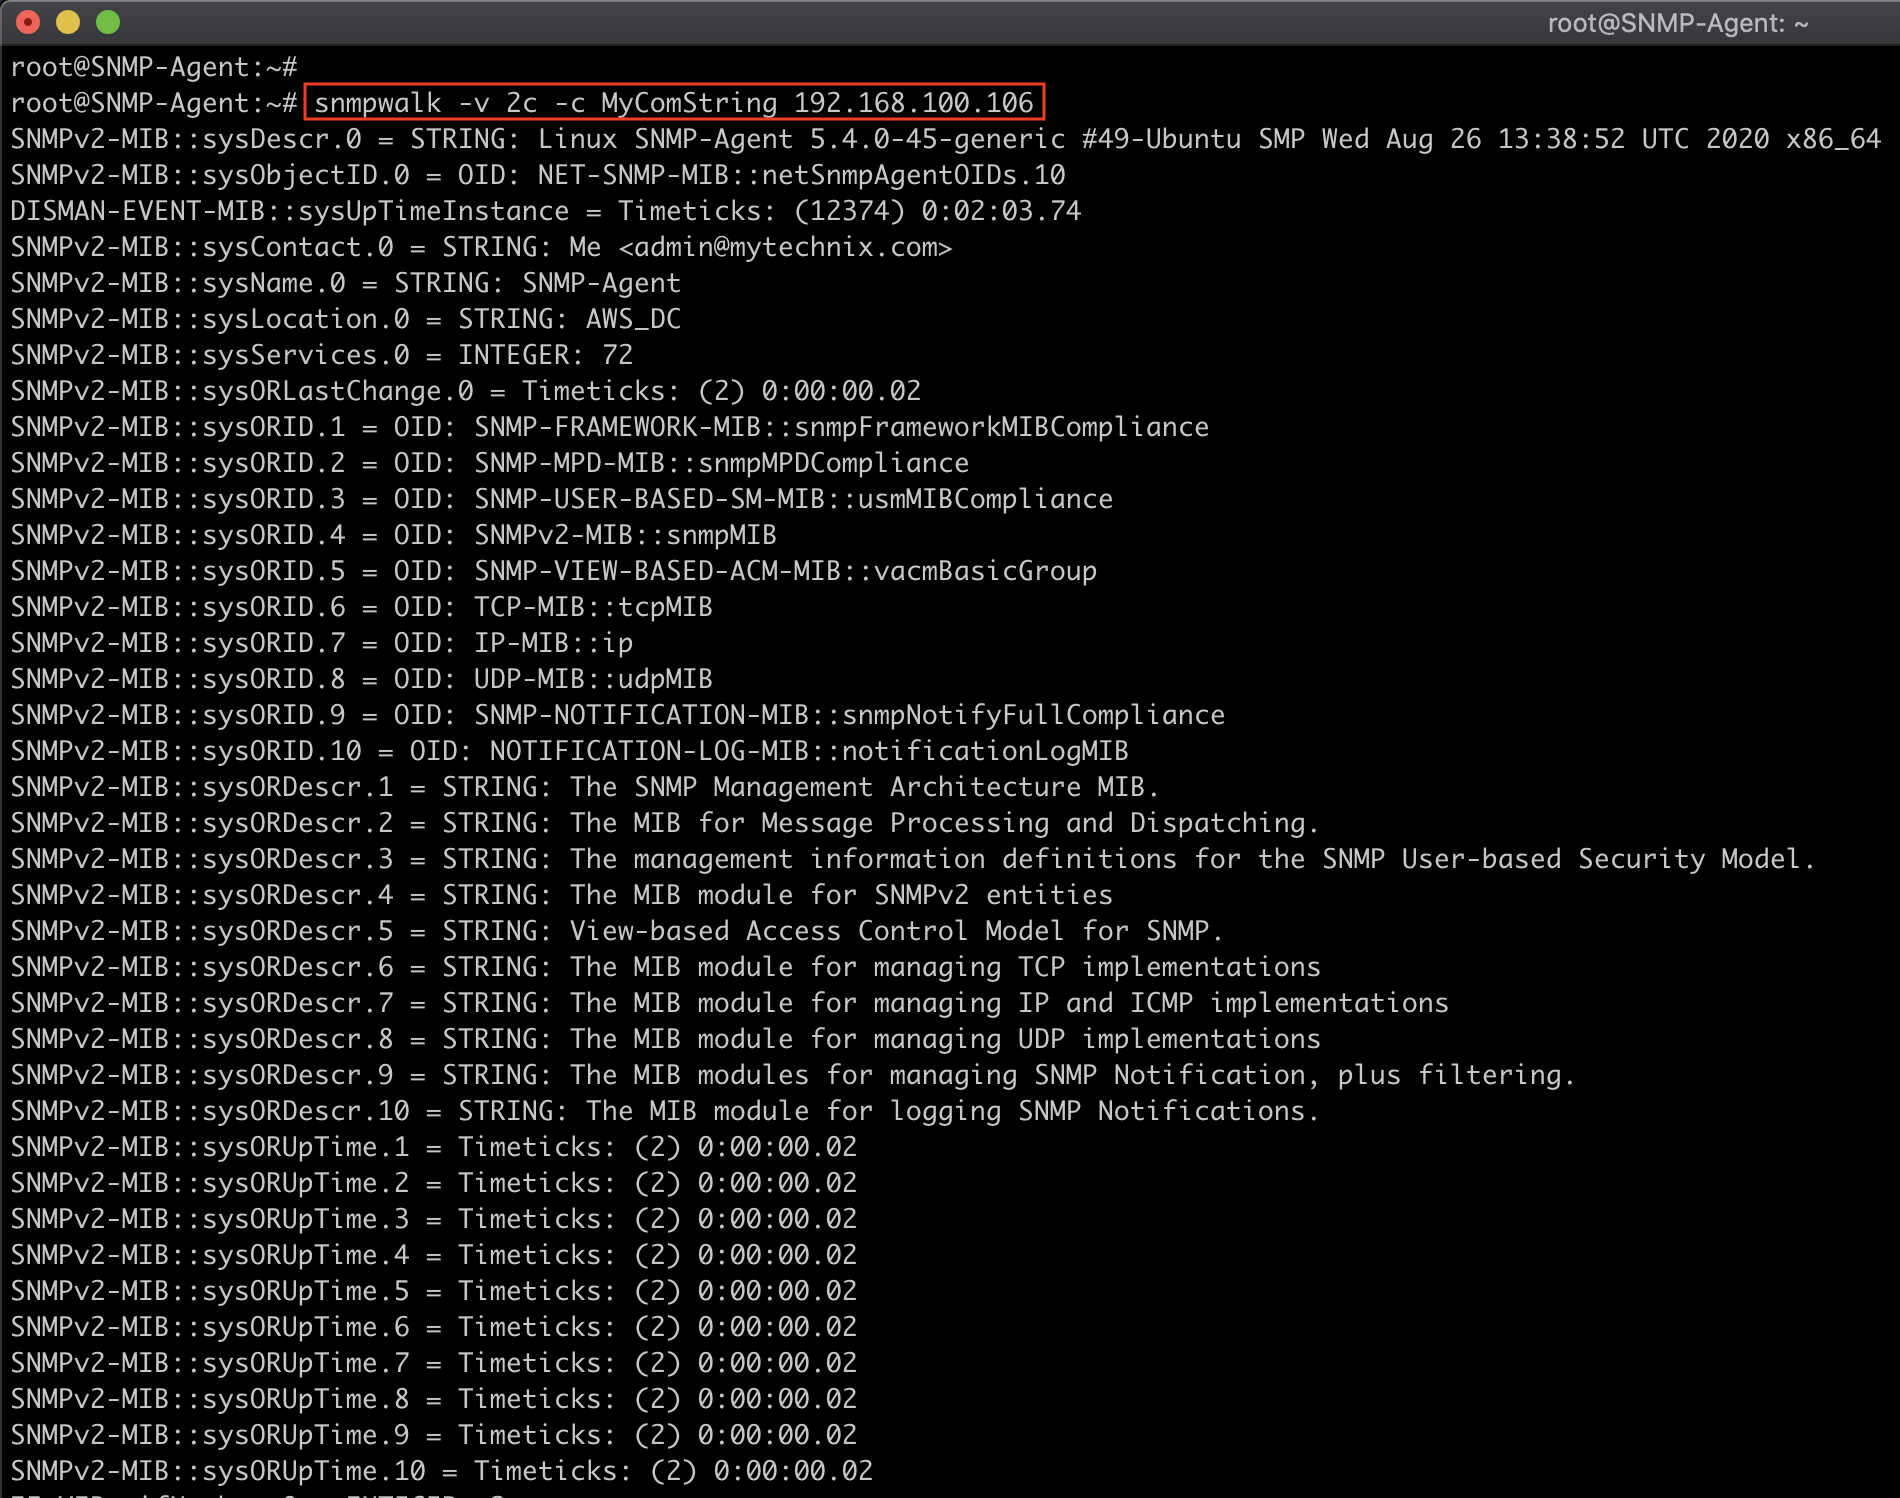
Test your snmpd configuration by invoking a snmpwalk on the SNMP-Agent instance IP:
snmpwalk -v2c -c MyComString 192.168.100.106
You should see verbose output like that shown below.
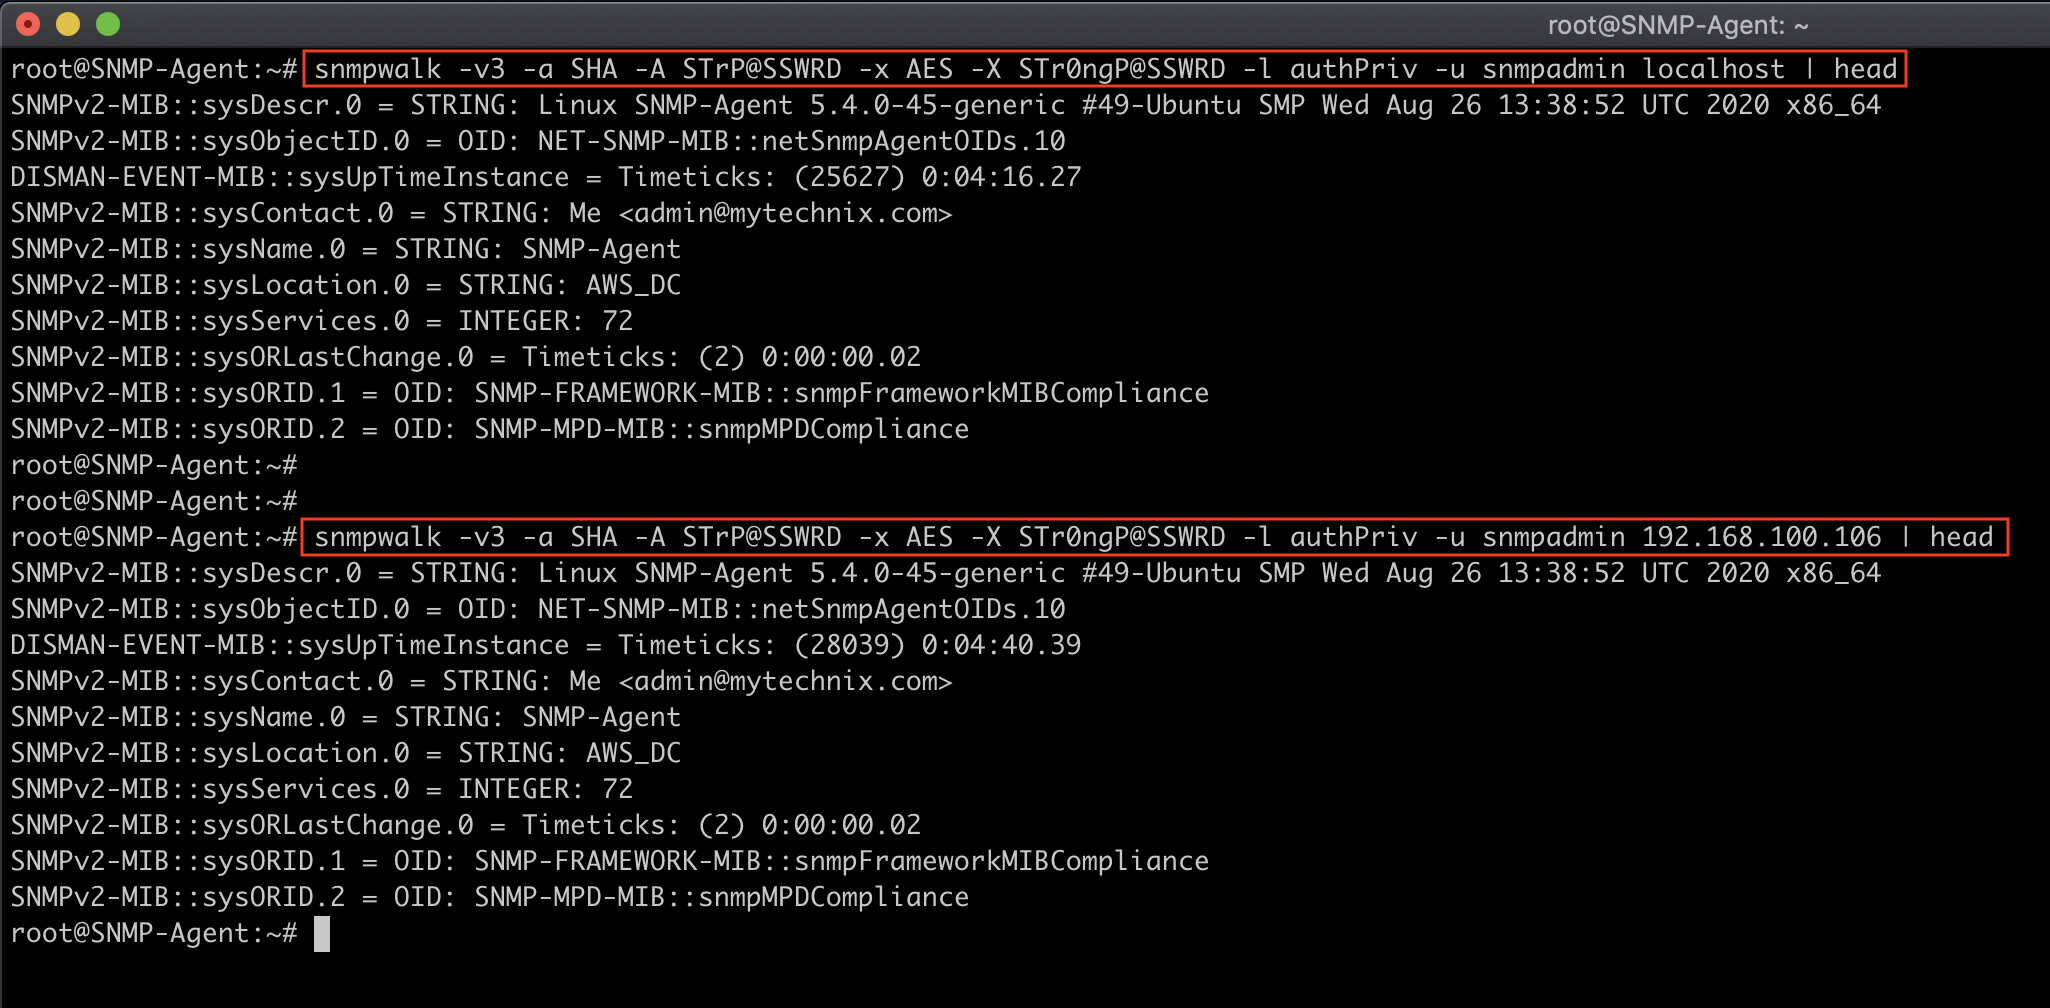
Verify SNMP v3 Connection
#From localhost
snmpwalk -v3 -a SHA -A STrP@SSWRD -x AES -X STr0ngP@SSWRD -l authPriv -u snmpadmin localhost | head

#From Remote Host IP
snmpwalk -v3 -a SHA -A STrP@SSWRD -x AES -X STr0ngP@SSWRD -l authPriv -u snmpadmin 192.168.100.106 | head
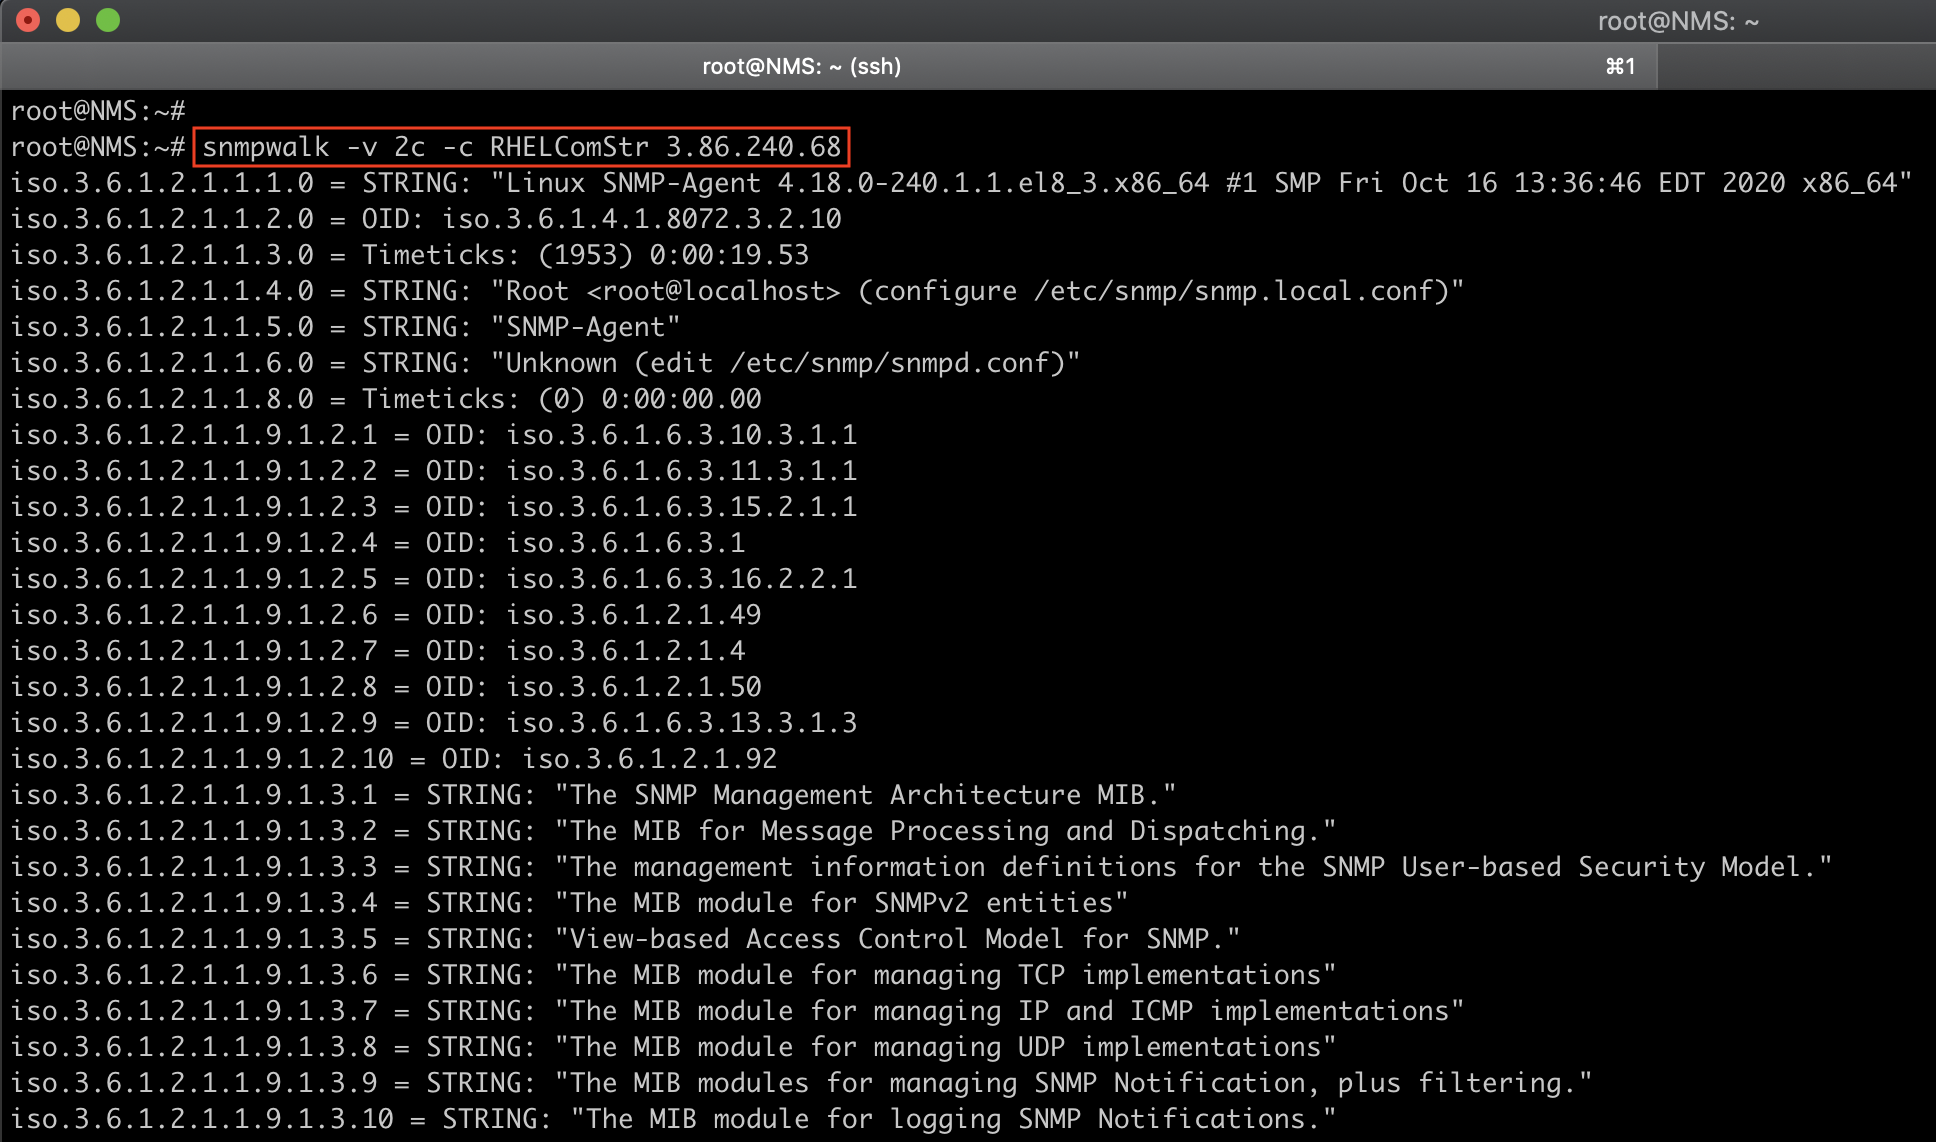
Test your snmpd configuration by invoking a snmpwalk on the SNMP-Agent instance IP:
snmpwalk -v2c -c RHELComStr 3.86.240.68
You should see verbose output like that shown below.
Verify SNMP v3 Connection
#From Remote Host
snmpwalk -v3 -a SHA -A STrP@SSWRD -x AES -X STr0ngP@SSWRD -l authPriv -u snmpadmin 3.86.240.68 | head

Great!!! You should now have successfully set up SNMP v2c or SNMP v3 on Linux servers. You can now configure your monitoring server for polling from Linux servers which provide you with rich statistics and performance monitoring. You can refer to my previous post “LibreNMS Monitoring” to monitor your all SNMP-enabled Linux servers.
Access SNMP-Enabled Devices Behind NAT Gateways
Sometimes you need to monitor SNMP-enabled devices that are not reachable directly from your monitoring server. Normally this happens if SNMP agents are located in a network with a private network behind a NAT device or a firewall. Therefore, you need the proxy function (SNMPD Proxy) that will use the reachable SNMPD to proxy requests to the unreachable SNMPD.
In my case, I have an AWS private network with some production servers, and a network management station (LibreNMS) is having internet-faced public IP with restrictions to the AWS network. So my management system locates on-premises and cannot communicate directly with these devices since all production servers are located inside a private network behind NAT gateways. That is when I found out about the SNMP proxy. I can use it for accessing devices behind a firewall or NAT.
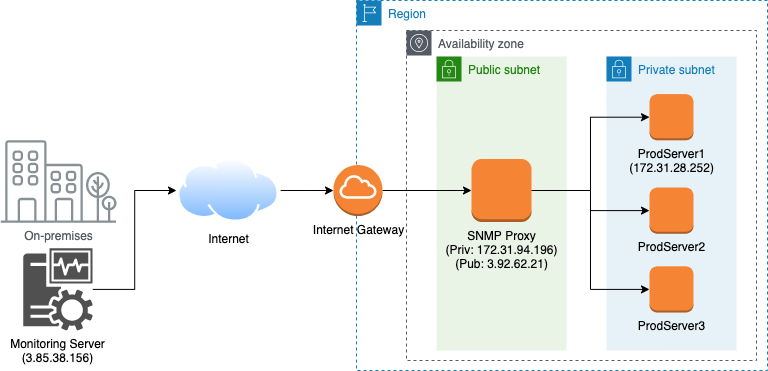
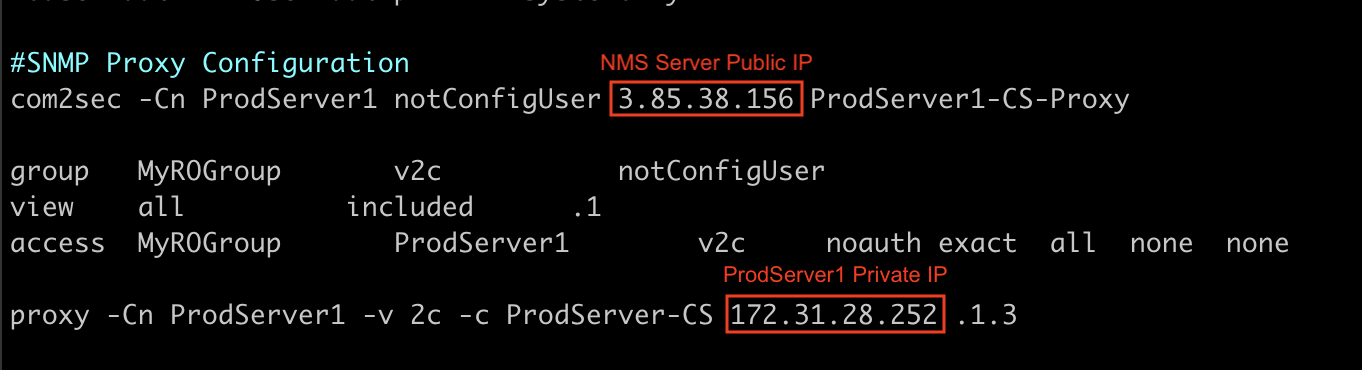
Let’s assume we want to poll “Production Servers” via “SNMP Proxy”. Here is an example configuration you have to configure inside “SNMP Proxy“:
agentAddress udp:161,udp6:[::1]:161

#SNMP Proxy Configuration
com2sec -Cn ProdServer1 notConfigUser 3.85.38.156 ProdServer1-CS-Proxy

group   MyROGroup       v2c           notConfigUser
view    all          included      .1
access  MyROGroup       ProdServer1        v2c     noauth exact  all  none  none

proxy -Cn ProdServer1 -v 2c -c ProdServer-CS 172.31.28.252 .1.3
All Production servers Configuration:
agentAddress udp:161,udp6:[::1]:161
rocommunity ProdServer-CS 172.31.94.196/32
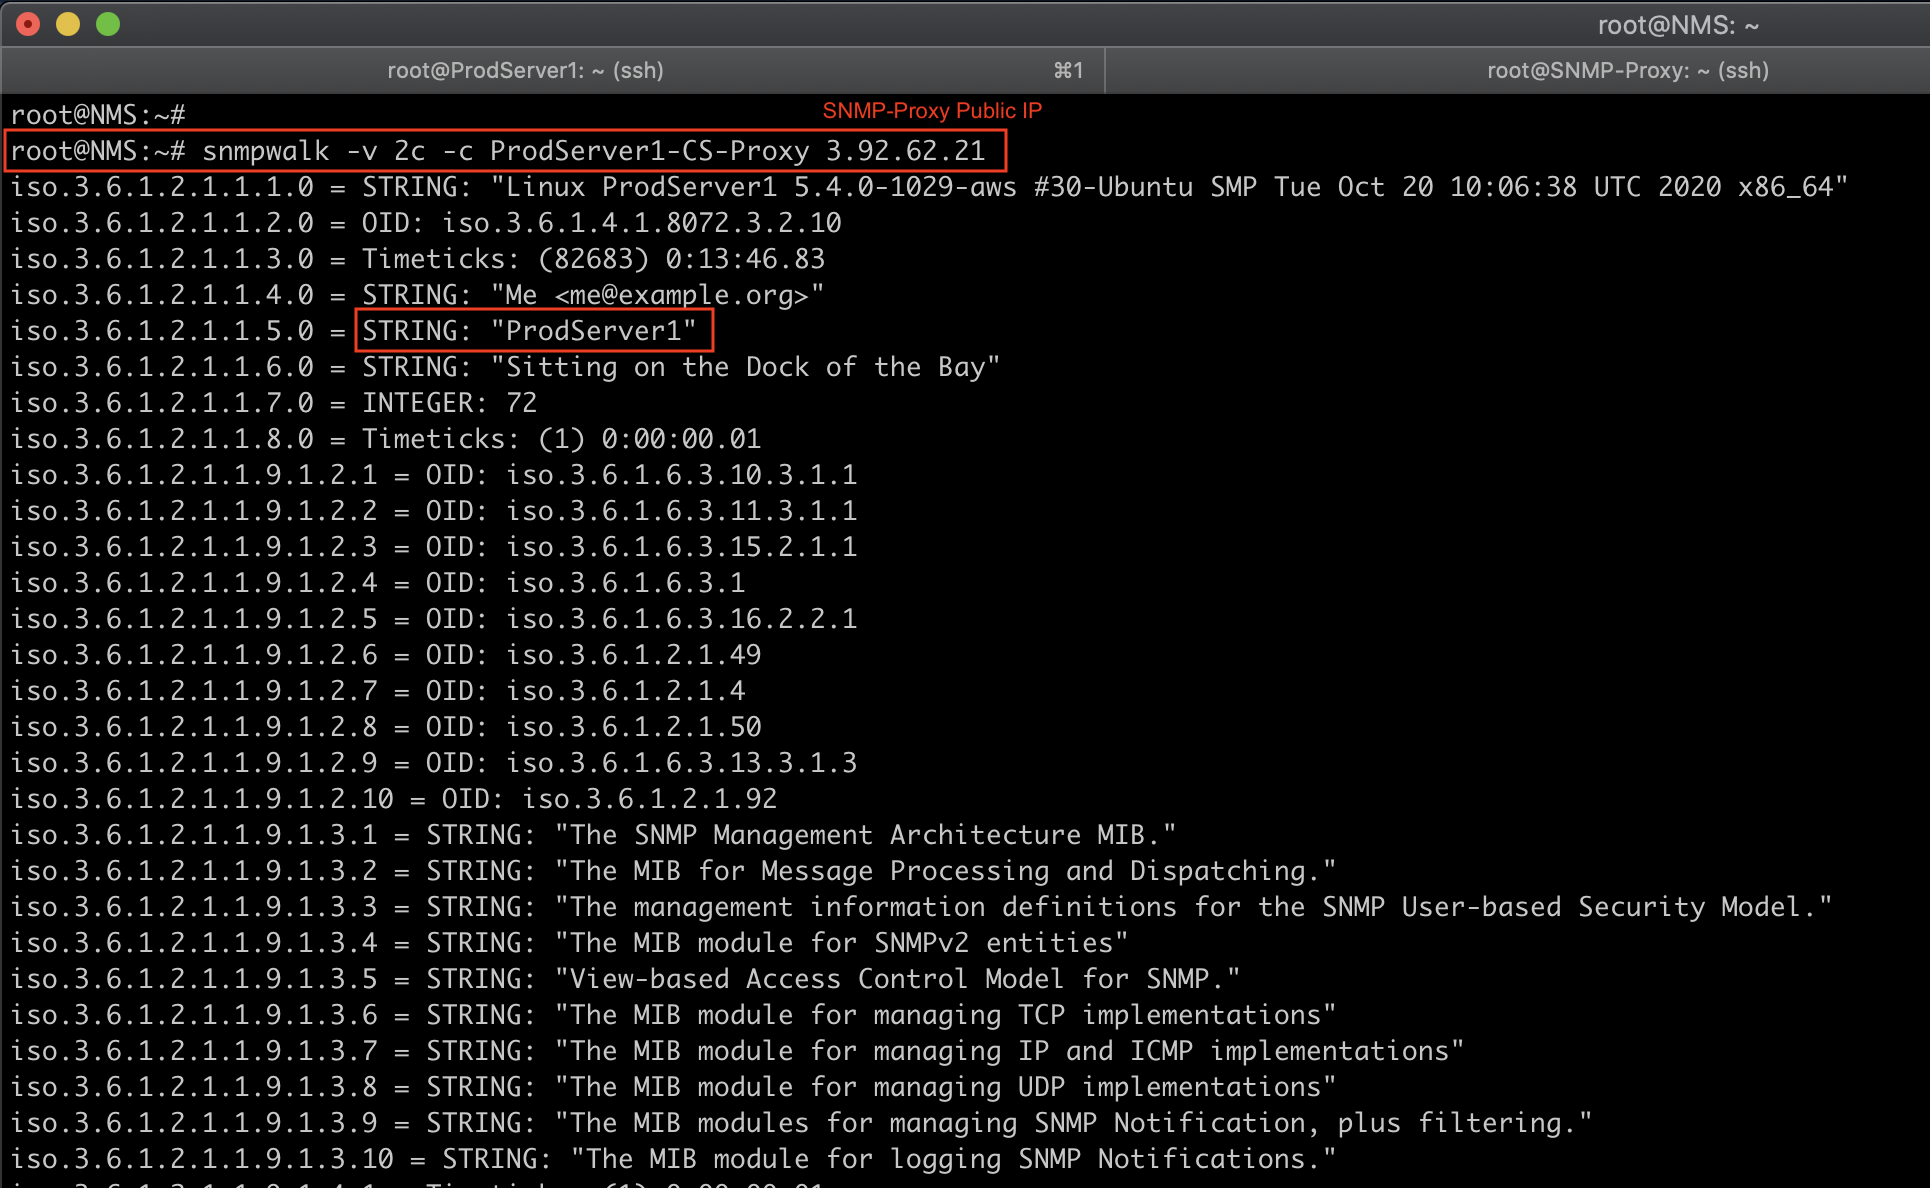
Verify the SNMP query working from SNMP Proxy –> ProdServer1
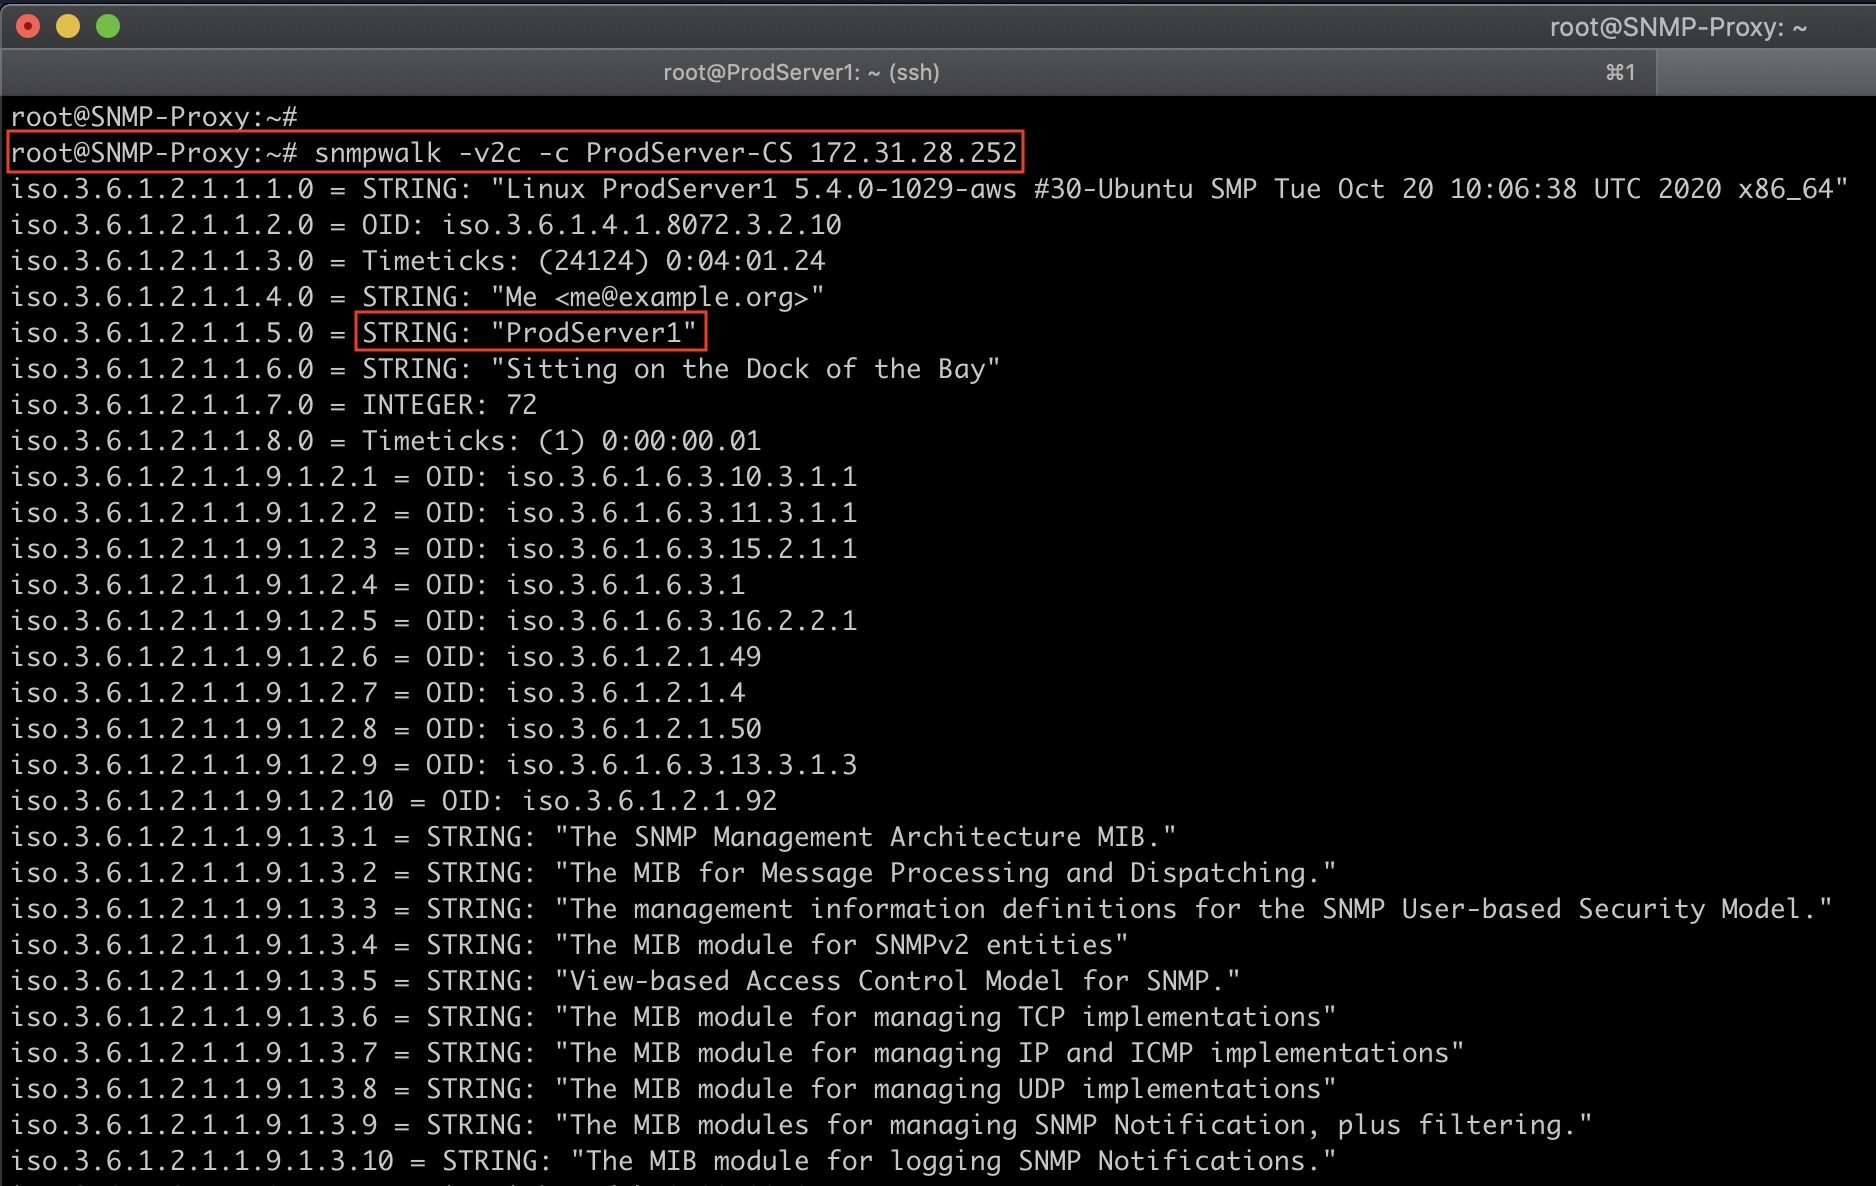
You can now poll community “ProdServer-CS” on “ProdServer1” via community “ProdServer1-CS-Proxy” on host “SNMP Proxy”. Please note that requests on “ProdServers” will be coming from “SNMP Proxy”, not your poller (NMS).
snmpwalk -v 2c -c ProdServer1-CS-Proxy 3.92.62.21
Useful Linux OIDs for CPU, Memory, and Disk Statistics
#CPU Statistics OIDs
#===================

#Load
1 minute Load: .1.3.6.1.4.1.2021.10.1.3.1
5 minute Load: .1.3.6.1.4.1.2021.10.1.3.2
15 minute Load: .1.3.6.1.4.1.2021.10.1.3.3

#CPU
percentage of user CPU time: .1.3.6.1.4.1.2021.11.9.0
raw user cpu time: .1.3.6.1.4.1.2021.11.50.0
percentages of system CPU time: .1.3.6.1.4.1.2021.11.10.0
raw system cpu time: .1.3.6.1.4.1.2021.11.52.0
percentages of idle CPU time: .1.3.6.1.4.1.2021.11.11.0
raw idle cpu time: .1.3.6.1.4.1.2021.11.53.0
raw nice cpu time: .1.3.6.1.4.1.2021.11.51.0

#Memory Statistics OIDs
#======================

Total Swap Size: .1.3.6.1.4.1.2021.4.3.0
Available Swap Space: .1.3.6.1.4.1.2021.4.4.0
Total RAM in machine: .1.3.6.1.4.1.2021.4.5.0
Total RAM used: .1.3.6.1.4.1.2021.4.6.0
Total RAM Free: .1.3.6.1.4.1.2021.4.11.0
Total RAM Shared: .1.3.6.1.4.1.2021.4.13.0
Total RAM Buffered: .1.3.6.1.4.1.2021.4.14.0
Total Cached Memory: .1.3.6.1.4.1.2021.4.15.0

#Disk Statistics OIDs
#====================

The snmpd.conf needs to be edited. Add the following (assuming a machine with a single ‘/' partition):

disk / 100000
(or)
includeAllDisks 10% for all partitions and disks

#The OIDs are as follows

Path where the disk is mounted: .1.3.6.1.4.1.2021.9.1.2.1
Path of the device for the partition: .1.3.6.1.4.1.2021.9.1.3.1
Total size of the disk/partion (kBytes): .1.3.6.1.4.1.2021.9.1.6.1
Available space on the disk: .1.3.6.1.4.1.2021.9.1.7.1
Used space on the disk: .1.3.6.1.4.1.2021.9.1.8.1
Percentage of space used on disk: .1.3.6.1.4.1.2021.9.1.9.1
Percentage of inodes used on disk: .1.3.6.1.4.1.2021.9.1.10.1

System Uptime: .1.3.6.1.2.1.1.3.0

#Network Interface Statistics OIDs
#==================================

List NIC names: .1.3.6.1.2.1.2.2.1.2
Get Bytes IN: .1.3.6.1.2.1.2.2.1.10
Get Bytes IN for NIC 4: .1.3.6.1.2.1.2.2.1.10.4
Get Bytes OUT: .1.3.6.1.2.1.2.2.1.16
Get Bytes OUT for NIC 4: .1.3.6.1.2.1.2.2.1.16.4