
In a large enterprise network, having one time standard for all network devices is very important for management, reporting, and correlating events logged across multiple devices. The Network Time Protocol (NTP) is a UDP protocol responsible for synchronizing all devices’ system clocks in a network.
The implementation of NTP requires a client-server architecture and the NTP daemon operating in both client mode and server mode. Using NTP packets, the client and server exchange time stamp data that set up the clock on the client machine similar to the NTP server.
Why NTP Authentication?
The network time is very important because if the device’s time is inaccurate, then it would be more difficult during an examination to correlate the system logs, disruption of authentication systems, etc. So what if the time synchronization is arbitrarily changed by attackers? Hence, the use of authentication mechanisms in NTP is vital to prevent the manipulation of time information by an attacker.
There are several ways to implement authentication on NTP depending on your NTP version.
- The older and still somewhat secure symmetric key approach, which was introduced in NTP v3 and also supports NTP v4. But the only drawback is that a secret key has to be exchanged in a safe way between servers and clients.
- Public Key Authentication (autokey)was introduced in NTP v4 which uses public/private keypairs for the authentication process. Because this method does not provide a level of protection as expected, therefore introduced Network Time Security (NTS).
If encryption is really required, the option is to use NTS or establish an encrypted tunnel (VPN) between the NTP client and the server. However, this also affects the network delay and jitter and thus reduces the accuracy of the synchronized time.
In this article, I will show you how to install an NTP server with NTP Authentication (Symmetric Key approach) and configure the NTP client as a CISCO IOS device.
NTP Authentication Procedure
NTP authentication checks the authenticity of the NTP server before synchronizing time with the NTP server. That helps you to identify legitimate server/s from unauthorized or illegal servers. NTP authentication works with a symmetric key that was already configured by the admin in their configuration and key files. Also, the “trustedkey keyid” attribute must be mentioned in the server’s ntp.conf file and the NTP process must be started on the server side for successful authentication.
The following figure shows how the NTP authentication works.
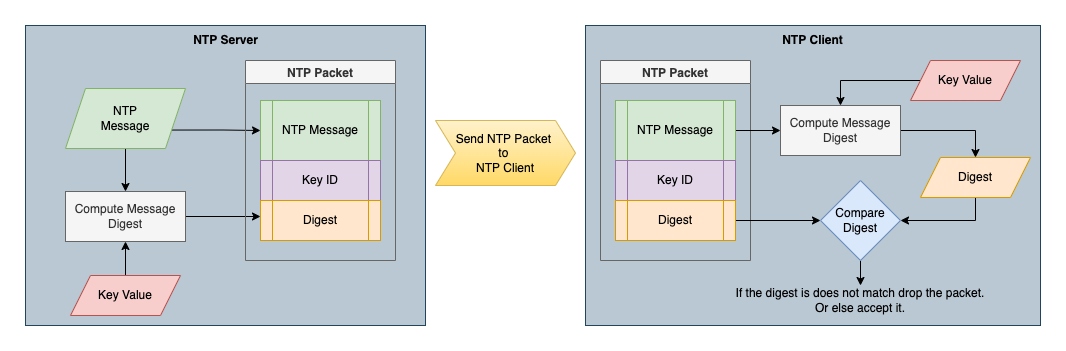
- The NTP server uses key-value identified by the Key ID to calculate a digest for the NTP message using a specified algorithm and send the calculated digest along with the NTP message and Key ID to the NTP client.
- Upon receiving the NTP packet to the NTP client, perform the following tasks.
- Get the configured key value according to the Key ID in the NTP packet.
- Use that key value and the same algorithm to calculate the digest.
- Compares the generated digests with the digest contained in the NTP packet. If they are different, the NTP client simply discards the packet and if it is the same, accepts the packet and creates the NTP session.
Let’s Install & Configure NTP Server
Install the NTP server
Update the System Repositories and install the NTP server.
sudo apt update -y
sudo apt install ntp
To verify that NTP has been successfully installed, run the command.
sntp --version
Configure NTP Server Pools
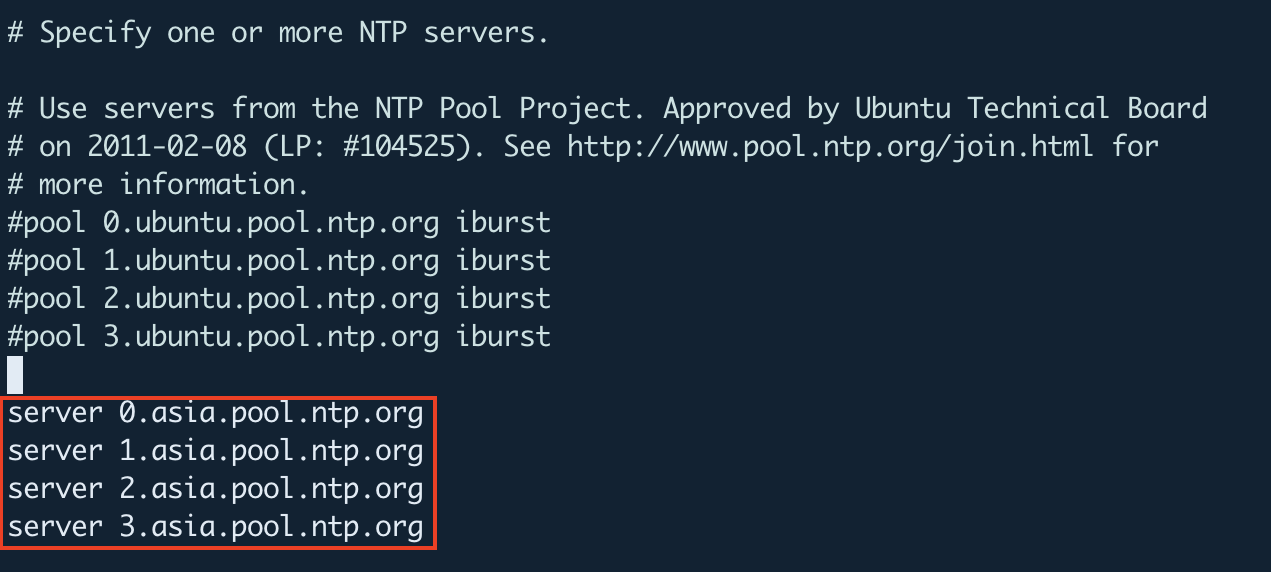
The default NTP server configuration comes with NTP pool servers in the /etc/ntp.conf file. However, you may change the default NTP server pools closest to your location. The following link directs you to a page where you can select your most preferred NTP pool list.
In this article, I’m using the NTP pools located in Asia (asia.pool.ntp.org) as shown below.
Configure NTP Authentication
NTP authentication is very easy to configure you only need to generate some NTP keys and trust them in your ntp.conf configuration file.
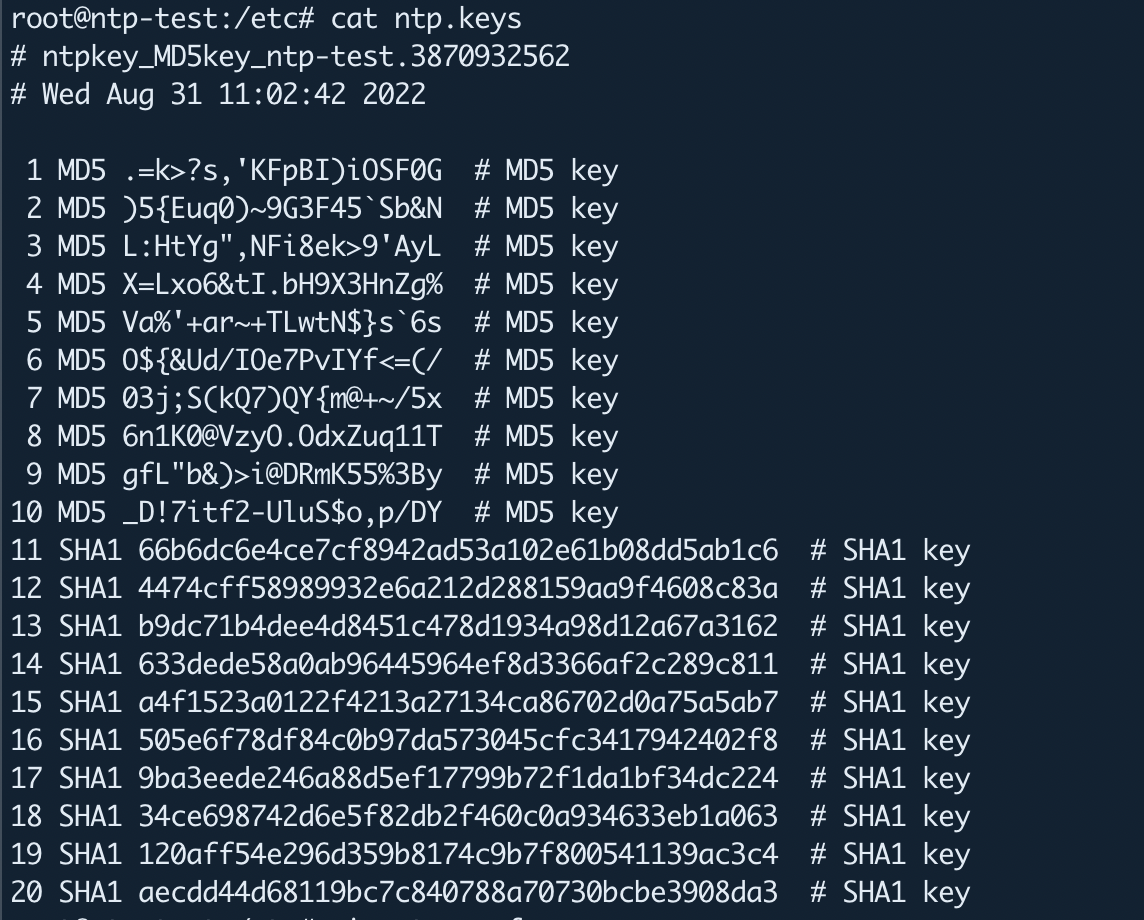
Using the following command line tool you can generate a symmetric keys file containing 10 MD5 and SHA (if OpenSSL is available). I’m running this command on the /etc/ directory and that generates a key file as well as a link called “ntp.keys”.
sudo su -
cd /etc/
ntp-keygen -M

Once you generate the NTP keys, you can see them as follows.
The next step is to enable NTP authentication by telling the NTP server which key file to use and which keys to trust inside the /etc/ntp.conf file.
keys /etc/ntp.keys        # path for keys file
trustedkey (1 ... 10)     # define trusted keys
Once you have done the above changes, restart the NTP service and verify its status by the following commands.
sudo systemctl restart ntp
sudo systemctl status ntp
That’s it about the configuration of the NTP server with authentication. You can now use those generated keys on your NTP clients to authenticate with a trusted NTP server.
Configure Cisco IOS Device as NTP Client
As an NTP client, I am using a Cisco 2960 device with IOS version 15.2(2).
To define an authentication key for NTP, use the following command in the Cisco device’s global configuration mode. Also, the message authentication support is provided using the MD5 algorithm, and the key type md5 is the only key type supported here.
Switch(config)#ntp authentication-key 2 md5 )5{Euq0)~9G3F45`Sb&N
Now enter the following commands in the same prompt.
#enabling NTP authentication
Switch(config)#ntp authenticate

#The ntp trusted-key command provides protection against accidentally synchronizing the device to a NTP server that is not trusted.
Switch(config)#ntp trusted-key 2

#adding the NTP server with the appropriate key ID
Switch(config)#ntp server 192.168.100.70 key 2 prefer
Once you are done with the above configuration on your Cisco IOS device, you can see it on the running configuration as follows.
Switch#show running-config | include ntp

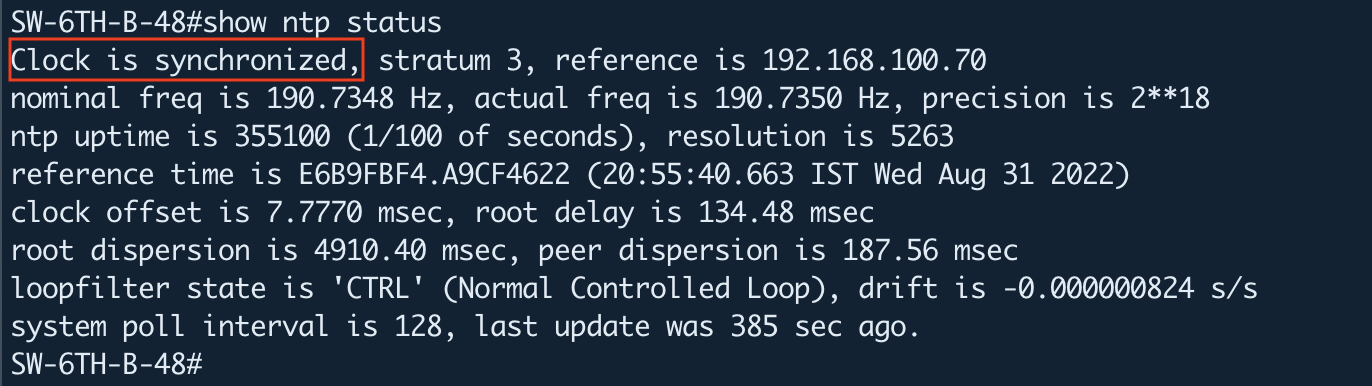
The clock is now synchronized. You can verify it by the following command.
Switch#show ntp status
Troubleshooting and Debugging
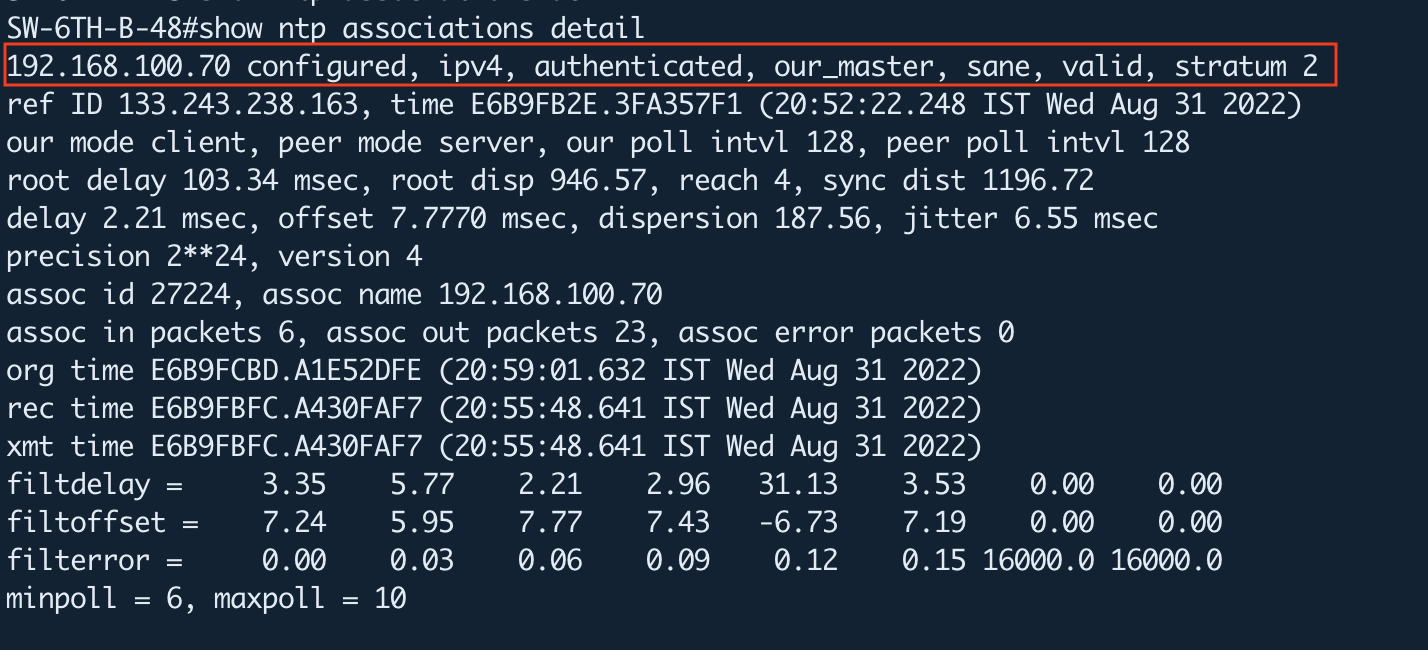
You can list the NTP associations with details to see the authentication status. The first line for each NTP server shows an “authenticated”.
Furthermore, you can refer to the following link for troubleshooting and debugging steps.
Network Time Protocol (NTP) Issues Troubleshooting and Debugging Guide
Conclusion
NTP is a well-known and efficient protocol to ensure your systems are always synchronized with the correct time; also, the use of authentication mechanisms in NTP is essential to prevent the manipulation of time information by an attacker. Authentication establishes the authenticity of a packet’s source, whereas encrypting the contents of the NTP packets is not necessarily required because it only contains time information, which isn’t really sensitive in itself.