
Multi-Factor Authentication is a security mechanism that adds an extra layer of protection on top of your username and password. The first factor is the one that you know the username and password and the second factor is what you might have as unique like a phone (For OTP) or Fingerprint. This adds an extra security layer to prevent an unauthorized person from accessing the resources even if they know your username and password.
Multi-Factor Authentication Methods
- Short Message Service (SMS)
- Time-based One Time Password (TOTP)
- Eg: Google Authenticator
- Push Notifications
- Eg: Google Prompt.
- Universal 2nd Factor
- USB Security Keys
Virtual MFA Applications
An application that runs on a mobile device or any other device generates a six-digit numeric code based on a time-synchronized OTP algorithm. The user must type a valid code from the device on an MFA field during sign-in. The virtual MFA app allocated to a specific user must be unique and the user cannot enter an OTP code from another user’s virtual MFA app to authenticate.
The following shows the well-known MFA applications for your mobile that can be installed from the play store/app store.
| Android | Authy, LastPass Authenticator, Microsoft Authenticator, Google Authenticator |
| iPhone | Authy, LastPass Authenticator, Microsoft Authenticator, Google Authenticator |
In this post, I am going to walk you through implementing an additional layer of authentication security for your AWS EC2 instances by enabling multi-factor authentication when you SSH into EC2 instances. AWS does not charge any additional fees for using MFA.
Usually, when you create an EC2 instance, you have to give a key pair for the instance so that you can SSH into the instance. That private key of that keypair is downloaded and kept on your local machine. The risk here is if your local machine gets compromised, then any user who has the private and the username (anyone can guess or search the default username) has full access to your EC2 instances. In order to make access to the instances more secure, you should implement additional controls. One of the best practices is to have multi-factor authentication (MFA) enabled for the EC2 instances. With MFA enabled, the user login is dependent on what they know (i.e., the password or private key) and what they have (the one-time password generated by a virtual MFA application or a physical token).
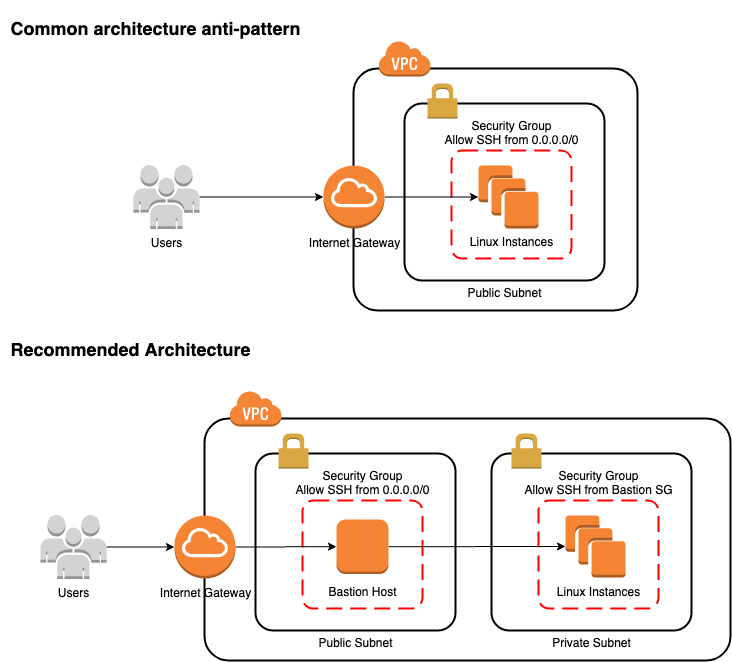
The most conman way of accessing EC2 instances via SSH is using its public IP or Elastic IP directly attached to the instance, which makes it vulnerable to many security attacks directly. The recommended way is to have a bastion host aka jump box in front of your instance and access your instance through the bastion host. Restricting access to your internal servers to the bastion host, the external attackers can not violate security policies by logging directly into the internal instances. That can achieve by creating security groups for each instance and allow only from the bastion server’s security group. The benefit is that you don’t need to have MFA enabled on each instance, you can enable it only on the bastion host.
Prerequisites
Before you begin following the steps, you’ll need the following:
- Launch the Ubuntu server 20.04 instance from the AWS console and SSH into it.
- Install the Google Authenticator app on your mobile, which will later be used to generate the OTP code.
Enabling MFA on an EC2 Instance
In the example, I’m going to enable MFA on a Ubuntu instance. To do this I will use Google’s module (Google Authenticator) for Pluggable Authentication Module (PAM) to enable MFA.
Installing Google Authenticator on EC2 Instance
SSH into your EC2 instance in a normal way and then switch into your root user and run:
apt-get update
apt-get install libpam-google-authenticator

Configuring Google Authenticator
Run the initialization app to generate a key for the user who wants to add second-factor authentication to that user account.
su - ubuntu
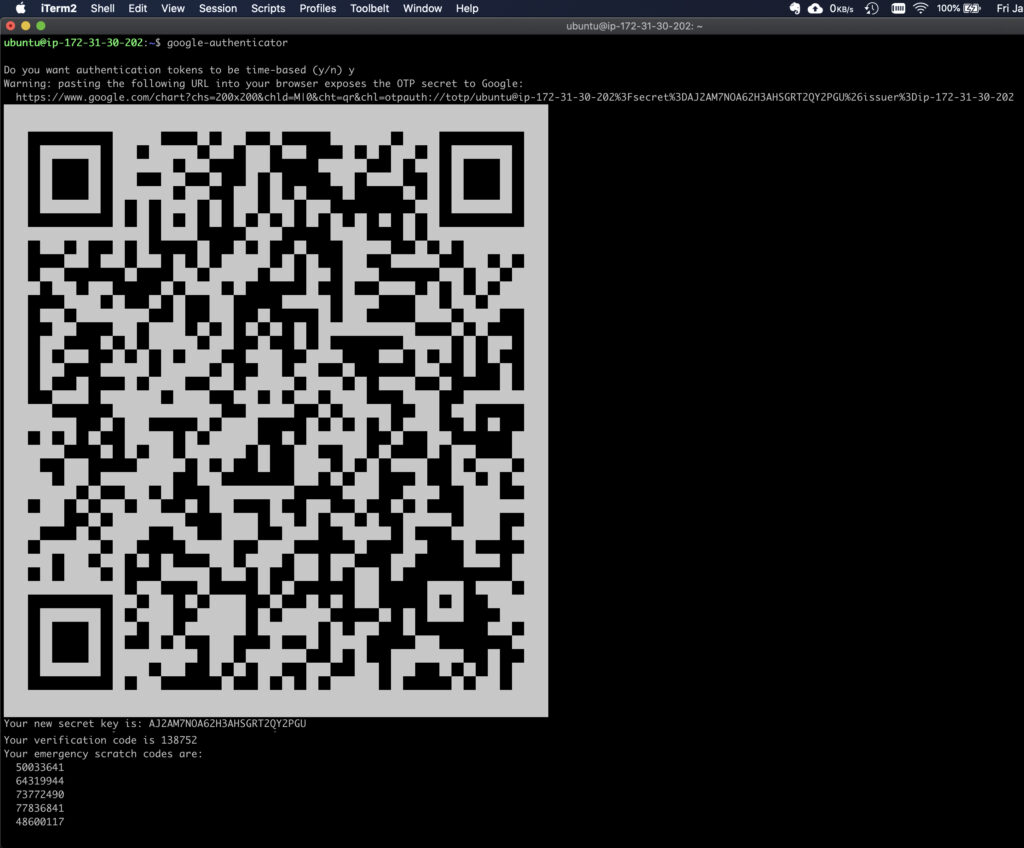
google-authenticator
You will be asked if the authentication tokens used should be time-based. In this example, we will use time-based tokens.
Do you want authentication tokens to be time-based (y/n) y
Now you will be presented with a QR code that you should scan using your Google Authenticator app. Or else, manually enter the secret key in your google authenticator app and register your device. Make sure to save the secret key, verification code, and scratch codes generated on the instance securely, if you lose access to the app on the registered device.
Next, you will be asked if the google_authenticator file should be updated for user ubuntu. By typing ‘y’ will save the generated secret key, scratch codes, and the other configuration options under the user’s home directory.
Do you want me to update your "/home/ubuntu/.google_authenticator" file (y/n) y
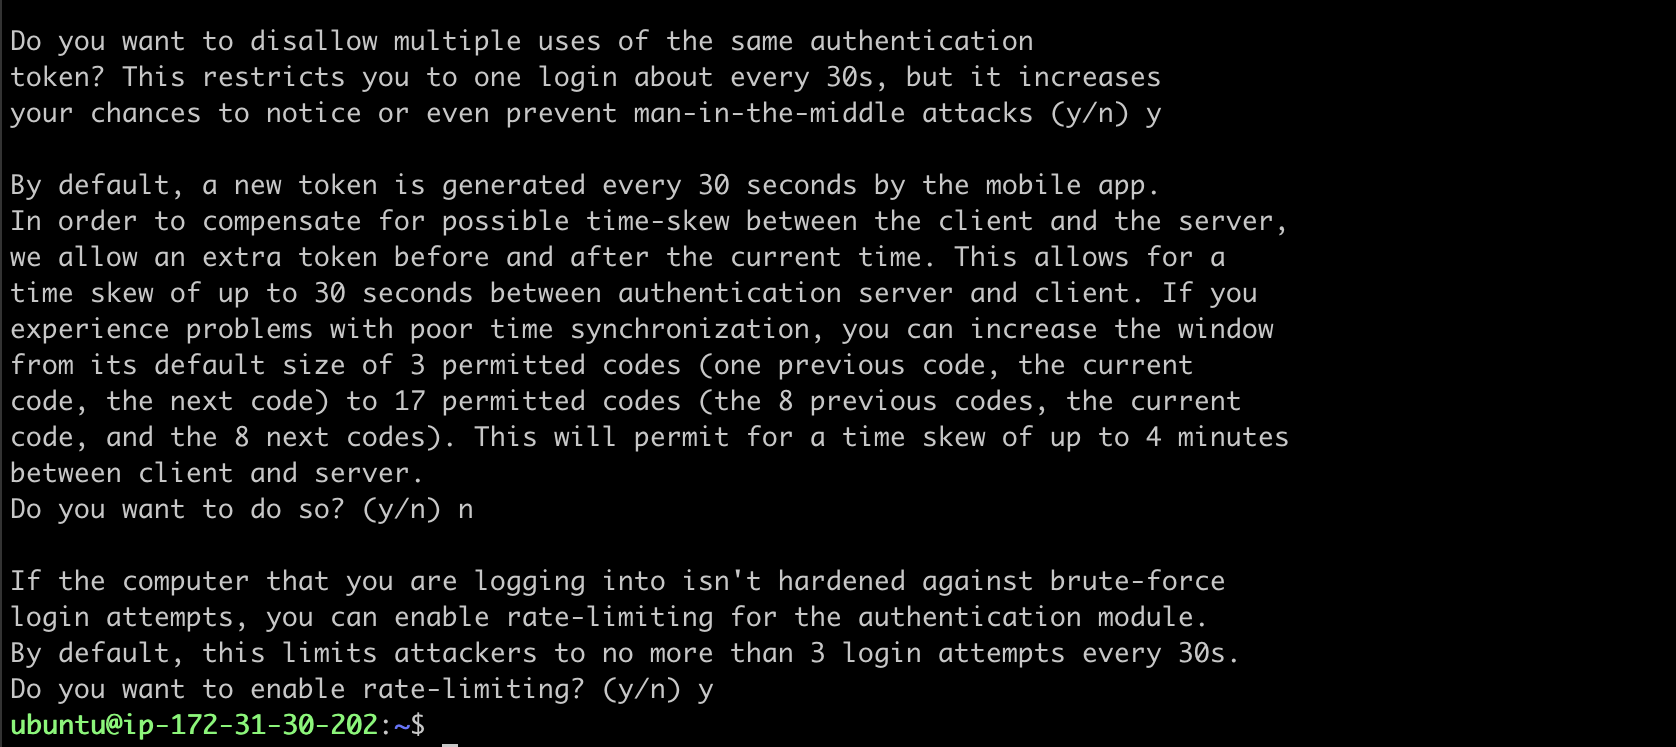
Once you’ve added the code, answer the remaining questions, which are:
Adding the secret to Google Authenticator
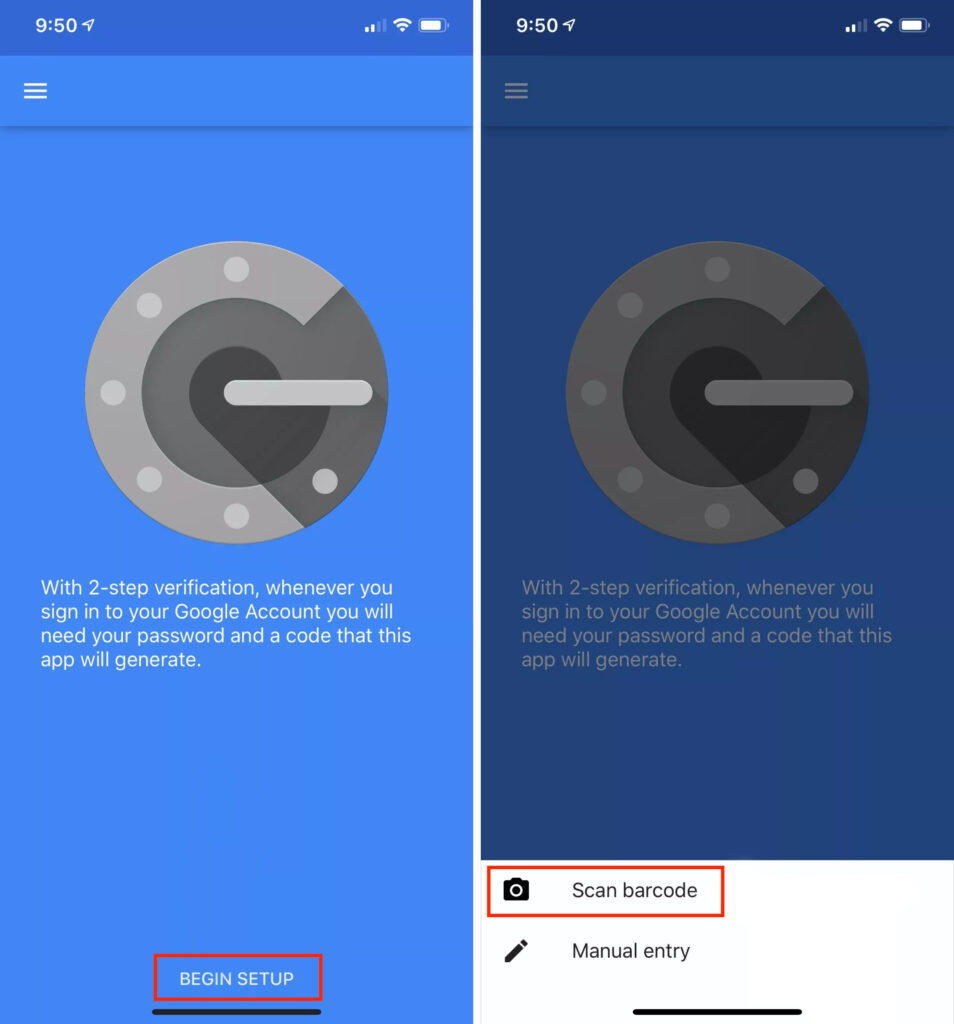
I’m using the latest version of the Google Authenticator from the Play Store. The process shouldn’t look different on iOS.
Touch the Begin Setup / Add icon (+) and select “Scan barcode”. Use a phone camera to scan the QR code.
Configure SSH to use the Google Pluggable Authentication Module
This module generates MFA codes for the above-configured user. But the SSH authentication process does not know it needs to use MFA codes as part of the authentication process.
You can configure this in two different options:
- You may require MFA every time a user SSH into the instance and every time a user entering to the sudo privileges.
- You may require MFA only for SSH login, whereas for subsequent
sudoauthentications you would only require the user’s sudo password.
The first option will be ideal for a shared environment, and in this post, I will show you to configure that option.
Now open the file /etc/pam.d/sshd and add the following line to the bottom of the file to use Google Authenticator:
vim /etc/pam.d/sshd

auth required pam_google_authenticator.so nullok
auth required pam_permit.so
The nullok keyword at the end of the first line state that the google authenticator PAM module is optional and that the users who don’t run Google Authenticator initialization won’t be asked for a second authentication. This is useful if there are service accounts that should be able to log in without MFA.
The second line with pam_permit.so is required when the user logs in via SSH, each method needs a SUCCESS to allow authentication. If a user doesn’t configure the MFA, it uses the nullok option and returns an IGNORE for the interactive keyboard authentication. Then, pam_permit.so returns SUCCESS and allows authentication to proceed.
Also, comment out the following line ONLY if you’re not using password-based auth for SSH and you want to use google the authenticator with public-key authentication.
#@include common-auth
Save the changes and close the file.
Configure SSH to be aware of MFA
Do the following changes to the /etc/ssh/sshd_config file to make SSH aware of MFA.
vim /etc/ssh/sshd_config

PubkeyAuthentication yes
PasswordAuthentication no
ChallengeResponseAuthentication yes
AuthenticationMethods publickey,keyboard-interactive
Save the file. Restart the SSH to let the changes take effect.
systemctl restart sshd.service
Configure Multi-Factor Authentication for Sudo
Edit the /etc/pam.d/common-auth file and add the below line to the bottom of the file. The nullok option allows users that have not yet generated an MFA code to use sudo with the password, while codes are required if the user has generated the MFA codes.
vim /etc/pam.d/common-auth

auth required pam_google_authenticator.so nullok
Save the changes and close the file.
Testing Phase
Finally, you’ll see where SSH uses your SSH key and then asks for the verification code. You can now log in over SSH with an SSH key and a one-time password.
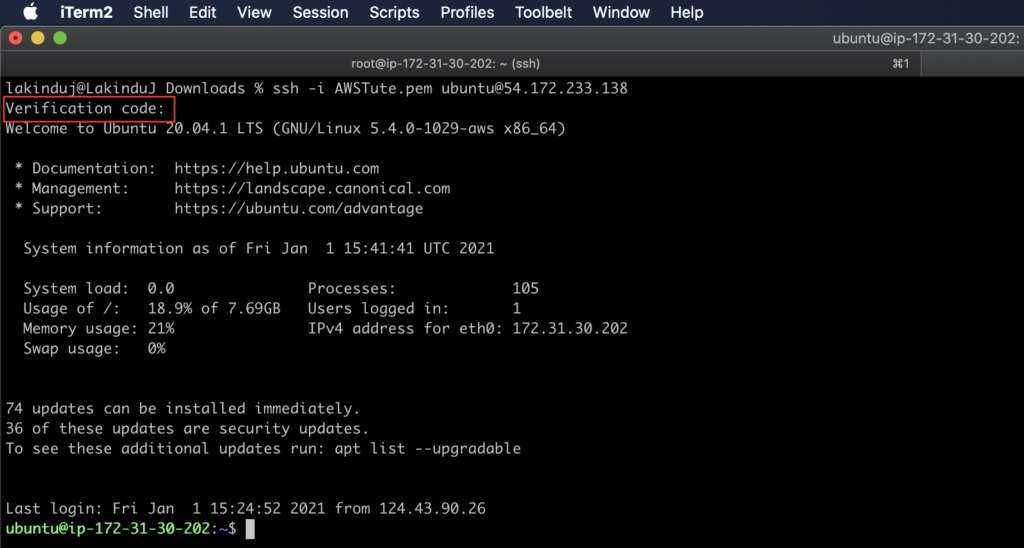
Congratulations, you’ve successfully added a second factor when logging in remotely to your server over SSH.
- If you lose your virtual MFA device, you can enter one of the emergency scratch codes instead of an OTP to complete the two-step verification. These codes are can use only one-time.
- If you want to change the secret key, re run the google-authenticator command inside the required user again to update the ~/.google_authenticator file.
- Since the OTP is computed using the shared secret key and the current time, it’s better to set up NTP time synchronization on your instance to keep accurate time.
MFA Troubleshooting when a Lockout
Disable MFA for a specific user
- Log in to the instance using the root user.
- Then remove/rename the
.google_authenticatordirectory in the required user’s home directory.
Disable MFA for all users
- Remove or comment on the “
AuthenticationMethods publickey,keyboard-interactive” line from the/etc/ssh/sshd_configfile.
sed -i "s:AuthenticationMethods publickey,keyboard-interactive:#AuthenticationMethods publickey,keyboard-interactive:g" /etc/ssh/sshd_config

systemctl restart sshd.service
Forcing MFA for New Users (optional)
If we want to enable MFA for new users during the initial login, we can initialize google-authenticator to configure MFA on their first login. By the following script, we can do it. (Note: Make sure the new user e configured with public key-based authentication.)
Switch to the root user and create a file enable_mfa.sh inside /etc/profile.d/ directory and paste the following script in it. This script will run automatically when a new user’s initial login.
if [ ! -e ~/.google_authenticator ]  &&  [ $USER != "root" ]; then
    google-authenticator --time-based --disallow-reuse --force --rate-limit=3 --rate-time=30 --window-size=3
    echo
    echo "Save the generated emergency scratch codes and use secret key or scan the QR code to register your device for multifactor authentication."
    echo
    echo "Login again using your ssh key pair and the generated One-Time Password on your registered device."
    echo
    logout
fi
Automating the above Setups with Configuration Management (optional)
Nowadays most system administrators are doing automation to simplify their tasks using configuration management tools like Puppet, Chef, Ansible, or any other tools. The following commands may use when you use such tools.
google-authenticator supports command-line switches to set all the options in a single, non-interactive command (Use --help for more options). This fully initialized authenticator saves it to a file and then outputs the secret key, QR code, and recovery codes.
google-authenticator -t -f -d -w 3 -e 10 -r 3 -R 30
The options are explained as follows:
- -t : Use TOTP verification
- -f : Write the configuration to
~/.google_authenticator - -d : Do not allow the reuse of previously used tokens.
- -w 3 : The windows size of allowed tokens. By default, tokens expire every 30 seconds. A window size of 3 allows authentication with the token before and after the current token for clock skew.
- -e 10 : Generate 10 emergency backup codes
- -r 3 -R 30 : Rate-limit. Allow 3 logins every 30 seconds.
The following single commands do the changes in /etc/ssh/sshd_config and /etc/pam.d/sshd files.
# Apply changes to sshd to enable the authenticator.

sed -i "s:ChallengeResponseAuthentication no:ChallengeResponseAuthentication yes:g" /etc/ssh/sshd_config

# REQUIRED to allow public-key auth while using google authenticator.

echo "AuthenticationMethods   publickey,keyboard-interactive" >> /etc/ssh/sshd_config

# Comment out the following line ONLY if you're not using password-based auth for ssh and you want to use google the authenticator with public-key authentication.

sed -i "s:@include common-auth:#@include common-auth:g" /etc/pam.d/sshd

#Enable MFA for sudo access

echo "auth required pam_google_authenticator.so nullok" >> /etc/pam.d/common-auth