
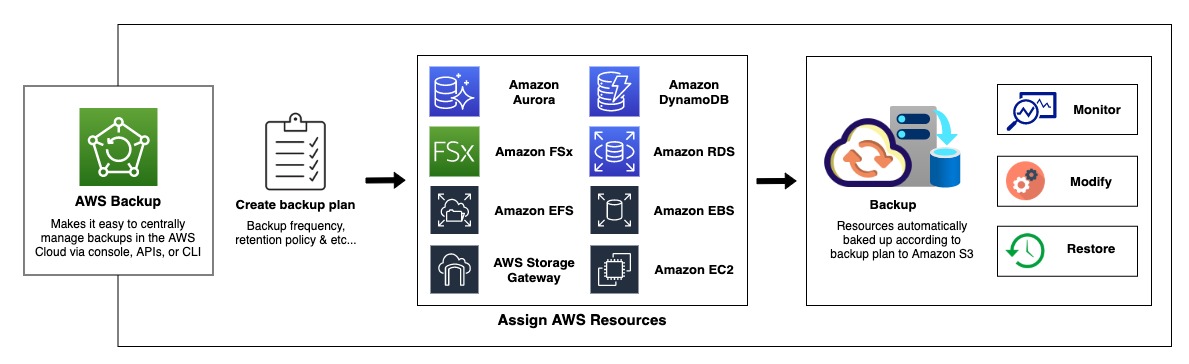
AWS Backup is a fully managed cloud service that makes system engineers’ life easy by centrally managing and automating data backups across AWS services as well as an on-premises data center. This cloud service gives you full control to configure backup policies/plans and monitor backup activities for AWS resources like Amazon EBS, EC2, RDS, DynamoDB, EFS, and AWS Storage Gateway volumes. AWS Backup automates your regular backup tasks by removing custom scripts and manual processes.
From the AWS Backup console, you can create backup policies that automate backup schedules and retention management in just a few clicks. AWS Backup simplifies your backup management and enables you to meet your business and regulatory backup compliance requirements.
AWS Backup Features and Capabilities
- Centralized backup management
- Policy-based backup
- Tag-based backup policies
- Lifecycle management policies
- Cross-Region backup
- Cross-account management and cross-account backup
- Backup activity monitoring
- Secure your data
- Satisfy compliance obligations
More details: https://docs.aws.amazon.com/aws-backup/latest/devguide/whatisbackup.html
Basic Overview of How it Works
Getting started with AWS Backup
This article shows you the step-by-step approach to configure AWS Backup to backup & restore EC2 instances and get backup/restore job status notifications via Email.
Prerequisites
Before you begin, ensure that you have the following:
- An AWS account and IAM user with EC2, AWS Backup, and Amazon SNS full access.
- Pre-deployed EC2 instance to test AWS Backup.
Step 1: Create a backup plan
A backup plan is a set of instructions that defines how you want to back up your AWS resources on the scheduled backup window. You can assign AWS resources to the backup plan, and it will automatically back up and keep backups for assigned resources according to the retention time mentioned in the backup plan.
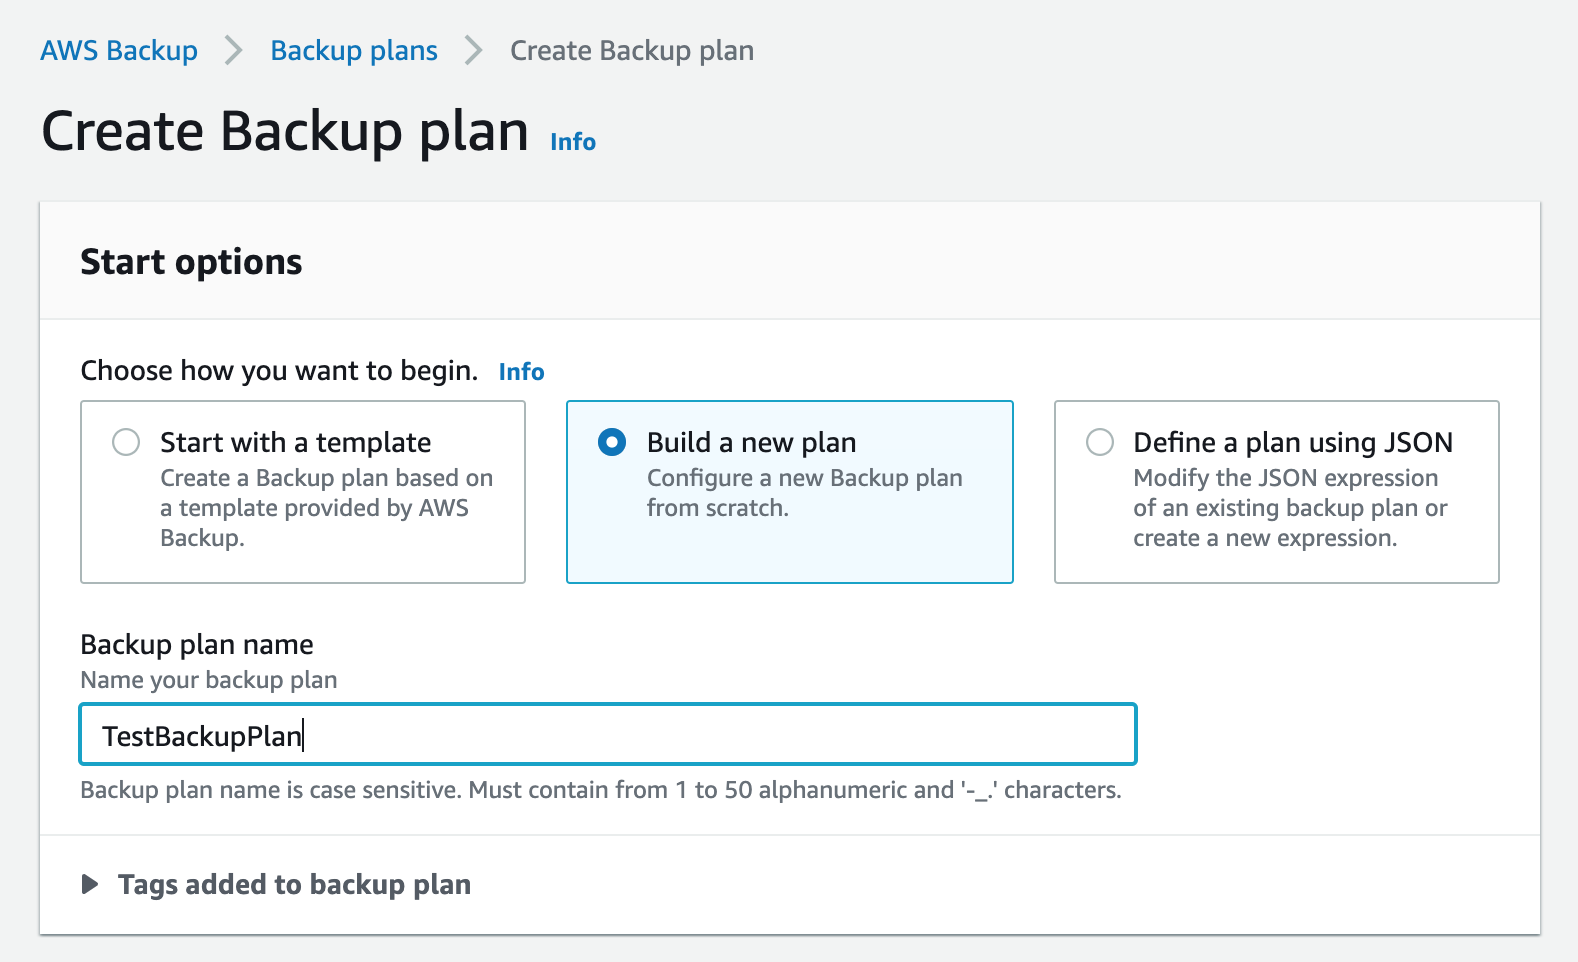
Mainly there are two ways to create a new backup plan: You can create one from the beginning or build one using a pre-defined template. In this example, I’m using the AWS Backup console to create a backup plan by creating a new plan.
Sign in to the AWS Management Console, open the AWS Backup console at the AWS Backup console, and click Backup Plans from the left menu.
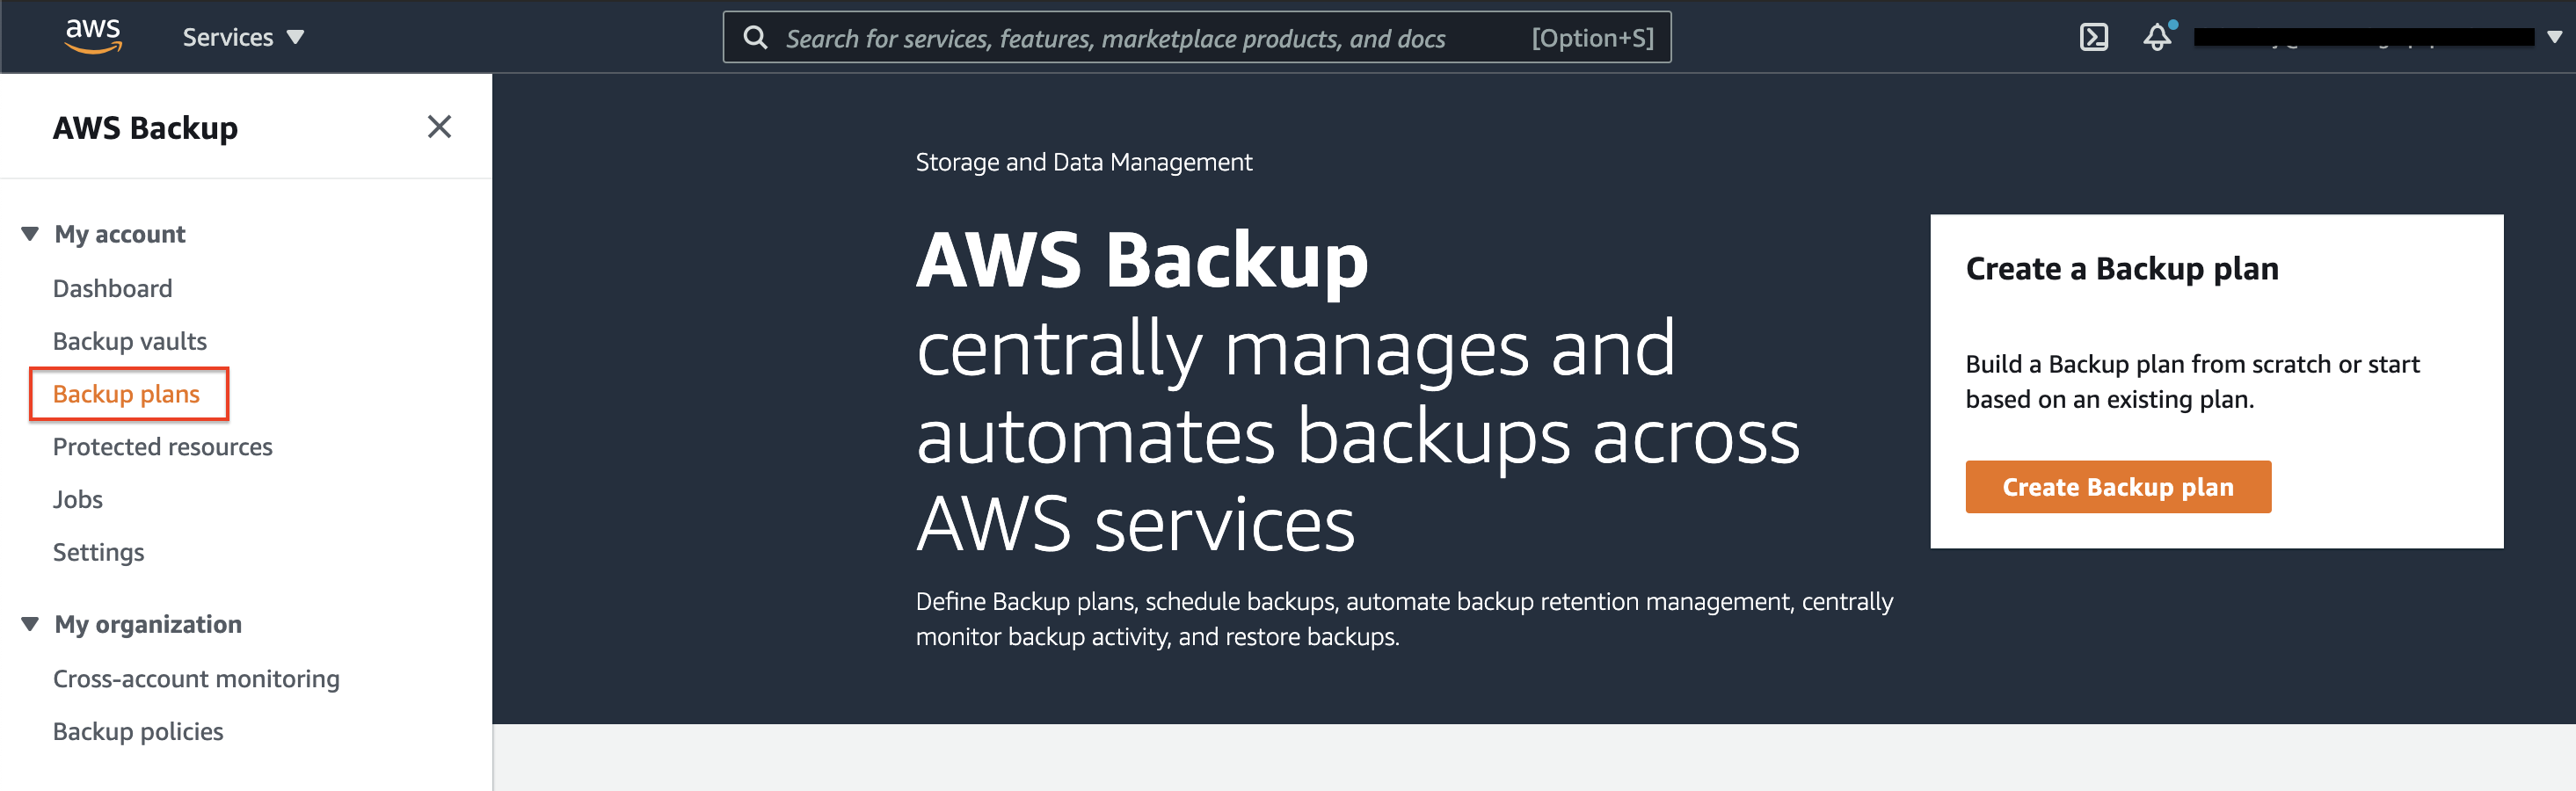
In the Backup plan window, choose to Create Backup plan.
Now select Build a new plan and give the backup plan name in the Start options section.
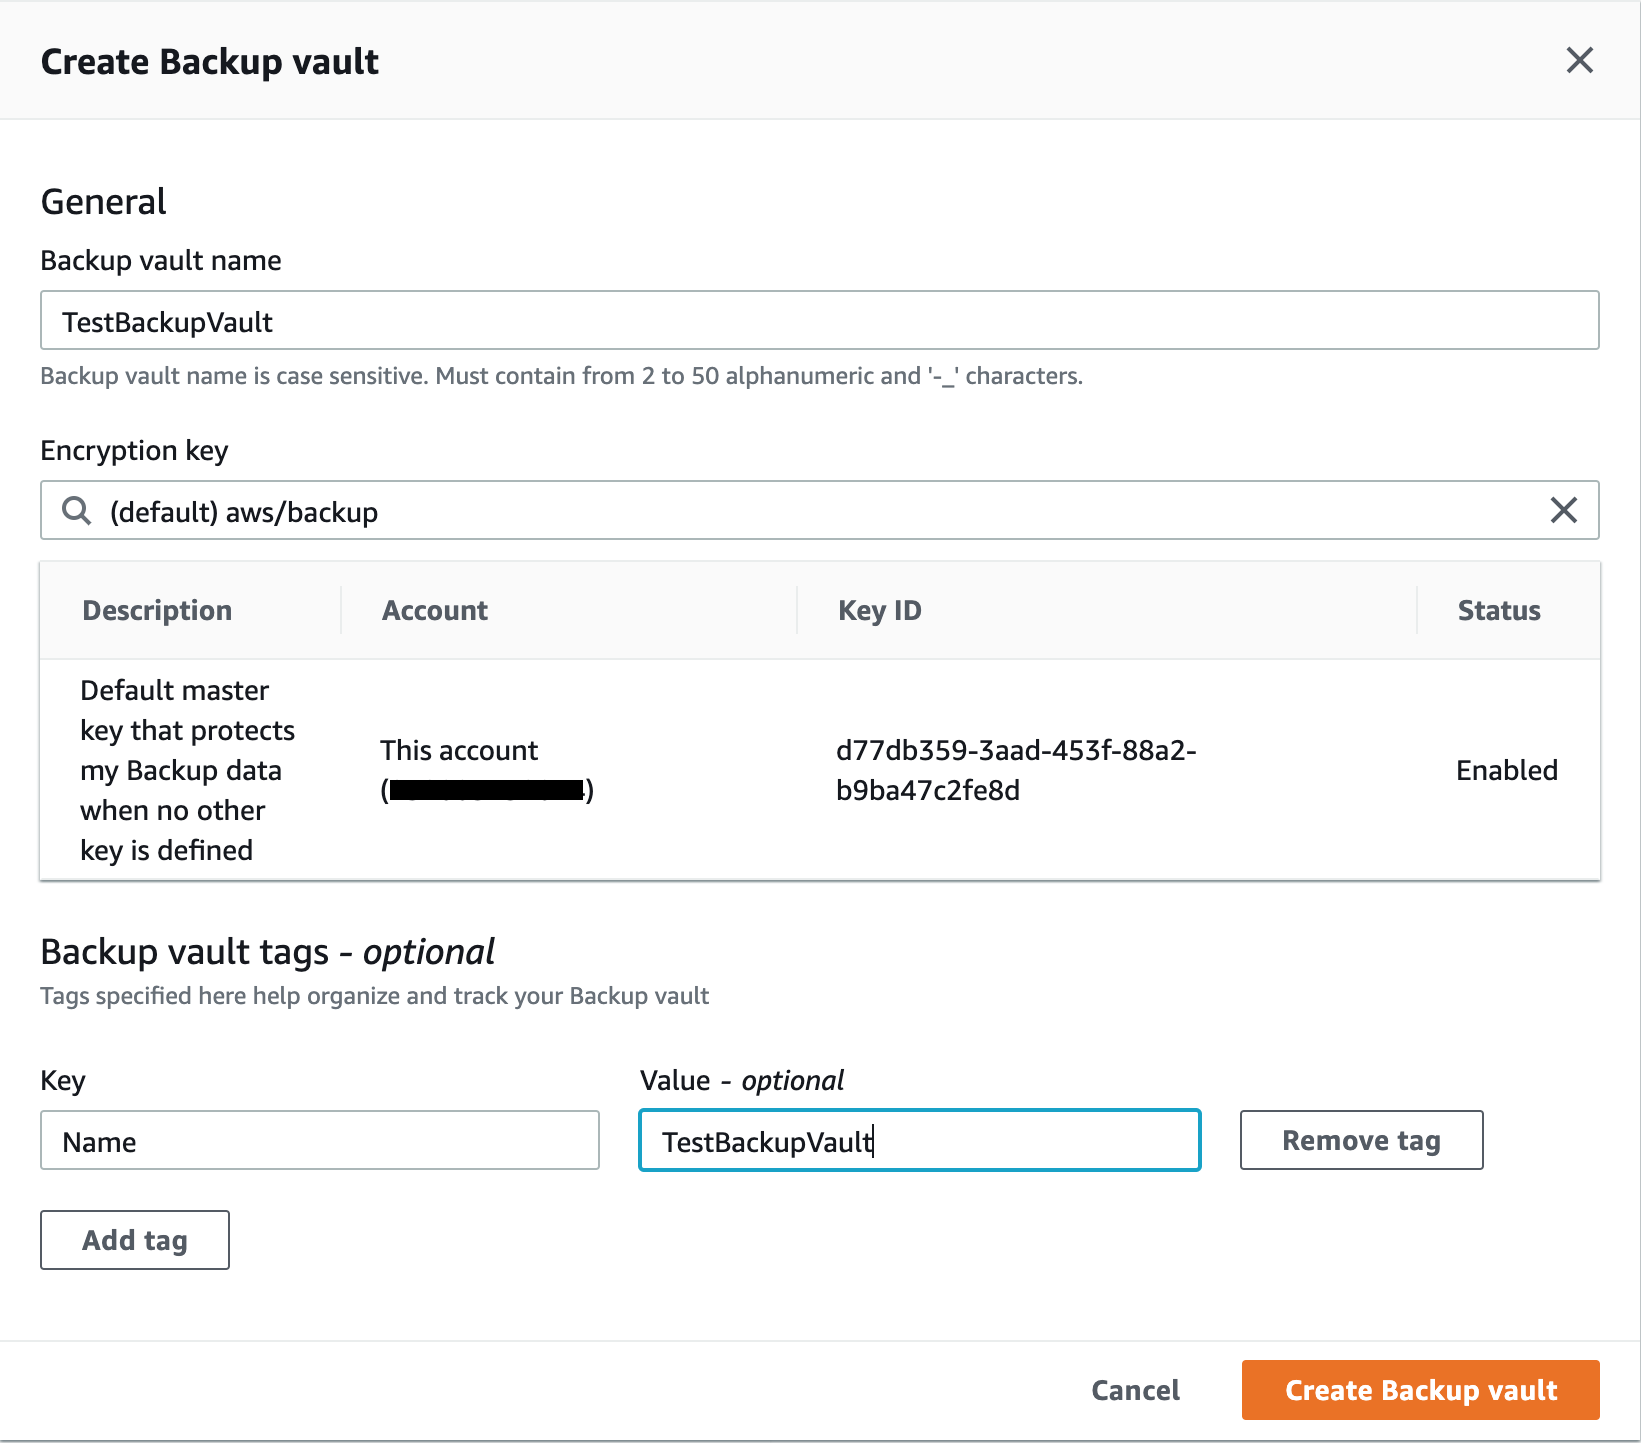
Step 2: Create a backup vault
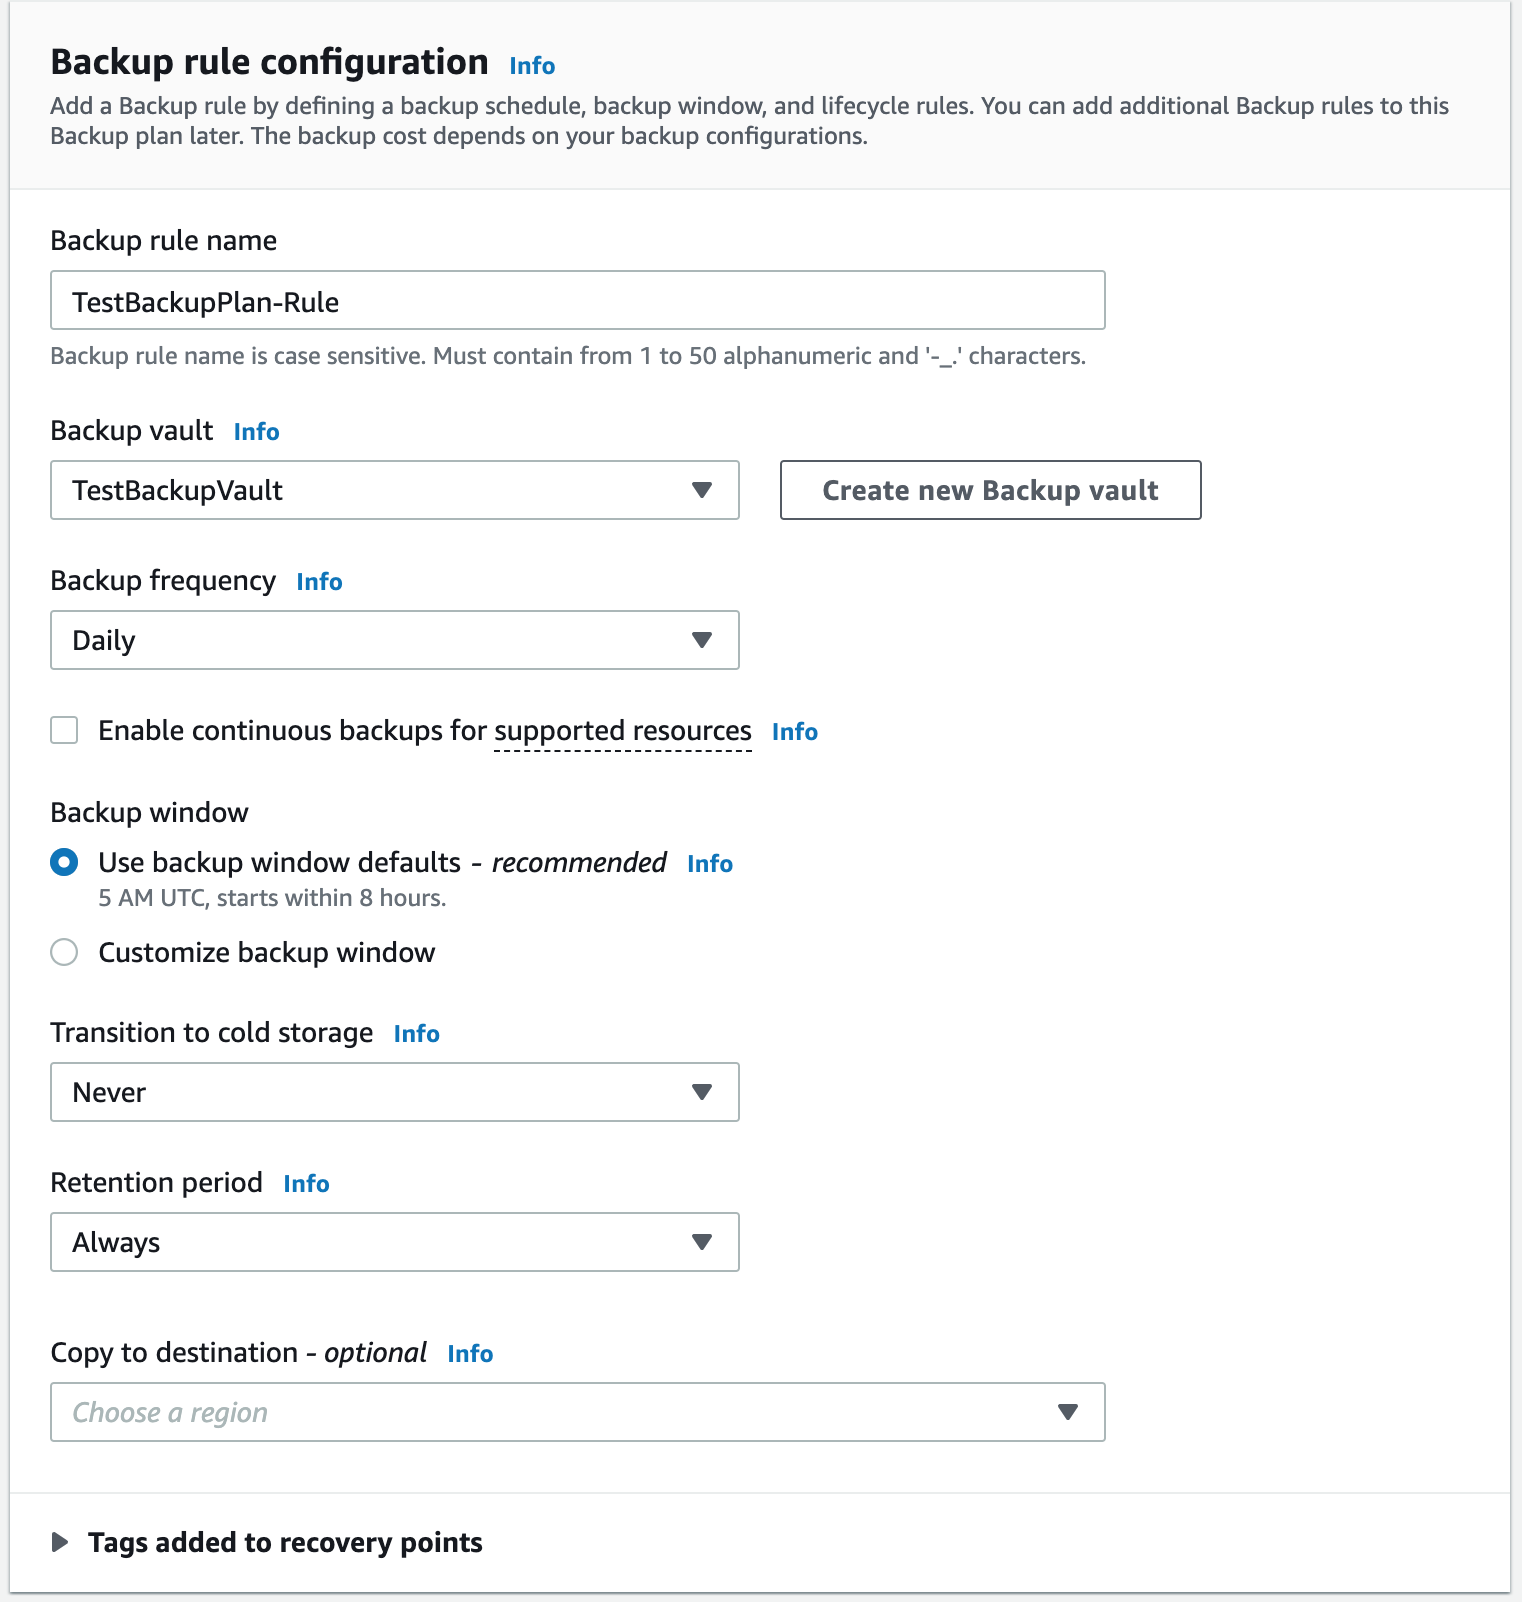
Instead of using the default backup vault better to create specific backup vaults to save and organize groups of backups in the same vault.
Backup rule configuration section, give the backup rule name and click Create new Backup vault if you don’t have any pre-configured backup vault.
Fill in required details like backup frequency, backup window and etc… in the Backup rule configuration section according to the following screenshot. Then click Create plan.
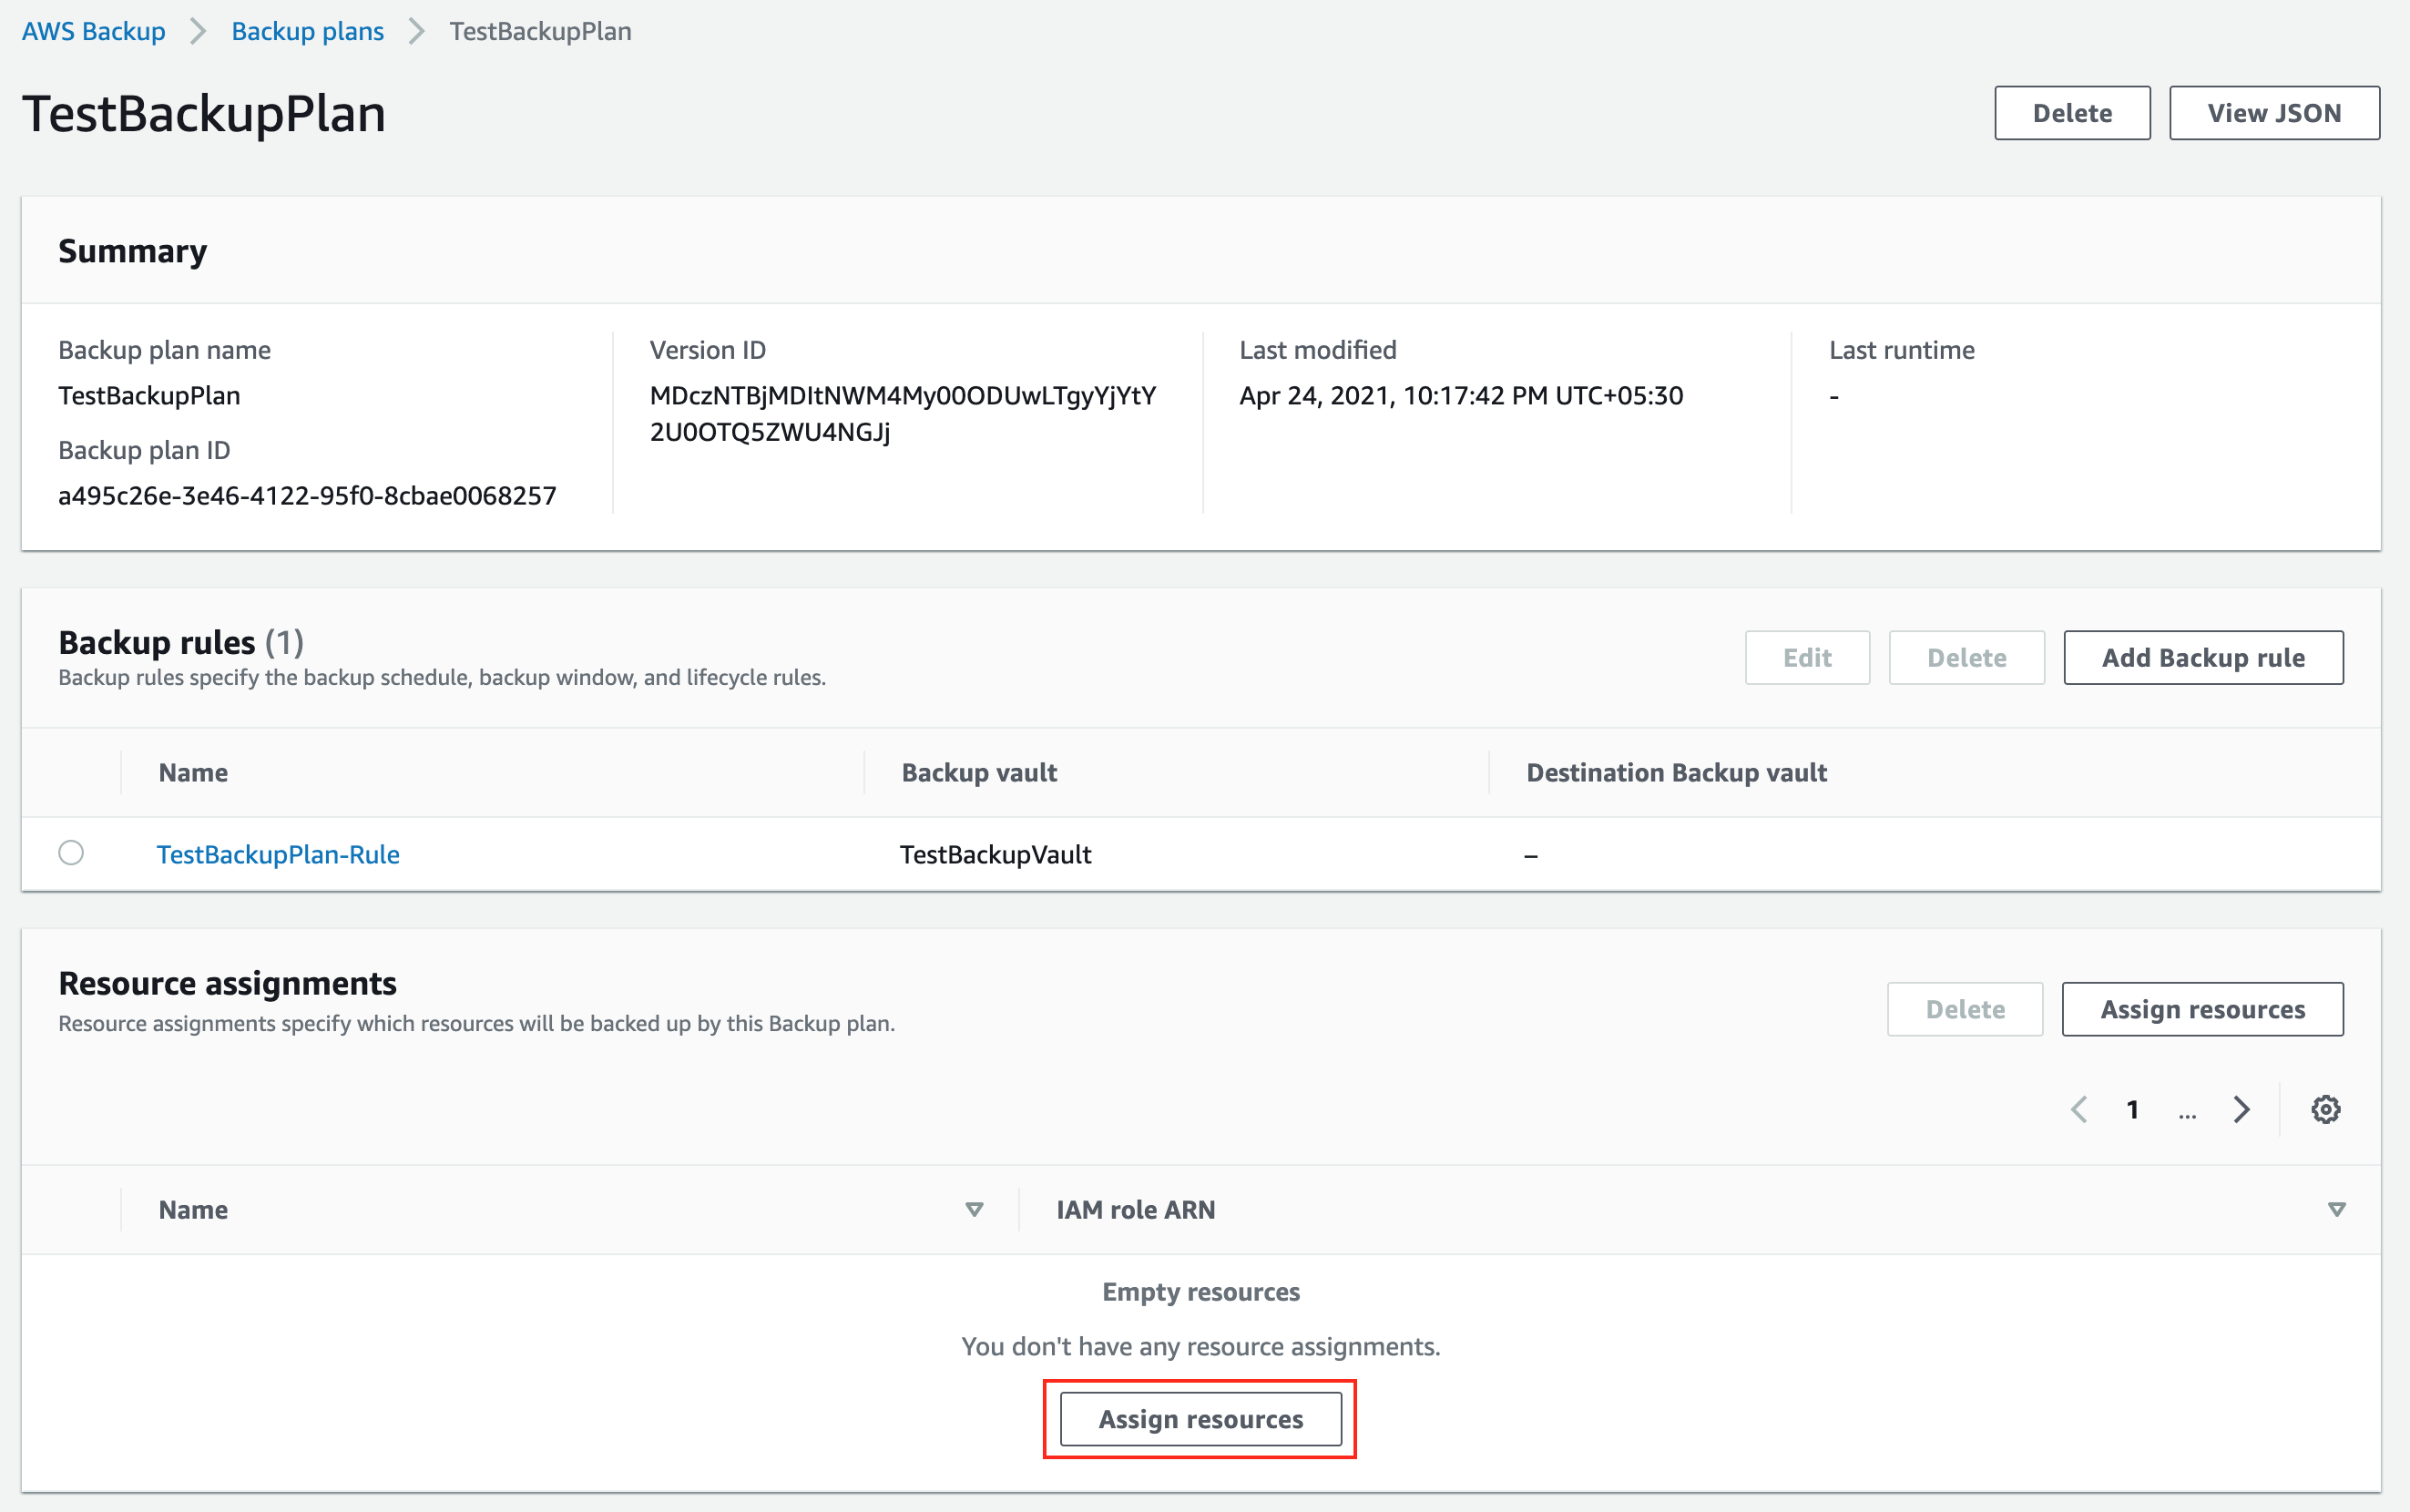
Step 3: Assign resources to a backup plan
Once you create the backup plan, it is time to assign resources to it. Click on the created backup plan and click Assign resources from the Resource assignments section.
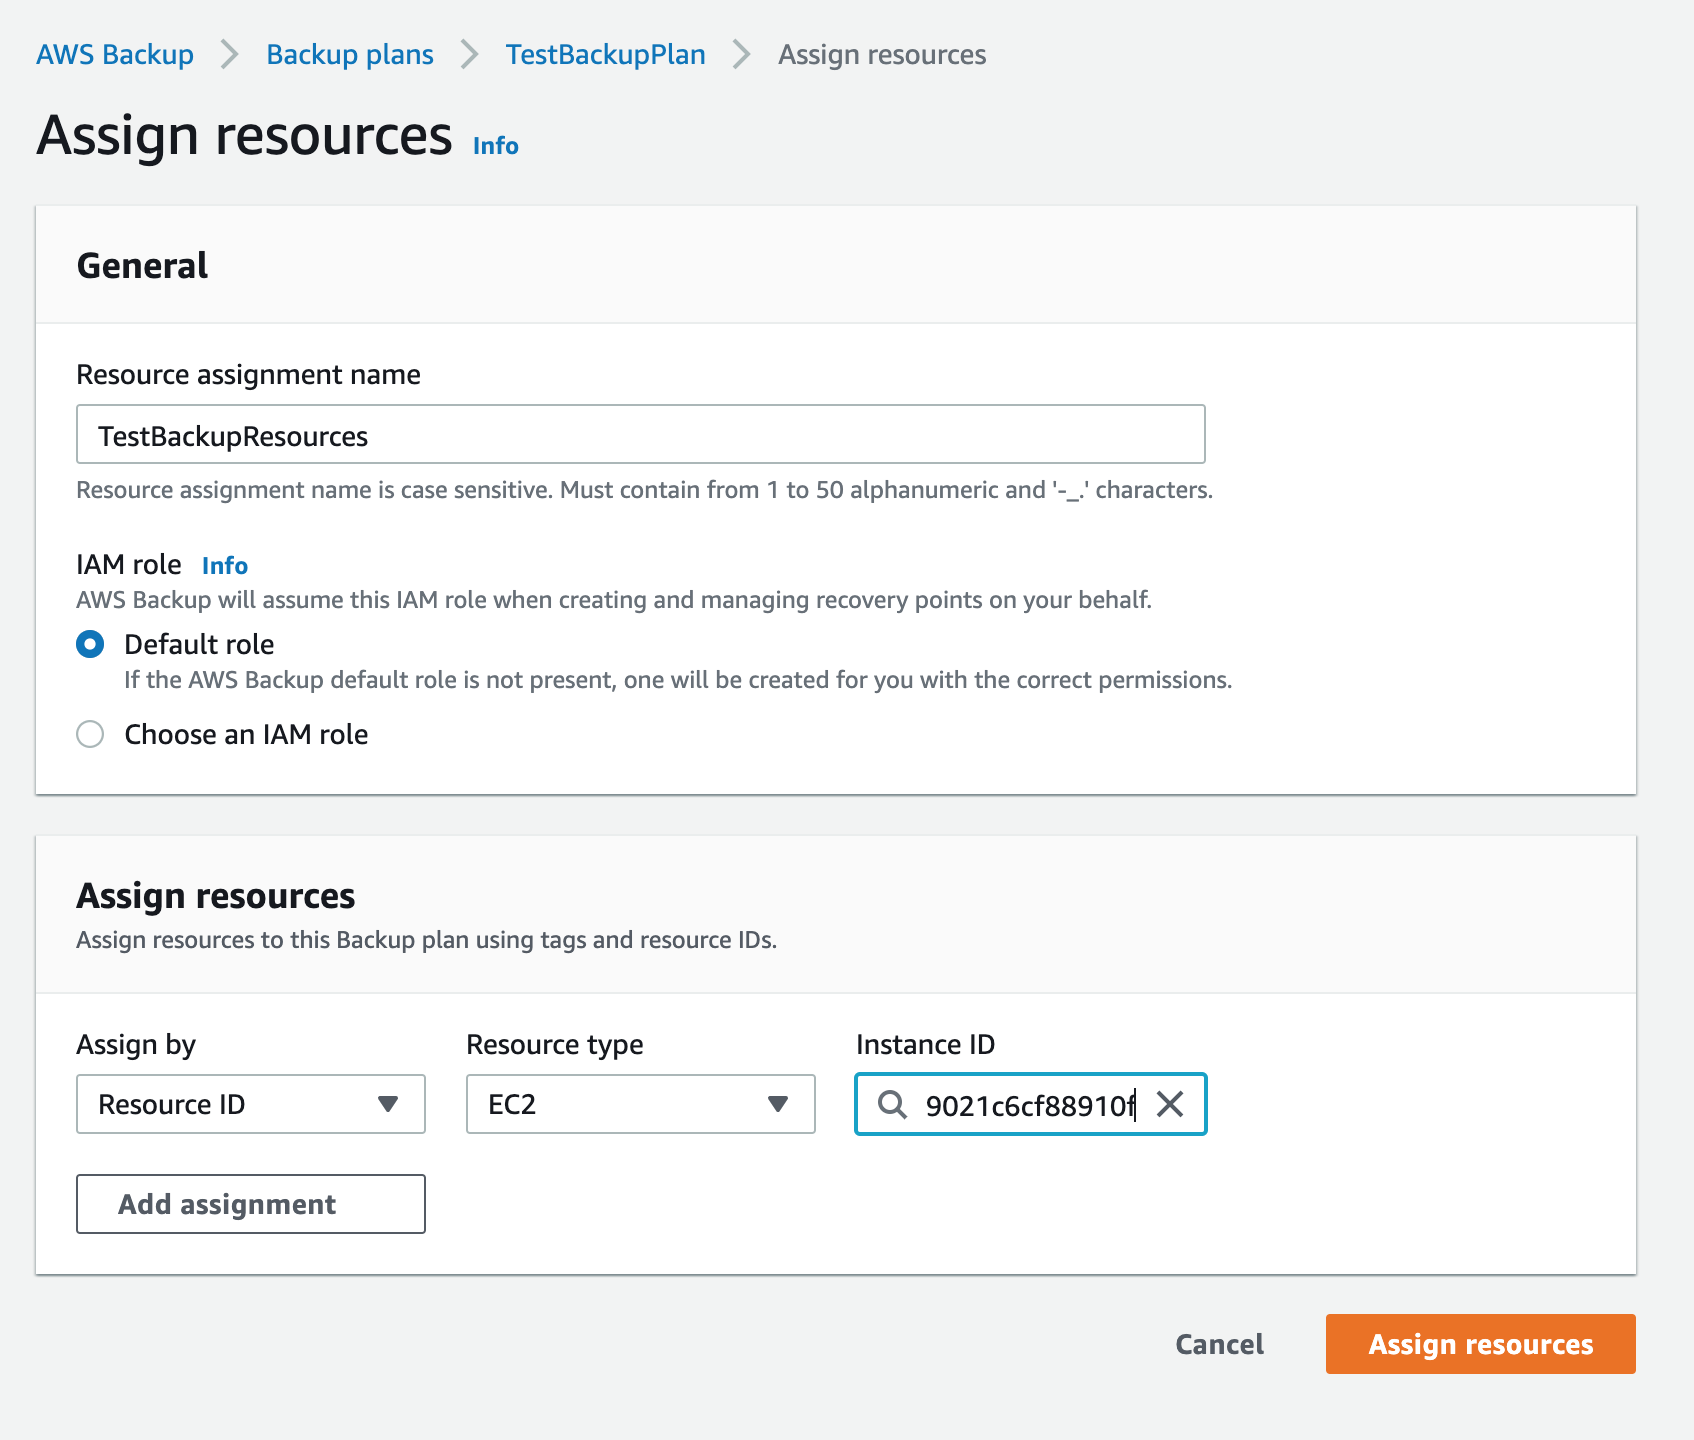
There are two ways to assign resources to the backup plan such as by using tags or listing the resource IDs directly. If you are planning to protect more than 100 resources in a plan, AWS recommends using tag-based management. But in this case, I’m using the resource ID of my previously created EC2 instance.
Up to this point, your backup plan is ready and it will automatically start the backup jobs based on the backup frequency and window you configured in the backup plan. But how can I get notifications for AWS Backup jobs that are successful or a failure?
Let’s Enable Email Notifications on AWS Backup
AWS Backup provides an automated way to receive notifications based on the status of their backup, restore, and recovery point jobs. Administrators can use Amazon SNS notifications to monitor their backups, this functionality will allow admins to filter for certain job status types, such as failed backup jobs.
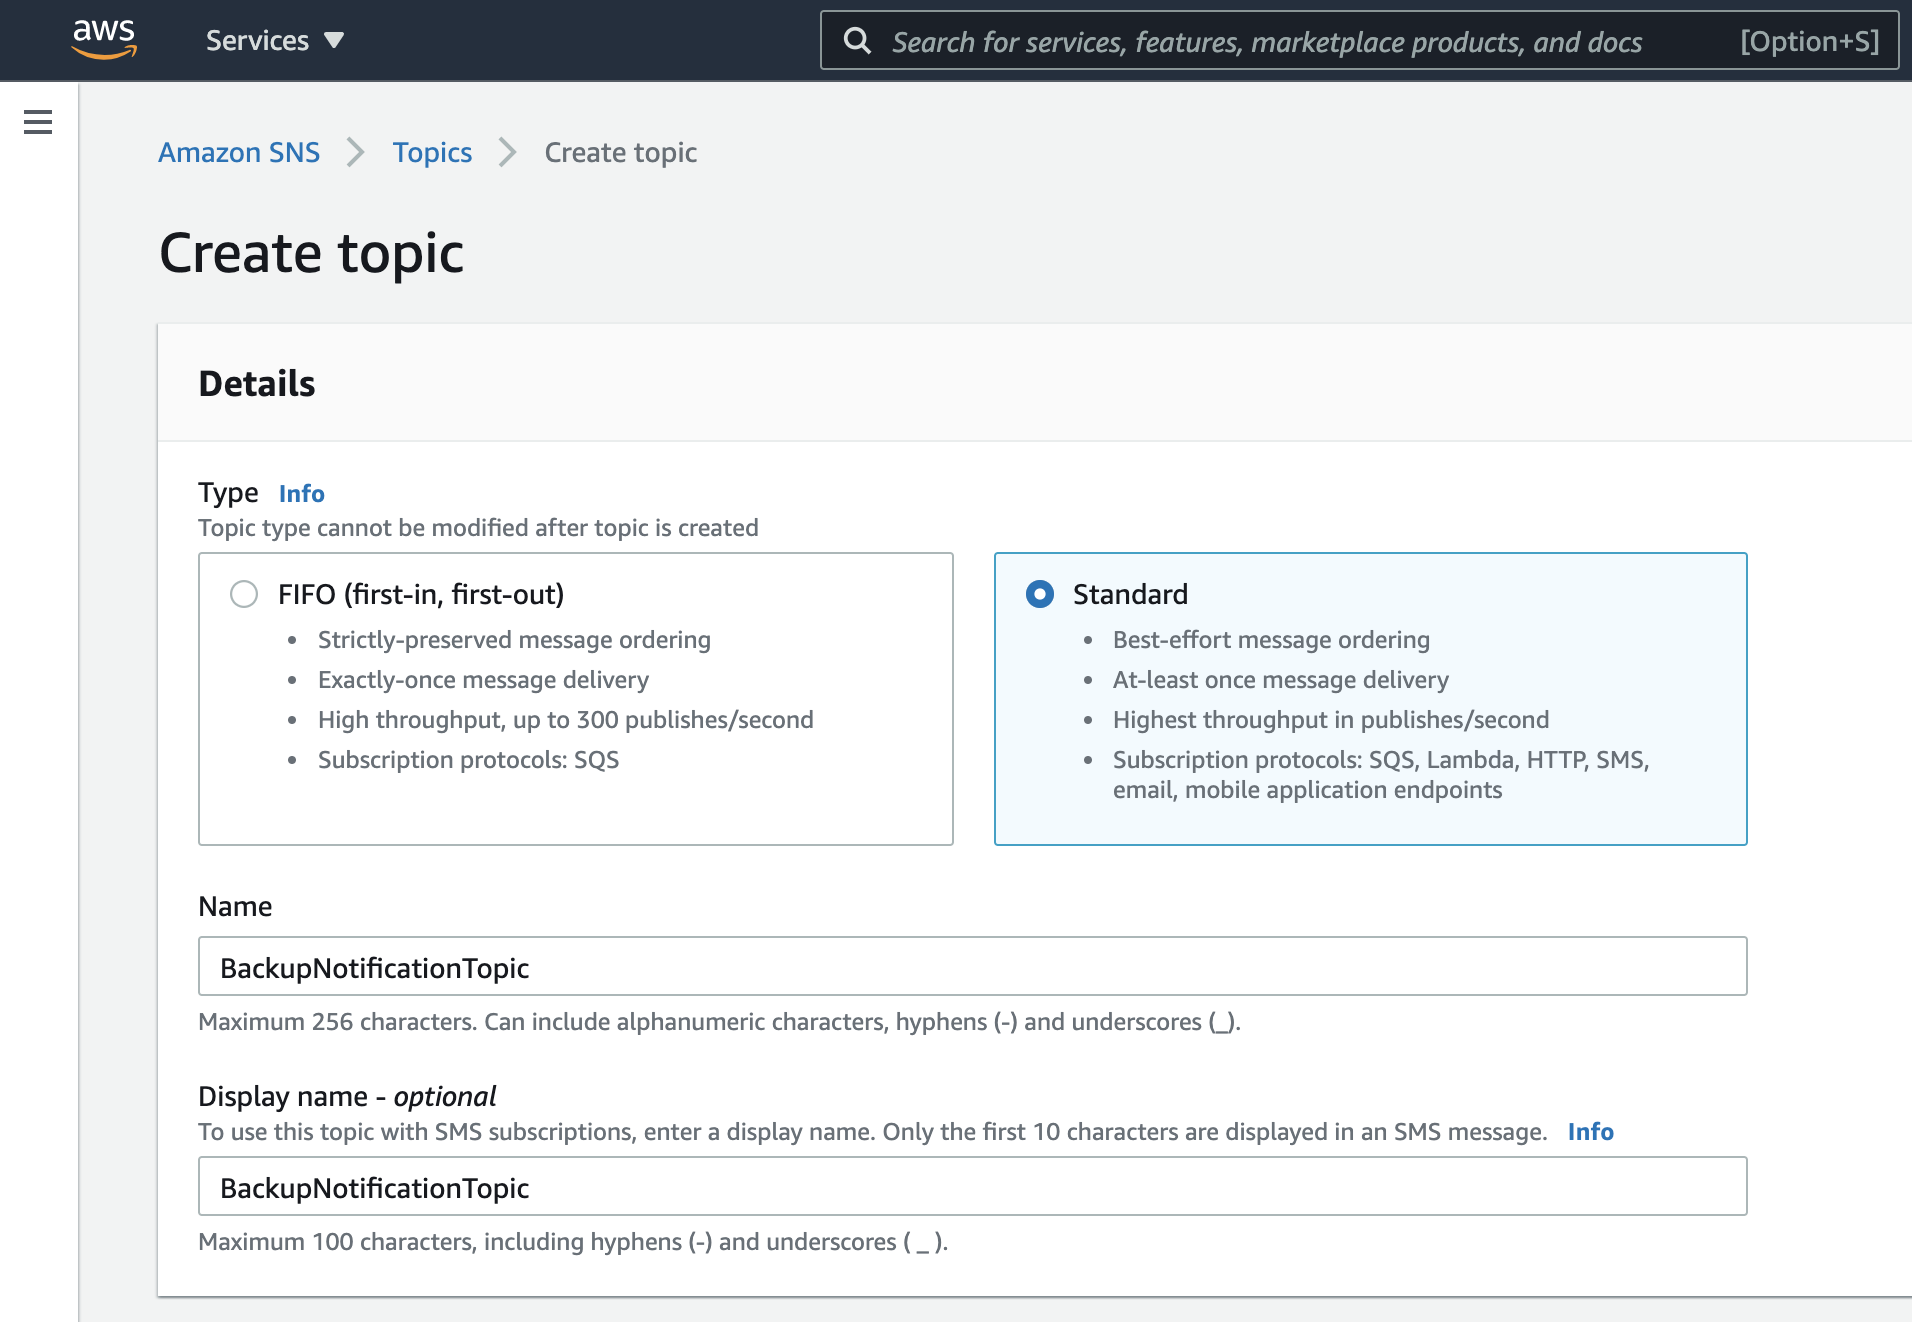
Step 1: Create an Amazon SNS topic
Open the Amazon SNS console, choose Topics from the left navigation pane, and click Create topic.
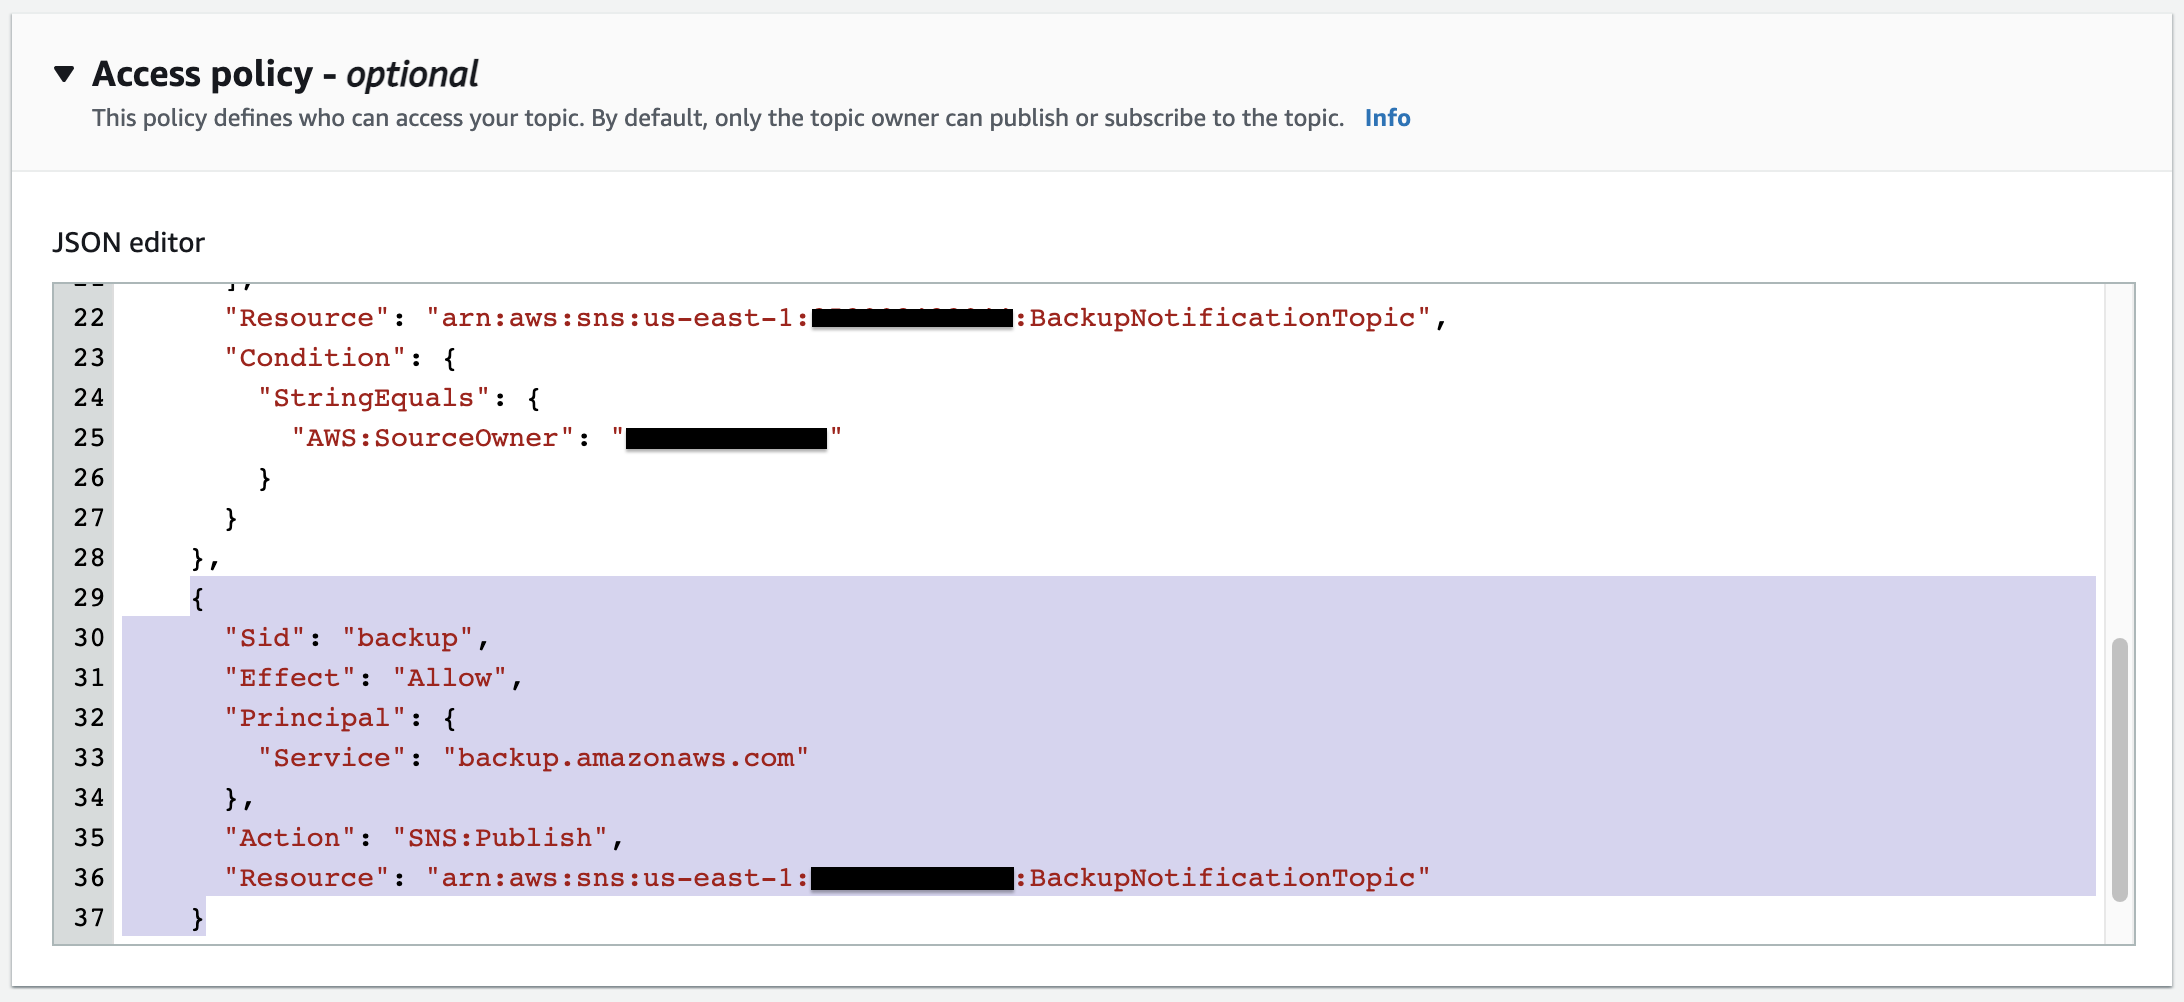
Go to the details of the topic that you just created and copy the ARN of the topic. Then click Edit to modify the Access policy and append the below permission policy. That gives AWS Backup to publish messages to the SNS topic.
Note: Replace the value for Resource with the ARN that you copied above.
{
      "Sid": "backup",
      "Effect": "Allow",
      "Principal": {
        "Service": "backup.amazonaws.com"
      },
      "Action": "SNS:Publish",
      "Resource": "Paste copied SNS topic ARN here"
}
Step 2: Add Subscriptions to SNS Topic
In this post, I’m not filtering out any notifications and I need to get all notifications via email. Therefore you need to subscribe to your email to the created SNS Topic.
Go inside to create an SNS Topic and click Create Subscription.
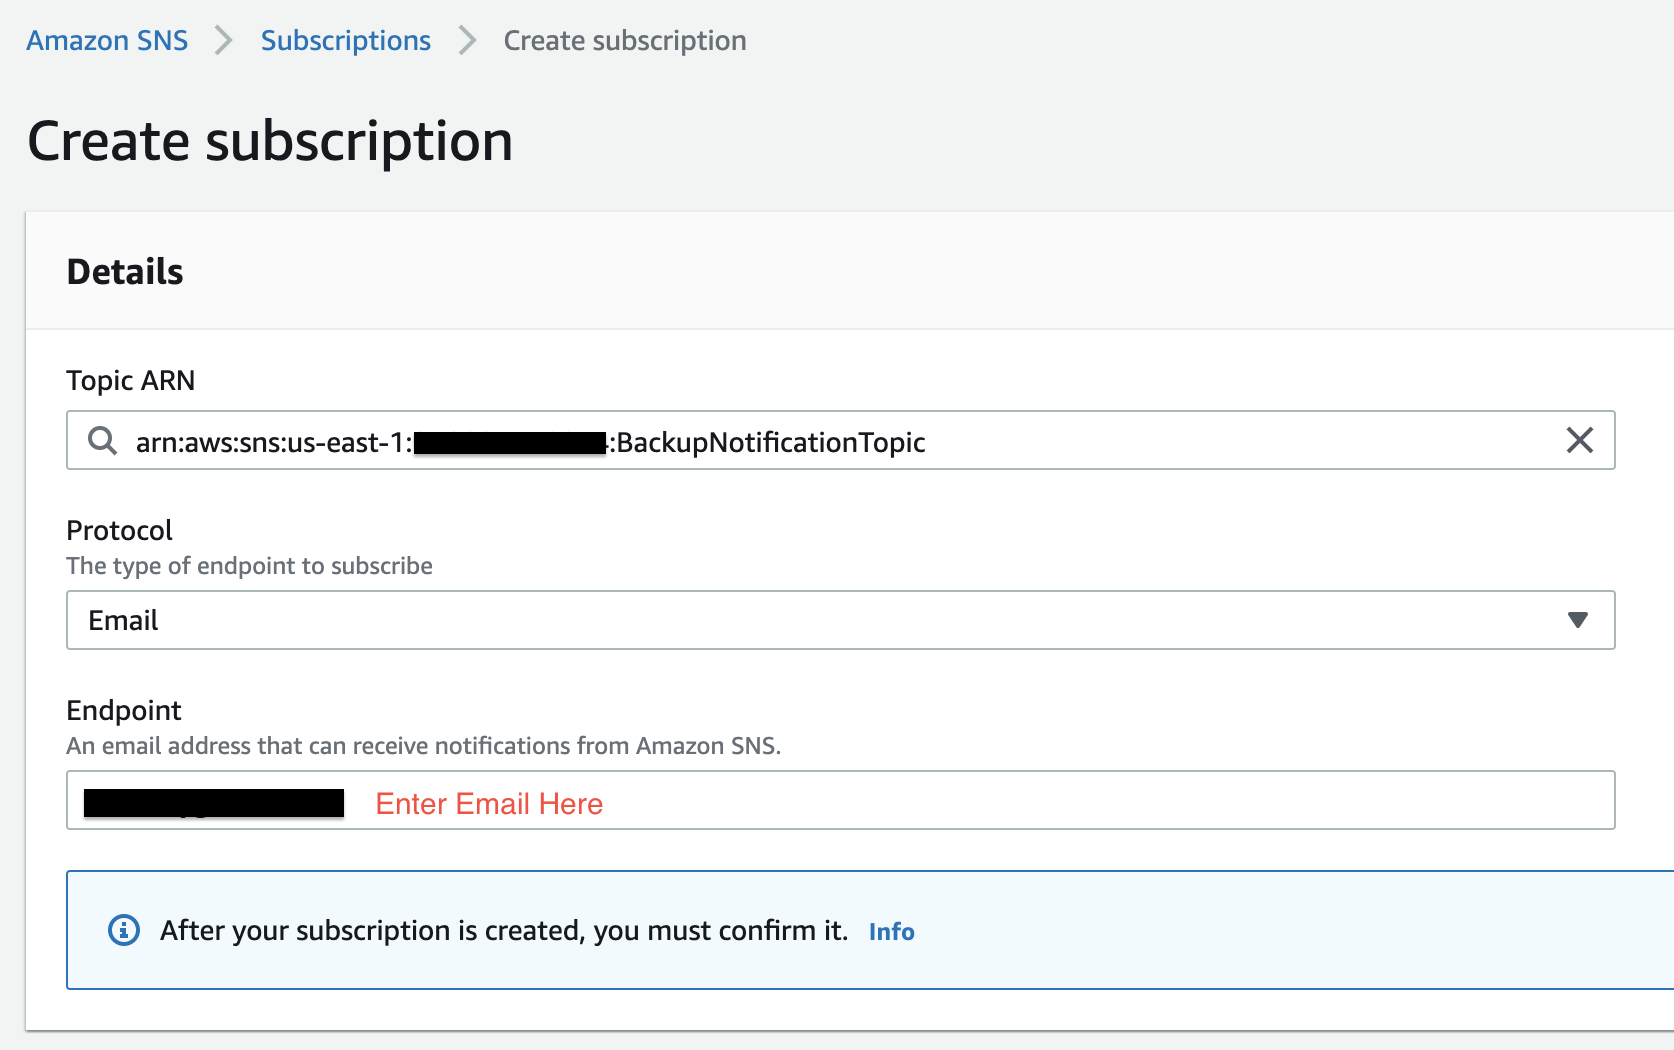
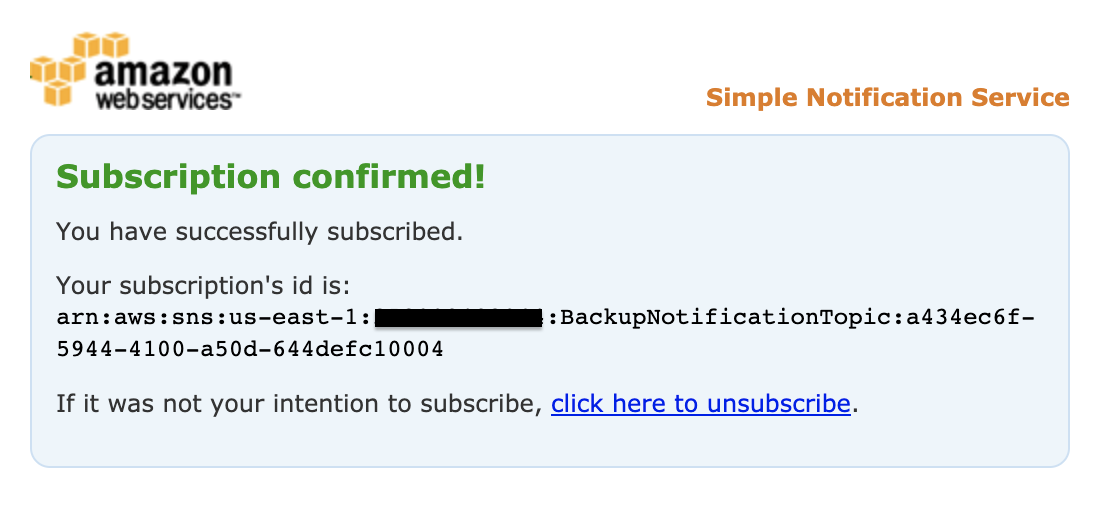
Once it is done, you will get an email for confirmation. Click the Confirm subscription link on email to confirm it.
Step 3: Configure the backup vault to send notifications to the SNS topic
Once you create your topics using the Amazon SNS console, you have to use the following AWS Backup Notification API operations to manage your backup notifications.
- get-backup-vault-notifications — Lists all event notifications for the specified backup vault.
- put-backup-vault-notifications — Turns on notifications for the specified topic and events.
Backup/Restore Job Events
In this example, I’m going to use only the following backup/restore notification events. But you can find more notification events from this link that can be customized according to your requirements.
BACKUP_JOB_COMPLETEDRESTORE_JOB_COMPLETED
Configuring backup notifications for a backup vault cannot be done by the AWS console. Therefore first we need to set up AWS CLI on any Linux machine with an IAM user who has required permission to administer AWS Backup.
- Install and configure the AWS Command Line Interface (AWS CLI).
- Using the AWS CLI, run the put-backup-vault-notifications command by replacing the following values in the command:
- –backup-vault-name: Name of your backup vault.
- –backup-vault-events: One or more above-mentioned events.
- –sns-topic-arn: The ARN of the SNS topic that you created.
aws backup put-backup-vault-notifications --region us-east-1 --backup-vault-name TestbackupVault --backup-vault-events BACKUP_JOB_COMPLETED RESTORE_JOB_COMPLETED --sns-topic-arn <YOUR SNS TOPIC ARN>
Run the get-backup-vault-notifications command to confirm that notifications are configured:
aws backup get-backup-vault-notifications --backup-vault-name TestbackupVault --region us-east-1

Testing Backup/Restore Notifications
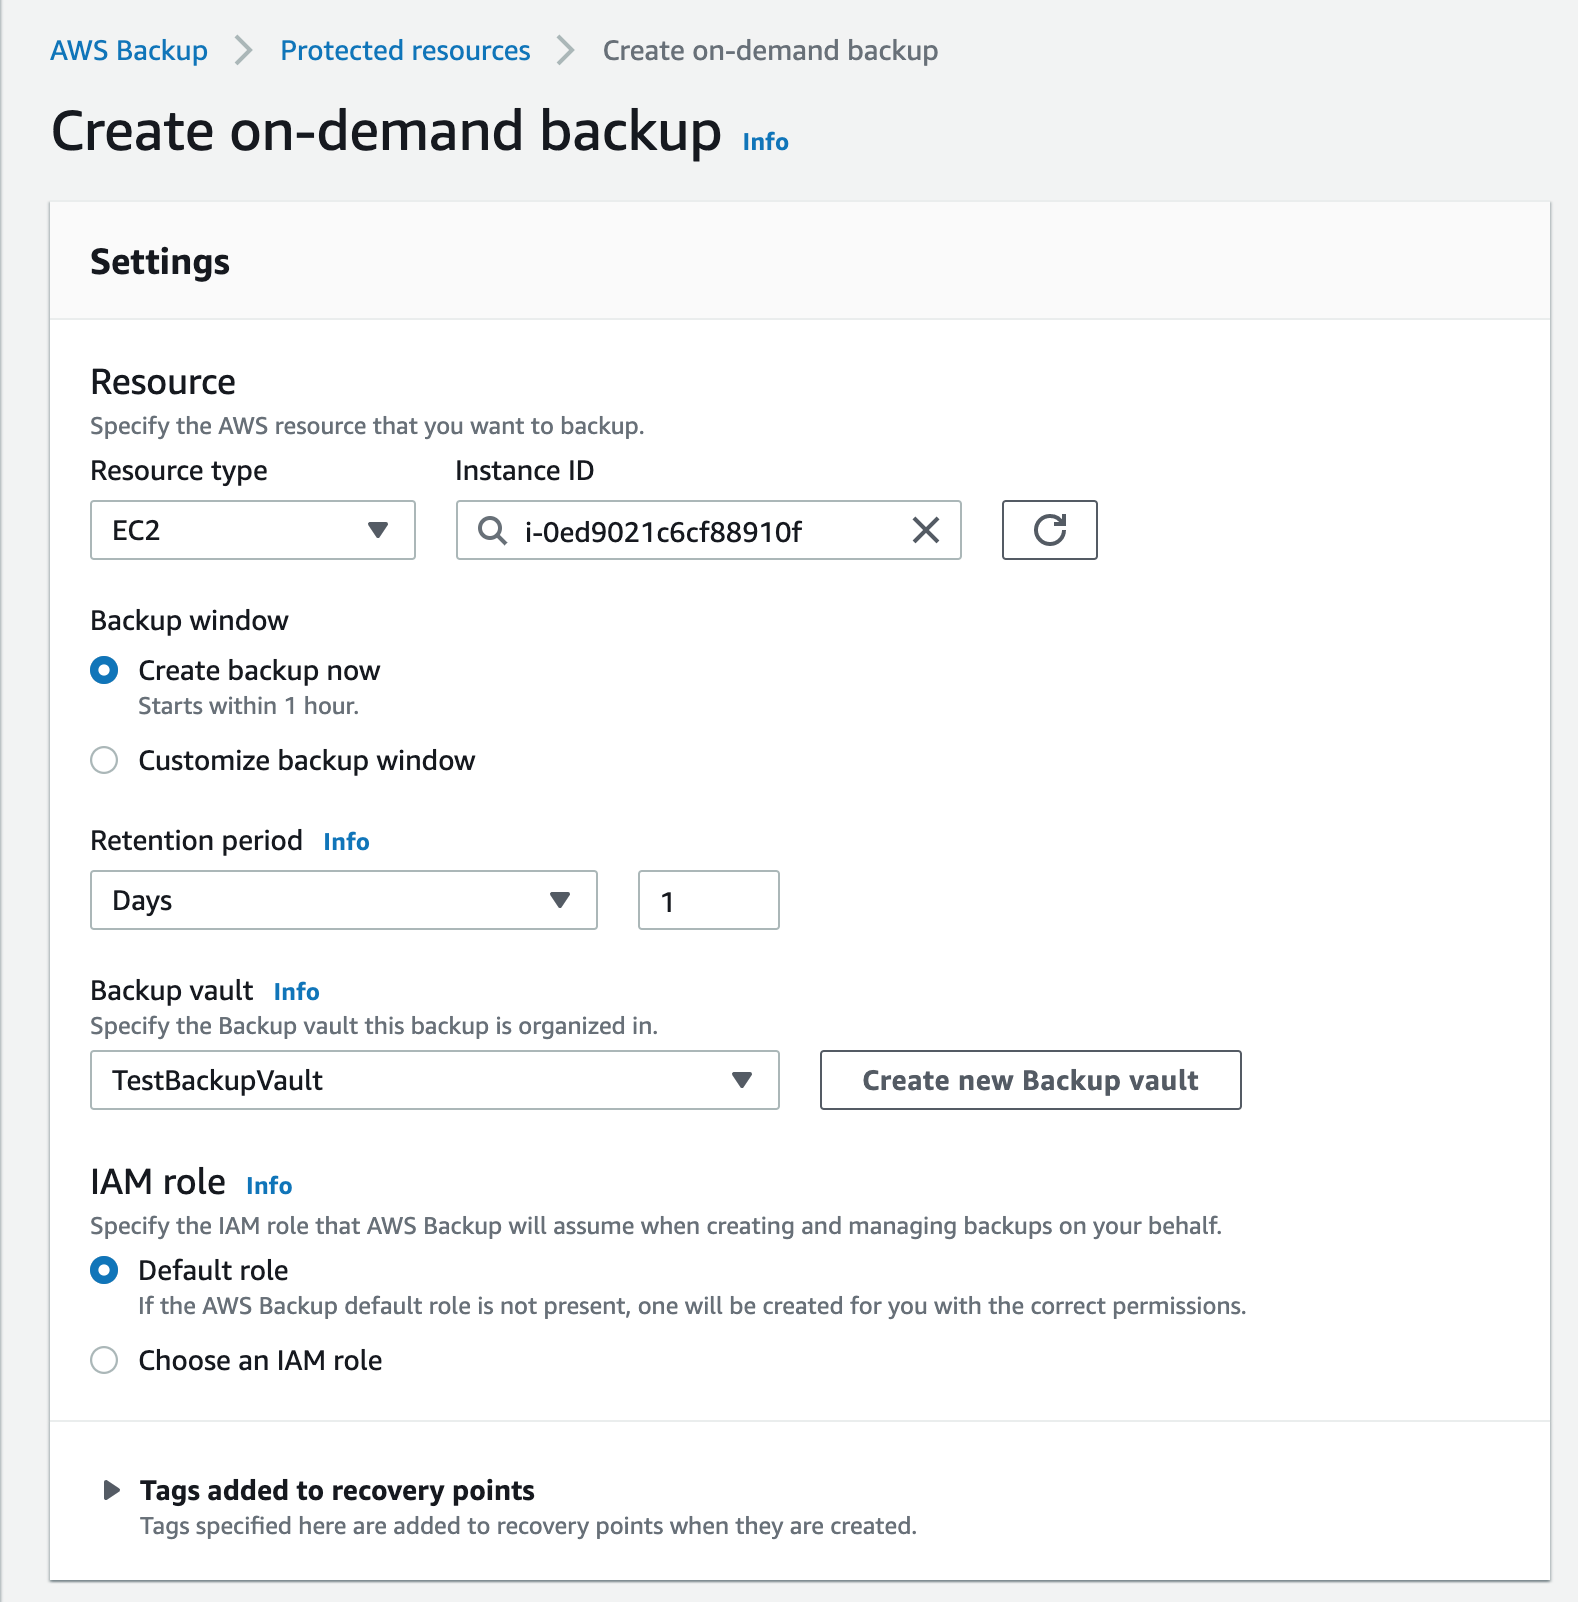
For testing, I’m going to create an on-demand backup to see if the backup is successful and getting notifications as configured.
From the AWS Backup console dashboard, click on Create an on-demand backup.
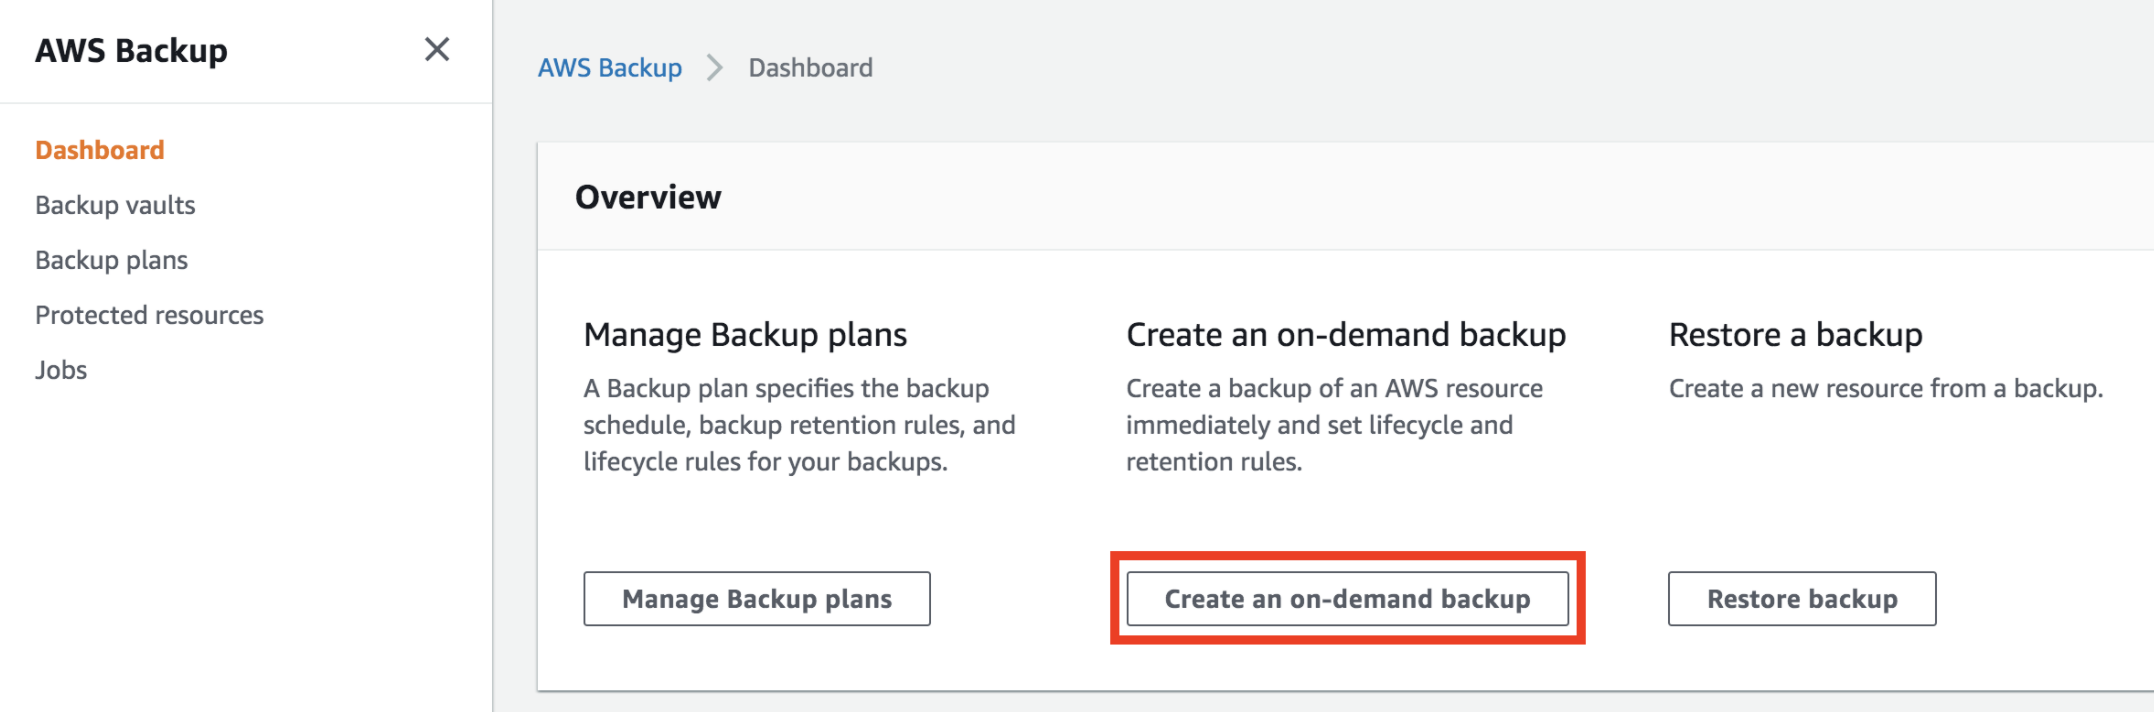
Then fill in the details according to the following screenshot and click on the Create on-demand backup.
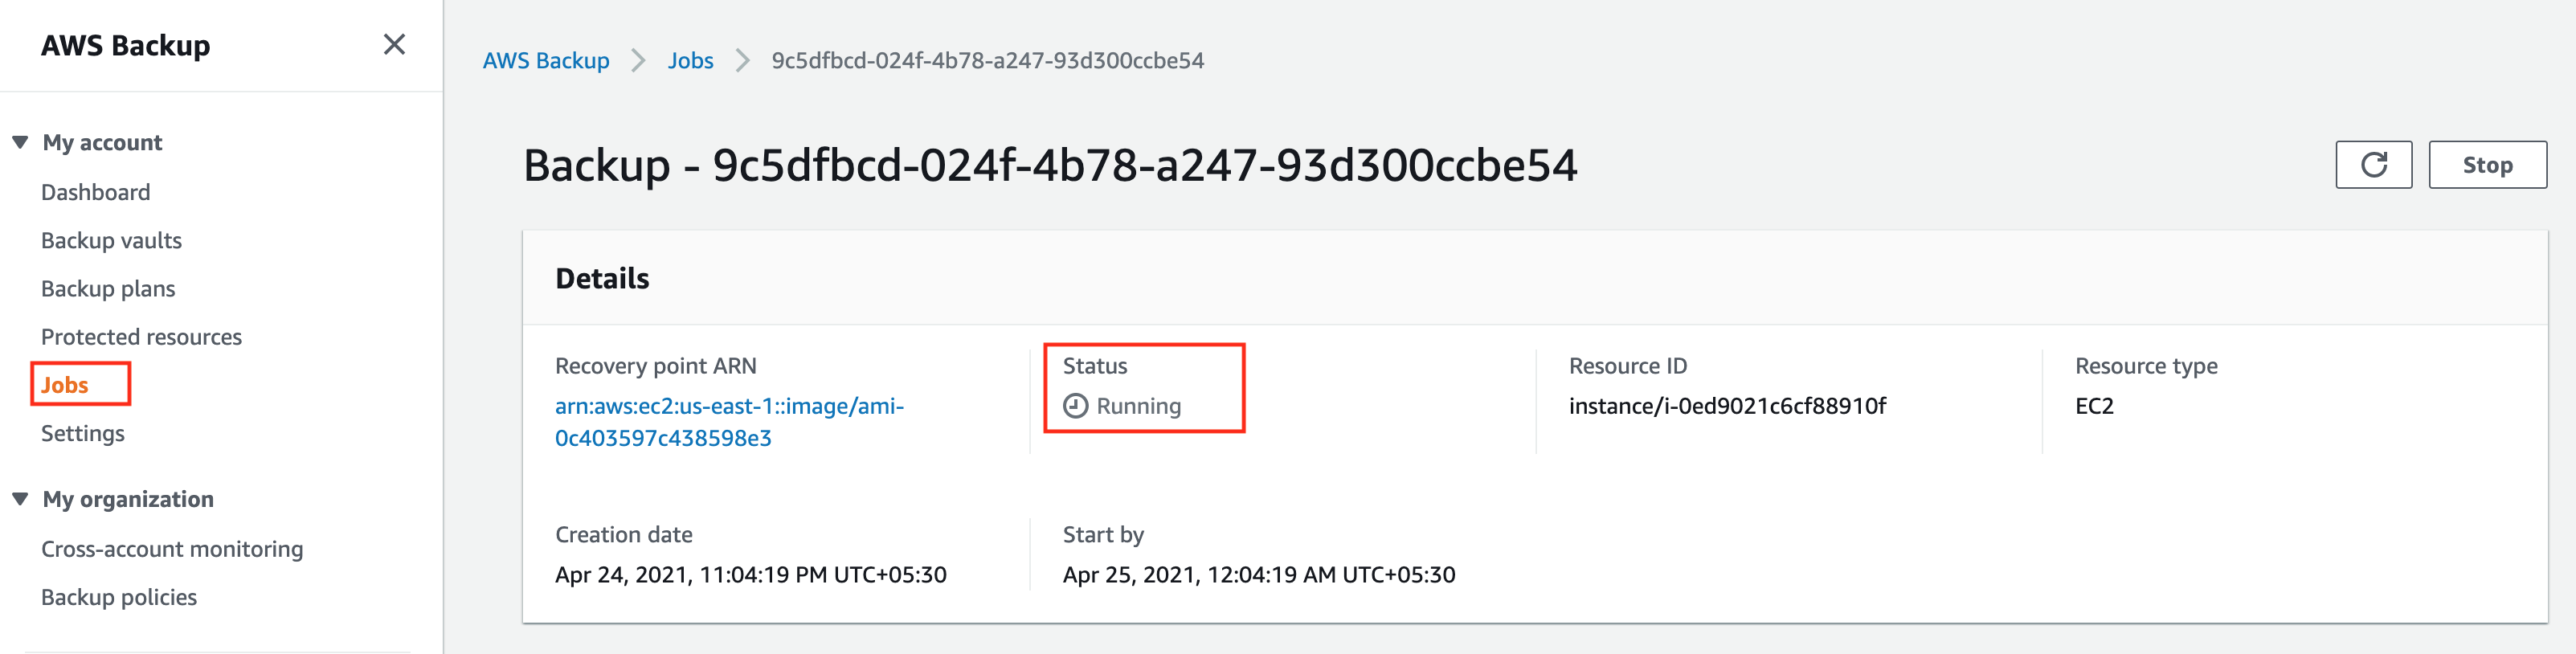
Now click on Jobs from the menu on the left and select Backup jobs. You should see a new backup job started with the status of Running.
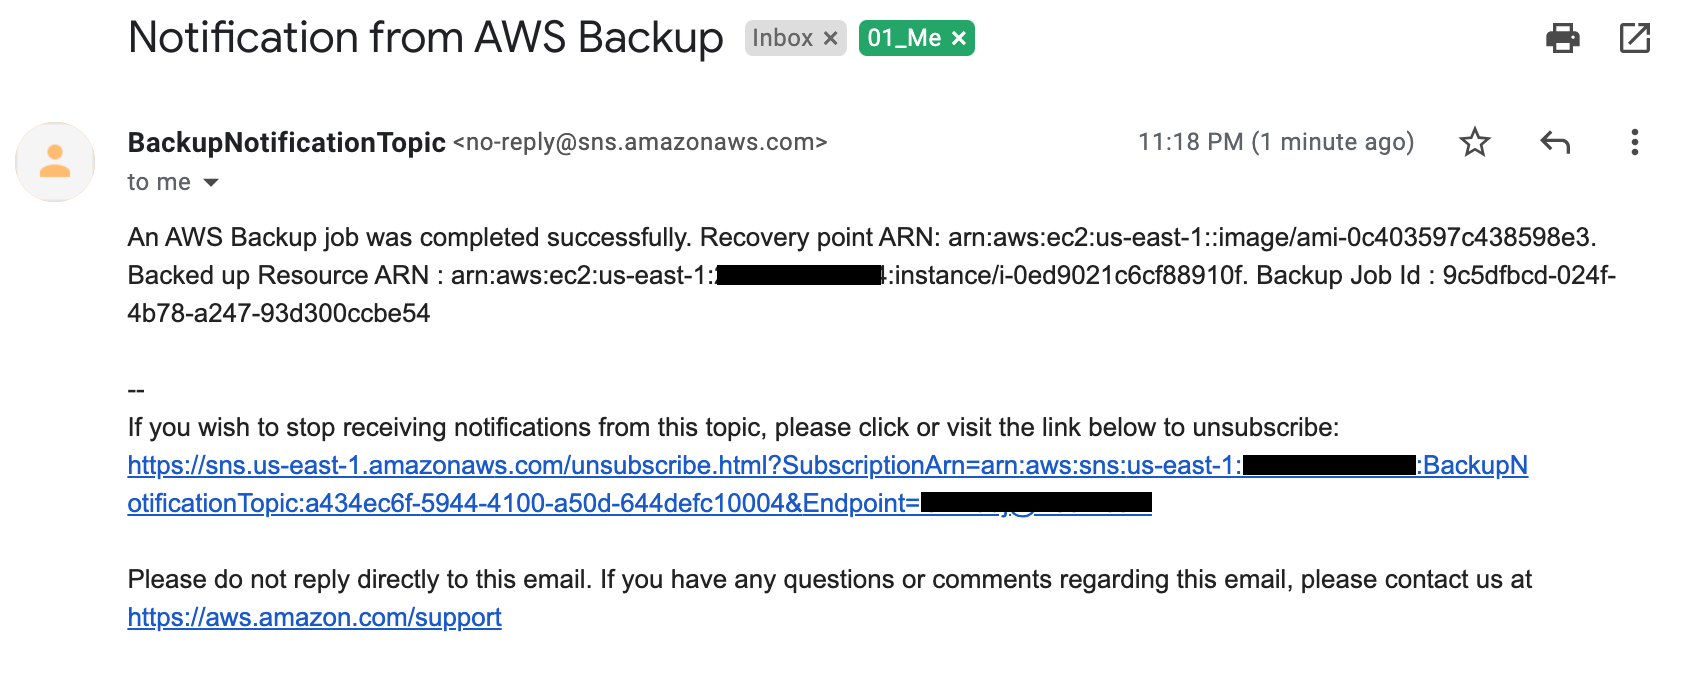
Once the backup job status-completed, you will receive an email notification as follows.
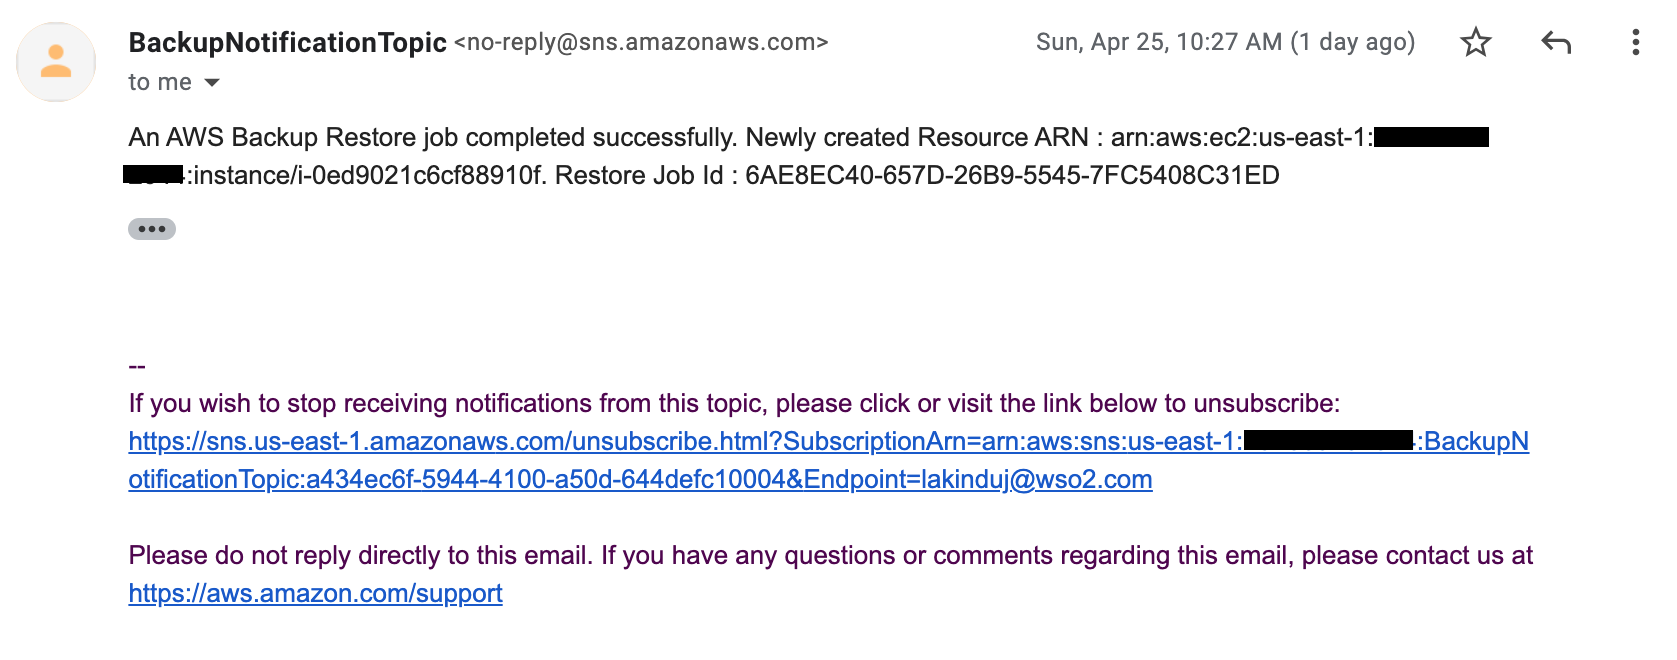
Same as the backup process, you will receive an email notification for the restoration process completion based on the above configuration steps. That can be done by going inside the Backup vaults, selecting the recovery point, and from the Action menu, you can initiate the Restore process. The restore process required inputting the instance type, VPC, Subnet, and Security group, keeping other settings as default, and starting the backup restore.
Once the restore job completes you will receive an email notification as follows.
Great…! You have now successfully completed all the steps and configured backup notifications for successful backup & restore email notifications.