
Overview of Amazon SES
Amazon Simple Email Service (aka Amazon SES) is a cloud-based email sending platform using your own email addresses and domains. This service simplifies digital marketers and application developers to send marketing emails such as special offers, transactional emails such as order confirmations, and other types of correspondence such as newsletters.
Building a large-scale email solution is a very complex and costly challenge for nowadays business requirements. That because you have to deal with infrastructure challenges like email server management, network configuration, IP address/domain reputation, and so on.
Benefits of using Amazon SES
By using Amazon SES you don’t have to worry about managing server infrastructure, domain & IP address reputation, and enough capacity to meet the demands of your application needs. Amazon SES will give you the best solution for your demand with no additional cost of maintaining server infrastructure, you only pay for what you have used, or rather by the number of emails sent.
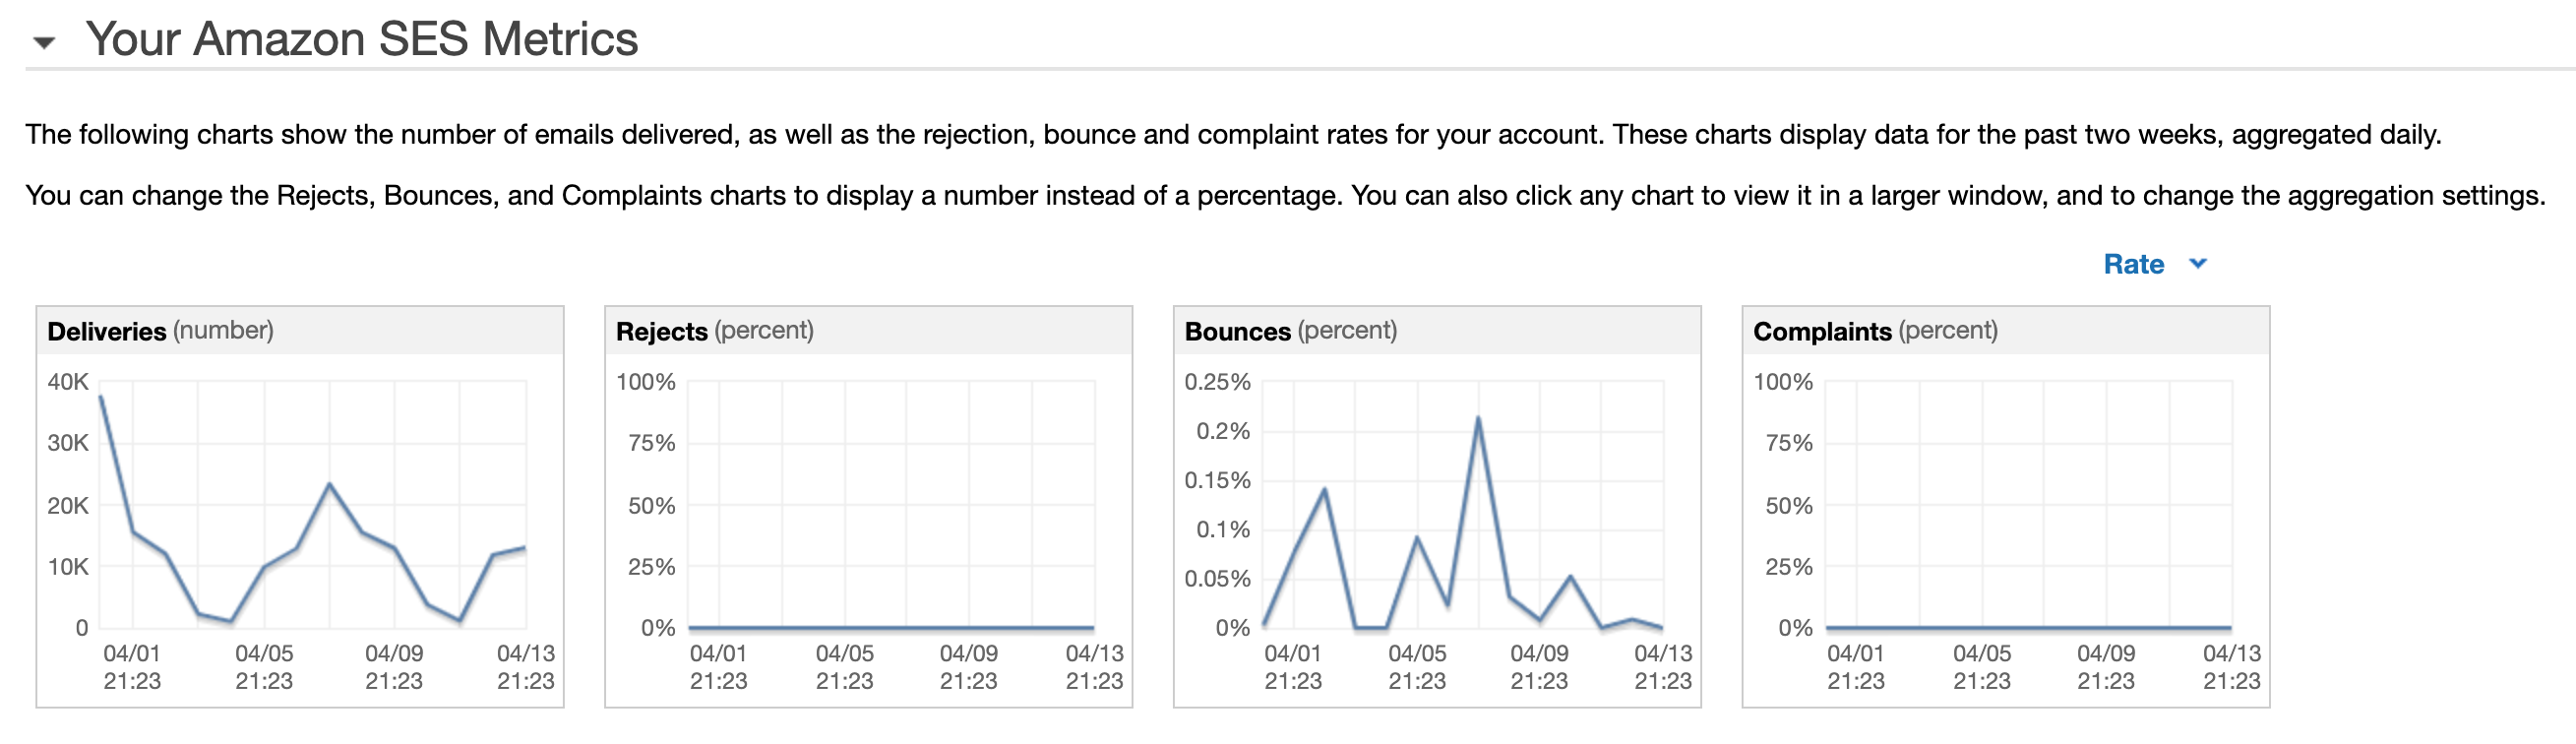
Based on Amazon SES Documentations you can simply configure and implement the SES solution and you can monitor the number of emails delivered from your account, as well as the number of messages that have been rejected, directly from the Amazon SES console.
But how do I know what’s happening inside?
Sometimes we need emails to be delivered to intended recipients and we need to know what happened when they are not receiving emails, particularly on bounced or reject emails. An email bounces, as an example, when the email address does not exist or when a mail server rejects due to security reasons. In that case, to troubleshoot email delivery issues, we need clear visibility on the email event notifications. Understanding the reason why they bounced/reject can help us tell recipients, for example, that they mistyped their emails or that they need to update the security rules of their email server so our emails are not rejected anymore.
By default, the Amazon SES doesn’t have any fully-featured monitoring suite like in detail logs monitoring in the AWS SES console. In this article, I will guide you on how you can configure monitoring of SES delivery, bounce, and complaint event logs to CloudWatch so that you can have a good insight on what’s happening and for troubleshooting email issues when sending emails.
Email Sending Events
| Event | Description |
|---|---|
| Deliveries | Amazon SES successfully delivered the email to the recipient’s mail server. |
| Bounces | The recipient’s mail server permanently rejected the email. This event corresponds to hard bounces. Soft bounces are only included when Amazon SES fails to deliver the email after retrying for a period of time. |
| Complaints | The email was successfully delivered to the recipient. The recipient marked the email as spam. |
| Rejects | Amazon SES accepted the email, determined that it contained a virus, and rejected it. Amazon SES didn’t attempt to deliver the email to the recipient’s mail server. |
How can I access my Amazon SES logs?
To get logs or notifications about your email-sending events on Amazon SES, use one of the following configurations:
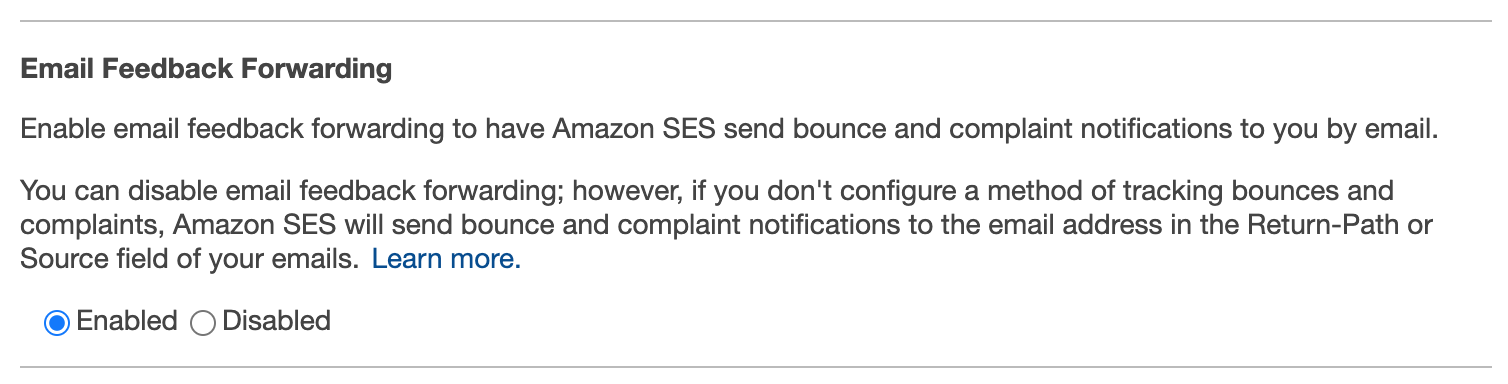
Option 1 – Use email feedback forwarding
By default, Amazon SES sends you emails when the messages get a bounce or complaint by a feature called email feedback forwarding.
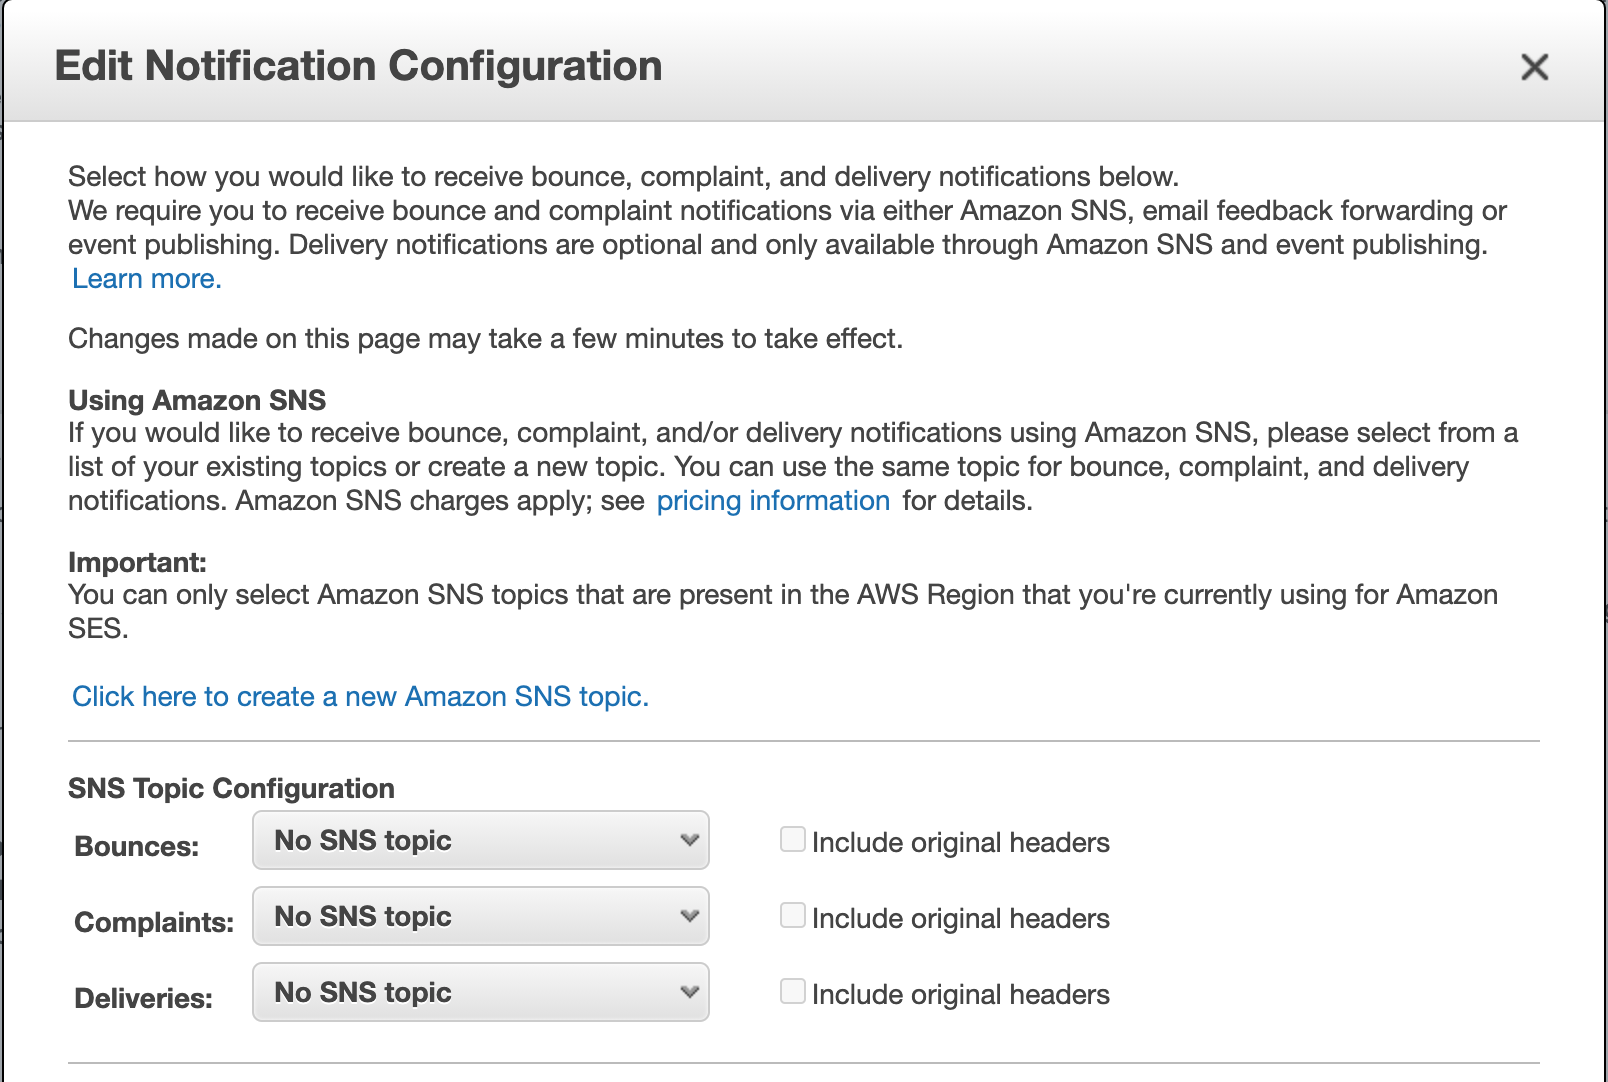
AWS SES Console -> Domains/Email Addresses -> Select Specific Email/Domain -> Edit Notification Configuration
Option 2 – Use an Amazon SNS topic to send notifications about Amazon SES events
We can use an Amazon SNS (Simple Notification Service) topic for notifications for email delivery, bounces, or complaints on Amazon SES. Once you create an SNS topic and configure it with SES event notifications, you will receive notifications at the endpoints that you subscribed to the topic.
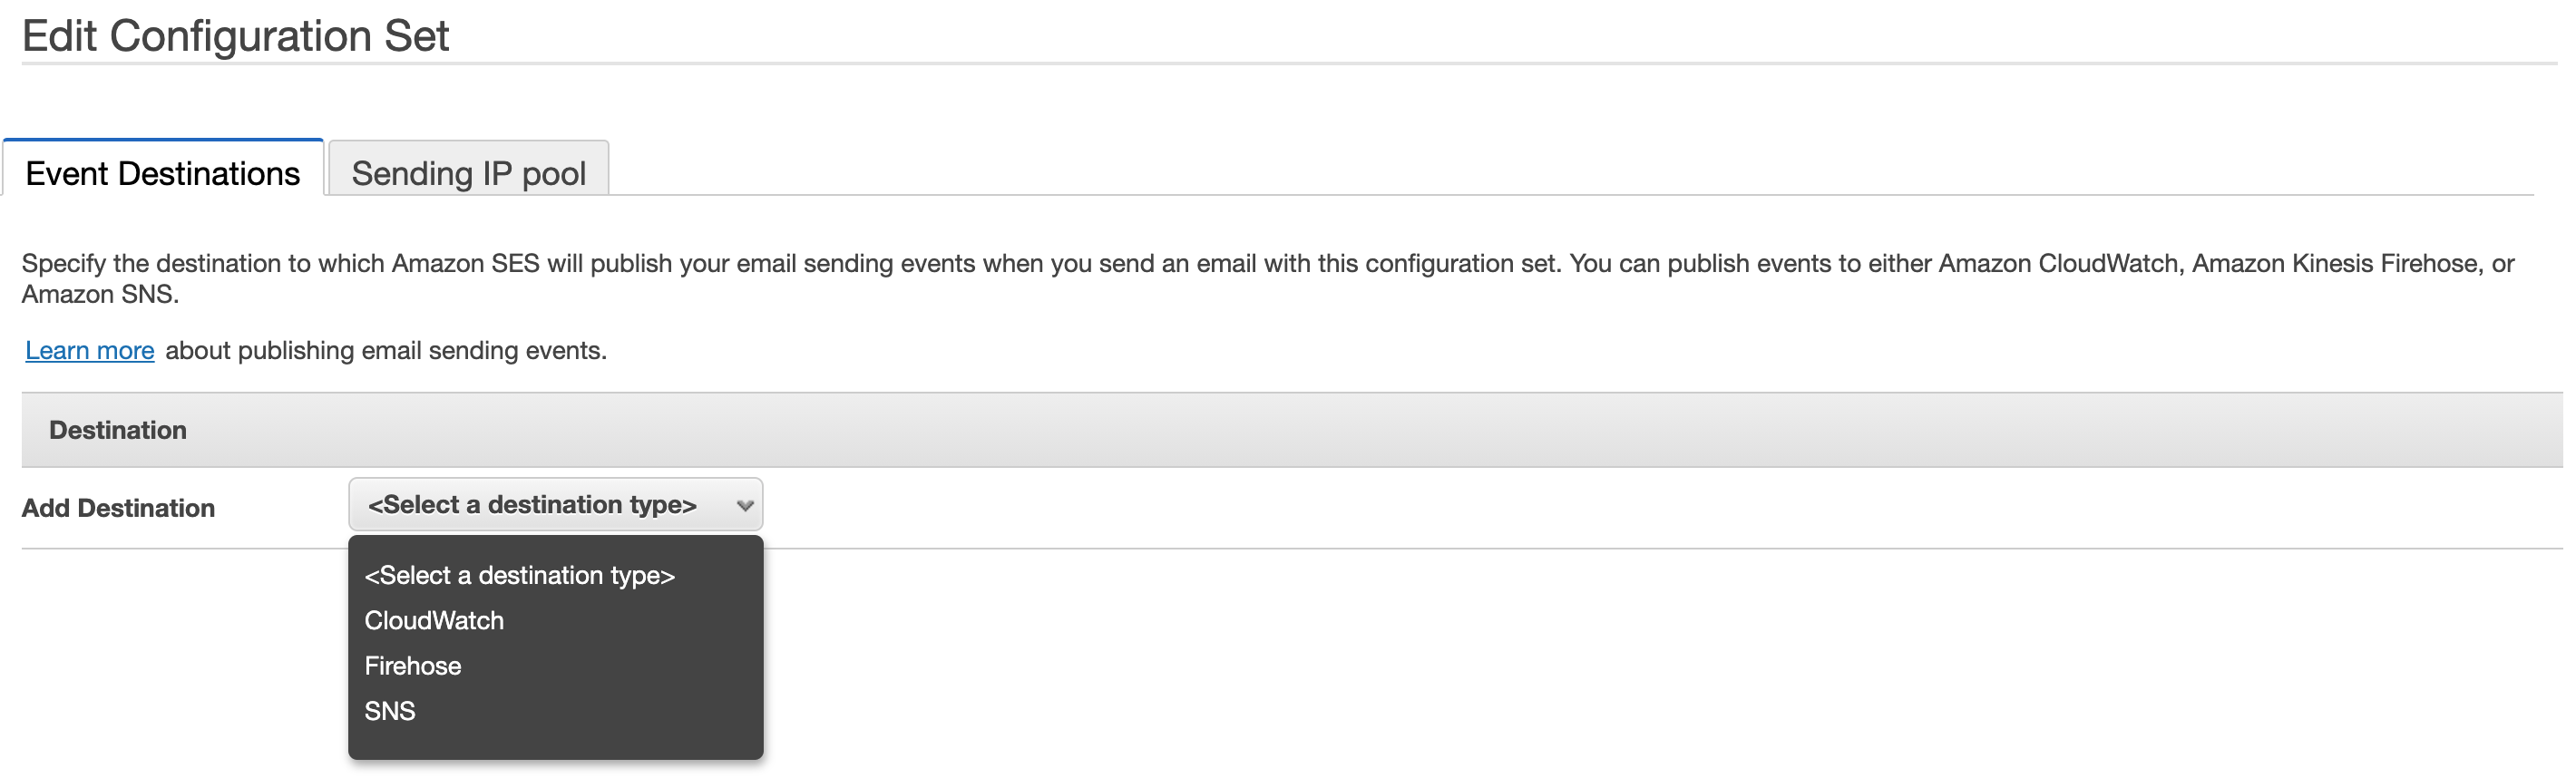
Option 3 – Use a configuration set to publish email sending events to Amazon SNS, CloudWatch, or Kinesis Data Firehose
You can get event notifications about sends, rejects, bounces, complaints, deliveries, opens, clicks, or Rendering Failures by using the Amazon SES configuration set. To use it you must create a configuration set, specify the event destination, and specify the parameters for the events that you want to publish. Then, you must configure your email-sending method or application to pass the name of the configuration set in the headers of your emails.
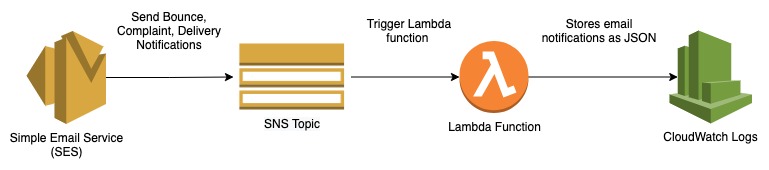
Let’s see by using above mentioned Option 2 with a few other AWS services, how to store the sending email notification events in an Amazon CloudWatch that you can browse when you need any troubleshooting purposes.
Solution Diagram
AWS provides an easy way to send the sending email notifications to an SNS topic and then create an AWS lambda function subscribed to the SNS topic that will get the notifications and store them as JSON in AWS CloudWatch logs.
Implement Logging on Amason SES
Here I will show you how to implement this solution step by step using the AWS management console. As a prerequisites you’ll need:
- A configured Amazon SES with a verified domain and email address (see this AWS tutorial if you need to set this up).
- An AMI user account that having write access to at least SES, SNS, IAM, Lambda, and CloudWatch.
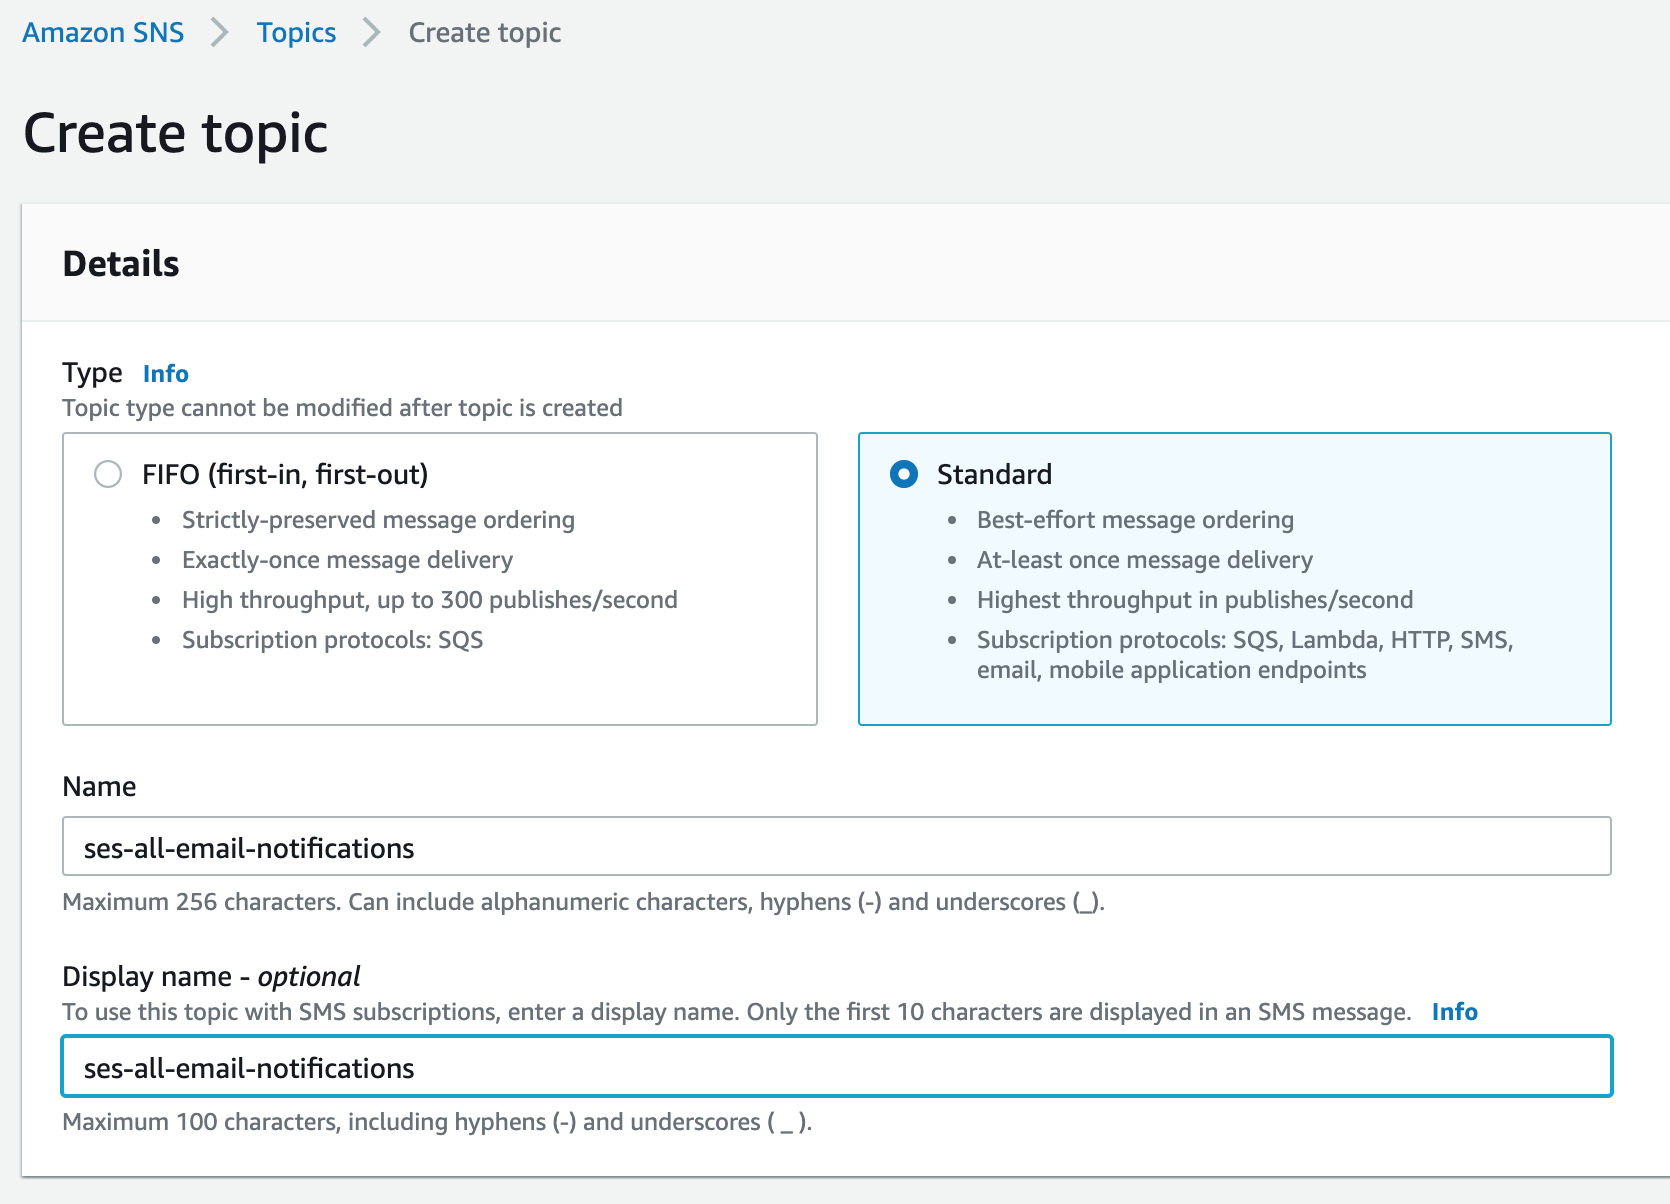
Create SNS Topic
- Open the Amazon SNS console at https://console.aws.amazon.com/sns/v2/home
- Choose Topic from the left panel and click Create Topic.
- Select Type as Standard.
- For the Topic name, you can type “ses-all-email-notifications” or any other name. Choose Create topic.
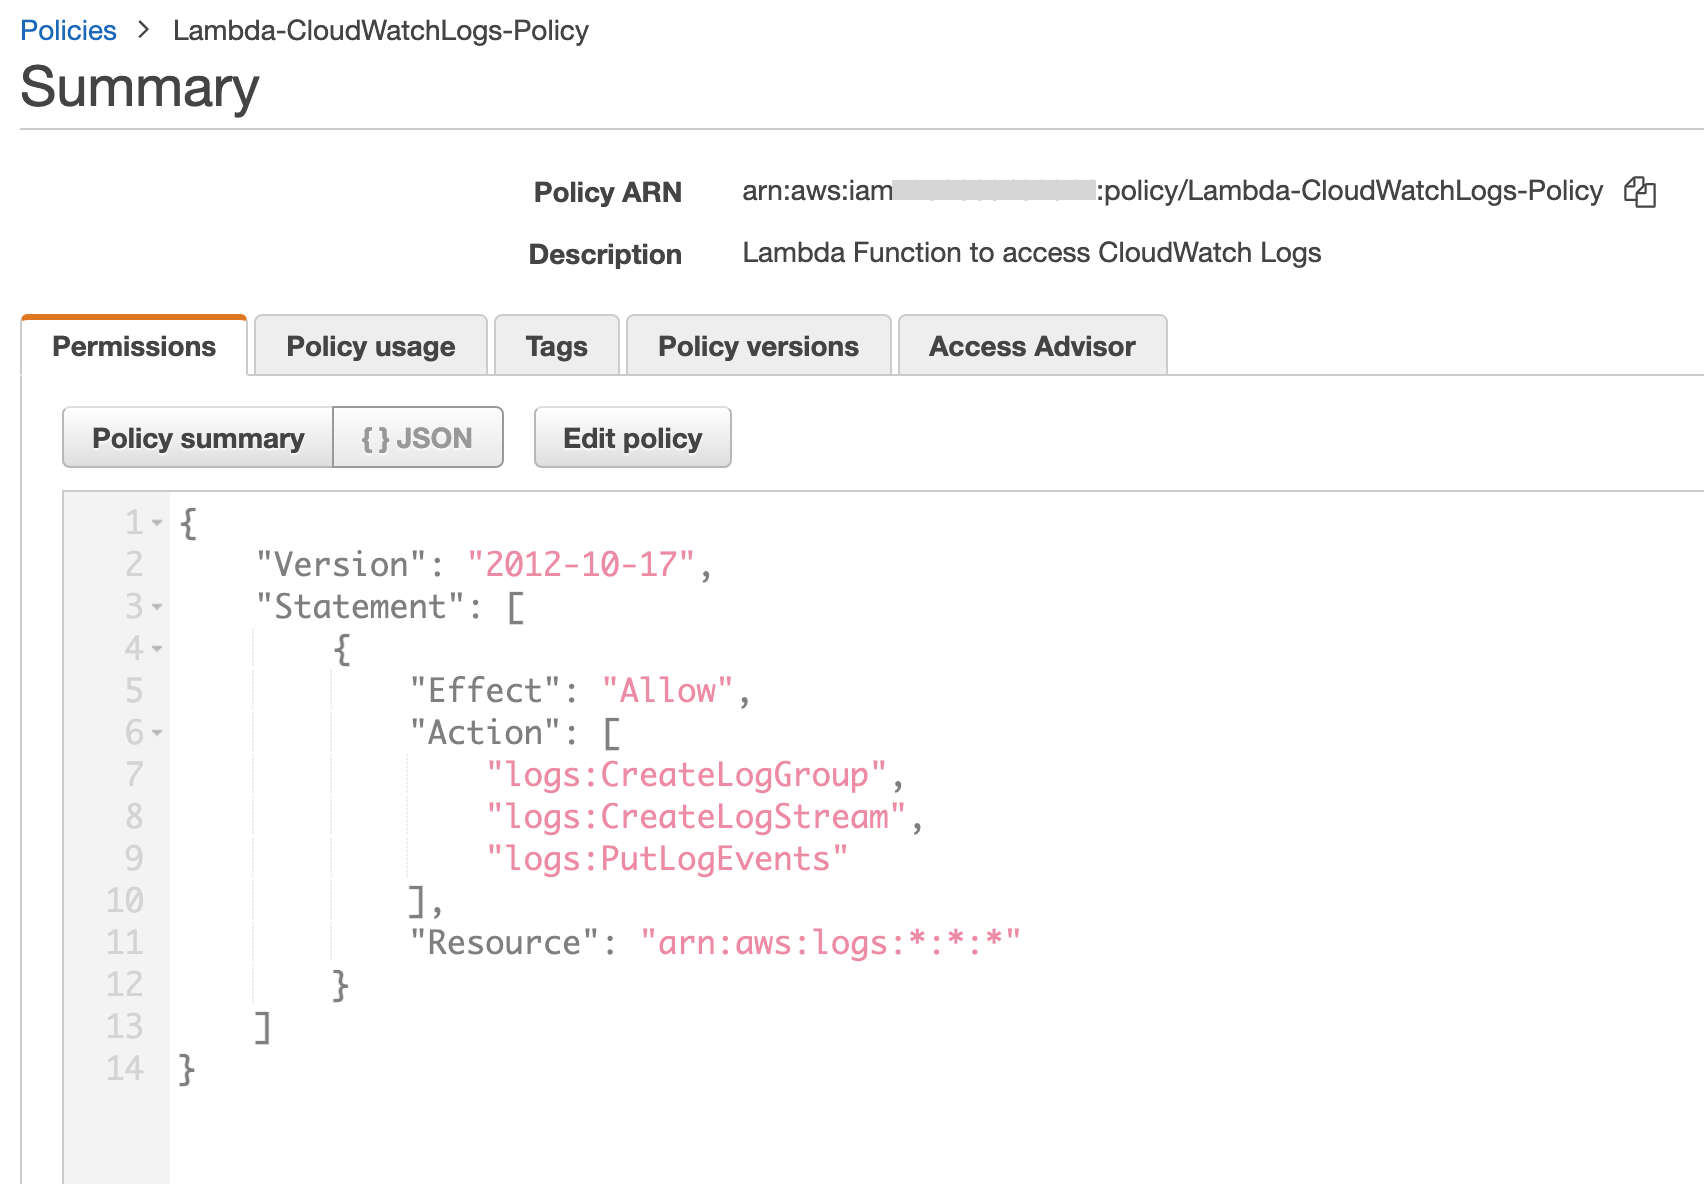
Create IAM Policy for Lambda
- Log on to IAM Management Console.
- Select “Policies” from the left navigation window and click on “Create Policy”.
- Select JSON and paste the following policy:
{
  "Version": "2012-10-17",
  "Statement": [
    {
      "Effect": "Allow",
      "Action": [
        "logs:CreateLogGroup",
        "logs:CreateLogStream",
        "logs:PutLogEvents"
      ],
      "Resource": "arn:aws:logs:*:*:*"
    }
  ]
}
- Click on Review Policy.
- Enter the policy name “Lambda-CloudWatchLogs-Policy” and description and click on save the policy.
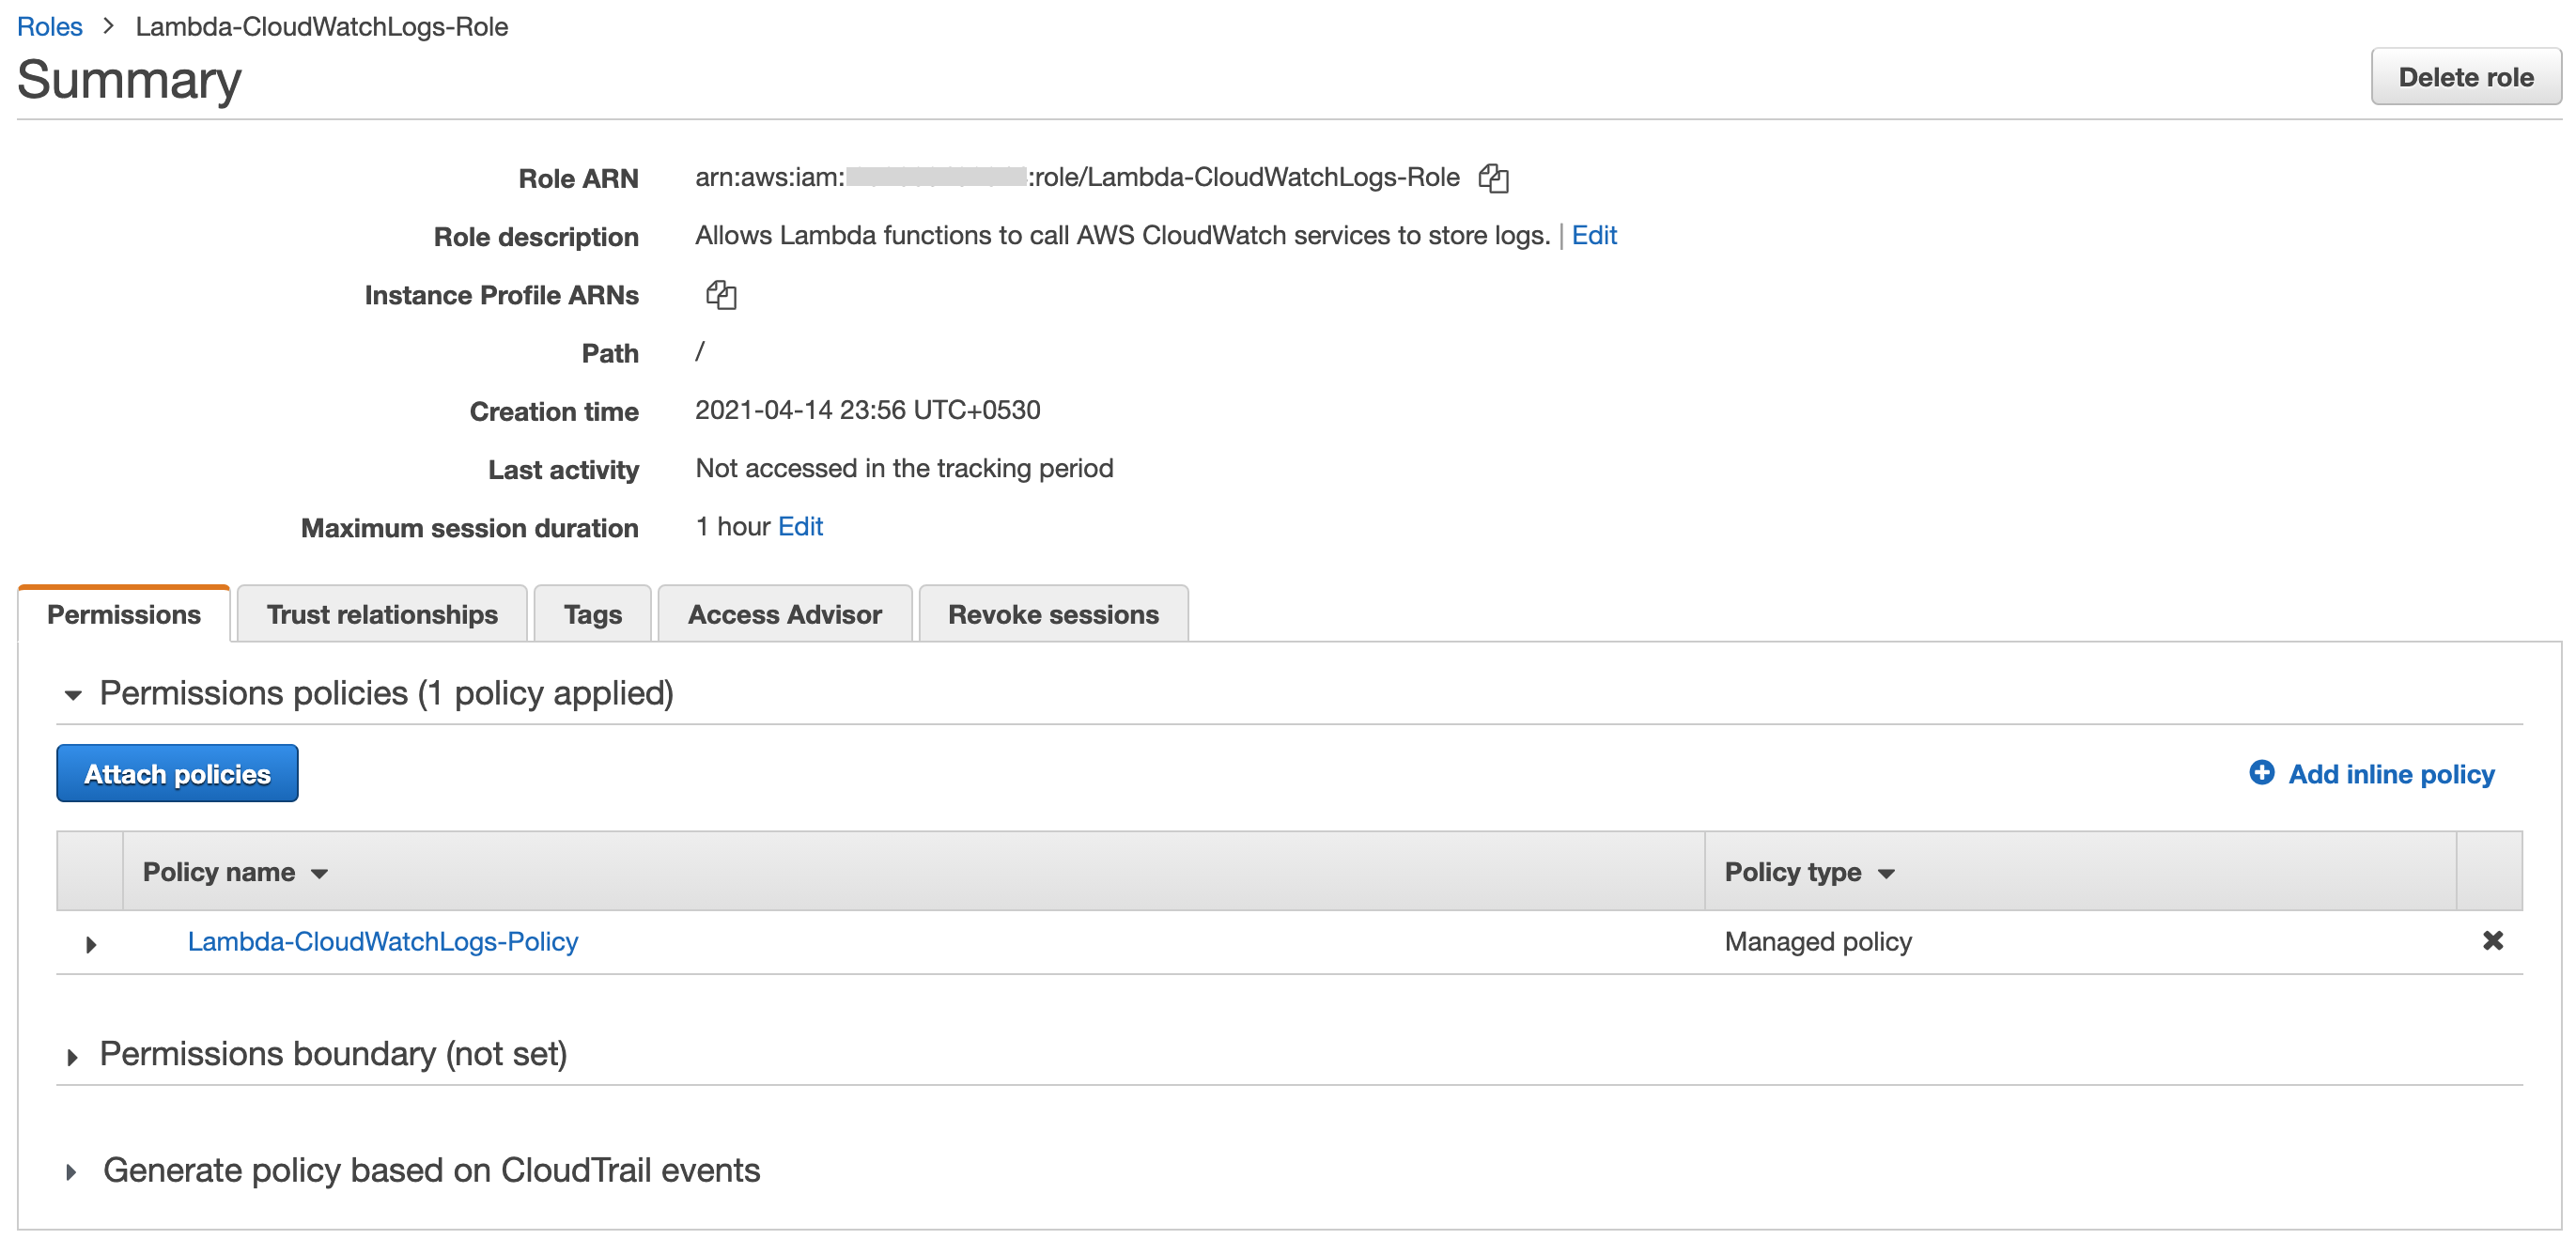
Create IAM Role for Lambda
- Log on to IAM Management Console.
- Select “Roles” from the left navigation window and click on “Create Role”.
- Select “Lambda” under the service that will use this role and click on “Next: Permissions”.
- Enter the Policy name “Lambda-CloudWatchLogs-Policy” which you created in the previous step.
- Select the policy and click on Next: Review.
- Enter the Role name “Lambda-CloudWatchLogs-Role” and Role description and click on Create role.
Create Lambda Functions
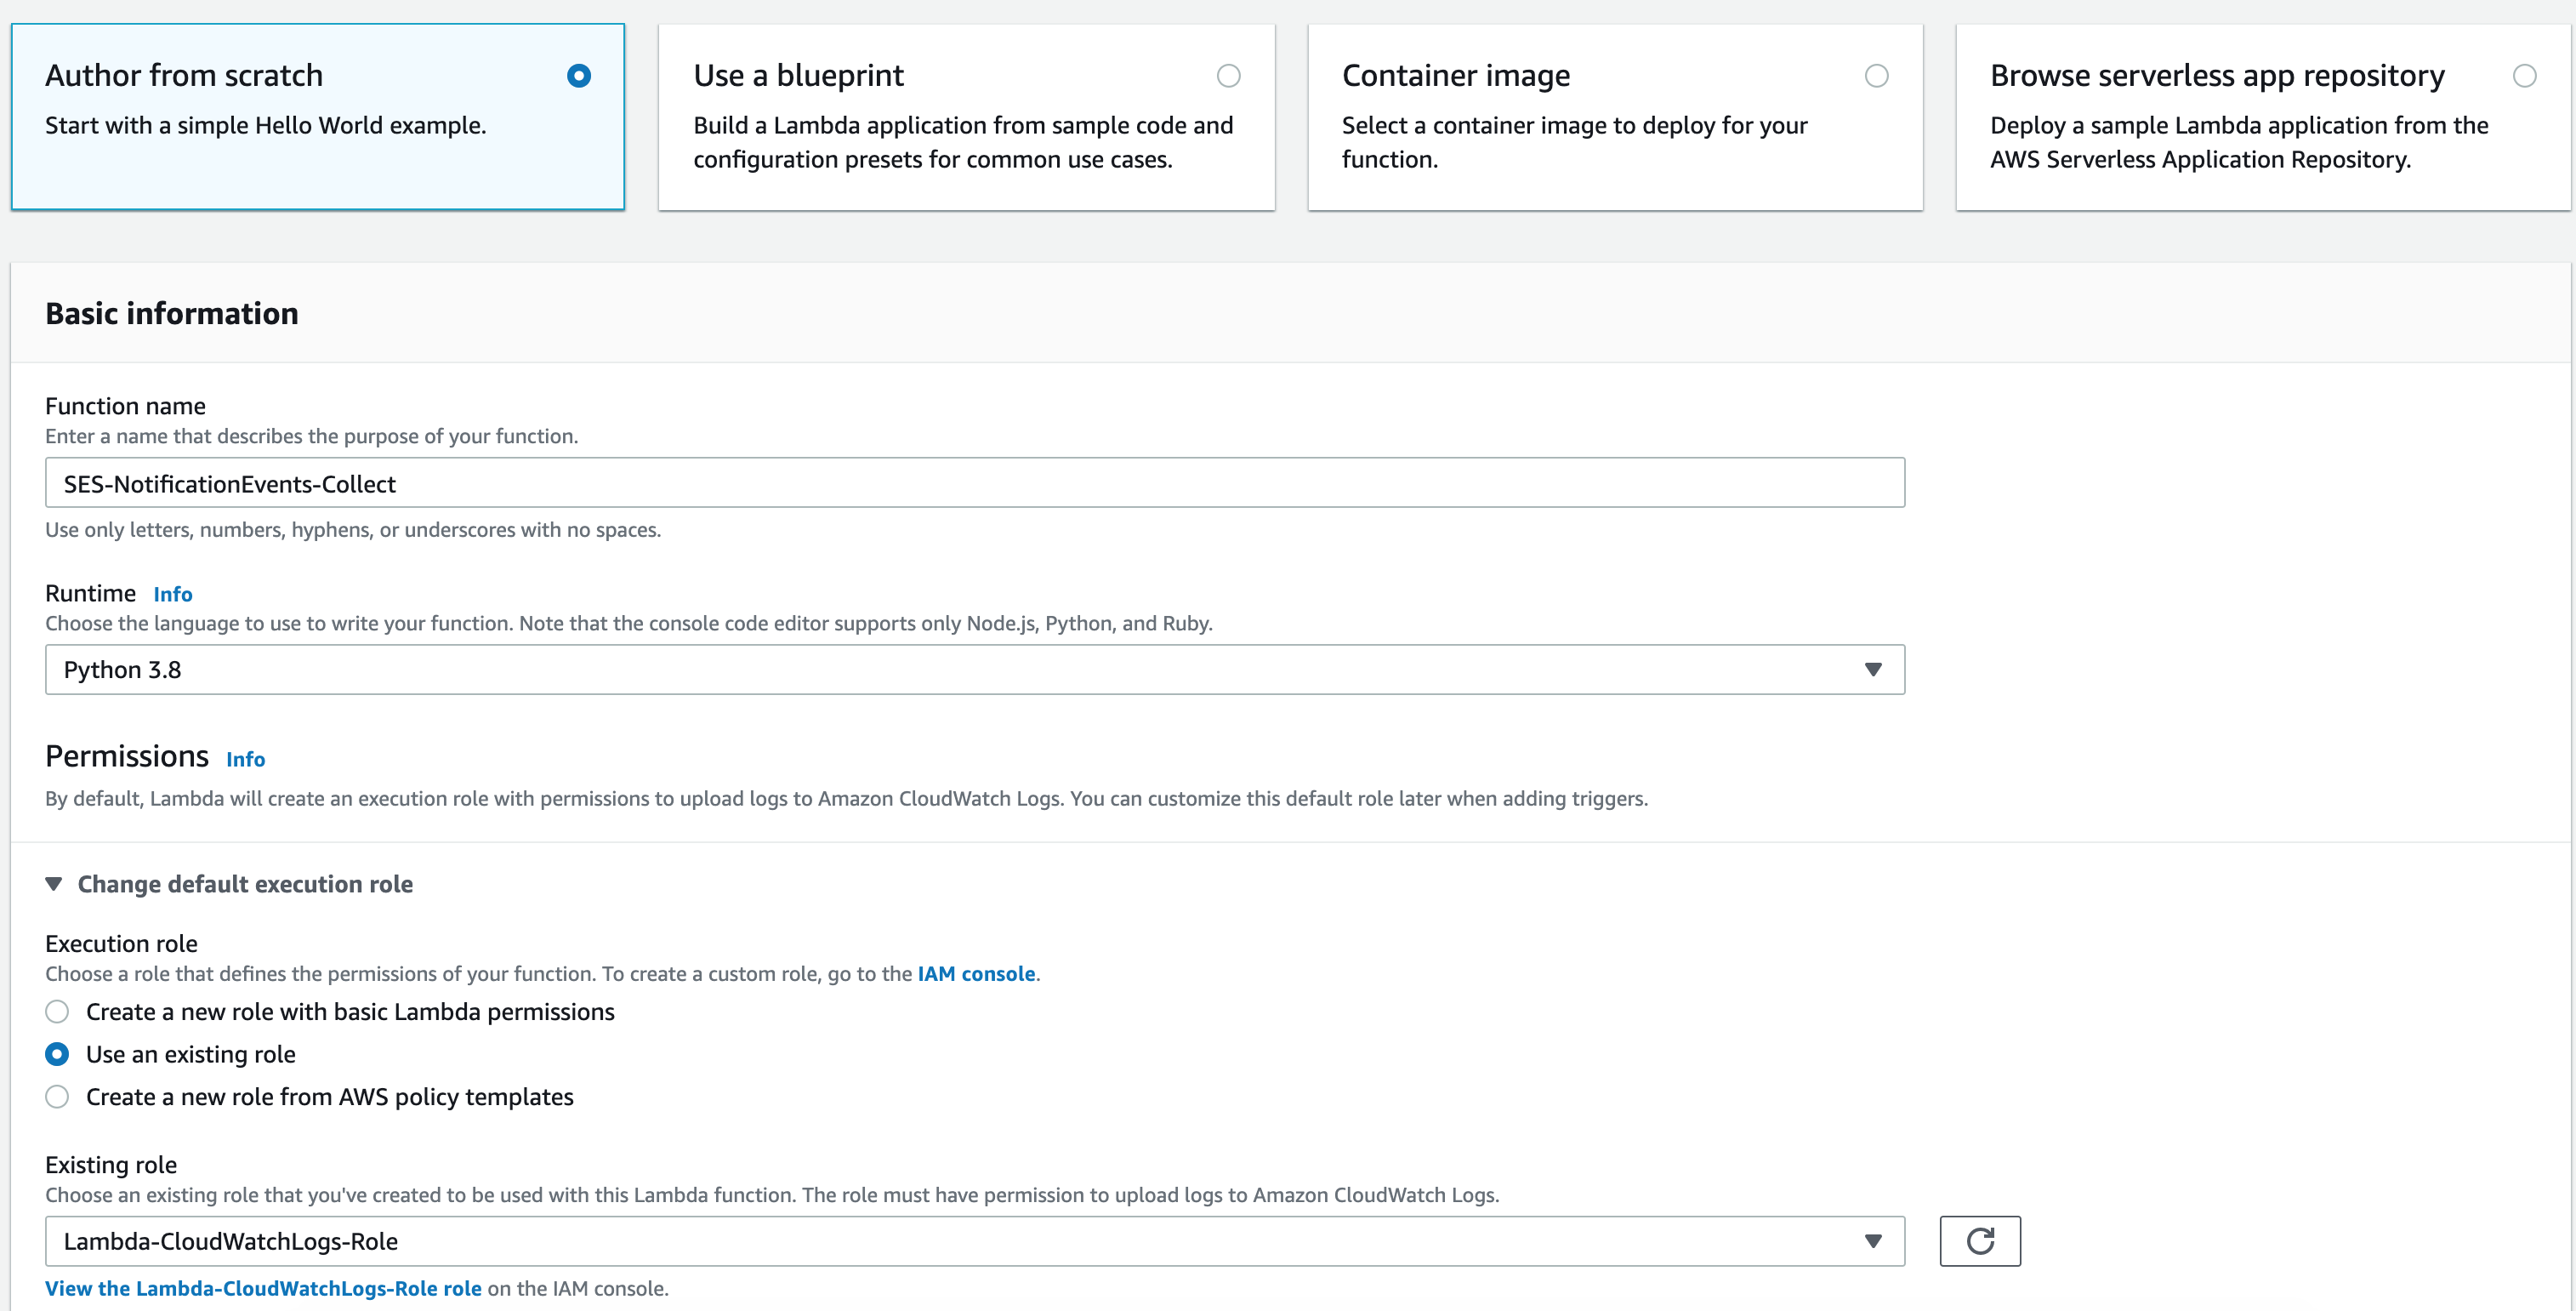
- Log on to Lambda Management Console and click on Create Function.
- Provide a function name. For example: “SES-NotificationEvents-Collect”
- Runtime: Select the latest Python version (Python 3.8).
- Choose Role as: Choose an existing role.
- Under the Existing role select the IAM role which we created in the above step and click on Create function.
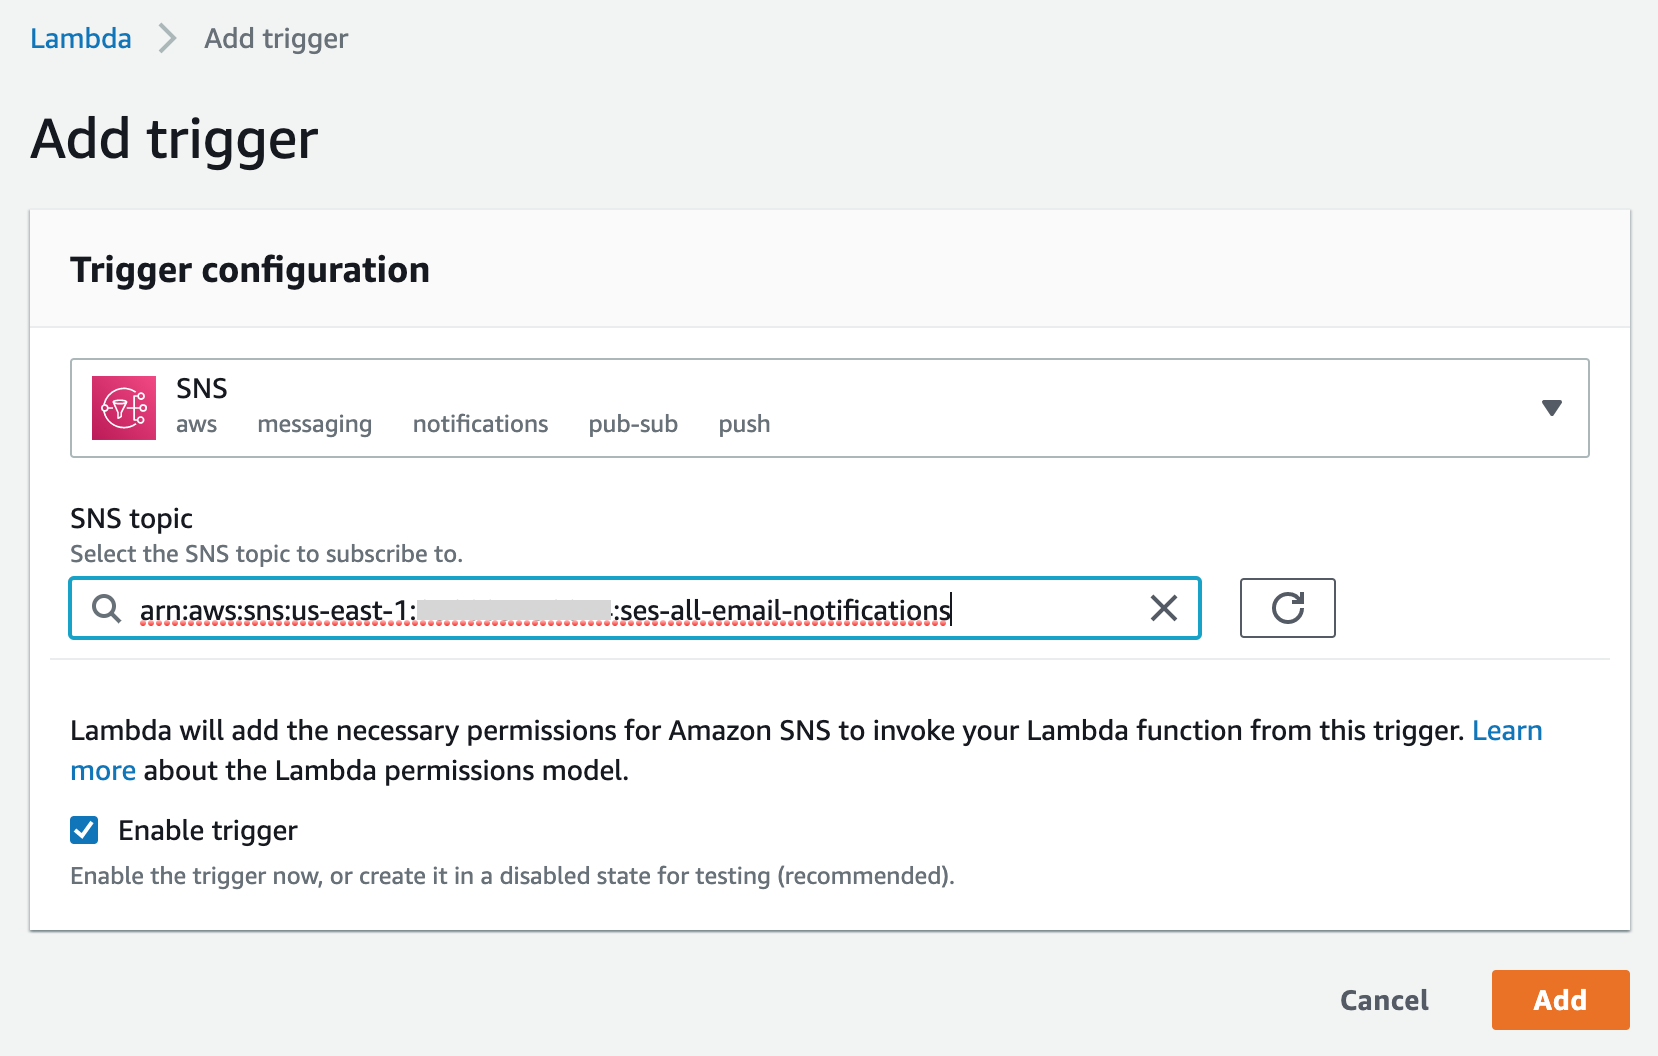
- On the new page, select SNS under the “Add triggers” section.
- Under Configure triggers, select the topic that was selected when you created it in the previous step.
- Make sure “Enable trigger” is checked, then click the “Add” button.
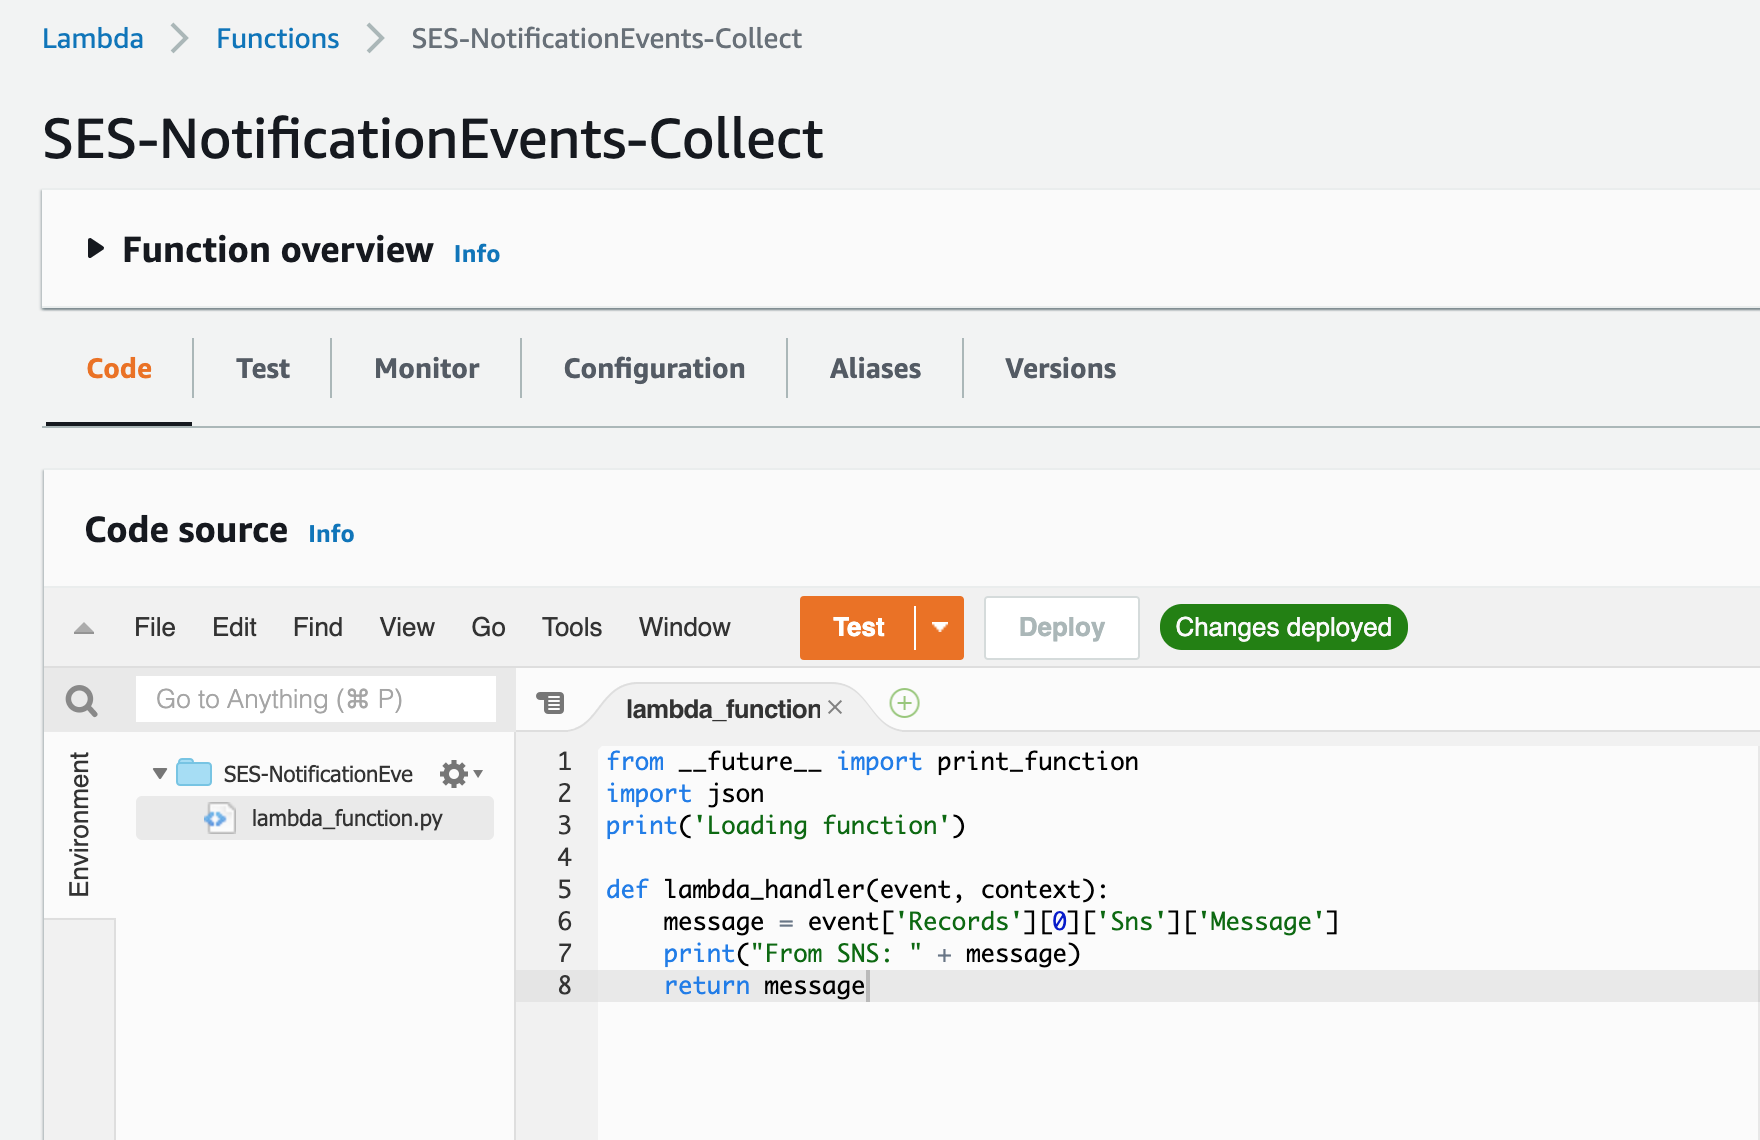
- Select the function by clicking on the Lambda box with your Lambda function name.
- Scroll down to the “Code source” section and paste the following code snippet and click Deploy:
from __future__ import print_function
import json
print('Loading function')

def lambda_handler(event, context):
    message = event['Records'][0]['Sns']['Message']
    print("From SNS: " + message)
    return message
Configure SNS Topic with Amazon SES
- Go to SES in the console and click on Domains/Email addresses in the left navigation panel.
- Click on the specific email address or entire domain for which you want to transfer the bounced emails.
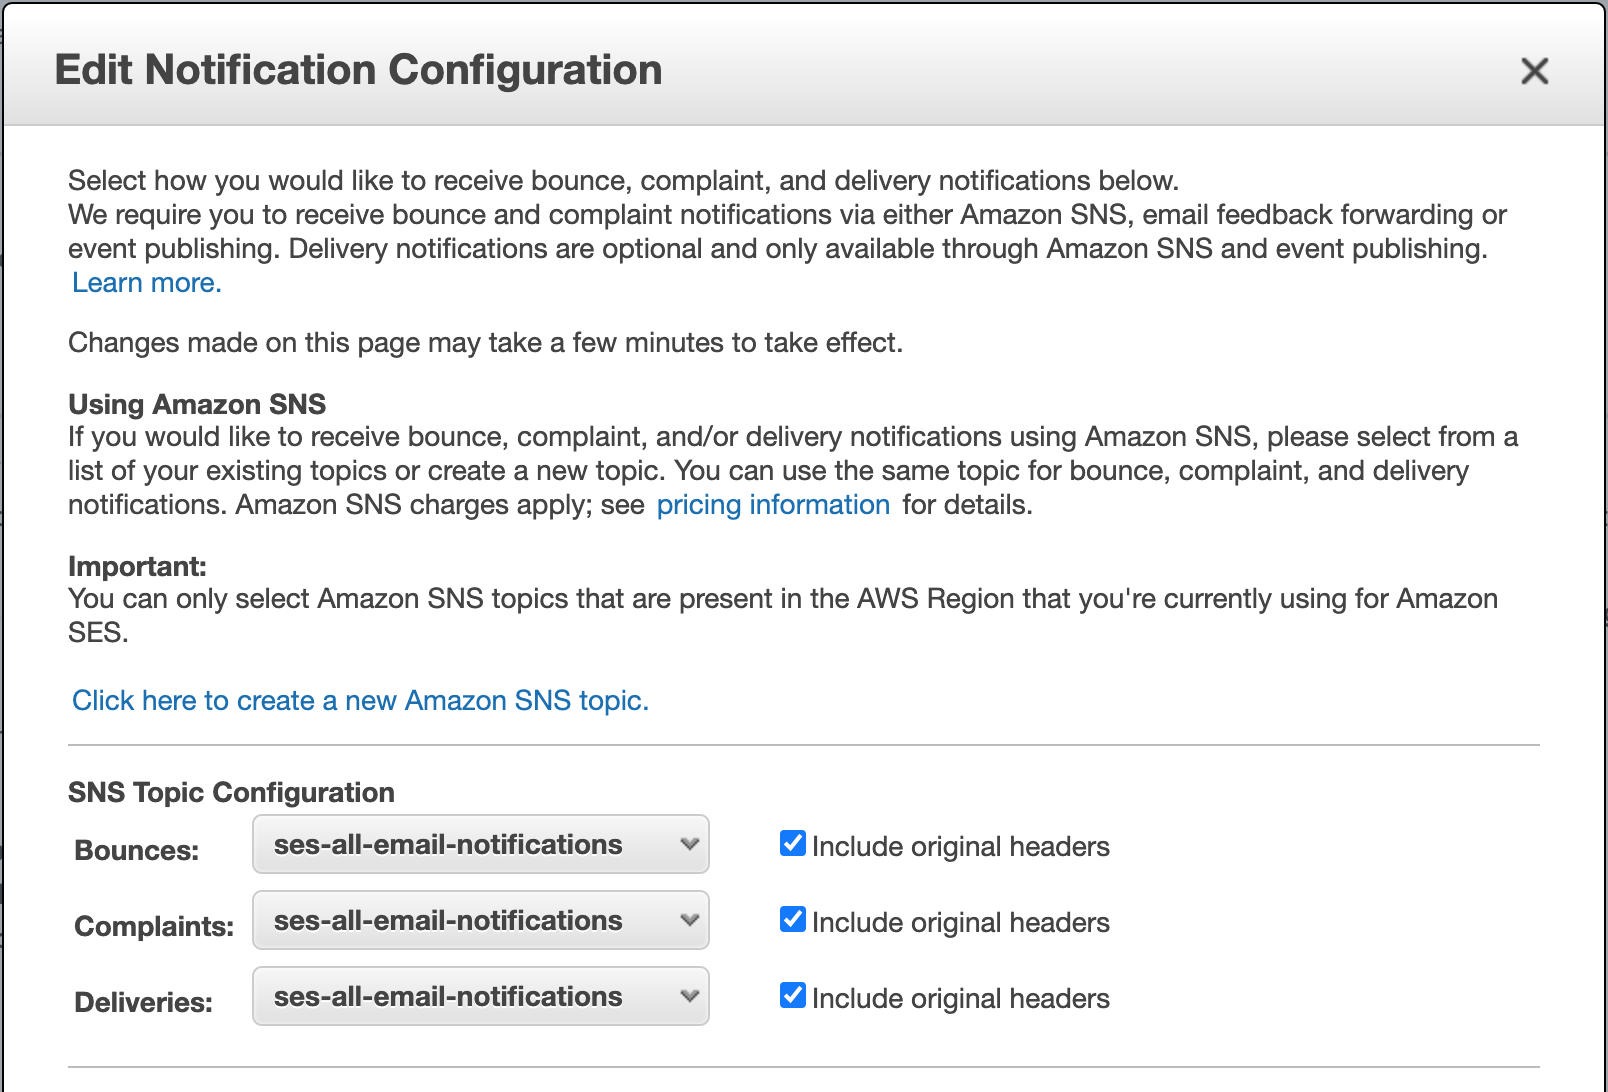
- In the Notifications part, click on Edit configuration
- In SNS Topic Configuration, select the topic you created in all three evetns (you can also tick the include original headers checkbox to have more information in your JSON document)
- Click on Save config.
Testing Phase
- Go to SES in the console and click on Email addresses in the left navigation panel.
- Select a specific email and Click “Send a Test Email“.

After sending the email, follow these steps to check the results:
- Open CloudWatch console.
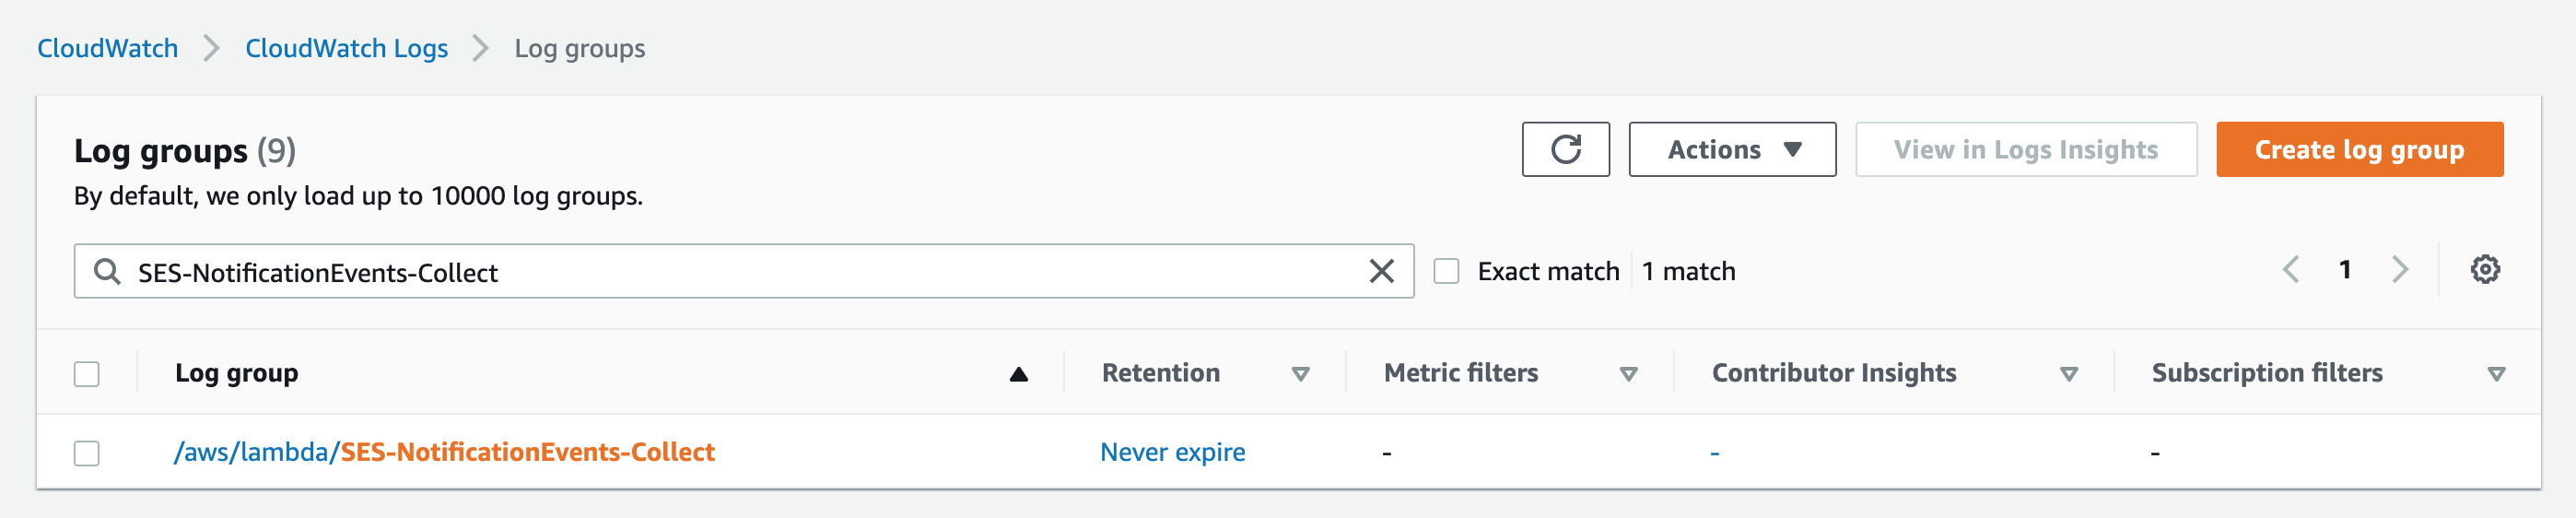
- Select ‘Log Groups‘ under Logs from the left navigation window.
- There will be a log group for the Lambda function named “SES-NotificationEvents-Collect“. Open it.
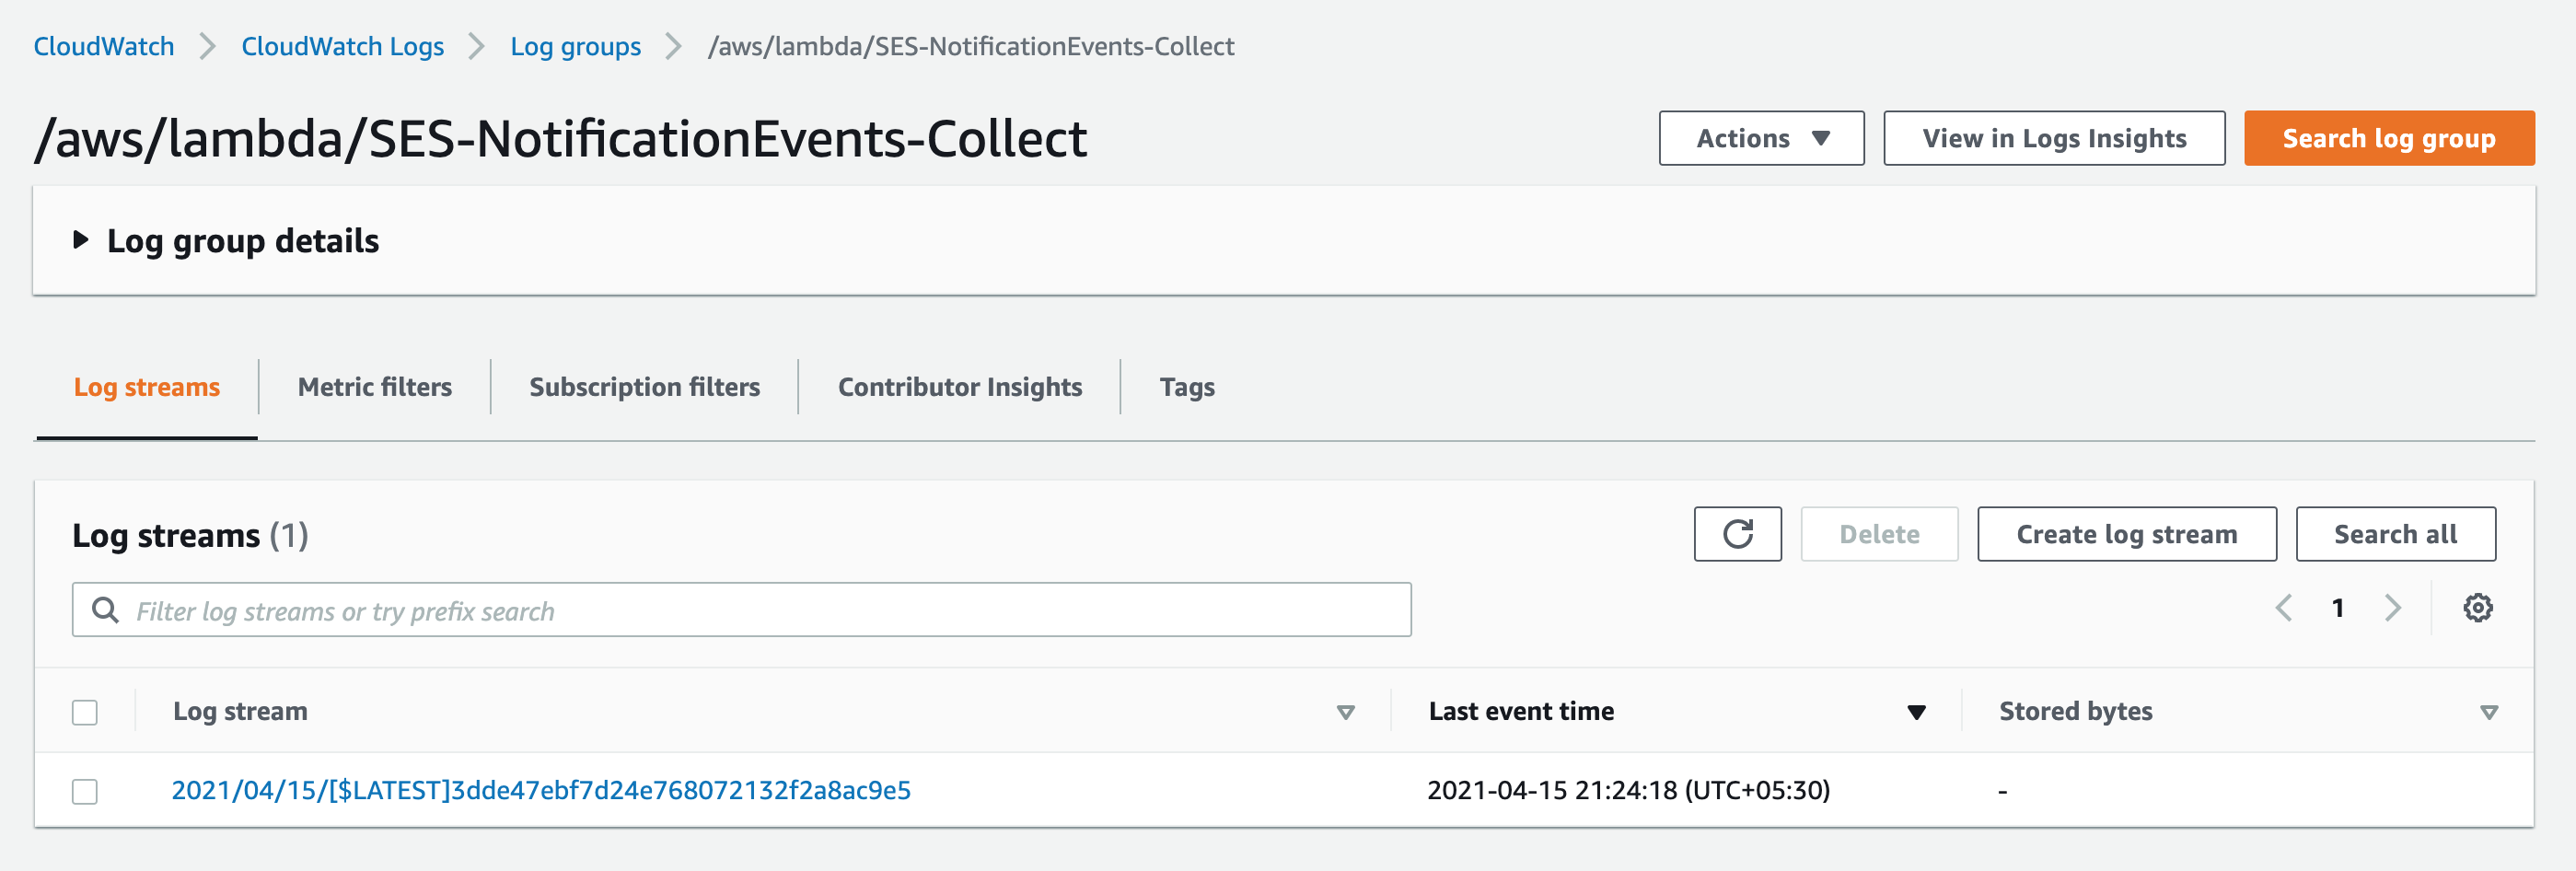
- Click on the log stream present there.
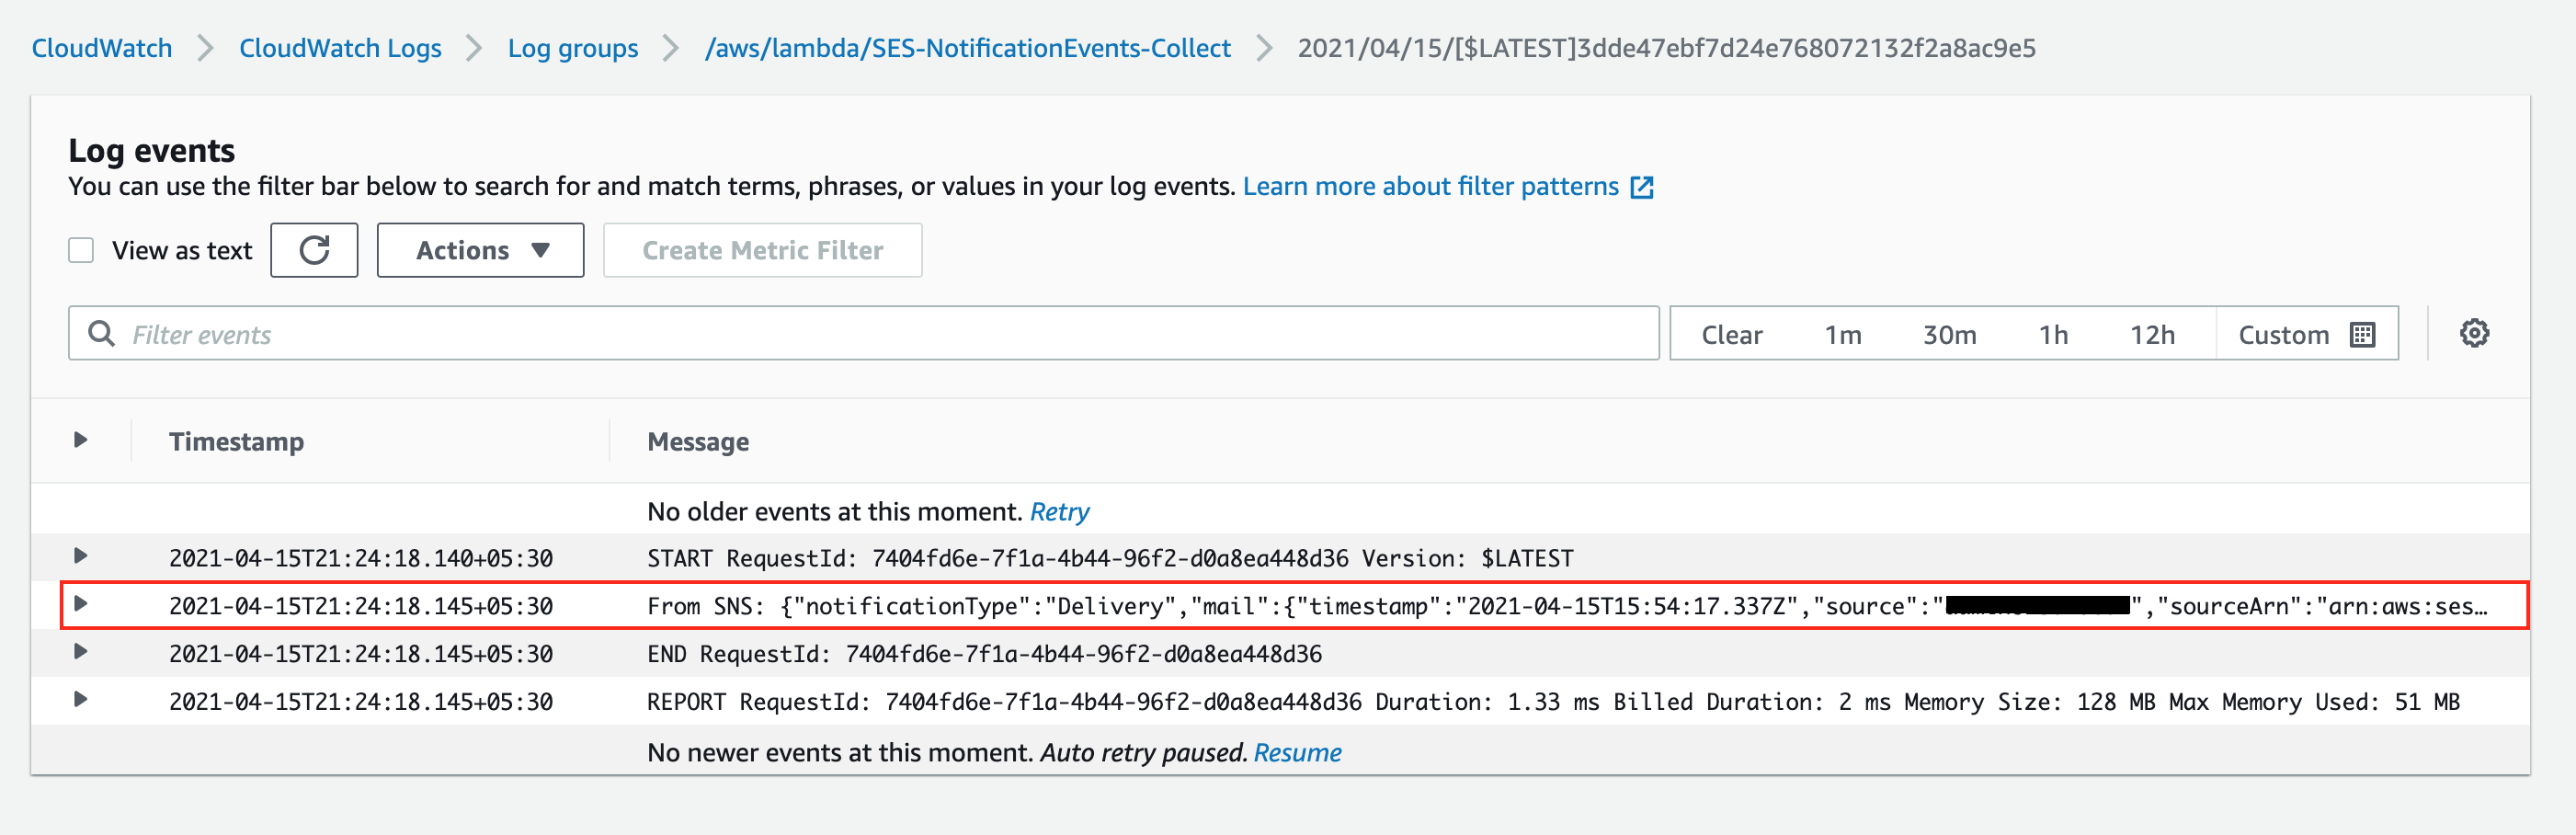
- Inside the log stream, there will be a notification called ‘From SNS’ which will have details about the event.
Inspecting the Logs in CloudWatch
After a few notification events, you should have a lot of logs generated in CloudWatch Logs as “/aws/lambda/SES-NotificationEvents-Collect” Log group. As per the previous screenshot, you will see a lot of unwanted from Lambda execution logs as well, and this can be a bit hard to analyze. This is where CloudWatch Log Insights comes in.
- Open CloudWatch console and navigate to the Logs -> Insights.
- Make sure you select “/aws/lambda/SES-NotificationEvents-Collect” Log group and desired timeframe.
- And try the following queries listed below by changing the
notificationTypeas Delivery, Complaint, or Bounce.
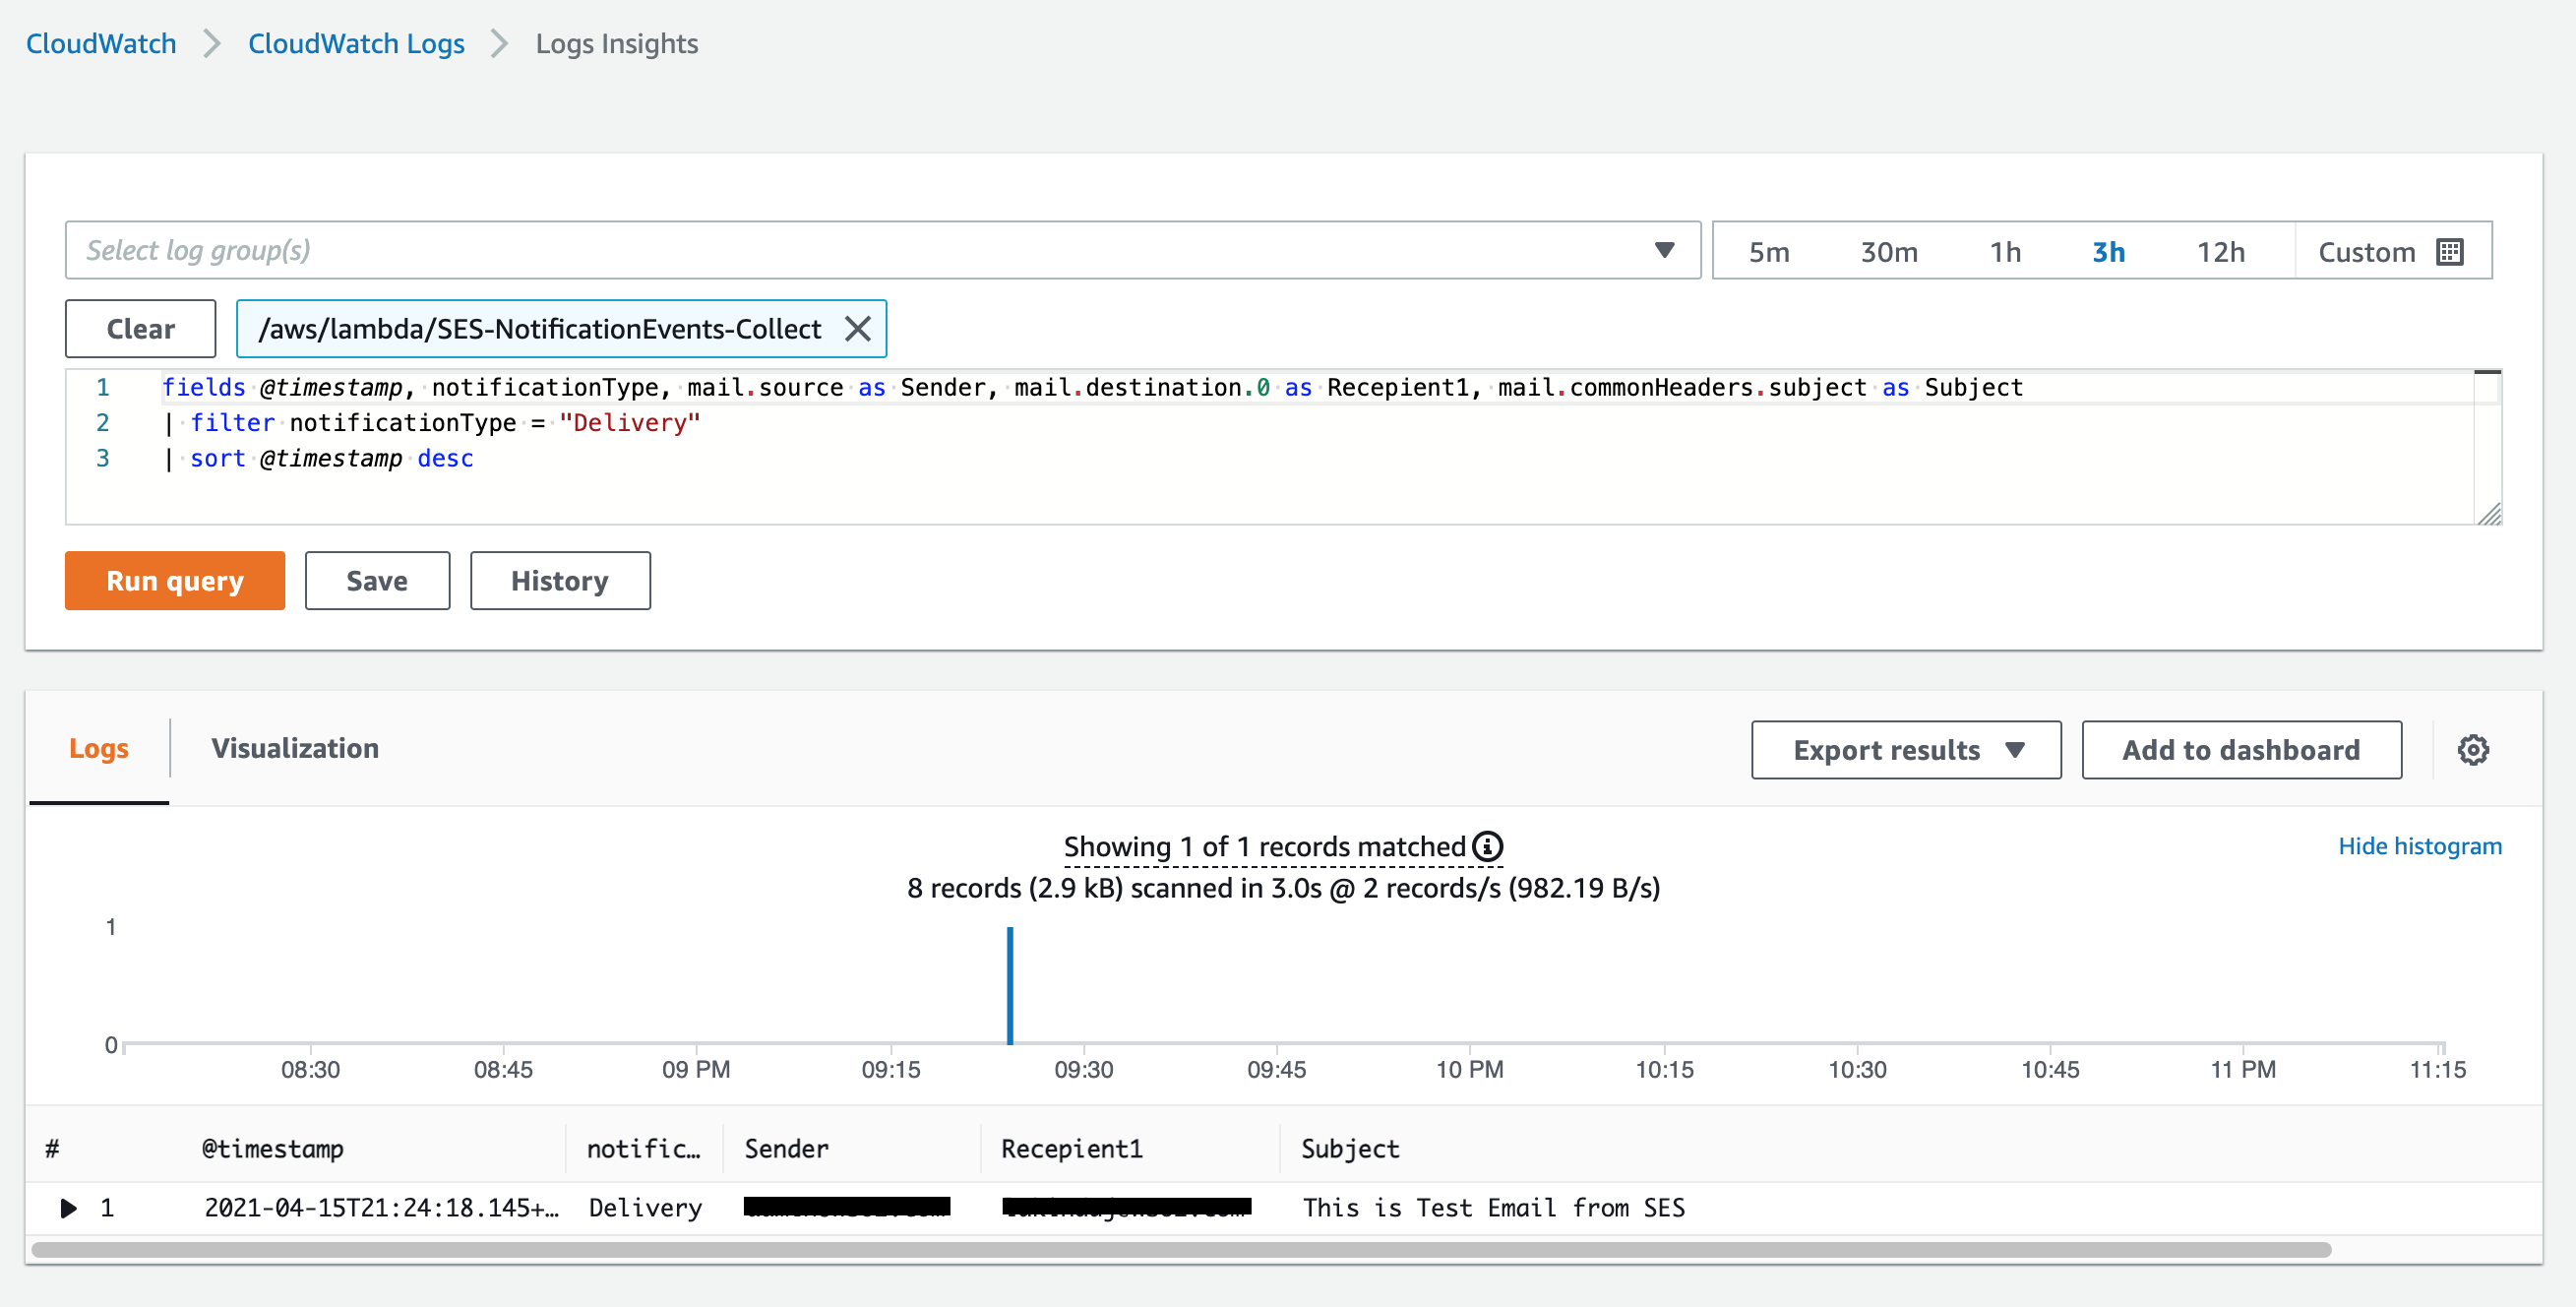
Mail Deliveries, Complaints or Bounces.
fields @timestamp, notificationType, mail.source as Sender, mail.destination.0 as Recepient1, mail.commonHeaders.subject as Subject
| filter notificationType = "Delivery"
| sort @timestamp desc
Search for specific address
Replace the DESTINATION placeholder to query the logs for one specific destination address.
fields @timestamp, notificationType, mail.source as Sender, mail.destination.0 as Recepient1, mail.commonHeaders.subject as Subject
| filter mail.destination.0 like /DESTINATION/
| sort @timestamp desc
1 comment
I configured exactly as shown but it is not logging the email body. Is there any way where I log the body aswell?