
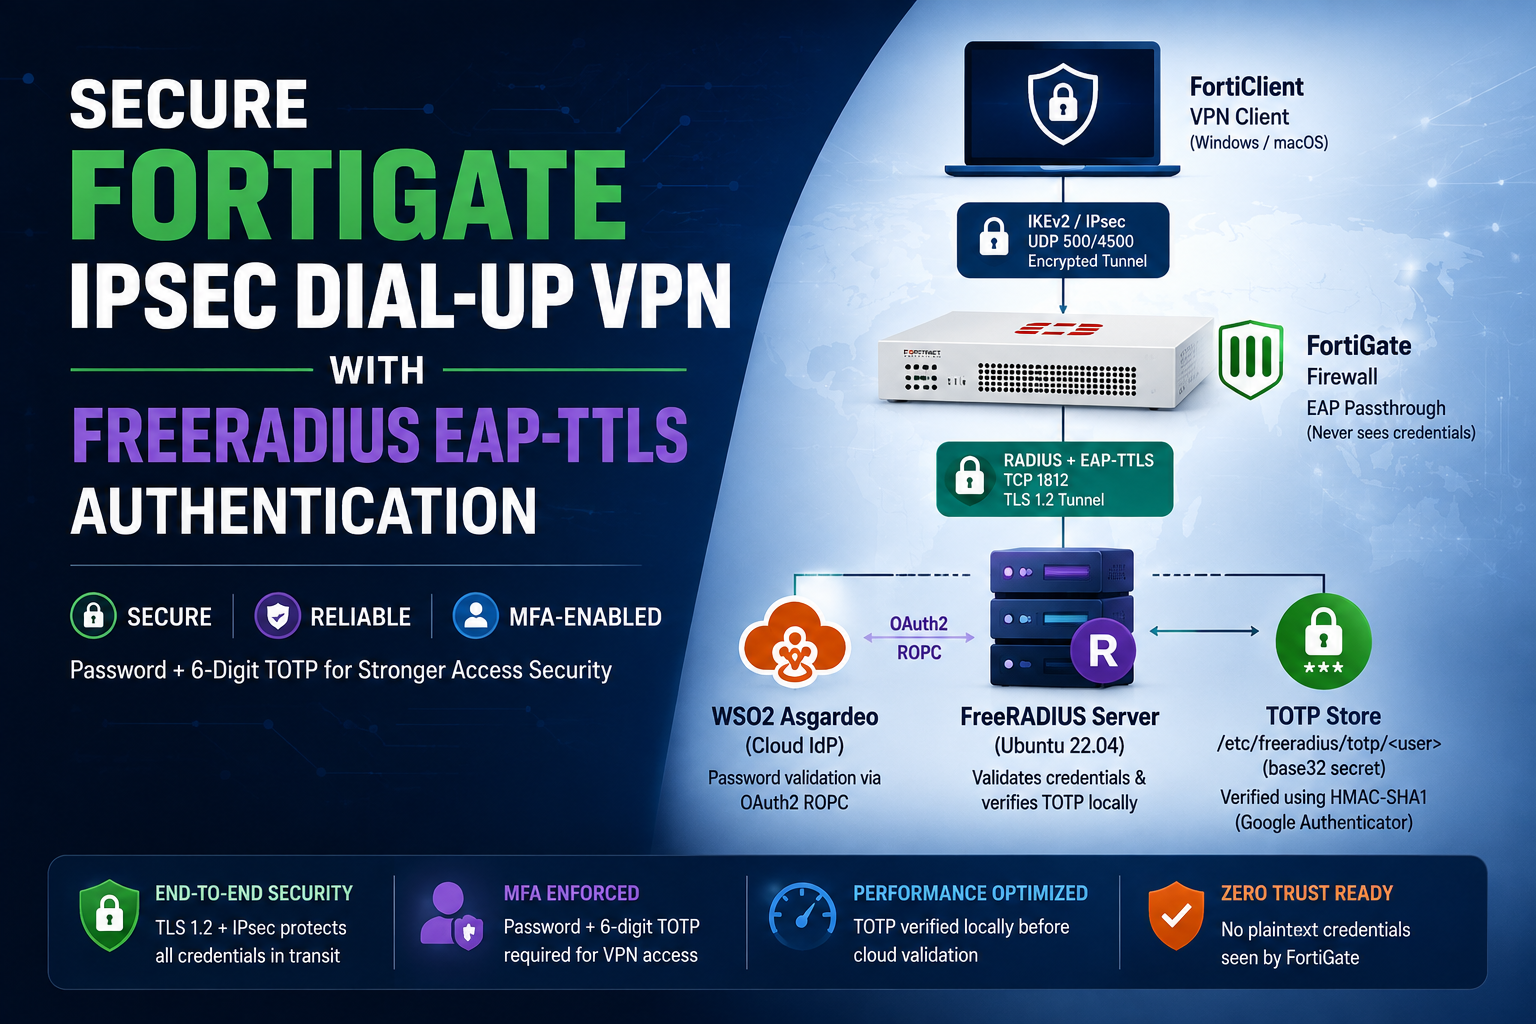
Modern enterprise VPN security requires more than just a username and password. A stronger design combines an encrypted VPN tunnel, protected EAP authentication, centralized identity validation, and a second authentication factor.
This guide shows how to build a FortiGate IKEv2 IPsec dial-up VPN with FreeRADIUS using EAP-TTLS authentication, WSO2 Identity Platform (Asgardeo) for password validation, and Google Authenticator TOTP for multi-factor authentication (MFA). The FreeRADIUS server runs on Ubuntu 24.04 LTS.
FortiGate IPsec Dial-Up VPN with FreeRADIUS – Architecture Overview
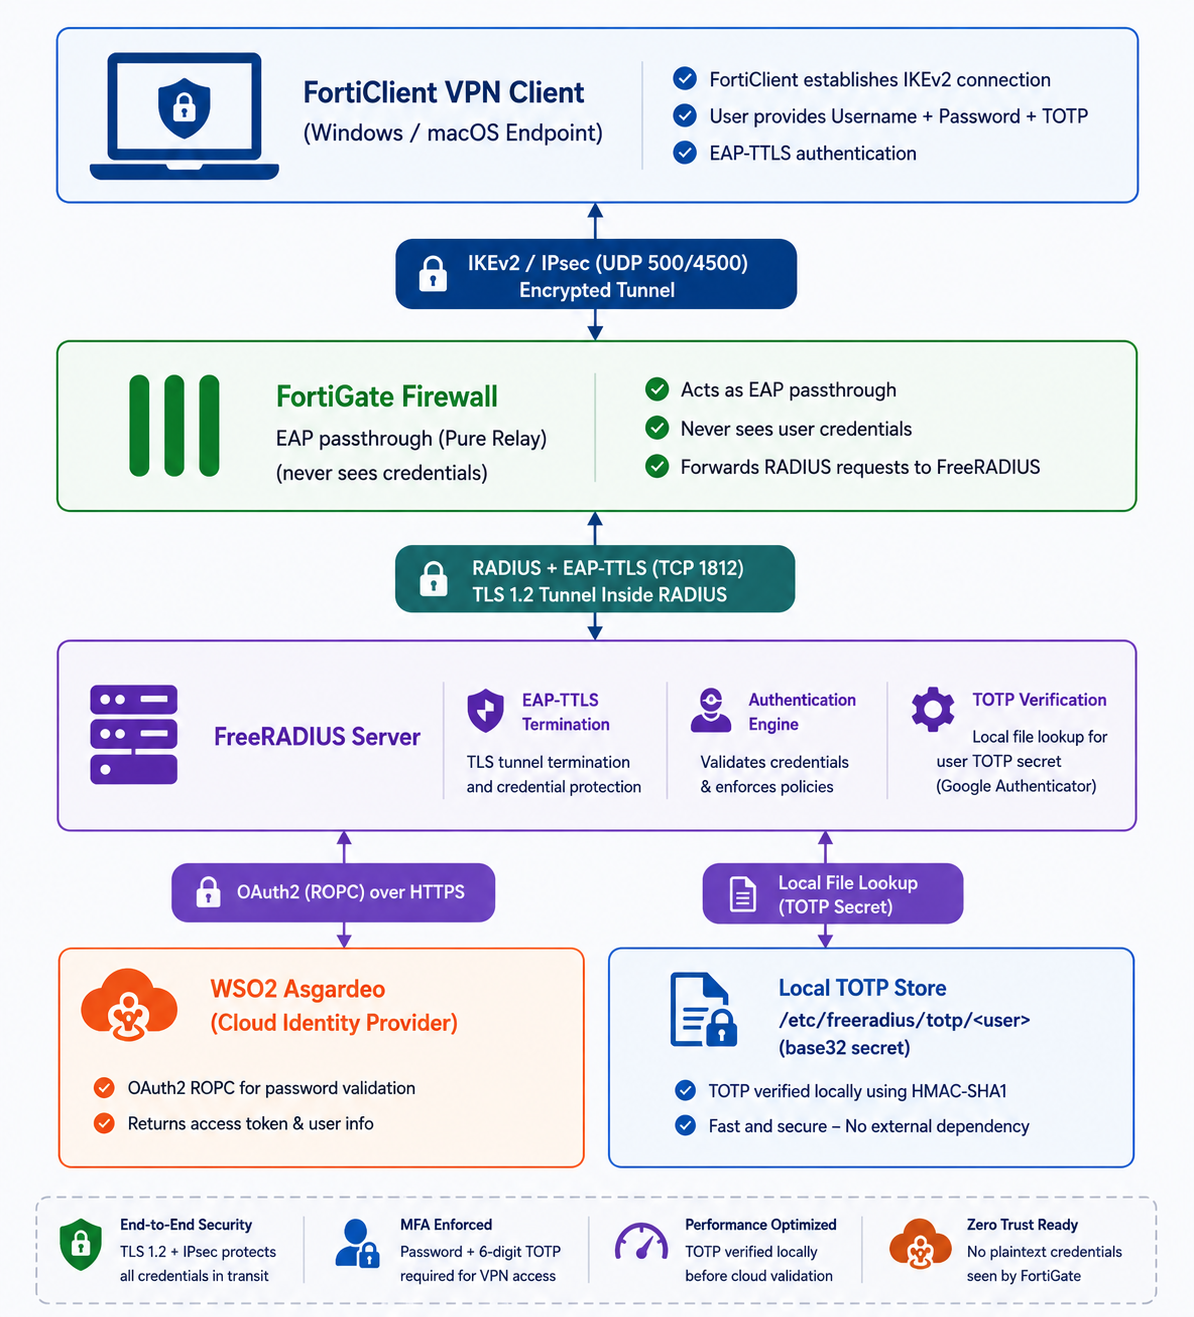
Why Use EAP-TTLS for a FortiGate IKEv2 VPN?
EAP-TTLS establishes a TLS-protected tunnel between the VPN client and the FreeRADIUS server. The protected tunnel allows an inner authentication method to be used without exposing the user’s authentication credentials directly on the network. EAP-TTLS can carry different inner authentication methods. In this implementation, the FreeRADIUS configuration supports both native PAP and EAP-GTC as inner authentication methods.
For FortiClient connections, the authentication configuration uses EAP-TTLS/PAP, while the FreeRADIUS configuration also accommodates EAP-GTC-based clients like strongSwan IPsec client.
EAP-TTLS Inner and Outer Layers
EAP-TTLS consists of an outer TLS-based EAP authentication layer and an inner authentication exchange carried inside the encrypted tunnel. The outer layer establishes the TLS tunnel and authenticates the FreeRADIUS server using its certificate.
The inner authentication method depends on the client and the authentication exchange:
- Native TTLS-PAP: The client sends the username and password using PAP inside the encrypted TTLS tunnel.
- EAP-TTLS/GTC: The client performs EAP-GTC inside the TTLS tunnel. The GTC module receives the password and can pass it to the configured PAP authentication mechanism.
The outer identity can be an anonymous identity such as anonymous, while the actual user identity is provided during the inner authentication exchange.
If you are new to EAP-TTLS or FreeRADIUS certificate configuration, see my detailed guide to deploying EAP-TTLS with FreeRADIUS.
How Authentication Works
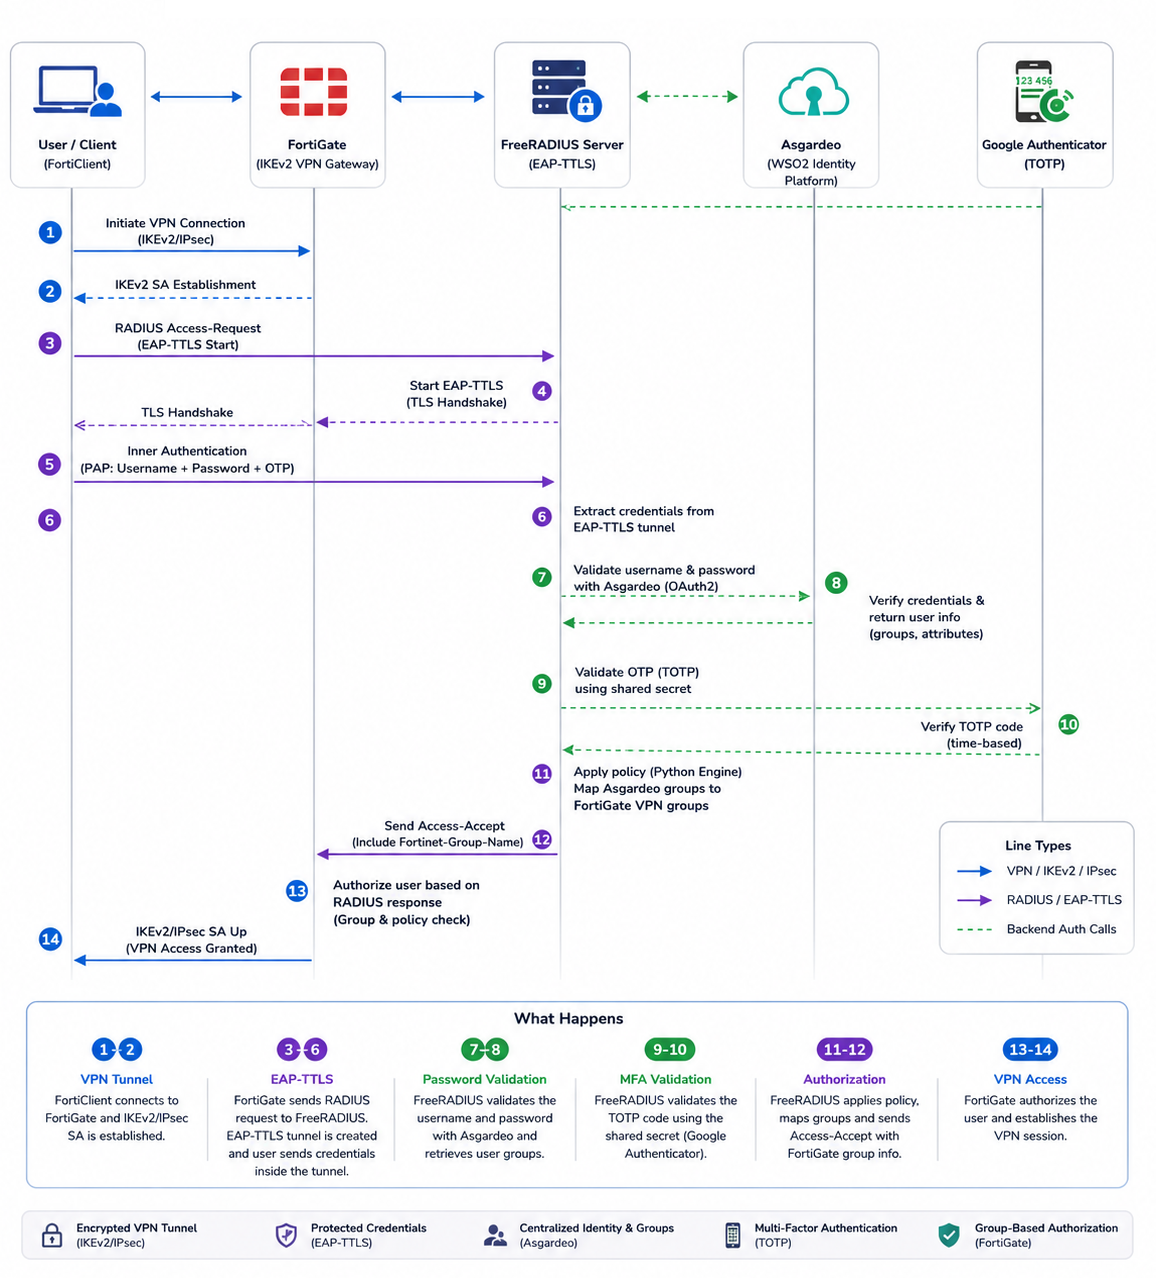
When a user connects using FortiClient, the authentication process passes through several layers before VPN access is granted.
- FortiClient initiates an IKEv2/IPsec connection to the FortiGate firewall.
- FortiGate acts as the VPN gateway and forwards the EAP authentication request to FreeRADIUS using RADIUS.
- FreeRADIUS establishes an EAP-TTLS TLS tunnel with the VPN client.
- Inside the EAP-TTLS tunnel, the Python policy engine validates the user’s password against Asgardeo and verifies the user’s TOTP code.
- After successful authentication, FreeRADIUS retrieves the user’s group information and maps it to the appropriate FortiGate VPN group.
- FortiGate receives the successful RADIUS response and authorizes the user, allowing the encrypted IPsec VPN tunnel to be established.
In simple terms, FortiGate handles the VPN connection, FreeRADIUS handles EAP authentication, Asgardeo validates the user’s identity, and TOTP provides the additional MFA layer.
Prerequisites
- Ubuntu 24.04 LTS VM with static IP
- FortiGate firewall with IKEv2 dial-up IPSec VPN
- Asgardeo account with a Standard-Based Application (ROPC grant enabled)
- FortiClient installed on end-user laptop
Install FreeRADIUS and Required Packages
Install FreeRADIUS, its utilities, Python integration, PAM, TOTP tooling and EAP testing tools:
apt-get update

apt-get install -y \
  freeradius freeradius-utils freeradius-python3 \
  python3-requests python3-yaml \
  libpam-google-authenticator qrencode oathtool \
  eapoltest
The main packages have these roles:
freeradiusandfreeradius-utils— RADIUS daemon and testing tools.freeradius-python3— Python policy integration.python3-requests— HTTPS calls to Asgardeo.python3-yaml— group mapping configuration.libpam-google-authenticator— Google Authenticator PAM integration.qrencode— TOTP enrollment QR codes.eapoltest— end-to-end EAP testing.
Enable the service:
systemctl enable --now freeradius
Important FreeRADIUS ownership rule:
The packaged service runs as the freerad user. If you edit files under /etc/freeradius/3.0/ with a root-owned editor, restore the ownership before restarting:
chown freerad:freerad /etc/freeradius/3.0/<modified-file>
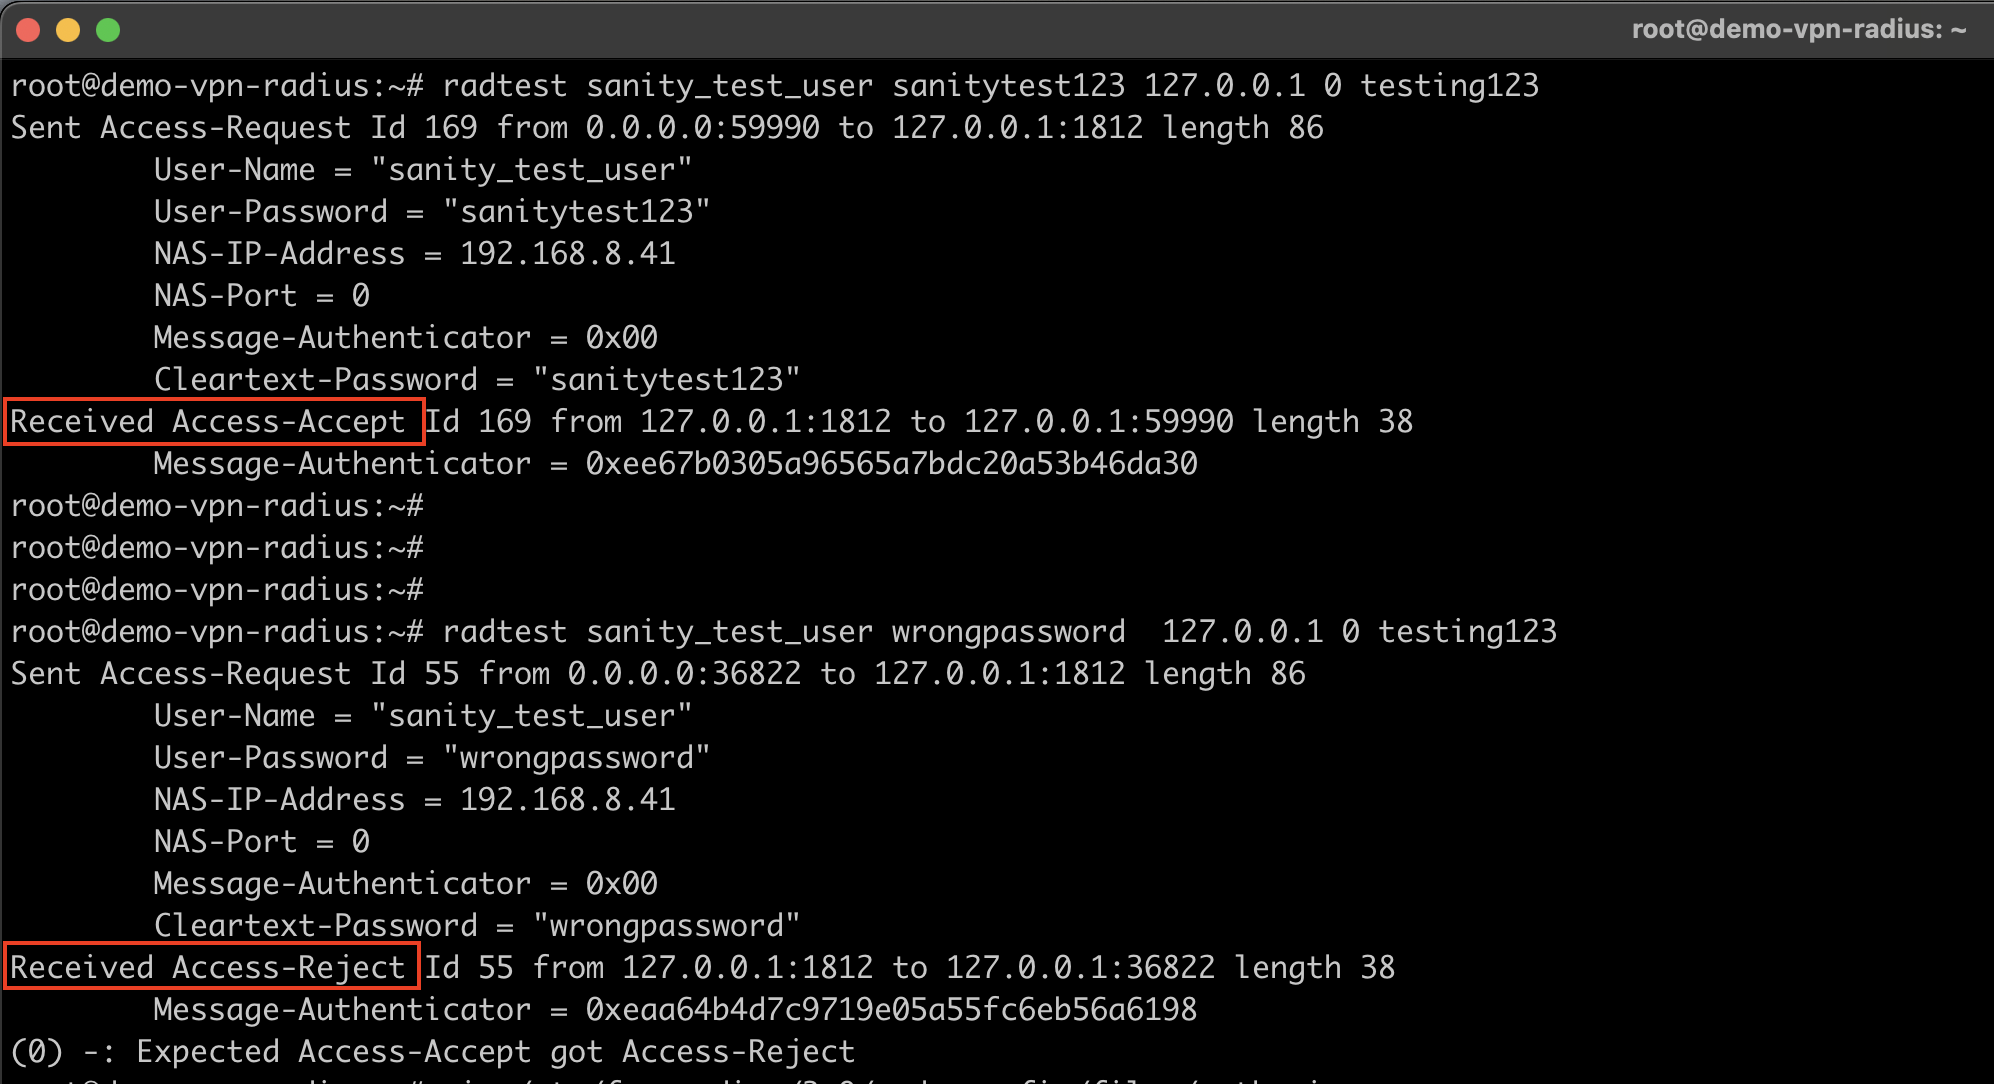
Perform a Baseline FreeRADIUS Test (optional)
Before adding EAP-TTLS and the custom policy engine, verify that the basic RADIUS installation works.
#Create a temporary test user:

cat >> /etc/freeradius/3.0/mods-config/files/authorize << 'EOF'
# Temporary sanity test user
sanity_test_user    Cleartext-Password := "sanitytest123"
EOF

chown freerad:freerad /etc/freeradius/3.0/mods-config/files/authorize

systemctl restart freeradius

#Test a valid password:

radtest sanity_test_user sanitytest123 127.0.0.1 0 testing123   # expect Access-Accept

#Then test an invalid password:

radtest sanity_test_user wrongpassword  127.0.0.1 0 testing123  # expect Access-Reject

#The first test should return Access-Accept and the second should return Access-Reject.
#Remove the temporary account after testing.
sudo sed -i '/^# Temporary sanity test user$/,+1d' /etc/freeradius/3.0/mods-config/files/authorize
Configure FortiGate as a RADIUS Client
The FortiGate must be defined as a RADIUS client in FreeRADIUS. In clients.conf, configure a dedicated client entry similar to:
vim /etc/freeradius/3.0/clients.conf

client fortigate_vpn {
    ipaddr  = <FORTIGATE_RADIUS_SOURCE_IP>
    secret  = <RADIUS_SHARED_SECRET>
    shortname = fortigate-vpn
    nas_type = other
    # Confirmed via radius.log that this FortiGate already sends
    # Message-Authenticator on every packet (BlastRADIUS / CVE-2024-3596
    # mitigation) - making it explicit and required, rather than relying on
    # FreeRADIUS's runtime auto-detection (which doesn't persist across
    # restarts and re-logs the same notice every time).
    require_message_authenticator = true
}
Make sure to validate the configuration and restart the service after change:
#Validate:
freeradius -CX | tail -5

#Then, Restart the service:
systemctl restart freeradius
Build the Internal PKI for EAP-TTLS
EAP-TTLS requires the RADIUS server to present a TLS certificate. FreeRADIUS ships with a bootstrap script that generates a self-signed CA and server certificate:
cd /etc/freeradius/3.0/certs

#Modify the ca.cnf and server.cnf files accordingly

#ca.cnf
#-------

[ CA_default ]
default_days            = 3650

[certificate_authority]
countryName             = LK
stateOrProvinceName     = Western
localityName            = Colombo
organizationName        = Demo
emailAddress            = [email protected]
commonName              = "Demo VPN RADIUS CA"


#server.cnf
#----------

[ CA_default ]
default_days            = 3650

[server]
countryName             = LK
stateOrProvinceName     = Western
localityName            = Colombo
organizationName        = Demo
emailAddress            = [email protected]
commonName              = "Demo Radius Server Certificate"
Note: Replace the above with your real org details.
Then generate the certificates and change the permissions accordingly.
bash bootstrap

chown freerad:freerad ca.pem server.pem server.key
chmod 640 ca.pem server.pem server.key
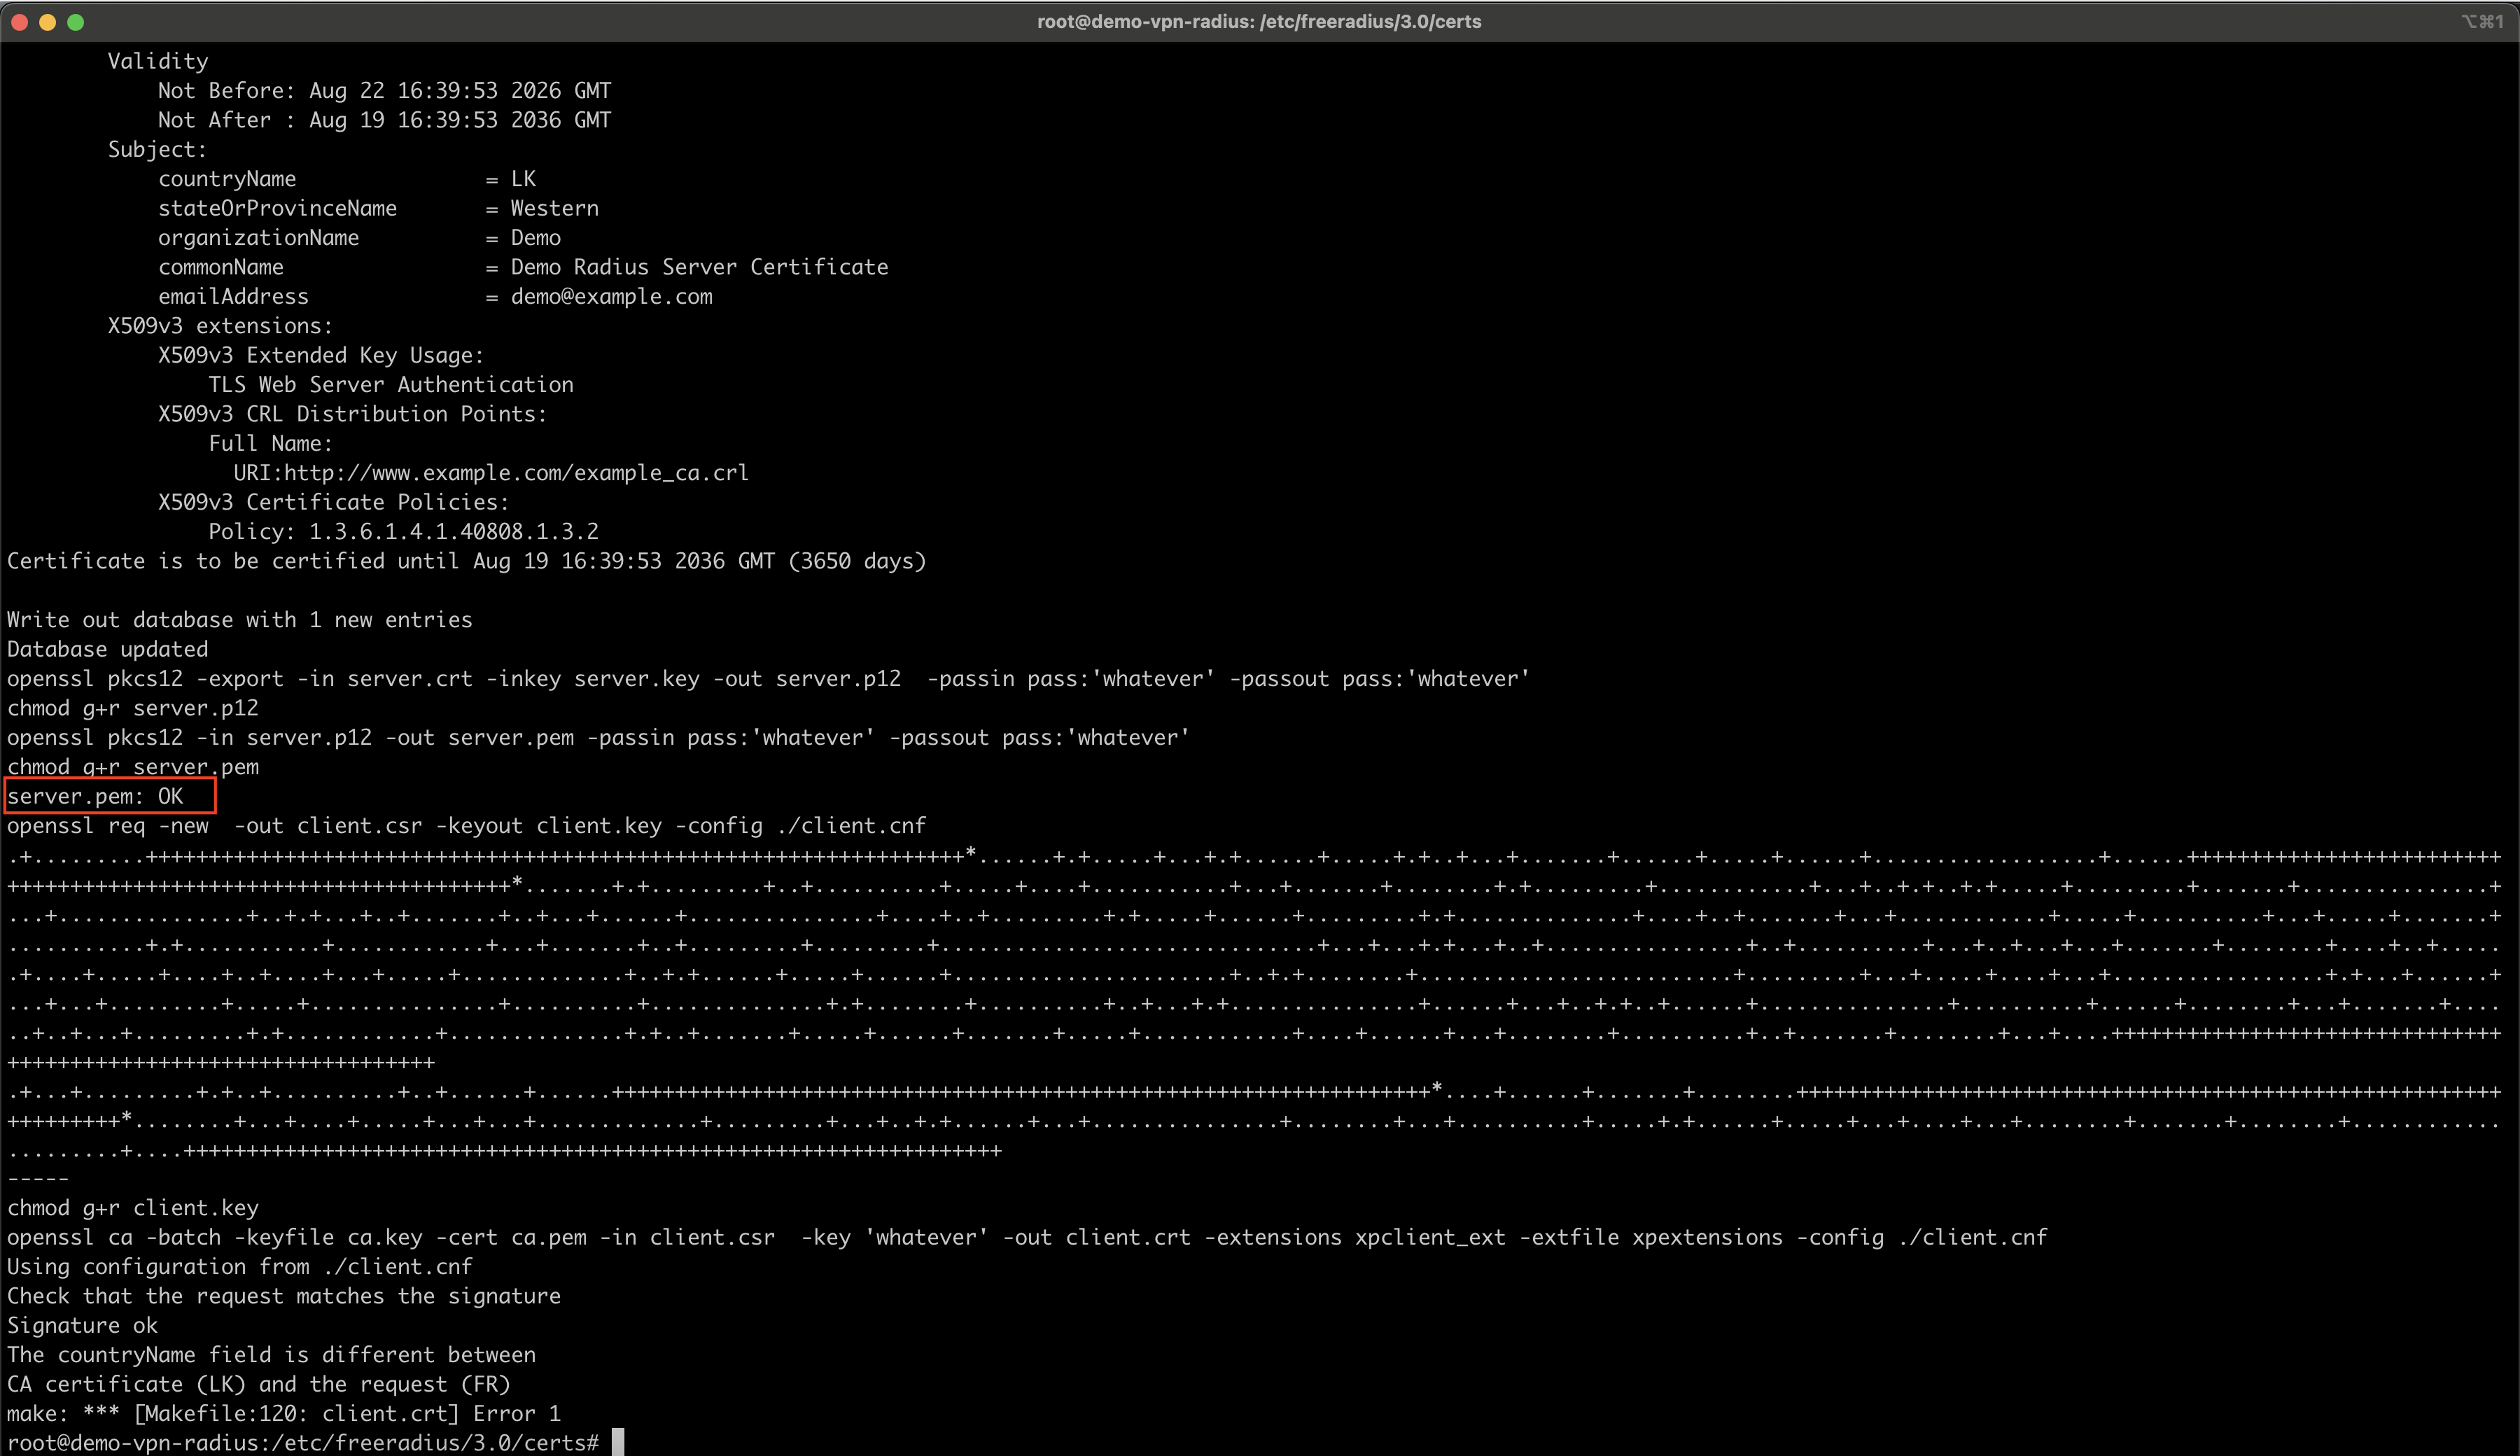
Note: This design does not require client certificates. The server certificate is used to establish the EAP-TTLS TLS tunnel, while user authentication is performed using an inner authentication method such as native PAP or EAP-GTC.
Once the CA and server certificates are generated, you can verify it is by following commands:
openssl x509 -in ca.pem -noout -subject -dates
openssl x509 -in server.crt -noout -subject -issuer -dates
openssl verify -CAfile ca.pem server.pem   # must print "server.pem: OK"
Note: Every FortiClient endpoint participating in EAP-TTLS must trust the CA that signed the FreeRADIUS certificate.
Configure FreeRADIUS EAP-TTLS
Modify the following configurations of eap module on /etc/freeradius/3.0/mods-available/eap.
eap {
    default_eap_type = ttls

    tls-config tls-common {
        private_key_file = ${certdir}/server.key
        certificate_file = ${certdir}/server.pem
        ca_file = ${cadir}/ca.pem
        tls_min_version = "1.2"
        tls_max_version = "1.2"
    }

    ttls {
        default_eap_type = gtc
        copy_request_to_tunnel = yes
    }
}
Make sure to validate the configuration and restart the service after change:
#Validate:
freeradius -CX | tail -5

#Then, Restart the service:
systemctl restart freeradius
Test EAP-TTLS end-to-end with eapol_test
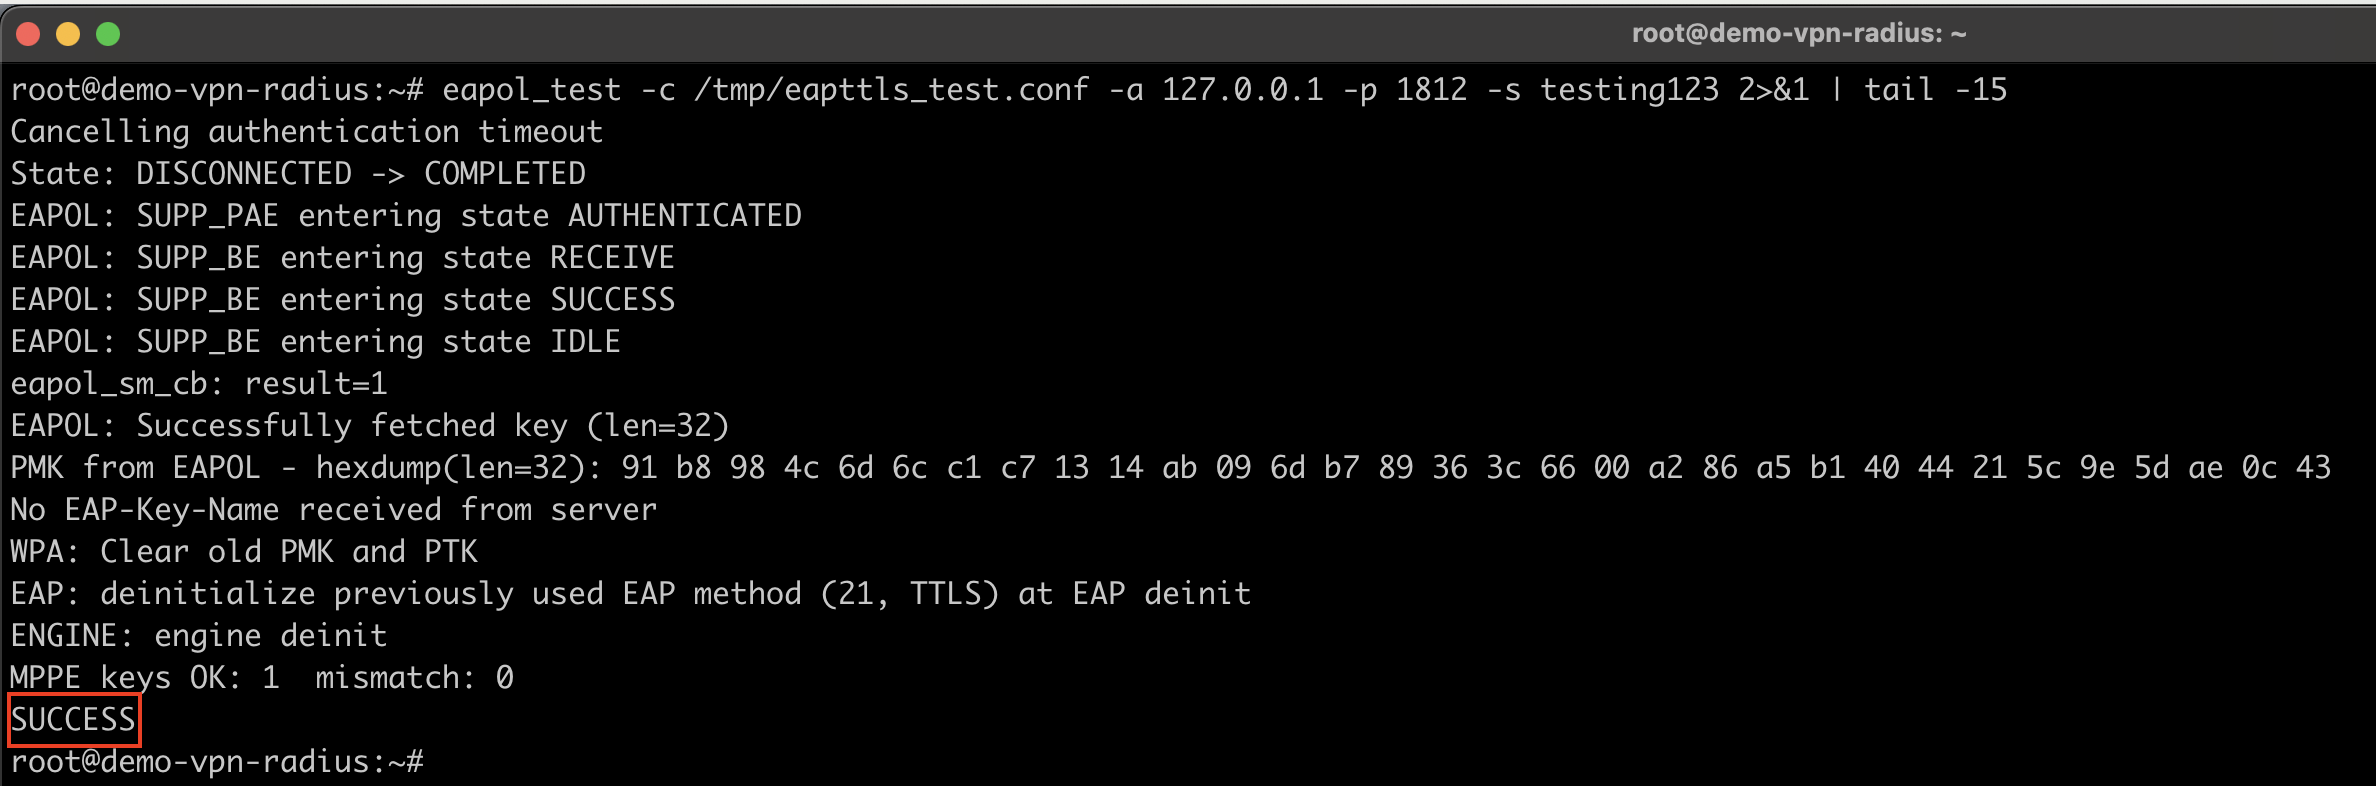
This test validates the native EAP-TTLS/PAP authentication path.
cat >> /etc/freeradius/3.0/mods-config/files/authorize << 'EOF'
# --- throwaway EAP-TTLS/PAP test user, remove after use ---
eapttls_test_user	Cleartext-Password := "eapttlstest123"
EOF

chown freerad:freerad /etc/freeradius/3.0/mods-config/files/authorize
systemctl restart freeradius

wget -O /tmp/eapttls_test.conf https://raw.githubusercontent.com/lakindu93/fortigate-ikev2-freeradius-eap-ttls-mfa/refs/heads/main/scripts/eapttls_test.conf

eapol_test -c /tmp/eapttls_test.conf -a 127.0.0.1 -p 1812 -s testing123 2>&1 | tail -15
Clean up the testing:
rm -f /tmp/eapttls_test.conf

sed -i '/--- throwaway EAP-TTLS\/PAP test user/,/eapttls_test_user\tCleartext-Password := "eapttlstest123"/d' /etc/freeradius/3.0/mods-config/files/authorize

chown freerad:freerad /etc/freeradius/3.0/mods-config/files/authorize

systemctl restart freeradius
Implement the Python Policy Engine
The main policy engine – radius_policy.py
The Python policy engine is invoked by FreeRADIUS after the inner authentication credentials have been made available by the EAP-TTLS authentication process.
For native TTLS-PAP, the username and password are available as part of the inner PAP request. For EAP-GTC, the credentials become available after the EAP-GTC exchange is processed.
The Python policy engine then performs the application-level authentication and authorization logic, including:
- Extracting the password and TOTP value.
- Validating the password against Asgardeo.
- Retrieving the user’s group membership.
- Validating the TOTP code.
- Mapping the user’s group to the appropriate
Fortinet-Group-Name. - Returning the final authentication decision
Access-AcceptorAccess-Reject.
Please make sure to create the following directories to store the TOTP secrets and it’s state.
mkdir -p /etc/freeradius/3.0/mods-config/python3/otp_secrets

mkdir -p /etc/freeradius/3.0/mods-config/python3/otp_state
You can directly download the radius_policy.py engine inside my repo.
sudo wget -O /etc/freeradius/3.0/mods-config/python3/radius_policy.py https://github.com/lakindu93/fortigate-ikev2-freeradius-eap-ttls-mfa/raw/refs/heads/main/freeradius-config/mods-config/python3/radius_policy.py
Google Authenticator TOTP Validation
This code snippet is a TOTP validation module for FreeRADIUS, written in Python. Its main purpose is to validate a user’s 6-digit time-based one-time password (TOTP), such as a code generated by Google Authenticator, while also providing replay protection and brute-force protection.
You can directly download the script inside my repo.
sudo wget -O /etc/freeradius/3.0/mods-config/python3/otp_check.py https://raw.githubusercontent.com/lakindu93/fortigate-ikev2-freeradius-eap-ttls-mfa/refs/heads/main/freeradius-config/mods-config/python3/otp_check.py
Map Asgardeo Groups to FortiGate VPN Groups
The policy engine uses a YAML mapping file rather than hard-coding every group into Python.
vim /etc/freeradius/3.0/mods-config/python3/vpn_group_map.yaml
# Left-hand side must exactly match:
#   - the Asgardeo group's display name, for cloud-path users, OR
# Right-hand side must exactly match the "group-name" configured in the FortiGate's `config user group`

network-admins: admin-users
all-non-admins: non-admin-users
Fix ownership/permissions on everything just created
chown -R freerad:freerad /etc/freeradius/3.0/mods-config/python3/

chmod 640 /etc/freeradius/3.0/mods-config/python3/*.py /etc/freeradius/3.0/mods-config/python3/*.yaml

chmod 700 /etc/freeradius/3.0/mods-config/python3/otp_secrets /etc/freeradius/3.0/mods-config/python3/otp_state
Wire the Policy Engine into FreeRADIUS
Configure and enable the python3 module
FreeRADIUS Python3 module configuration (/etc/freeradius/3.0/mods-available/python3) so that FreeRADIUS loads your custom Python module (radius_policy.py)
vim /etc/freeradius/3.0/mods-available/python3
python3 {
	#  Path to the python modules
	python_path="${modconfdir}/${.:name}"

	# radius_policy.py — Asgardeo + MFA policy engine
	module = radius_policy

	mod_instantiate = ${.module}
	func_instantiate = instantiate

	mod_authorize = ${.module}
	func_authorize = authorize

    mod_authenticate = ${.module}
    func_authenticate = authenticate
}
chown freerad:freerad /etc/freeradius/3.0/mods-available/python3

ln -sf ../mods-available/python3 /etc/freeradius/3.0/mods-enabled/python3
vim /etc/freeradius/3.0/sites-available/inner-tunnel
#Inside the authorize { ... } block, scroll towards the end until you find something "pap" and below that add the following if block.

authorize {
        pap

        #  The policy engine (radius_policy.py). Only run it here
        #  if a password is already present: native TTLS-PAP clients (e.g.
        #  FortiClient on Windows/macOS) get User-Password decoded before
        #  authorize{} runs, but EAP-GTC inner clients (e.g. strongSwan on
        #  Linux) don't decode it until authenticate{} runs the eap module's
        #  gtc submodule - calling python3 unconditionally here would reject
        #  those requests before they're ever decoded. See the matching
        #  python3 call added in the Auth-Type PAP block below.

        if (&User-Password) {
            python3
        }
}

authenticate {
        Auth-Type PAP {
                #  NOT calling pap here: there's no local password store for
                #  these users (same reasoning as the authorize{} comment
                #  above), so it always returns "fail" on the known-good-
                #  password check and that aborts this block before python3
                #  runs. The policy engine below makes the actual
                #  Accept/Reject decision (mirrors the authorize{} call
                #  above, used for the native TTLS-PAP path).

                python3
        }
}
Enable inner-tunnel reply propagation to the outer
This setting enables propagation of RADIUS reply attributes from the inner tunnel to the outer session. It is commonly required for tunneled EAP methods such as EAP-TTLS or PEAP.
When your custom Python authentication module (radius_policy.py) returns reply attributes (for example, Reply-Message, Filter-Id, or other RADIUS attributes), enabling this block ensures those attributes are copied from the inner authentication session to the outer RADIUS response sent back to the VPN client or Network Access Server (NAS), such as a FortiGate firewall. Without this change, those reply attributes would remain inside the inner tunnel and would not be visible to the client or NAS.
post-auth {
    if (1) {
        ...
        update {
            &outer.session-state: += &reply:
        }
    }
}
chown freerad:freerad /etc/freeradius/3.0/sites-available/inner-tunnel

freeradius -CX | tail -5

systemctl restart freeradius
Asgardeo Setup
Create the VPN Users and Groups
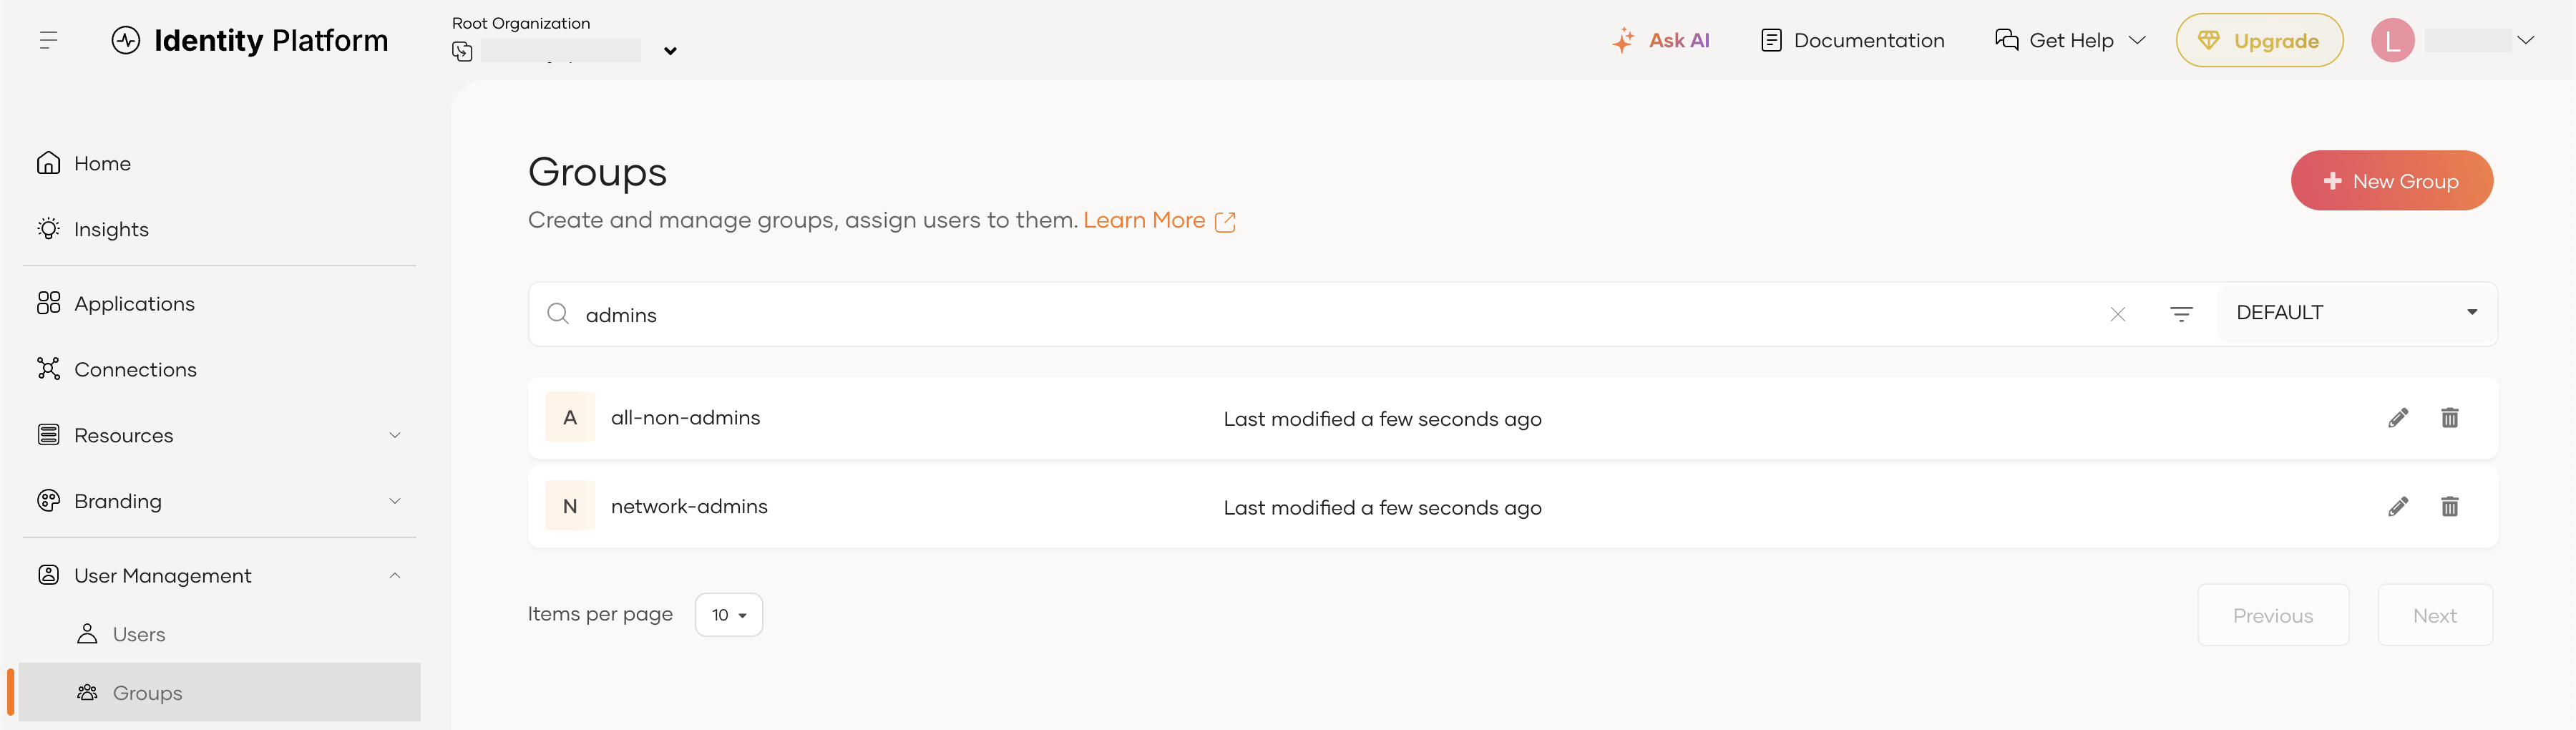
Sign in to the Asgardeo console and create at least two test users, and next create the groups that you want to use for VPN authorization. In this example, I will create two groups network-admins and all-non-admins.
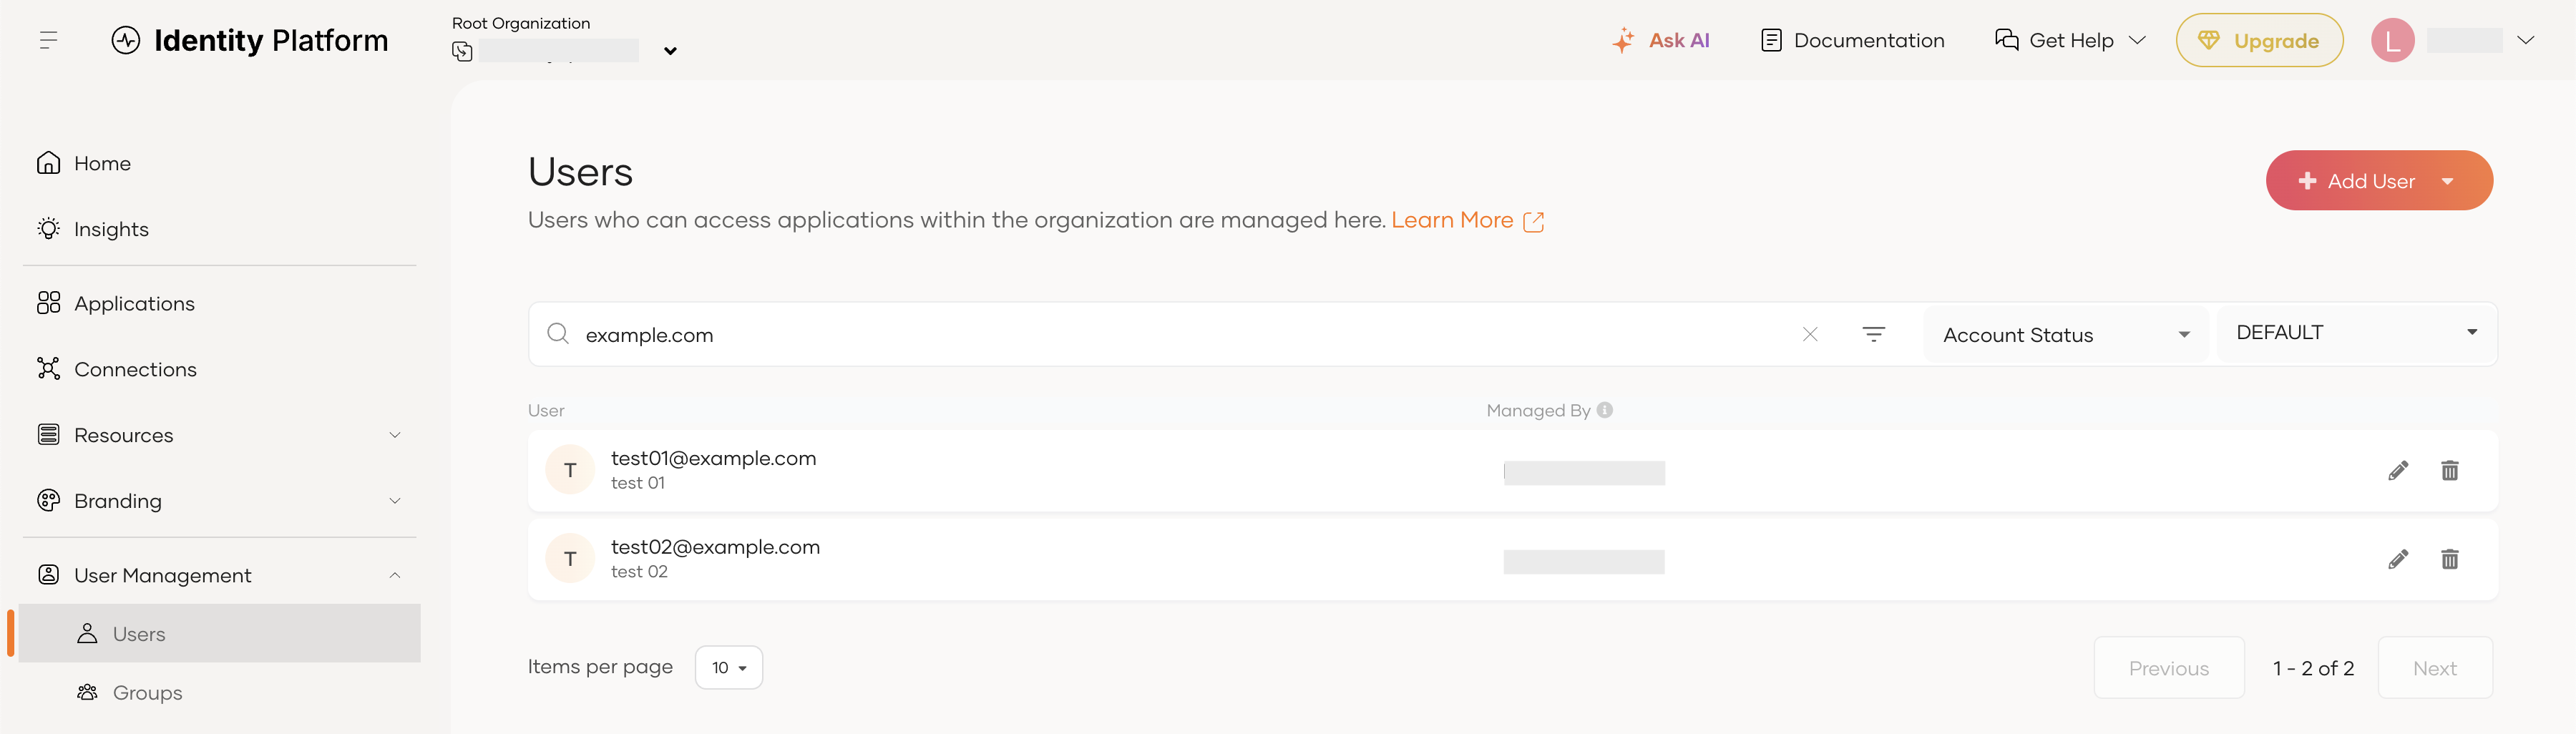
I’m adding one test user to each group. This allows you to verify that group-based VPN authorization is working as expected and confirm that users in different groups receive the appropriate level of access.
Create the Asgardeo Application
Go to: Applications → New Application Create a Standard-Based Application using OAuth 2.0 / OpenID Connect.
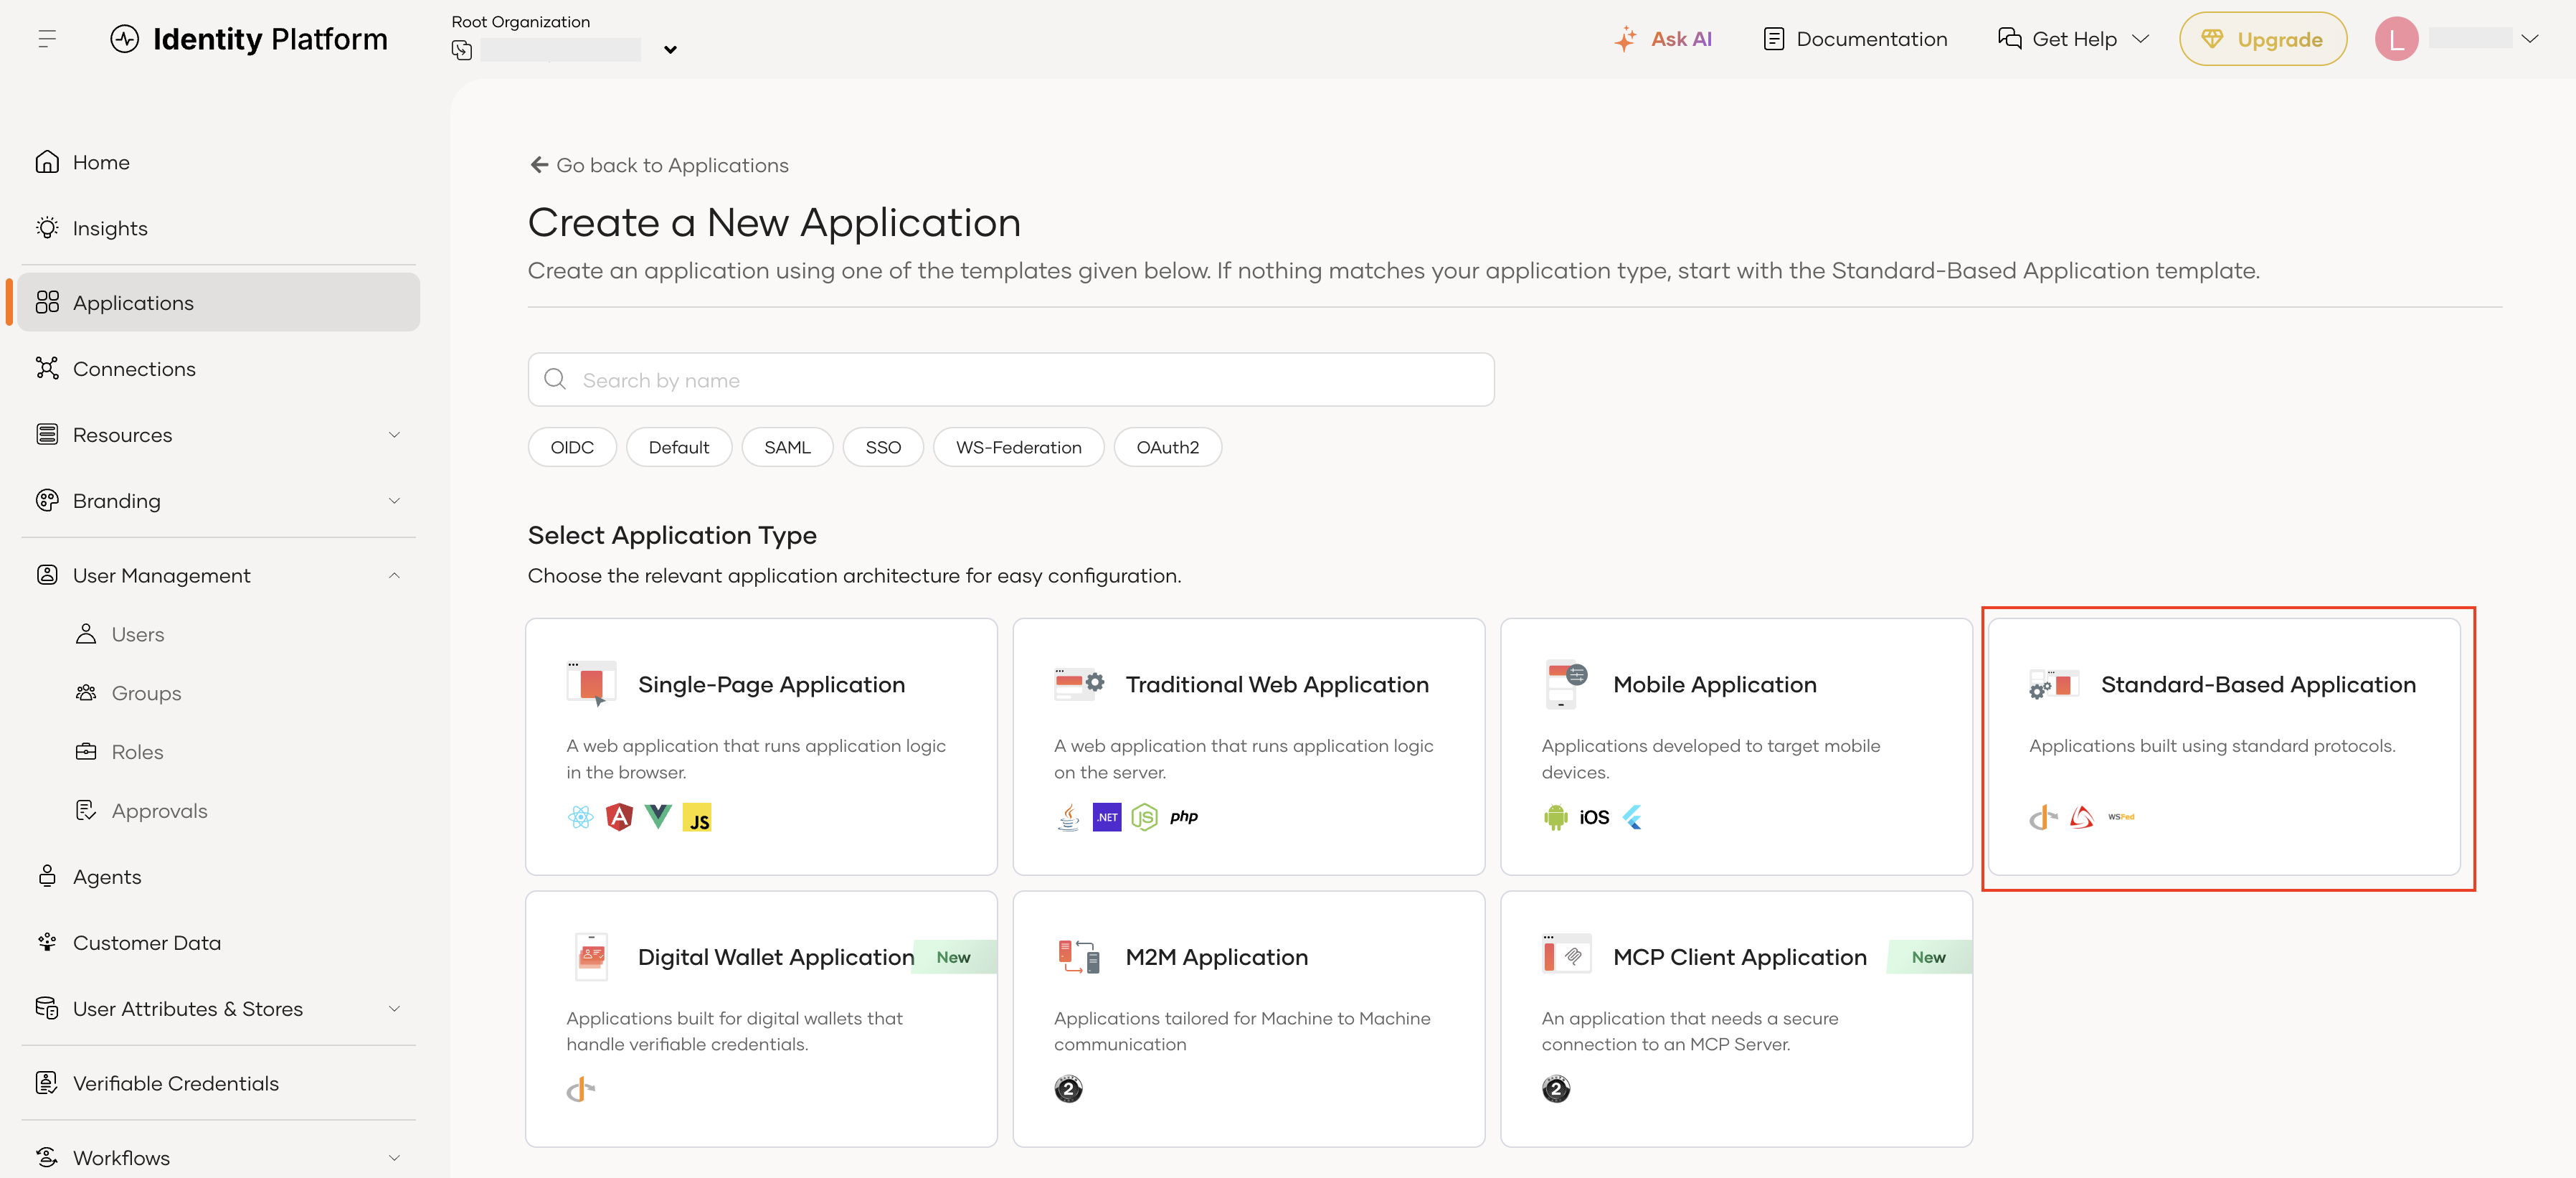
Give the name as vpn-radius-auth-demo or any name you preferred.
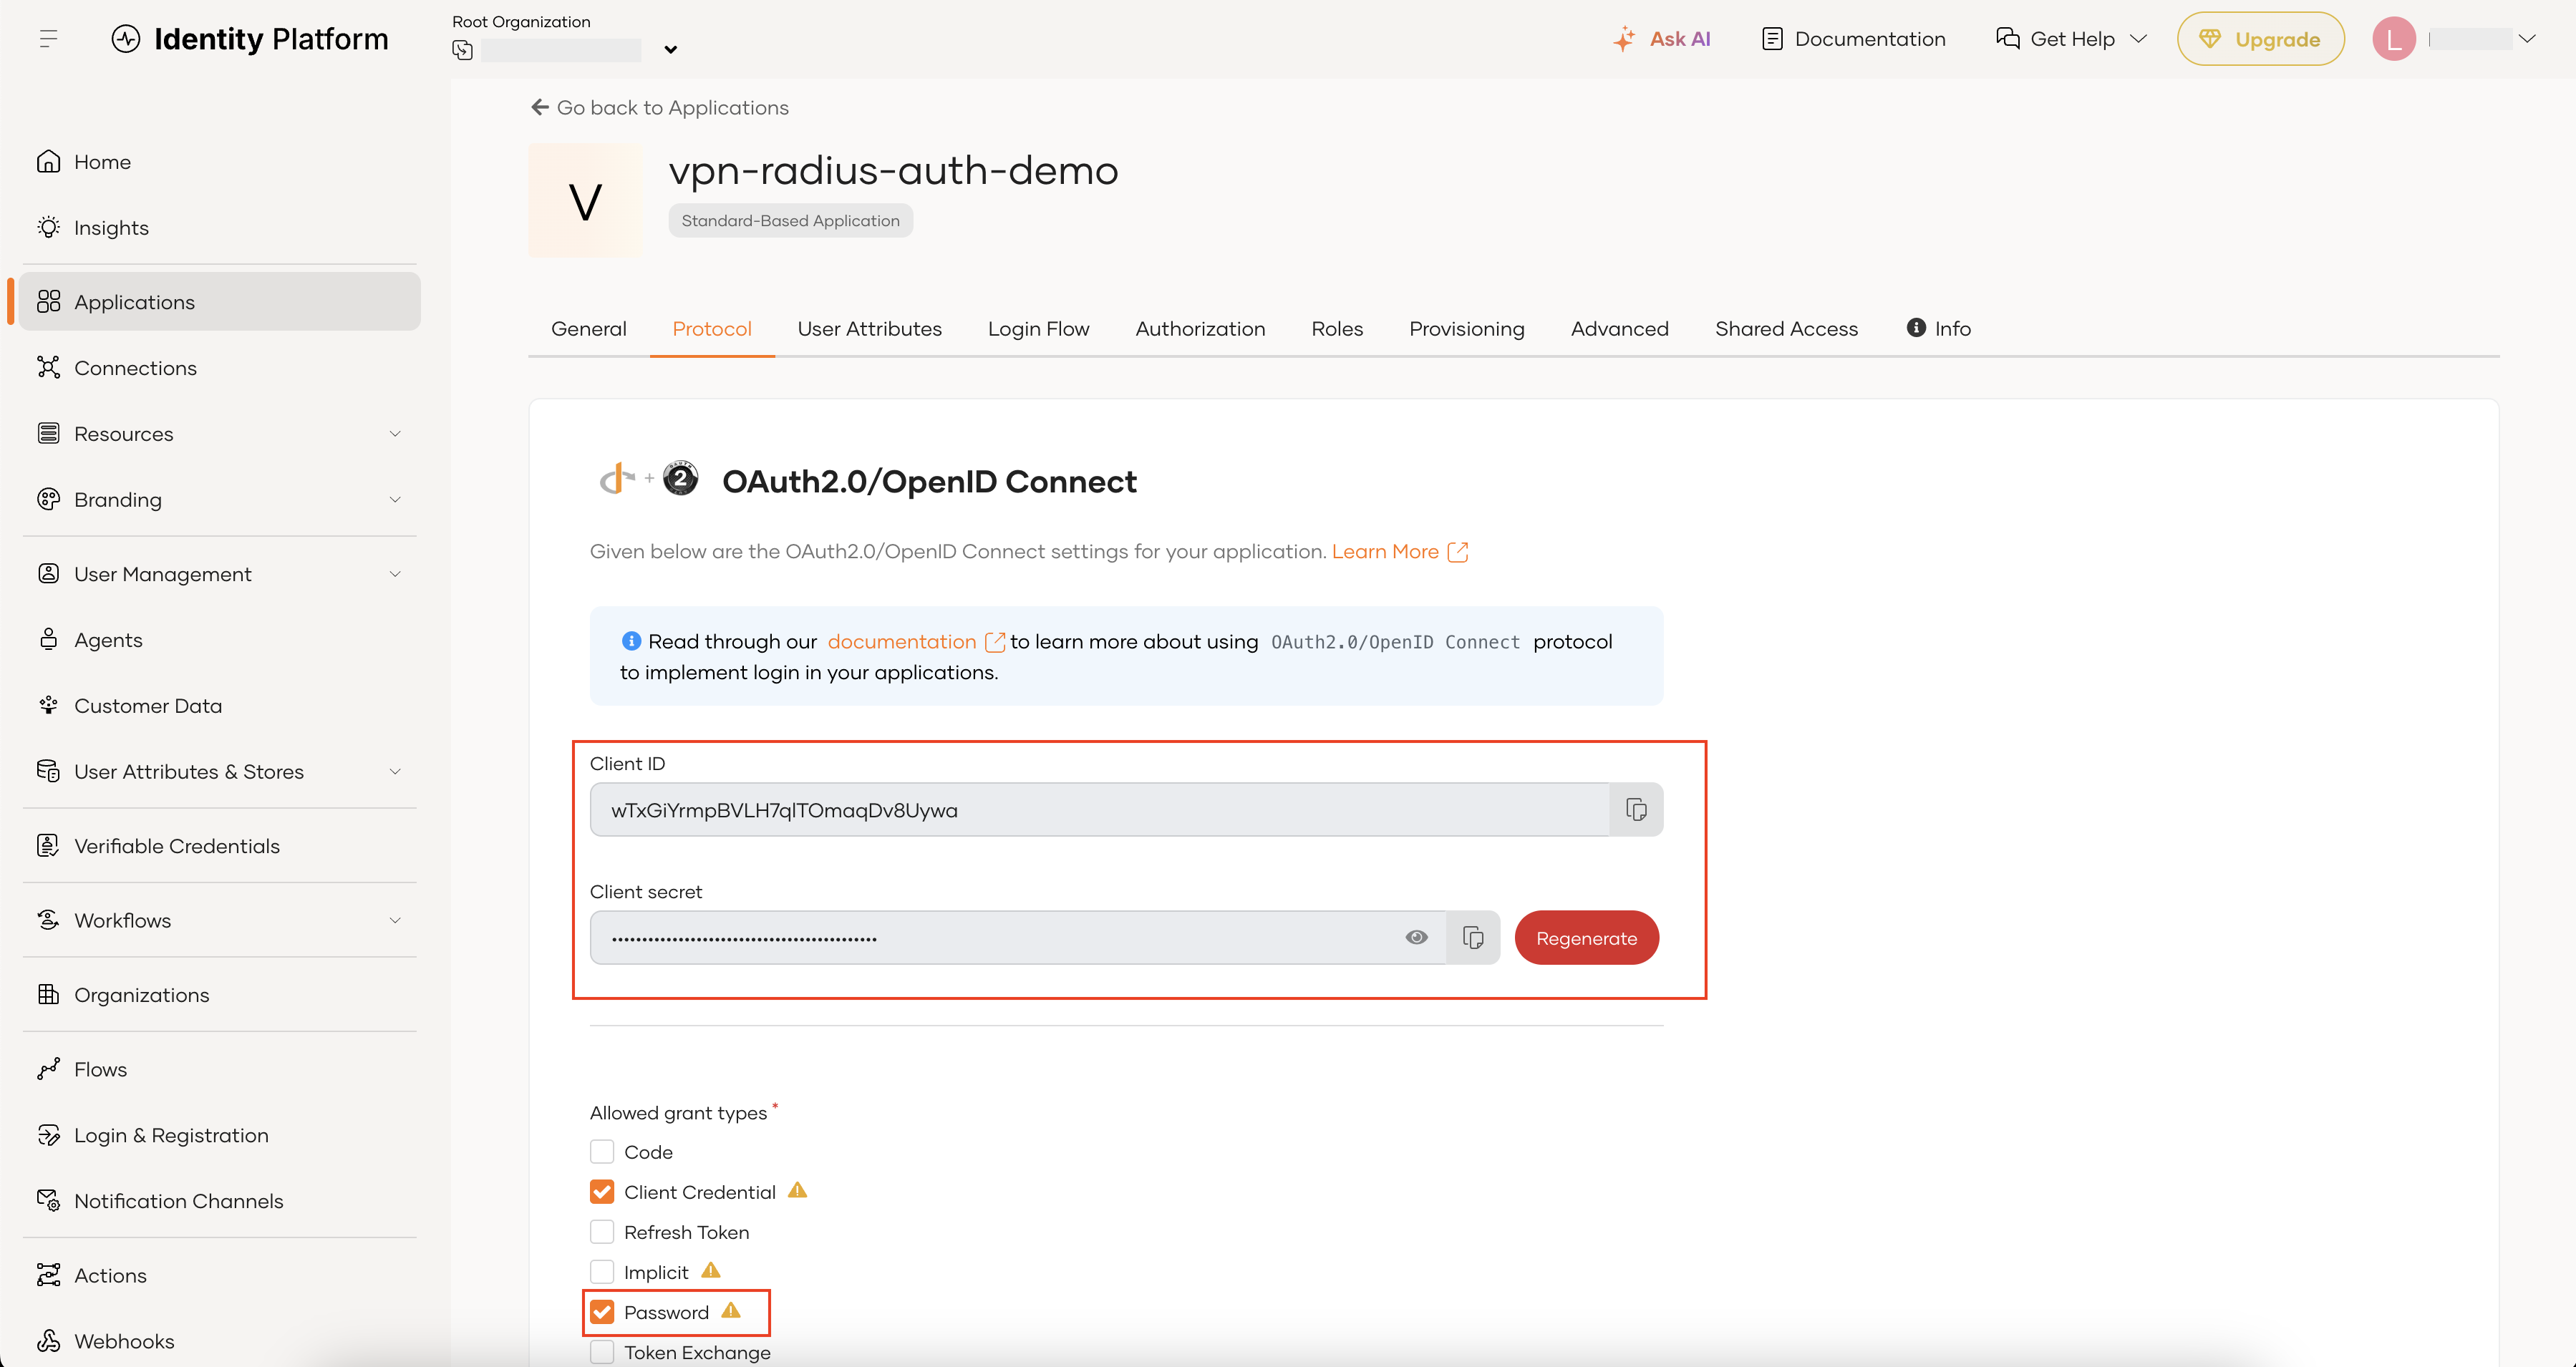
In the protocol section you can see the Client ID and Client Secret please make a note of it and you will require in in the next step. Also in the same section under “Allowed grant types” check the “Password” option.
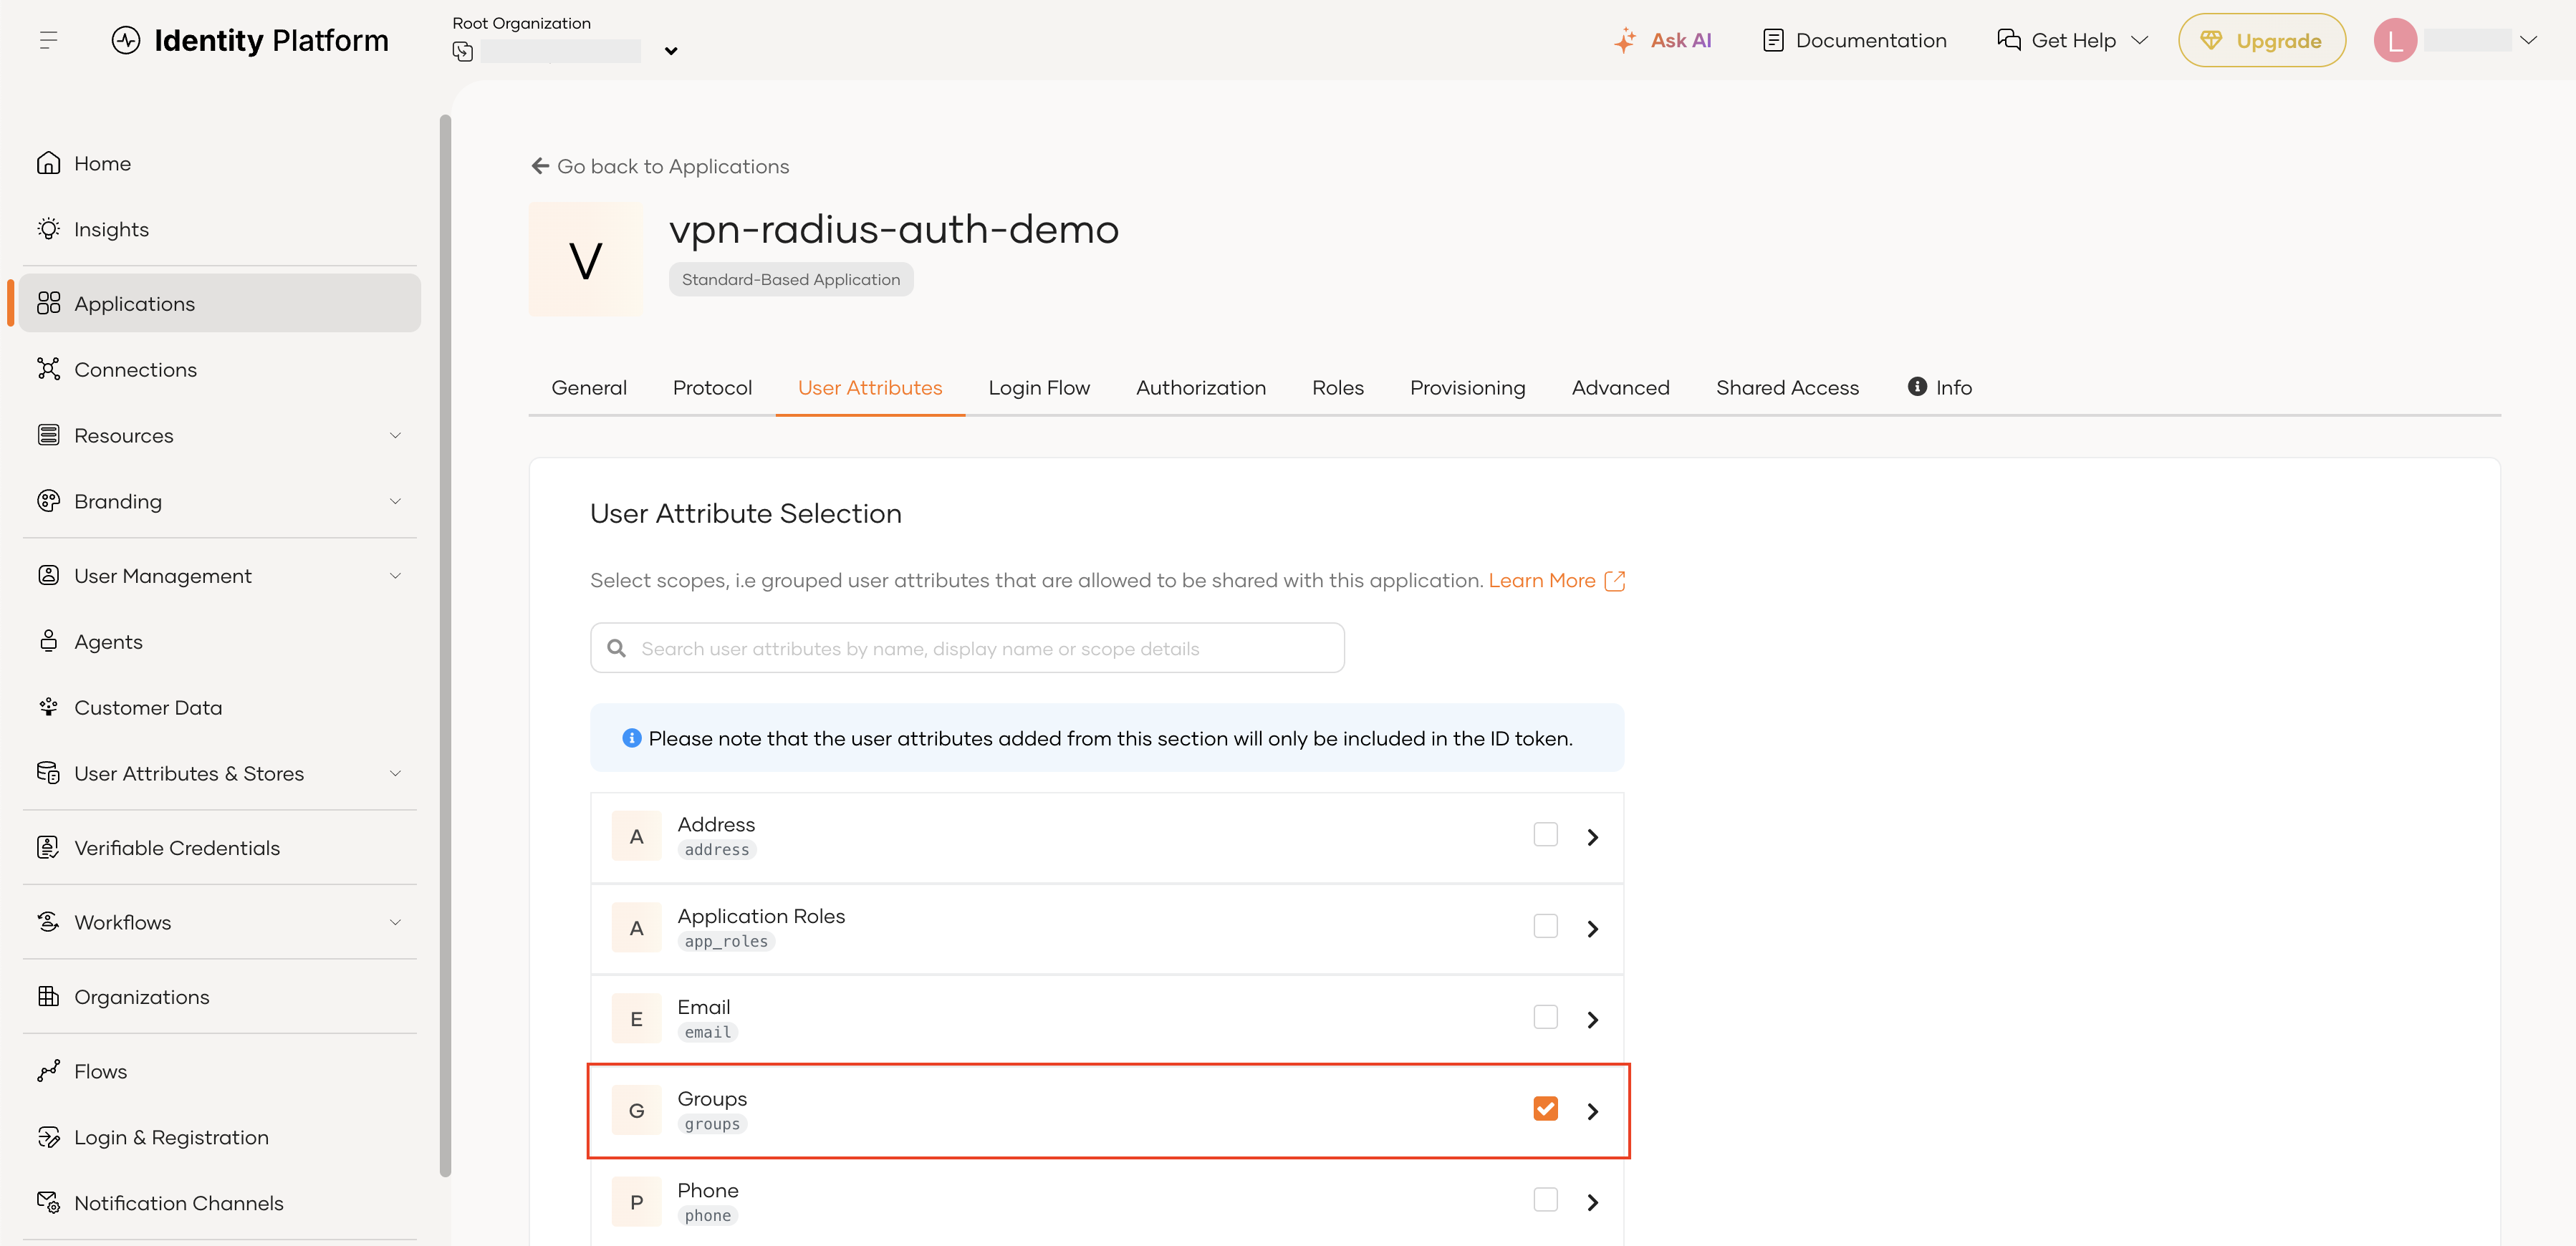
In the “User Attribute” section select the groups check box under the “User Attribute Selection”.
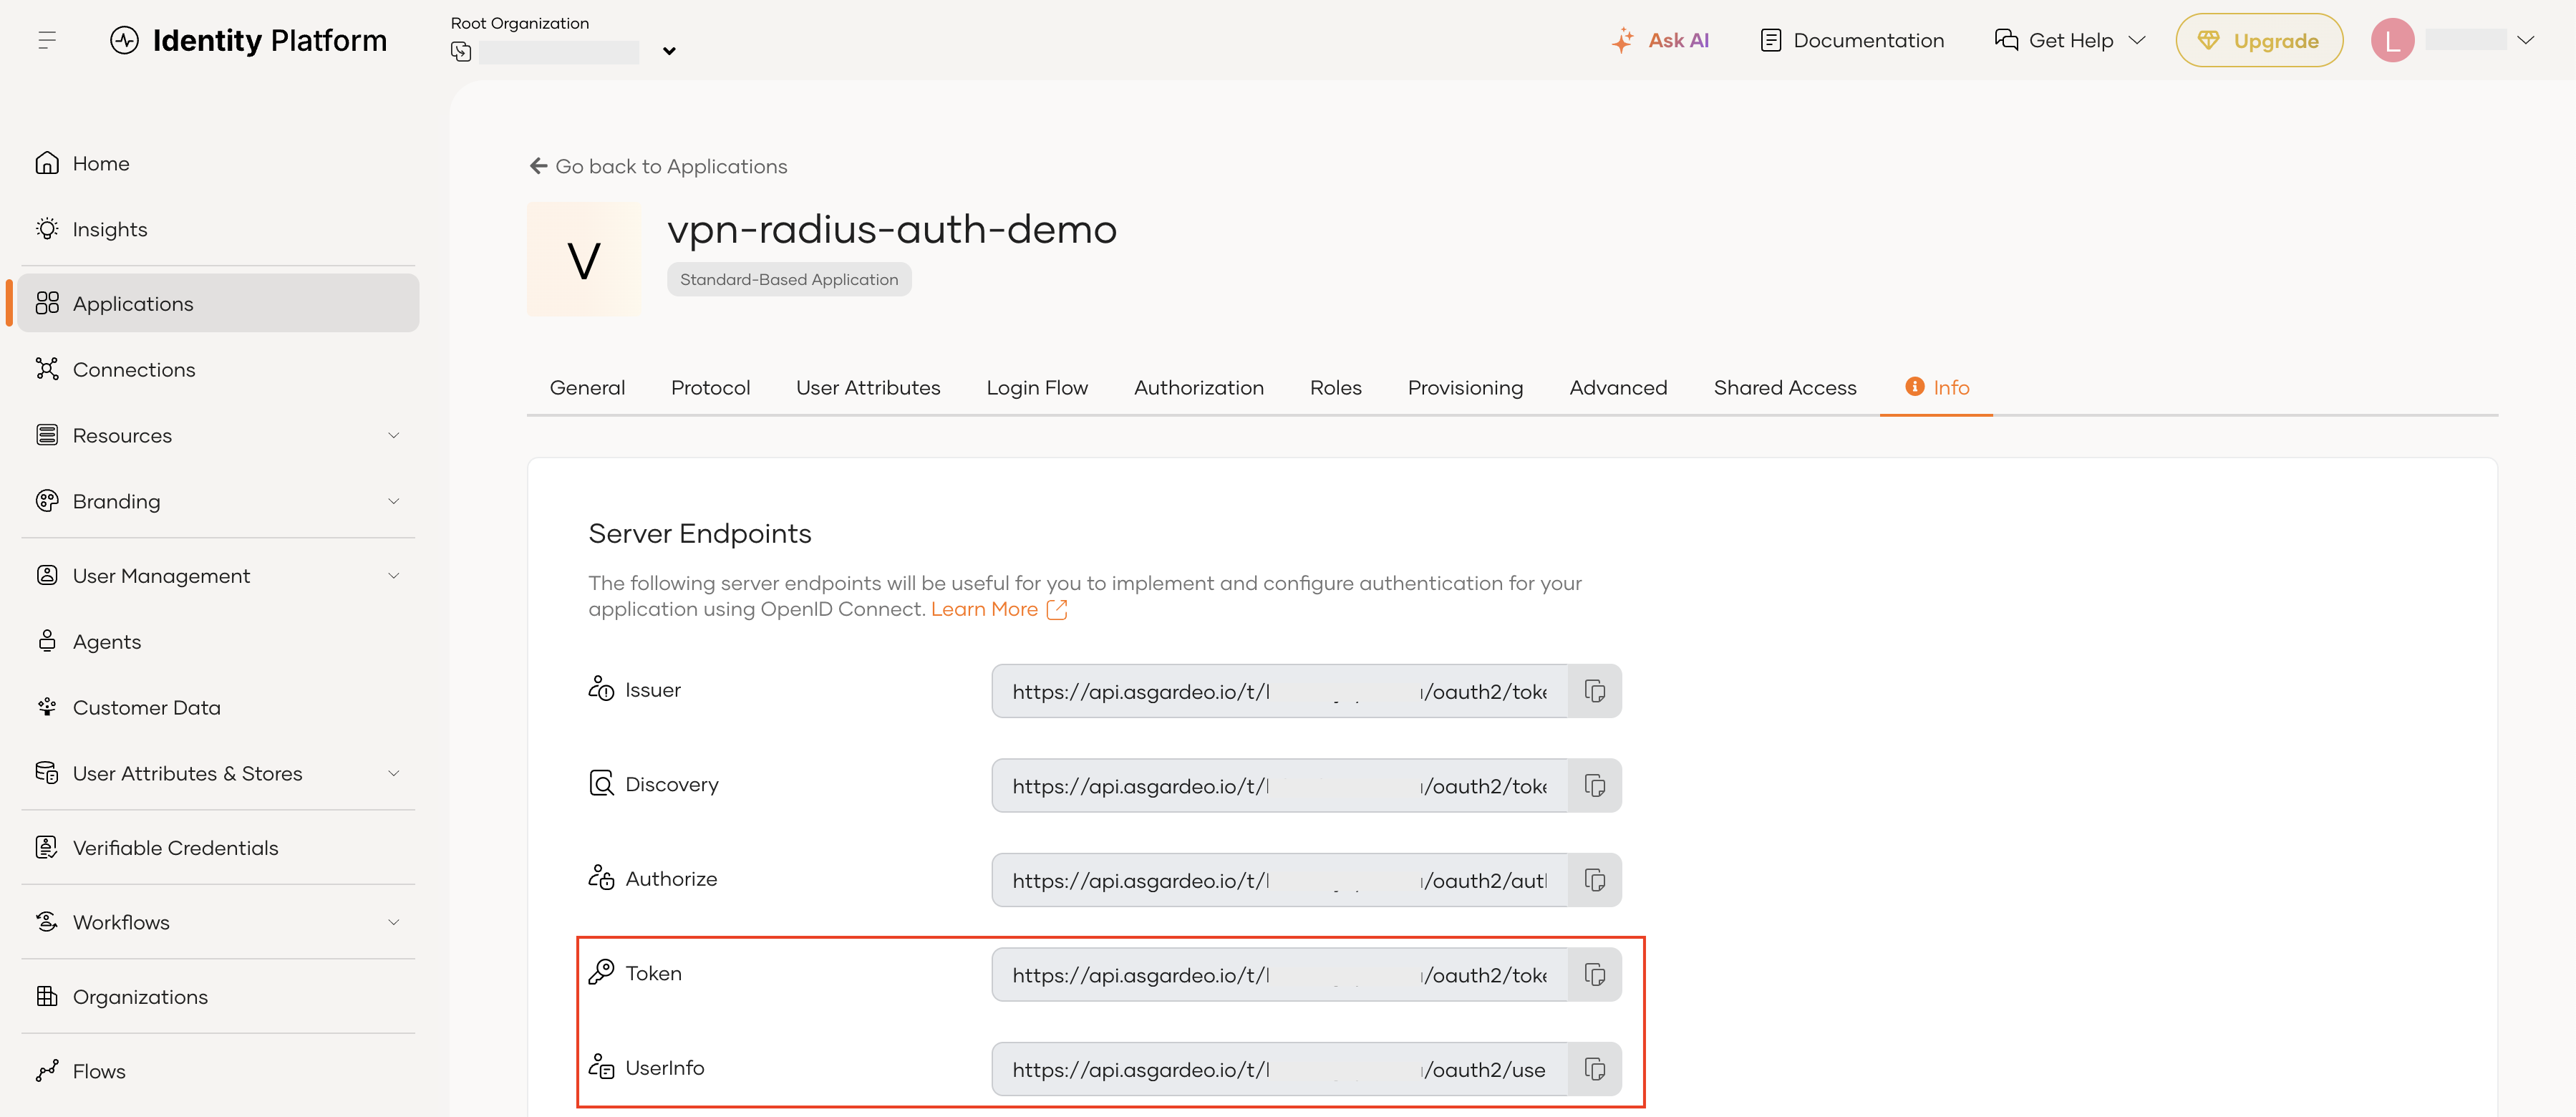
Finally navigate to the “Info” section of the application and get the required Server Endpoints for the next step.
Configure Asgardeo Authentication for FreeRADIUS
The policy engine uses the Asgardeo OAuth endpoint to validate the user’s credentials.
The exact tenant-specific values belong in the local configuration file: /etc/freeradius/3.0/mods-config/python3/asgardeo_config.json. Protect this file because it contains sensitive application credentials.
{
  "token_endpoint": "https://api.asgardeo.io/t/<ORG>/oauth2/token",
  "ropc_client_id": "<CLIENT_ID>",
  "ropc_client_secret": "<CLIENT_SECRET>",
  "ropc_scope": "openid groups",
  "groups_claim": "groups",
  "http_timeout_seconds": 3,
  "http_retries": 1,
  "userinfo_endpoint": "https://api.asgardeo.io/t/<ORG>/oauth2/userinfo"
}
chown -R freerad:freerad /etc/freeradius/3.0/mods-config/python3/

chmod 600 /etc/freeradius/3.0/mods-config/python3/asgardeo_config.json
Configure the FreeRADIUS systemd
The packaged FreeRADIUS service makes the configuration tree read-only. However, the policy engine needs controlled write access for Per-user TOTP replay/rate-limit state
So that, Create a service override:
mkdir -p /etc/systemd/system/freeradius.service.d

#Then configure the required writable directories:

cat > /etc/systemd/system/freeradius.service.d/override.conf << 'EOF'
# The packaged unit sets ReadOnlyDirectories=/etc/freeradius/, which bind-
# mounts the entire config tree read-only in radiusd's mount namespace.
# Carve out write access for the two directories that must be writable by
# the running service - see this guide's section on the systemd.
[Service]
ReadWriteDirectories=/etc/freeradius/3.0/mods-config/python3/otp_state
EOF
Reload systemd and Verify.
systemctl daemon-reload

systemctl show freeradius -p ReadOnlyPaths -p ReadWritePaths   # confirm both new paths appear in ReadWritePaths

systemctl restart freeradius
Without the override, authentication can appear to work during direct testing but fail through the real systemd-managed service because the process cannot update the required state files.
Enroll a Cloud VPN User for TOTP
This script generates a unique OTP secret for each user, saves it in the FreeRADIUS otp_secrets directory, and displays the corresponding QR code.
wget -O enroll_totp_user.sh https://github.com/lakindu93/fortigate-ikev2-freeradius-eap-ttls-mfa/raw/refs/heads/main/scripts/enroll_totp_user.sh

sudo chmod +x enroll_totp_user.sh

sudo ./enroll_totp_user.sh
Scan the printed QR code with Google Authenticator (or enter the otpauth:// URI manually). The secret is written to otp_secrets/<sanitized-username>.secret – note that @ and other special characters in the username get replaced with _ in the filename.
If you are new to Google Authenticator enrollment, see my guide on configuring Google Authenticator for MFA, which explains how to scan the QR code and register the TOTP secret.
Note: If you are trying these existing configurations on the FreeRADIUS server with @example.com domain, you have to comment out the following section from the /etc/freeradius/3.0/proxy.conf.
#  Disabled: this was the FreeRADIUS stock template's sample realm,
#  left uncommented. Any User-Name ending in "@example.com" was being
#  proxied to "my_auth_failover" instead of being authenticated locally
#  via EAP-TTLS, which broke VPN logins for accounts using that domain.

#realm example.com {
#       auth_pool = my_auth_failover
#       # nostrip
#}
Test EAP-TTLS Before Testing the VPN
Using the testing script below, you can test the EAP-TTLS authentication and obtain detailed debug logs showing whether the authentication was successful or failed.
wget -O eapttls-test-mfa.sh https://github.com/lakindu93/fortigate-ikev2-freeradius-eap-ttls-mfa/raw/refs/heads/main/scripts/eapttls-test-mfa.sh

sudo chmod +x eapttls-test-mfa.sh

sudo ./eapttls-test-mfa.sh
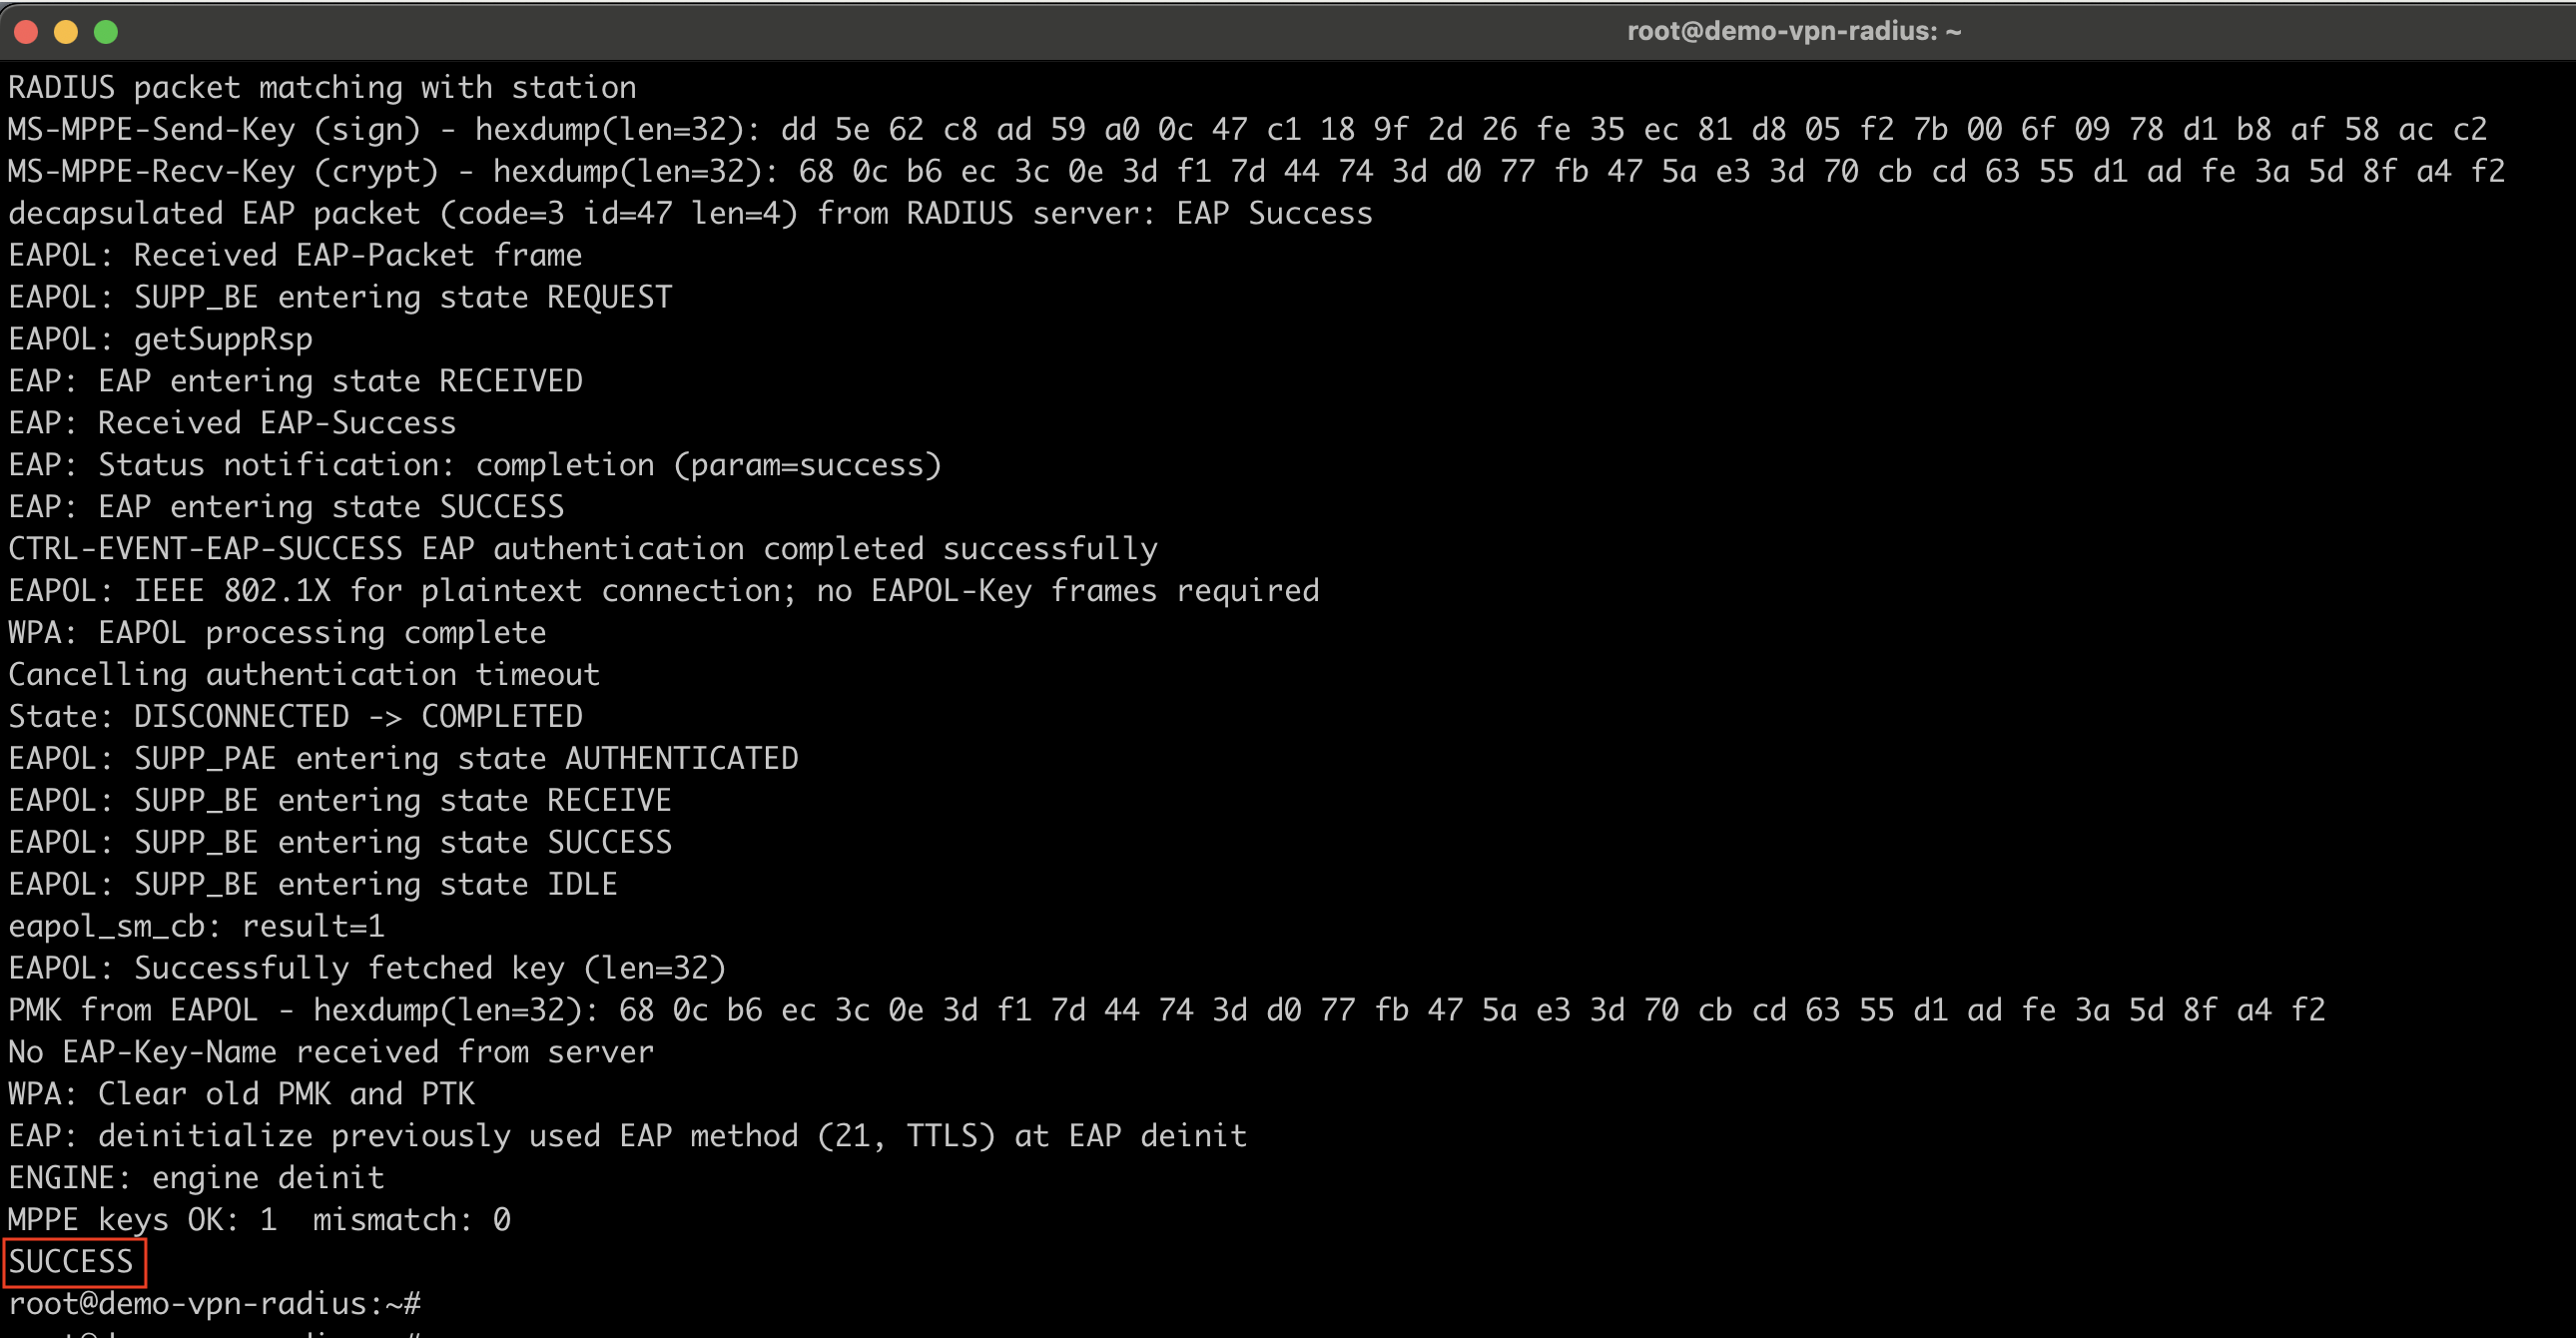
If the authentication is successful at the end of the logs you can see it as follows.
Configure FortiGate IPsec Dial-Up VPN with FreeRADIUS
Create the RADIUS Server and User Groups
Go to User & Authentication → RADIUS Servers → Create New
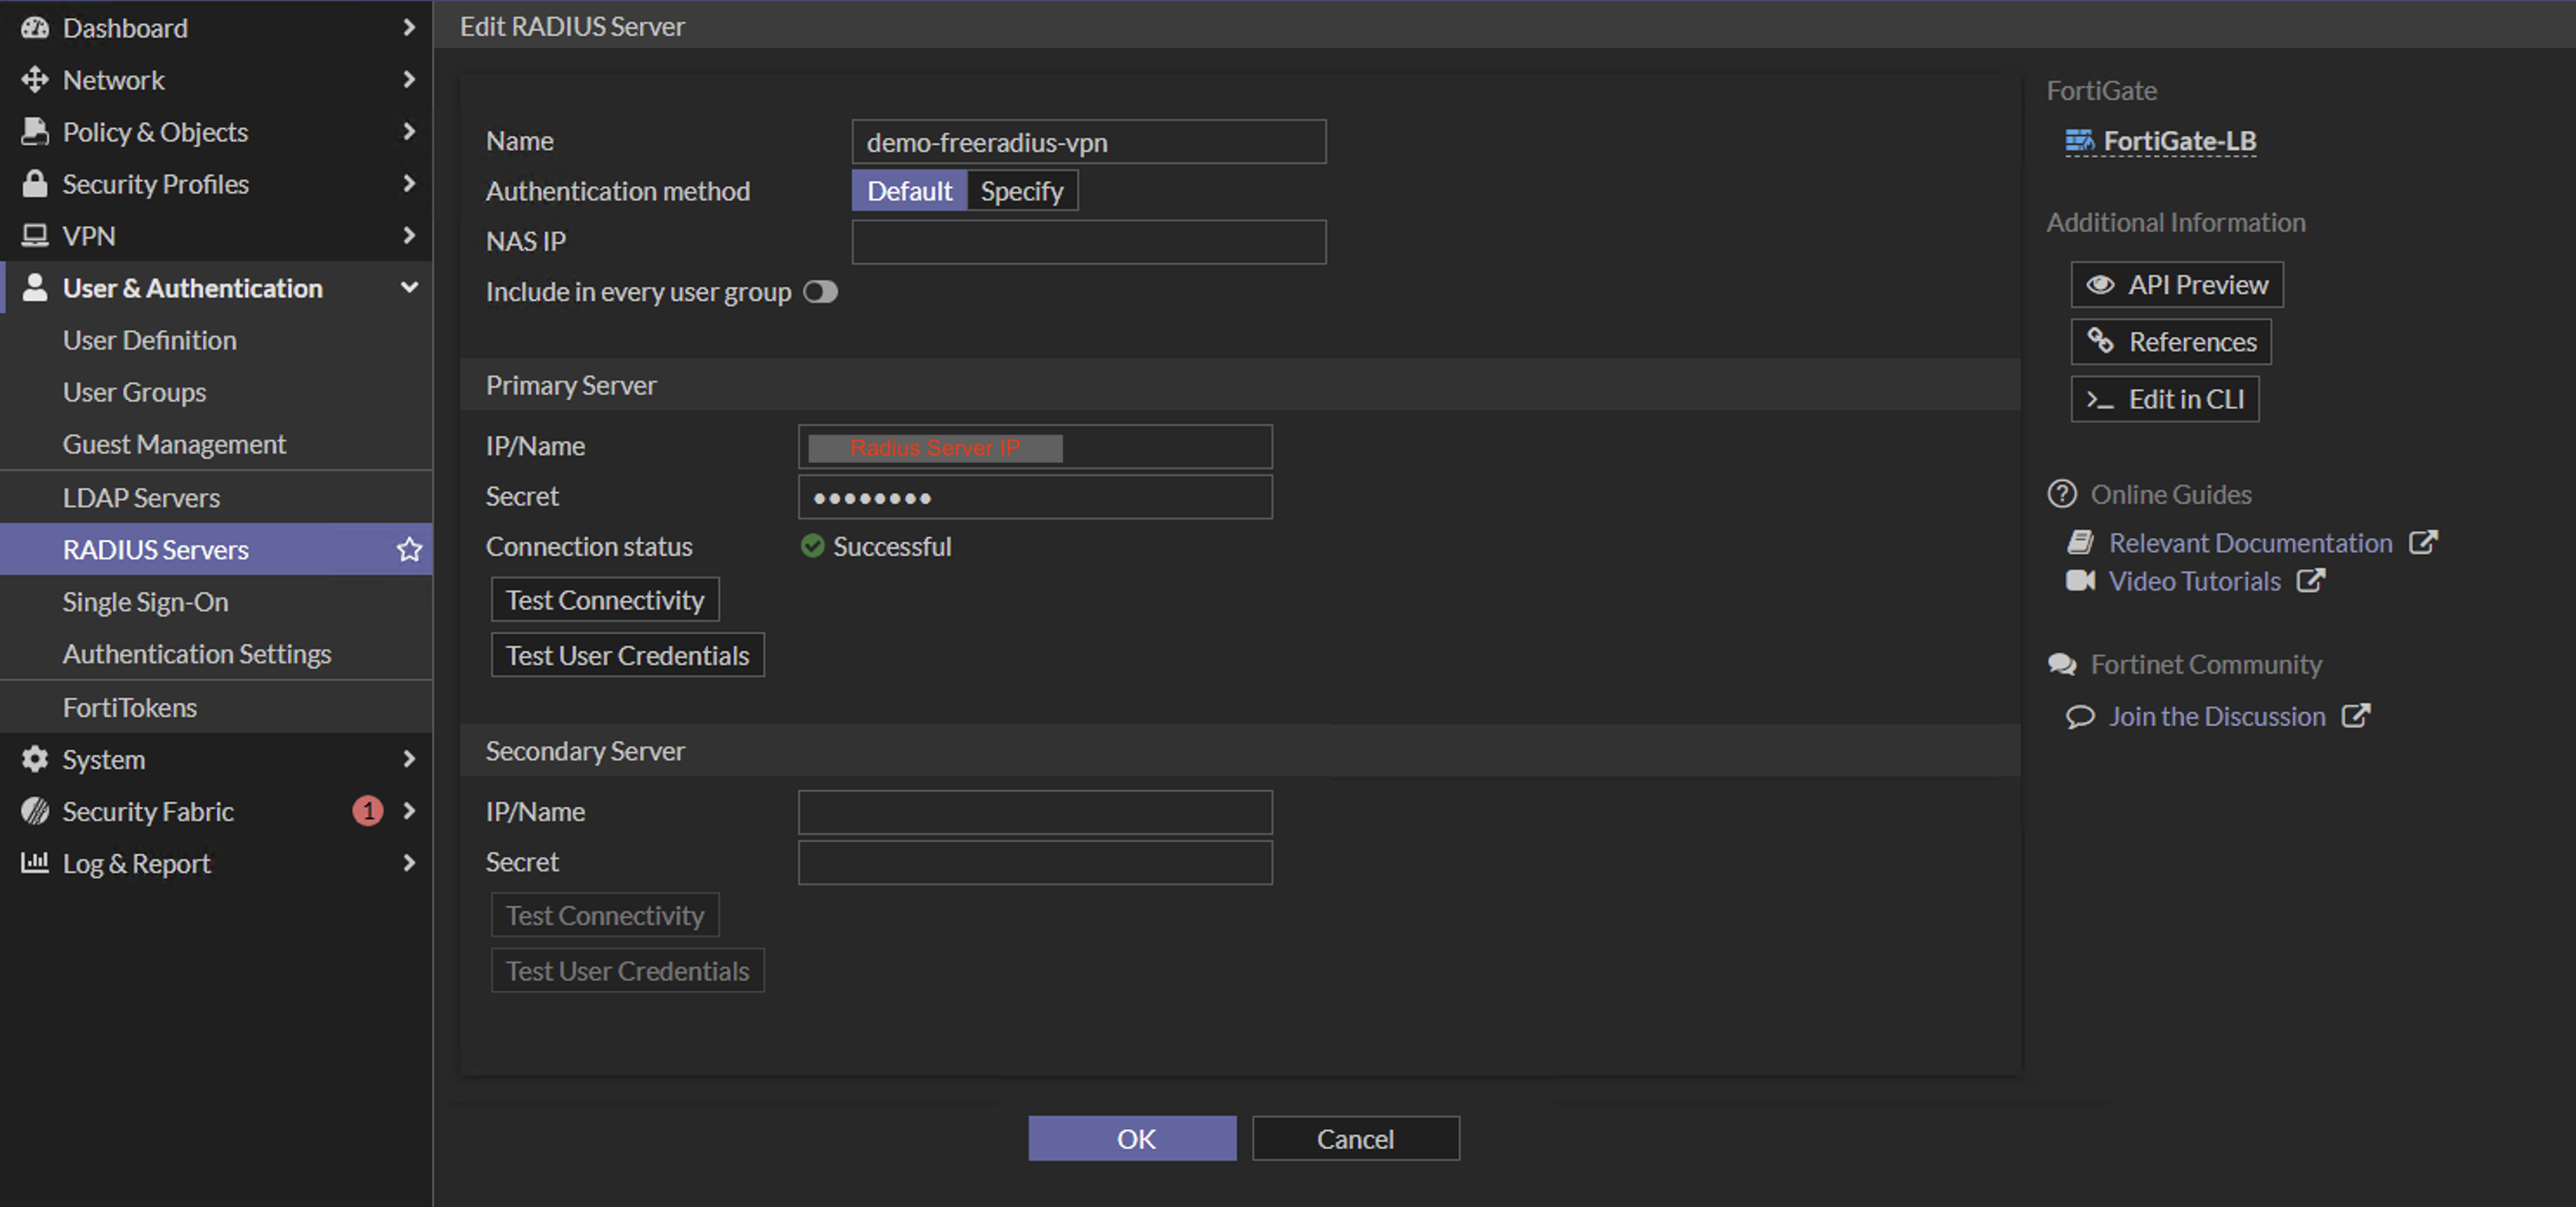
CLI example:
config user radius
    edit "demo-freeradius-vpn"
        set server "<RADIUS_SERVER_IP>"
        set secret <RADIUS_SHARED_SECRET>
        set auth-type auto
    next
end
Note: The important point is that the FortiGate must be configured as a RADIUS client on the FreeRADIUS side.
Create the appropriate FortiGate user groups and map them to the group names returned by the RADIUS server. These groups will be used by the IPsec VPN to authenticate and authorize users through RADIUS.
Go to User & Authentication → User Groups → Create New
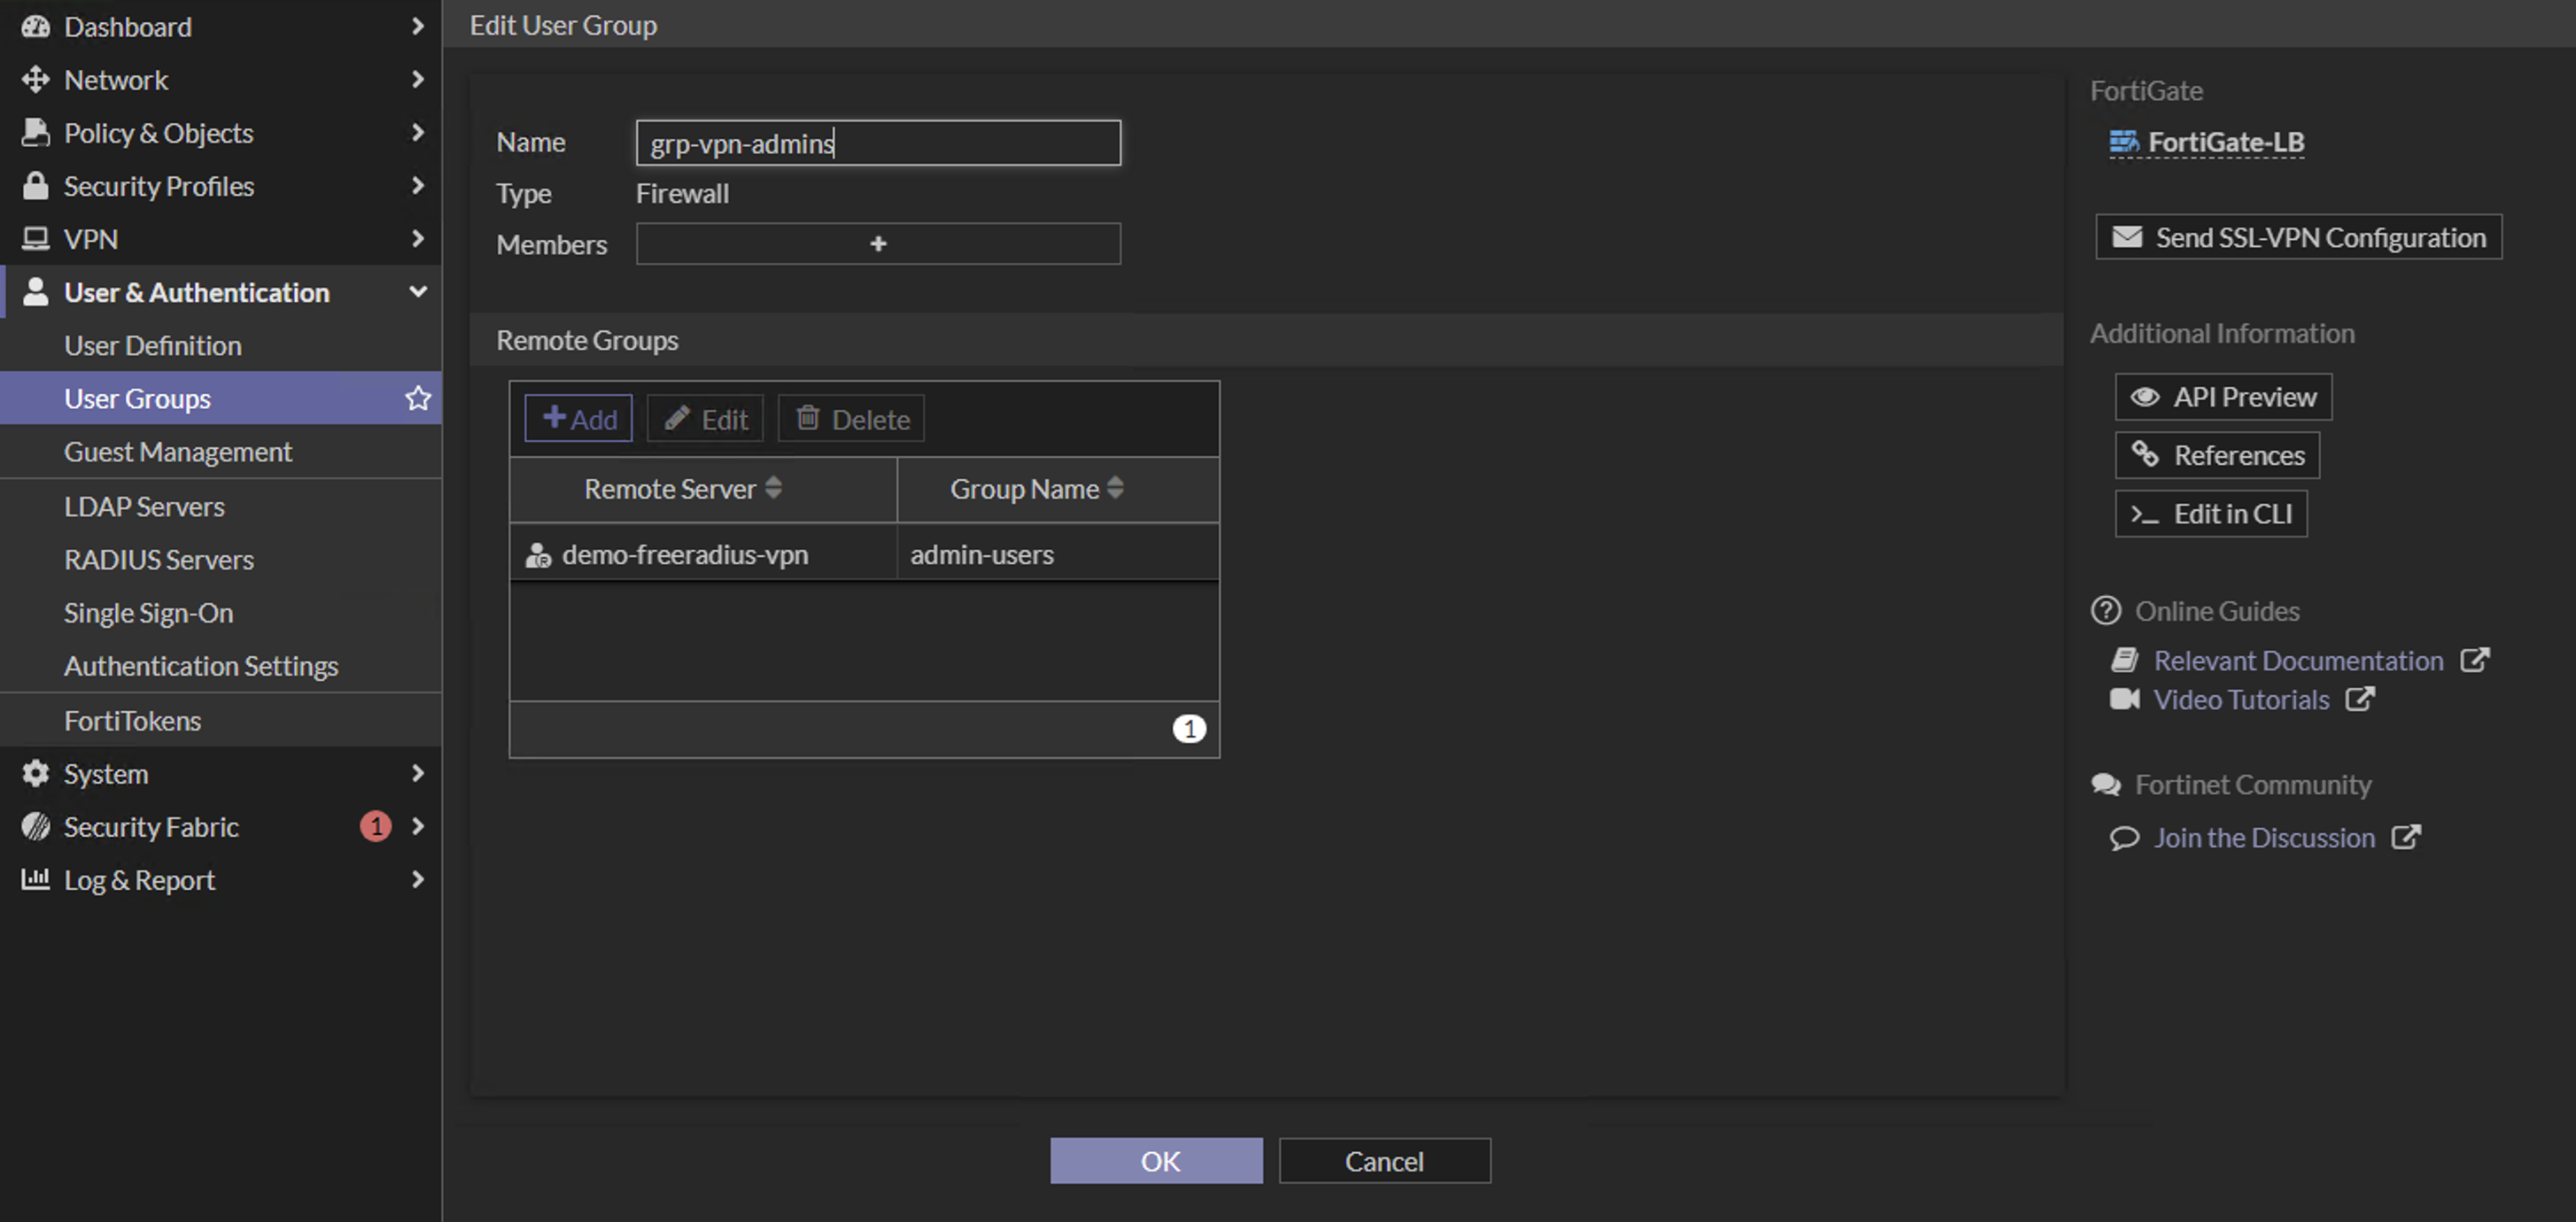
CLI example:
config user group
    edit "grp-vpn-admins"
        set member "demo-freeradius-vpn"
        config match
            edit 1
                set server-name "demo-freeradius-vpn"
                set group-name "admin-users"
            next
        end
    next
    edit "grp-vpn-users"
        set member "demo-freeradius-vpn"
        config match
            edit 1
                set server-name "demo-freeradius-vpn"
                set group-name "non-admin-users"
            next
        end
    next
end
Configure the FortiGate IKEv2 Dial-Up VPN
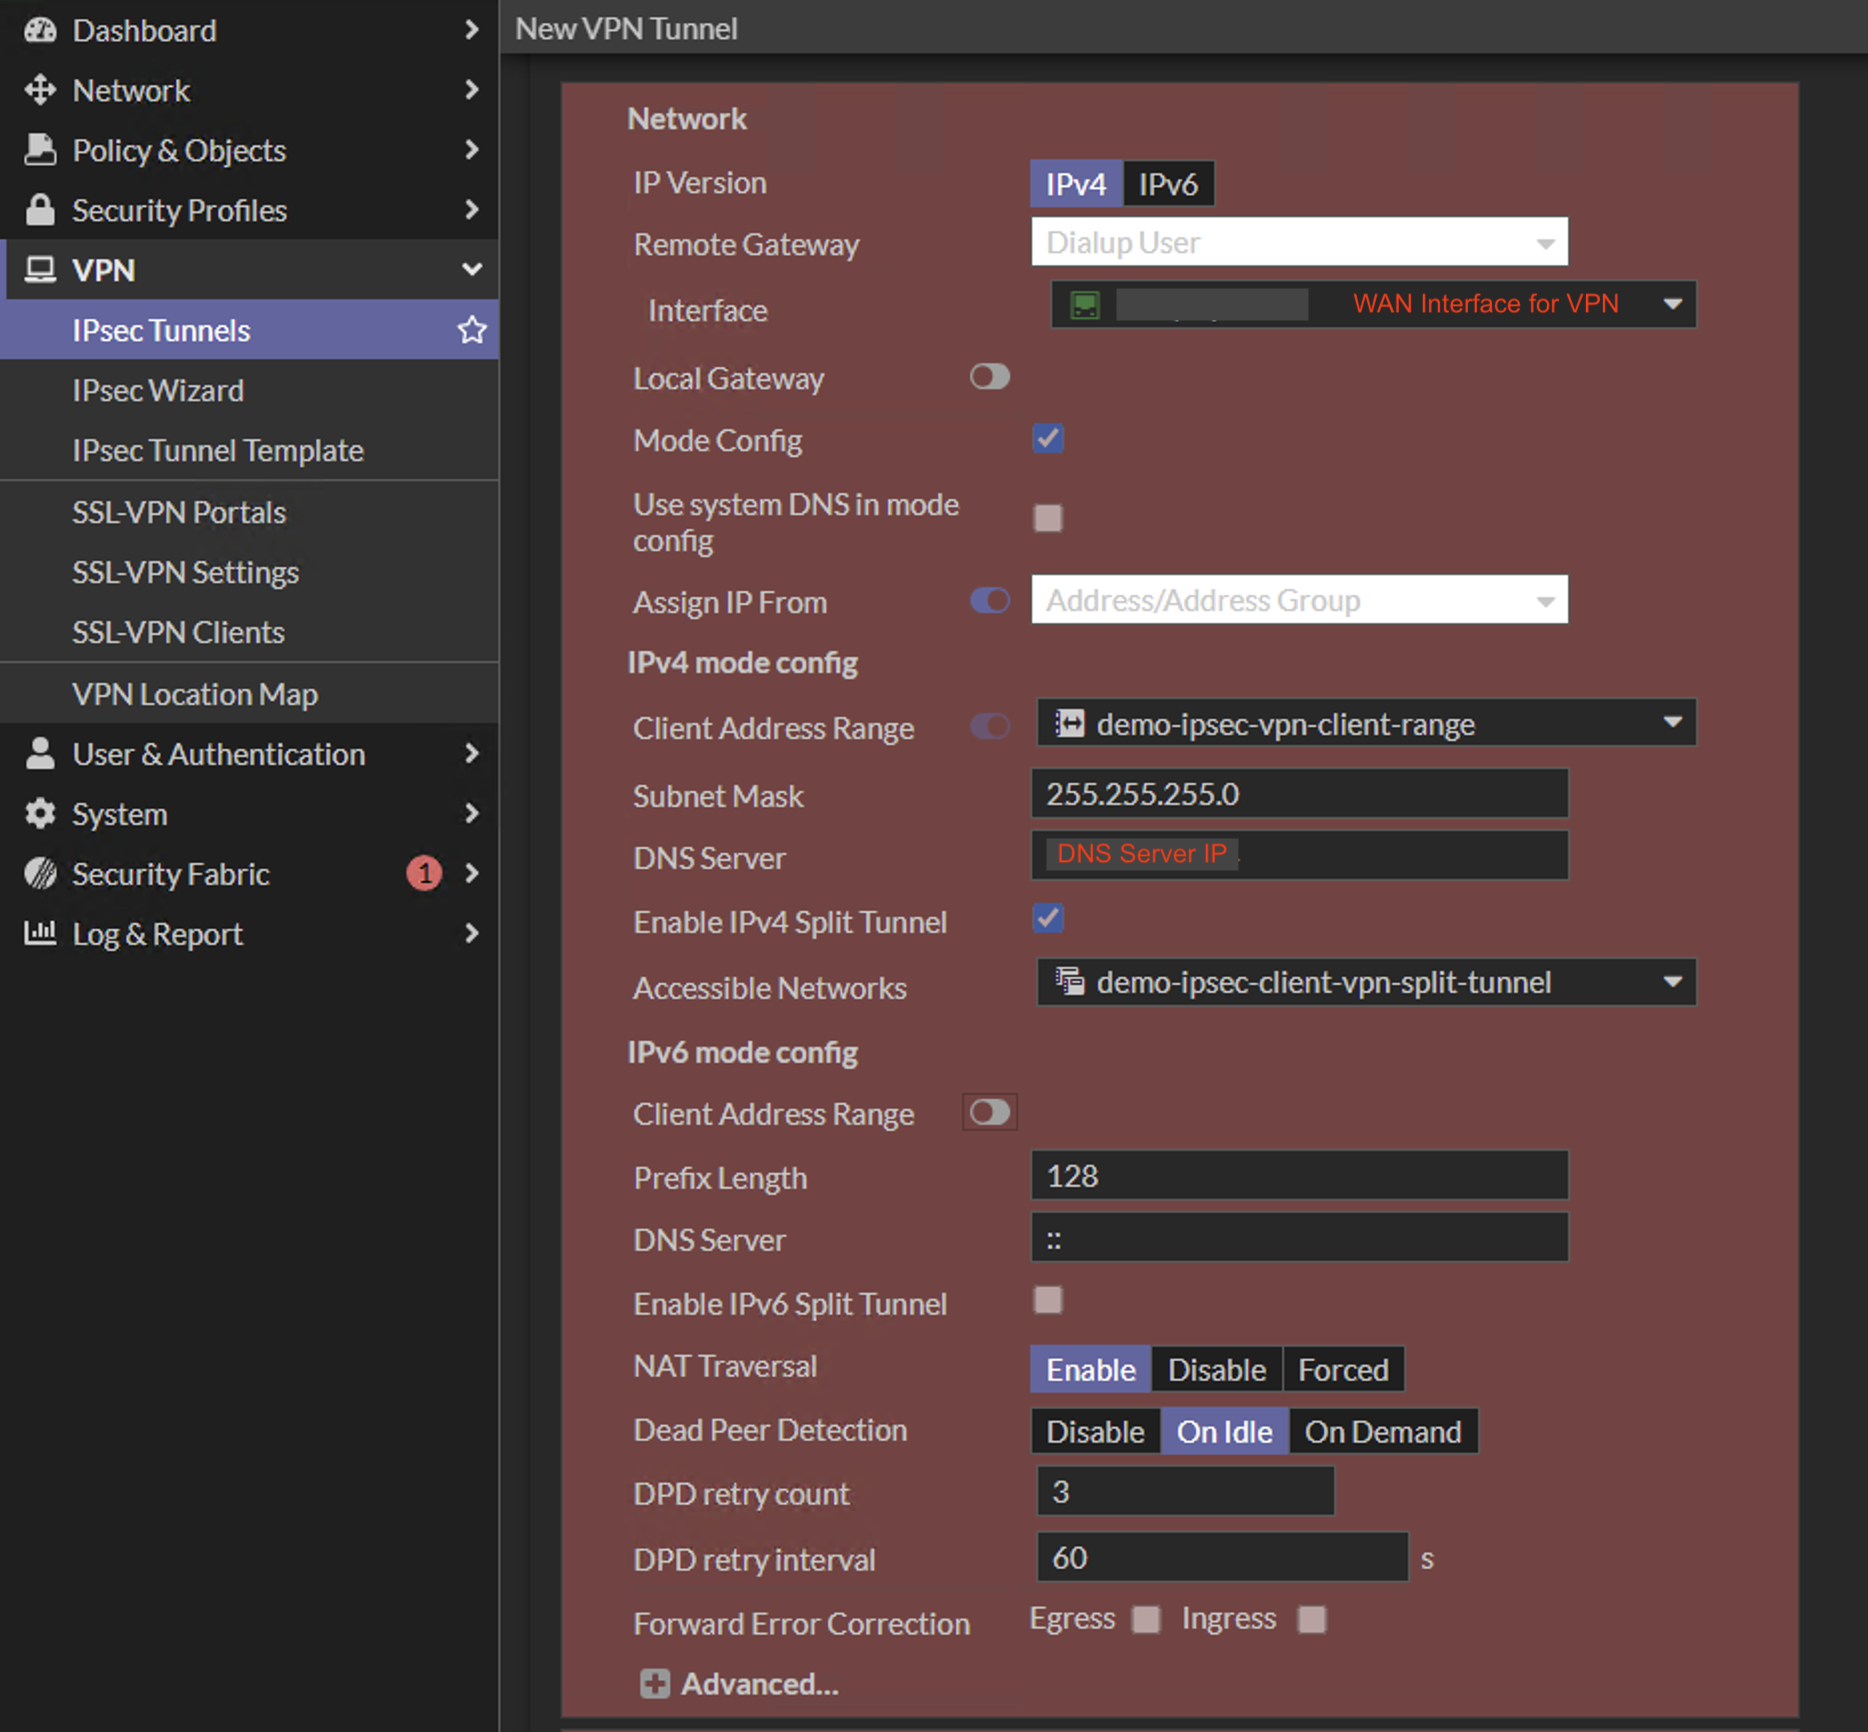
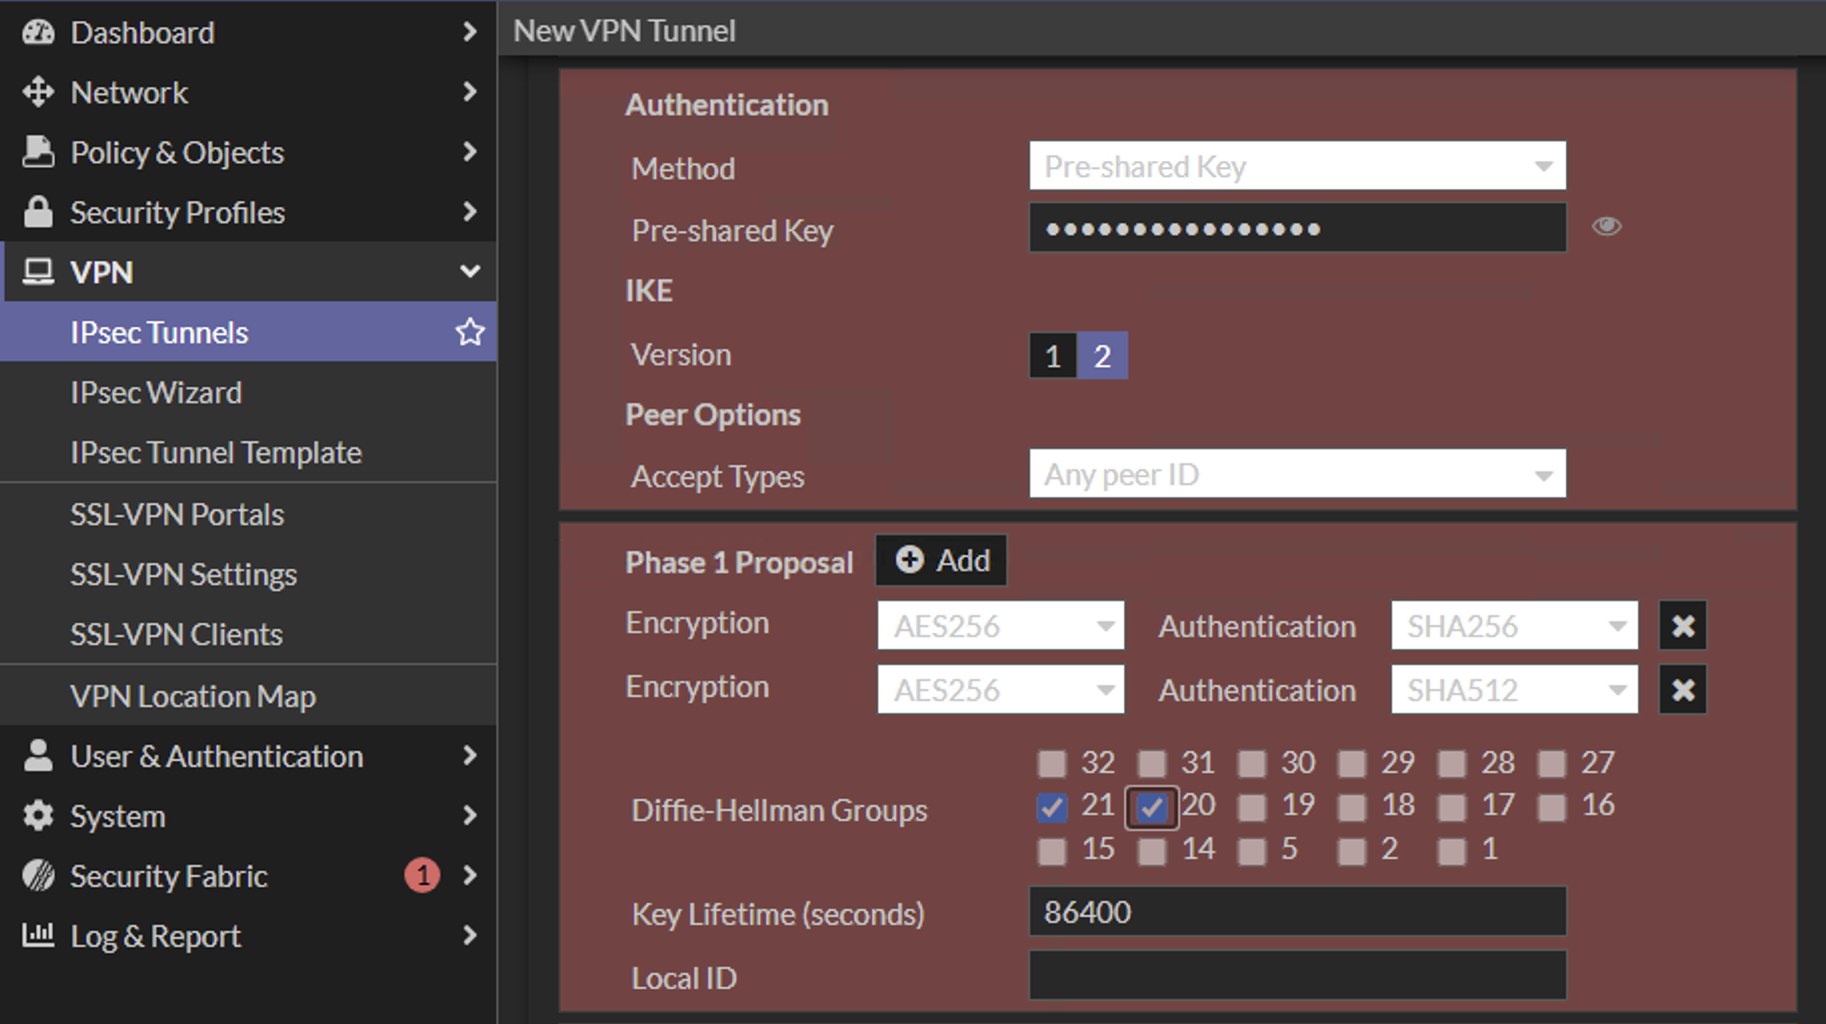
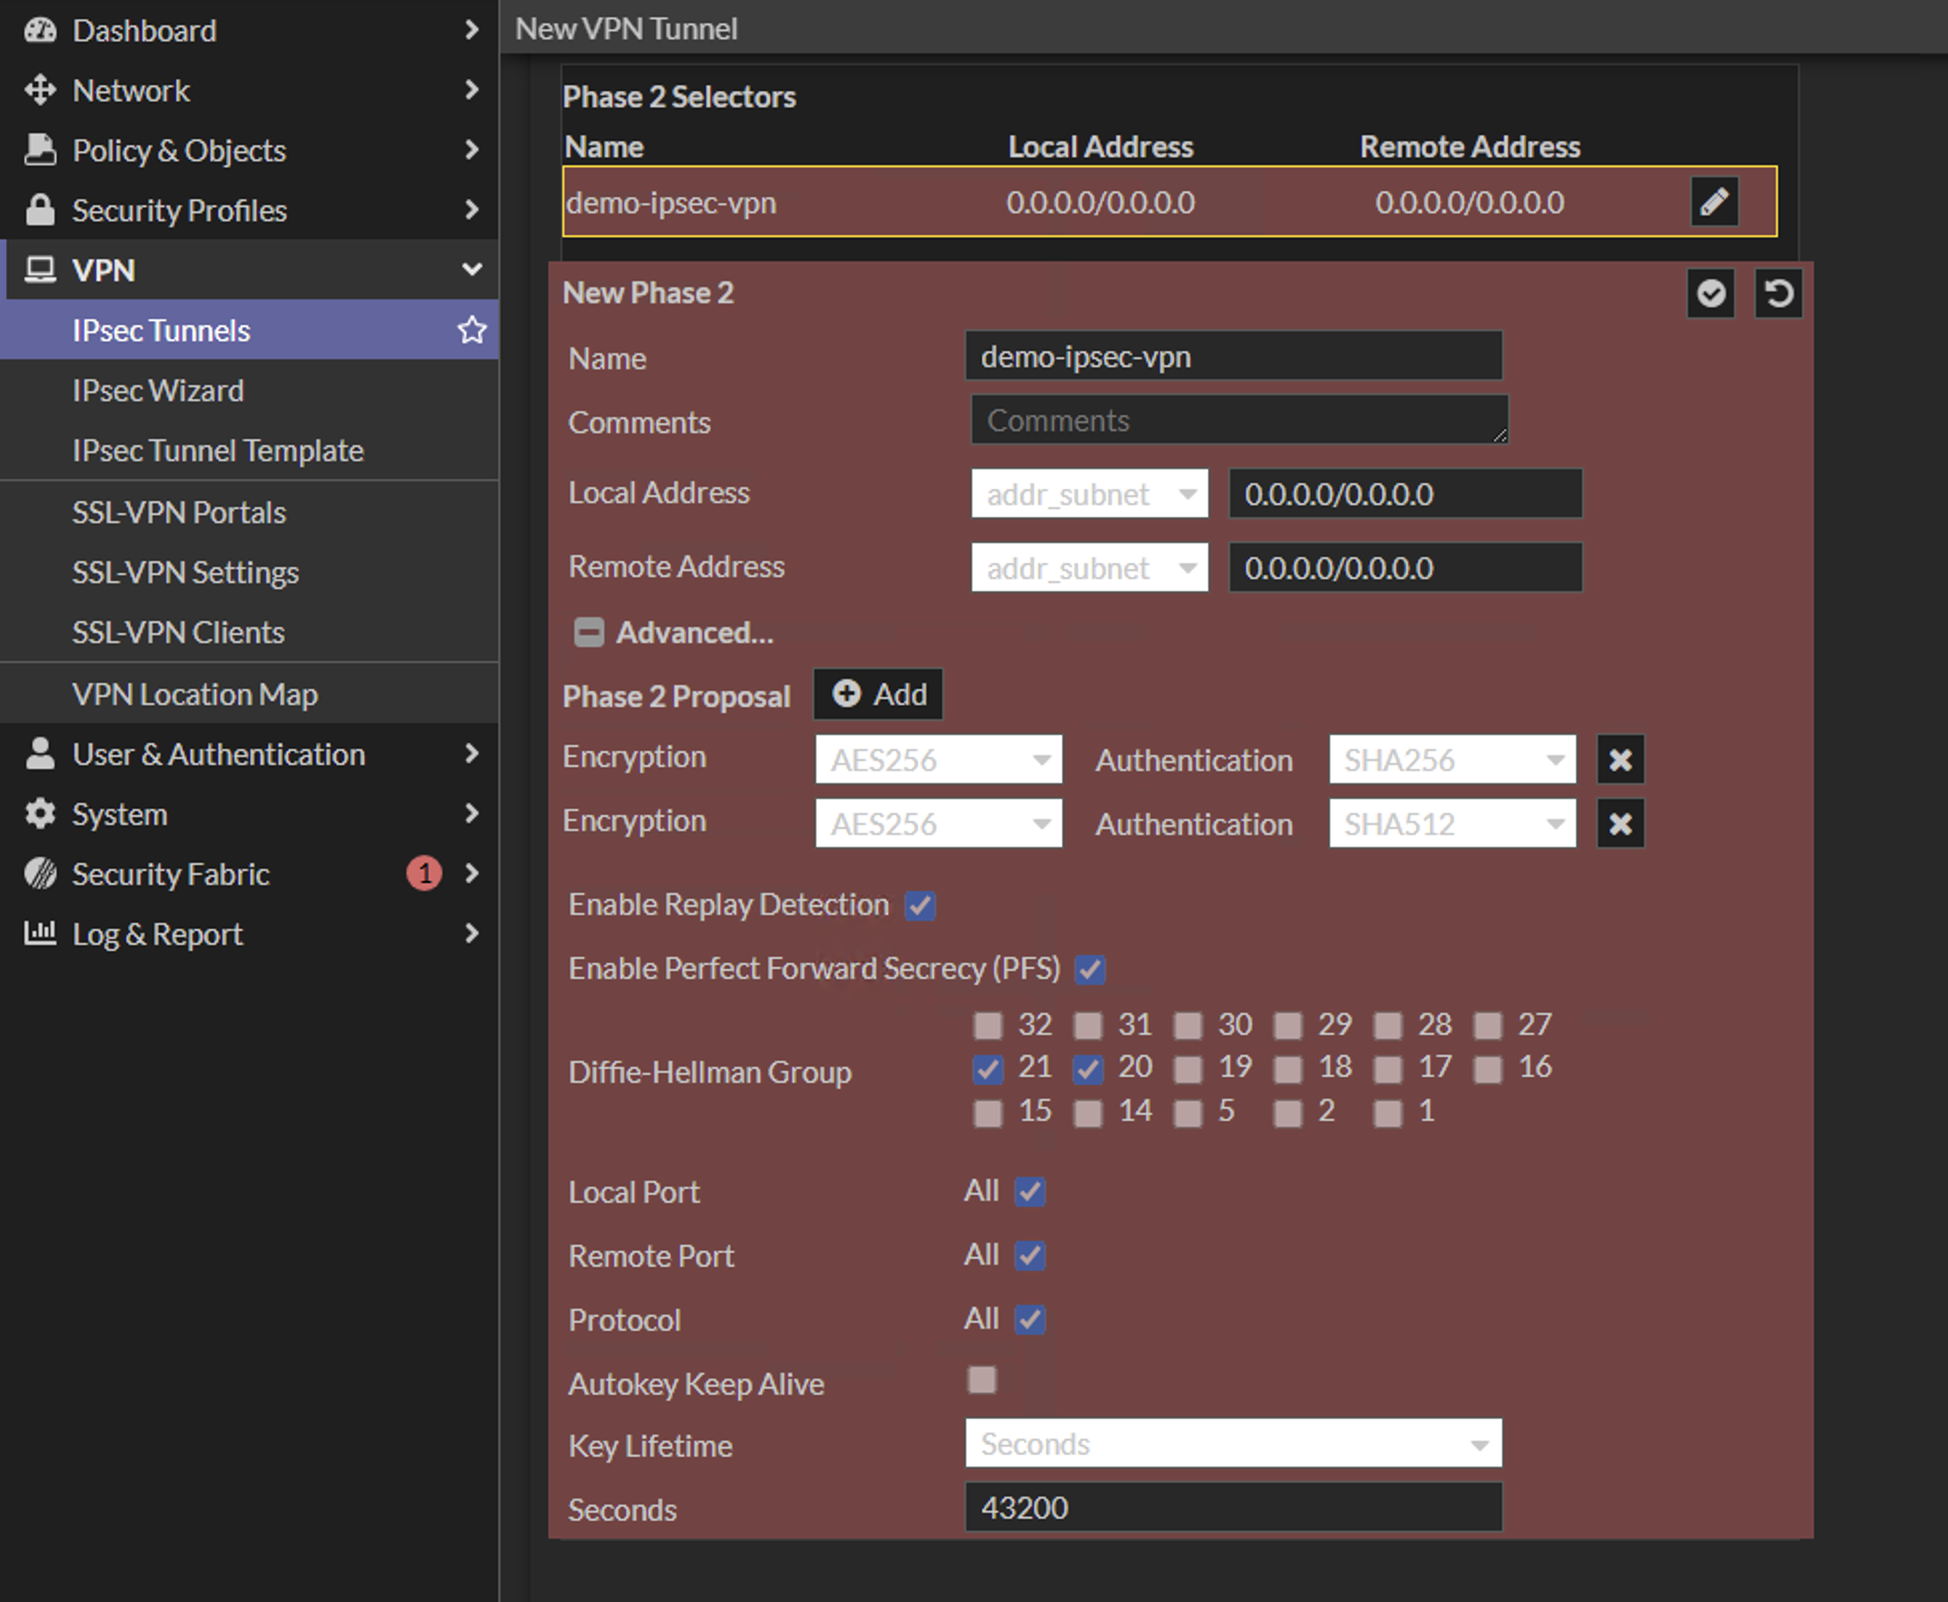
Go to VPN → IPsec Tunnels and then give name for the VPN and select Custom option. Then, configure the Network, Authentication, Phase 1 Proposal, and Phase 2 Selectors settings according to the following screenshots.
Before configuring the tunnel, you should first determine the VPN client address range and decide whether split tunneling will be enabled. This decision determines which traffic will be routed through the VPN tunnel when users connect remotely. Based on the selected configuration, create the relevant address objects/groups and define the appropriate traffic selectors.
Split Tunnel vs. Full Tunnel
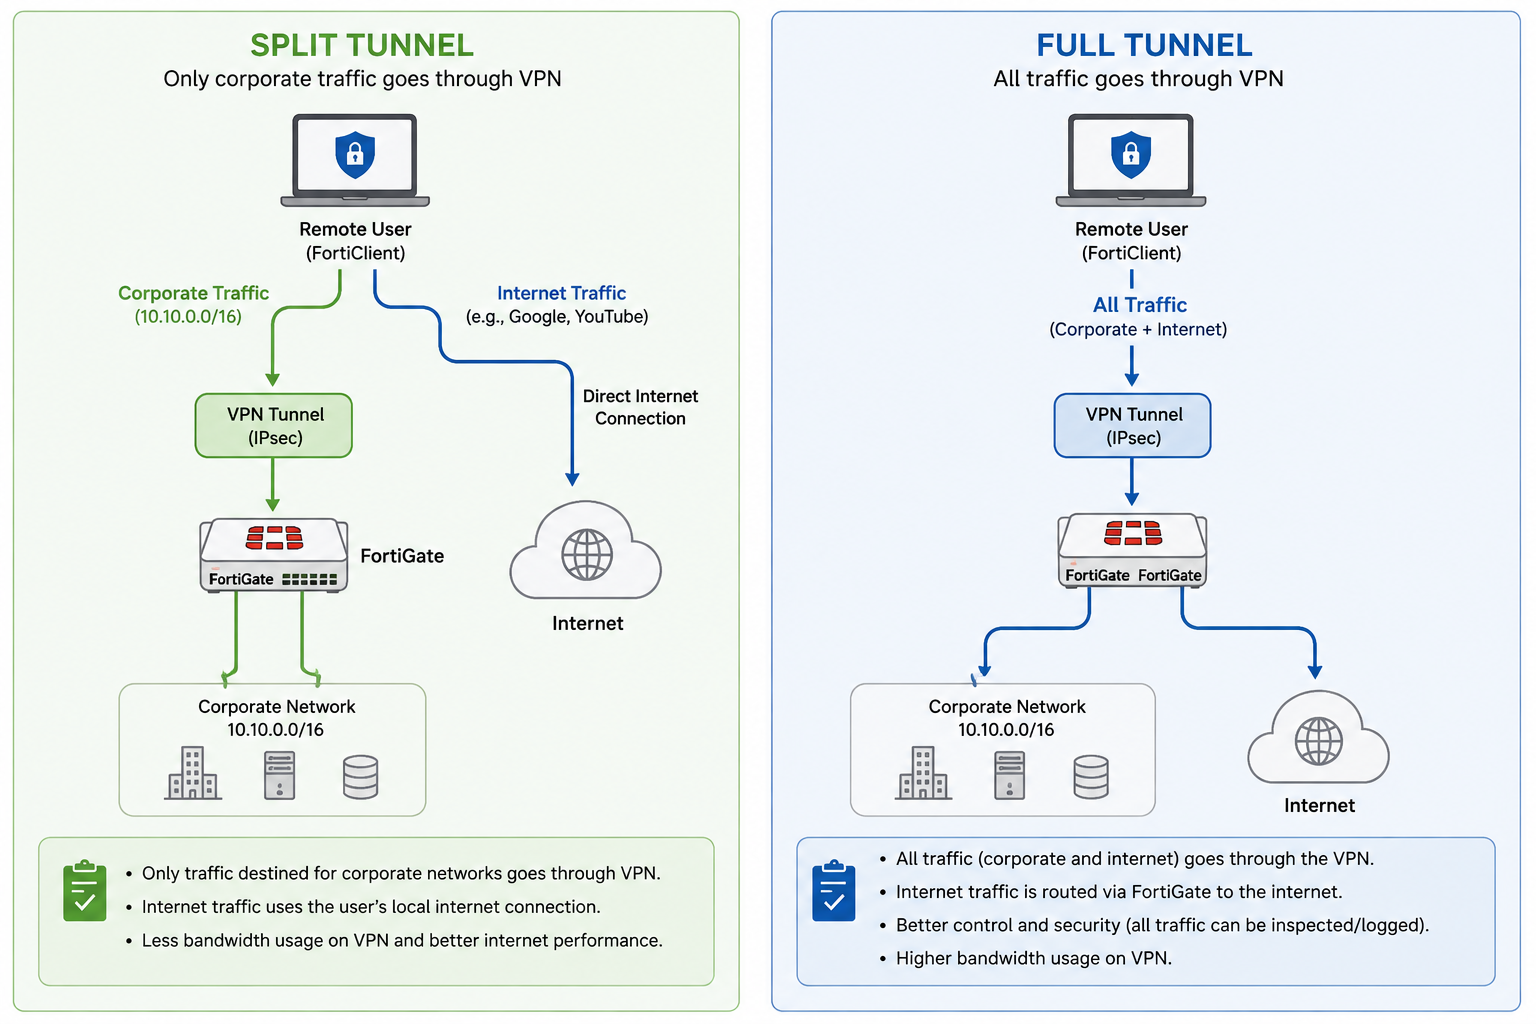
In general: split tunneling reduces VPN bandwidth consumption and latency for internet traffic, while full tunneling provides greater centralized control and allows the organization’s security policies and inspection mechanisms to be applied to internet-bound traffic.
IPsec Dial-Up VPN – Network Configurations
IPsec Dial-Up VPN – Authentication & Phase 1 Configurations
IPsec Dial-Up VPN – Phase 2 Configurations
Note: In some older versions of FortiOS, certain options may not be available or configurable through the GUI. For example, enabling EAP on the IPsec tunnel may require CLI configuration. In such cases, the required settings must be configured manually using the FortiGate CLI.
CLI example:
config vpn ipsec phase1-interface
    edit "demo-ipsec-vpn"
        set type dynamic
        set interface "port1"
        set ike-version 2
        set peertype any
        set net-device disable
        set mode-cfg enable
        set ipv4-dns-server1 192.168.1.1
        set proposal aes256-sha256 aes256-sha512
        set dpd on-idle
        set dhgrp 21 20
        set eap enable
        set eap-identity send-request
        set assign-ip-from name
        set ipv4-netmask 255.255.255.0
        set ipv4-split-include "demo-ipsec-client-vpn-split-tunnel"
        set ipv4-name "demo-ipsec-vpn-client-range"
        set psksecret ENC <FORTIGATE_ENCRYPTED_PSK>
        set dpd-retryinterval 60
    next
end

config vpn ipsec phase2-interface
    edit "demo-ipsec-vpn"
        set phase1name "demo-ipsec-vpn"
        set proposal aes256-sha256 aes256-sha512
        set dhgrp 21 20
        set src-addr-type name
        set dst-addr-type name
        set src-name "demo-ipsec-client-vpn-split-tunnel"
        set dst-name "all"
    next
end
Authentication via Policy Configuration
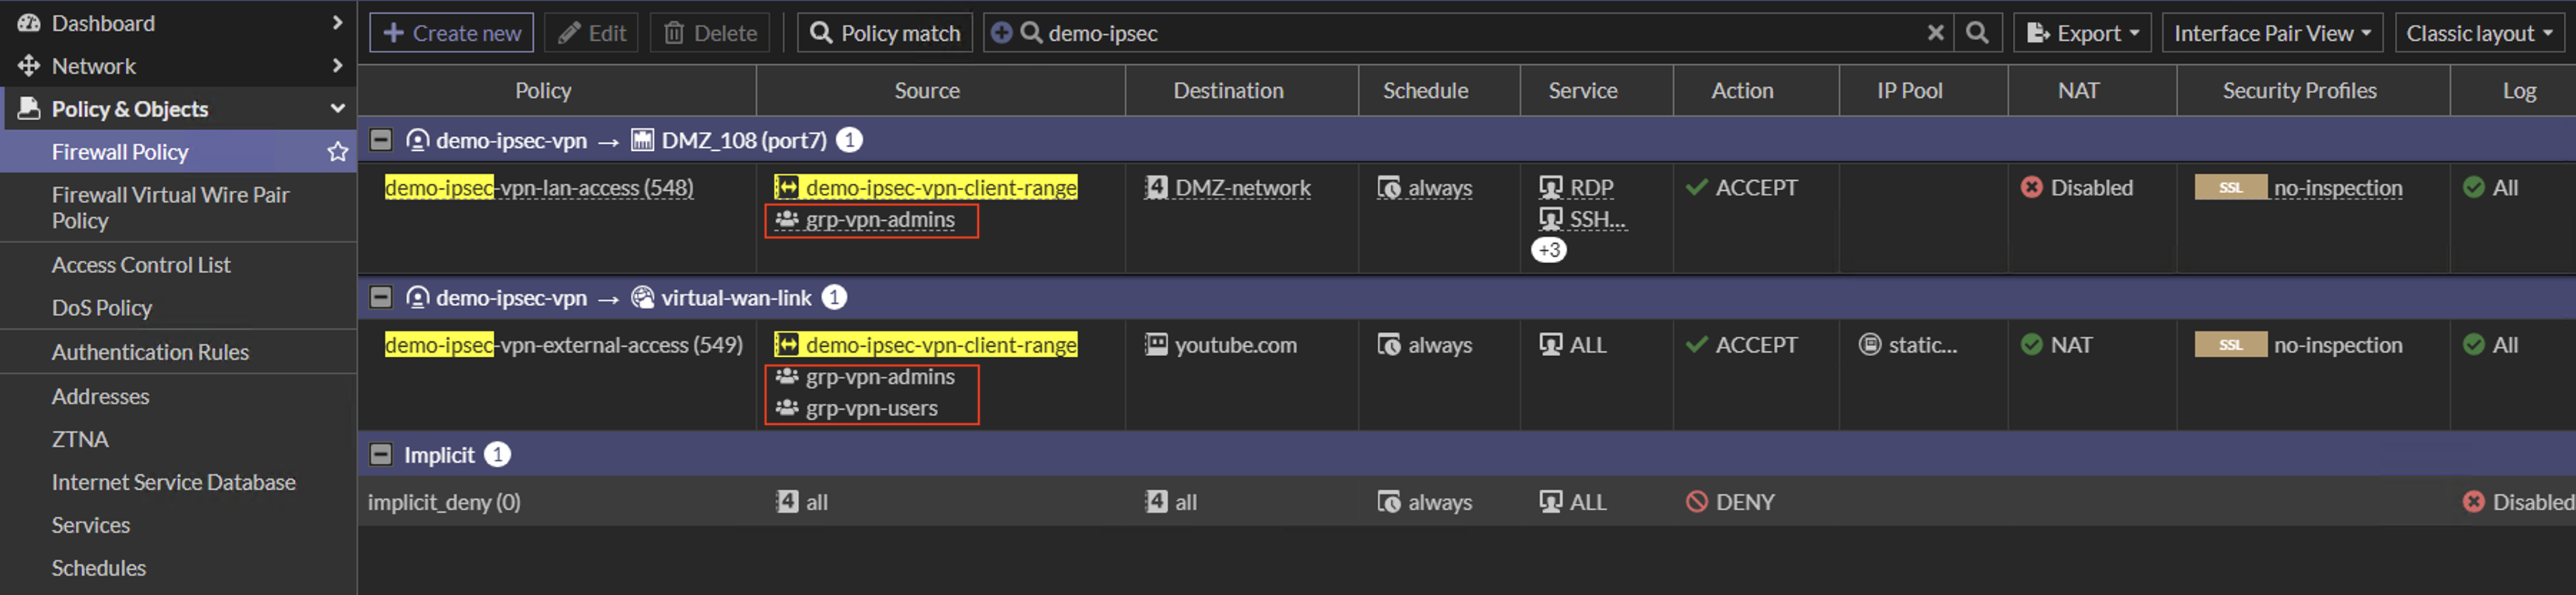
If no user group is explicitly specified in the VPN configuration above, IPsec authentication checks the user groups associated with firewall policies that use the IPsec tunnel interface as the source. It then attempts to authenticate the user against the applicable groups.
For IKEv1, this behavior is achieved by setting XAuth to Inherit from Policy. For IKEv2, the same behavior can be configured through the CLI by enabling EAP and setting eap-identity to send-request, while leaving the authusrgrp value unset.
For more information, refer to Fortinet’s technical guide: Technical Tip: A guide to dial-up IPSec VPN authentication and policy matching
Next, let’s create the required firewall policies and associate them with the user groups created earlier.
Configure FortiClient for Real VPN Testing
Install CA Certificate on macOS
Before configuring the FortiClient you have to install the FreeRADIUS server certificate’s CA on each endpoint who wants to connect to the VPN.
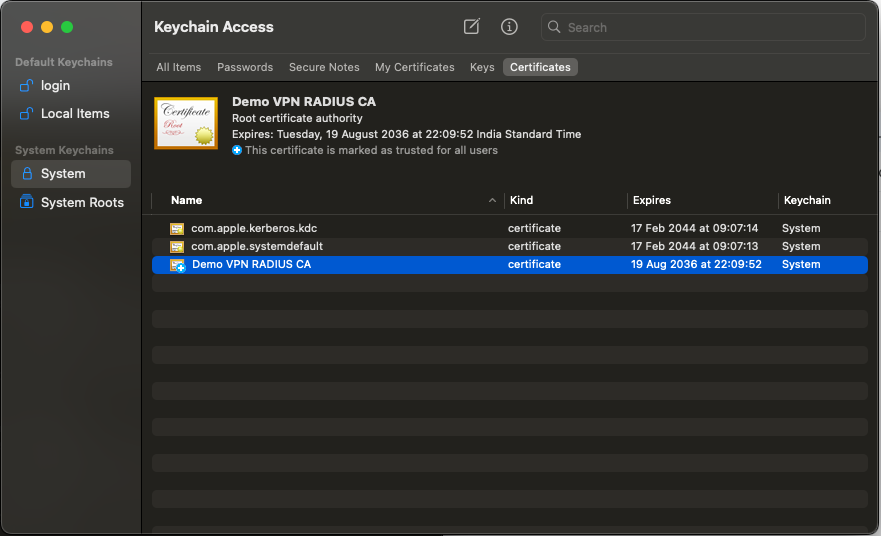
On the Mac Applications → Utilities → Keychain Access. Select the System keychain In the left-hand panel then select Certificates.
You can now import the CA certificate by either:
- Dragging the
.crt/.cerfile into the Keychain Access window, or - Right-clicking the System keychain and selecting Import Items…
You may be prompted for an administrator password.
Double-click the imported CA certificate. Expand Trust You should see “When using this certificate” : “Use System Defaults”. Change it to “Always Trust“. Then close the certificate window.
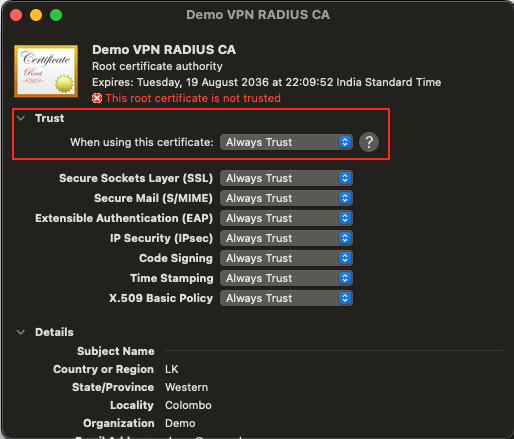
MacOS will request administrator authentication to save the trust change. After authentication, the certificate should show as trusted.
Configure the FortiClient on MacOS
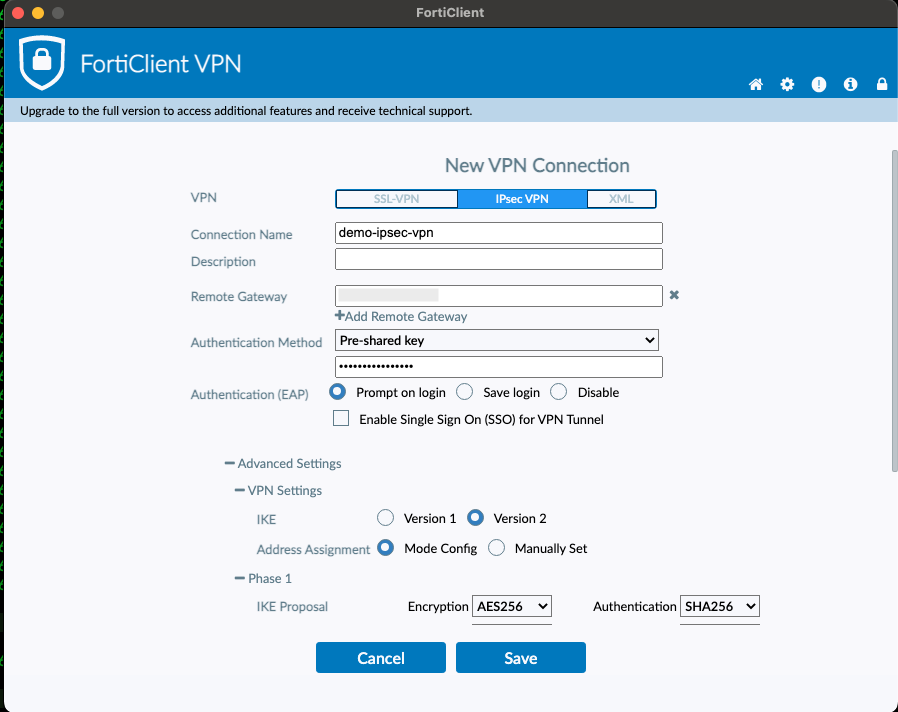
FortiClient 7.4.3+ supports creating an IPsec VPN connection from Remote Access → Configure VPN with IKEv2 and EAP-TTLS/PAP authentication.
Configure the basic VPN settings according to the following screenshot.
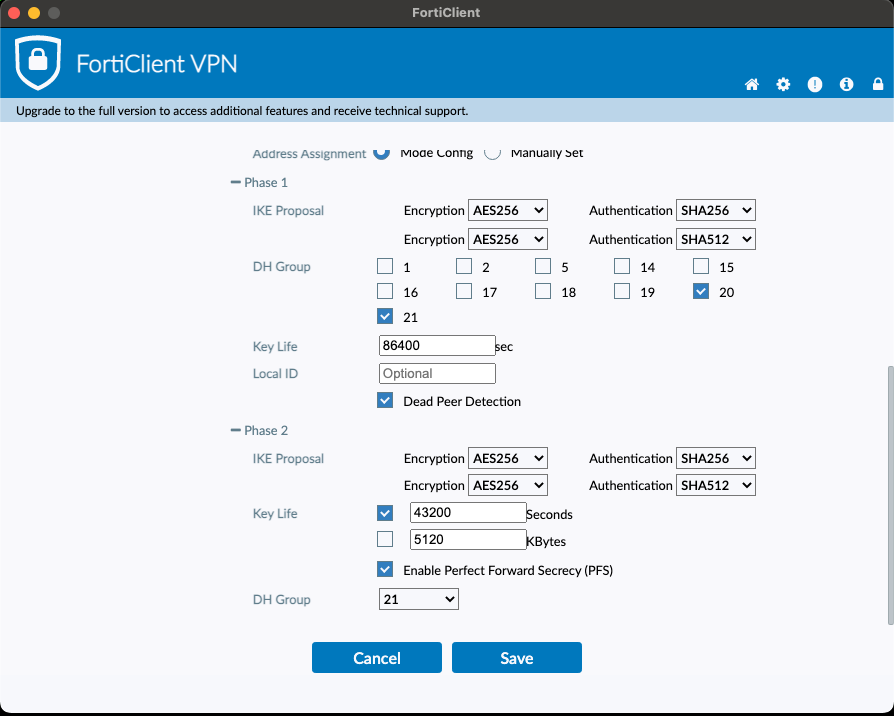
Phase 1 and Phase 2 settings must correspond exactly with the configuration on the FortiGate. Fortinet notes that at least one Phase 1 and Phase 2 proposal must match the remote peer.
Finally Save the configured settings and click connect. Then you should be prompted for the RADIUS credentials if you selected “Prompt on login” during the FortiClient configuration.
Configure the FortiClient on Windows
For the required Windows-side configuration, refer to Fortinet’s technical documentation: How to Enable EAP-TTLS for IPsec IKEv2 Tunnels in VPN-only (Unlicensed) FortiClient. Once the required FortiClient configuration has been completed, create an IPsec VPN profile using the corresponding settings and use the profile to establish the VPN connection.
Note: Please make sure to add the FreeRADIUS server CA file to the to the system’s trust store.
Troubleshooting FortiGate IPsec VPN with FreeRADIUS EAP-TTLS
Verify from the FortiGate
While connecting from the FortiClient, run following commands on the Fortigate Firewall.
diagnose debug reset
diagnose debug console timestamp enable
diagnose debug application ike -1
diagnose debug application fnbamd -1
diagnose debug enable
Then initiate the VPN connection. You should ideally see the IKE negotiation followed by EAP/RADIUS authentication and finally establishment of the IPsec tunnel.
After testing, you can disable the debug on firewall.
diagnose debug disable
diagnose debug reset
Furthermore you can verify it on the Fortigate GUI as well.


Verify on FreeRADIUS
At the same time, stop the systemd freeradius.service and run it as debug mode you should see the request arriving from the FortiGate.
systemctl stop freeradius.service

freeradius -X
When troubleshooting EAP-TTLS, remember that FreeRADIUS processes an outer EAP session and an inner authentication session.
For a native TTLS-PAP authentication, the debug output should show:
- The outer EAP-TTLS negotiation.
- TLS tunnel establishment.
- Creation of the inner-tunnel request.
- Availability of
User-Passwordin the inner request. Auth-Type := PAP.- Invocation of the Python policy engine.
- Asgardeo password validation.
- TOTP validation.
- Group mapping and the resulting
Fortinet-Group-Name. - Final Access-Accept or Access-Reject.
For an EAP-GTC client, the sequence differs because the password becomes available only after the inner EAP-GTC exchange is processed.
Conclusion
A secure FortiGate IPsec dial-up VPN with FreeRADIUS does not have to rely on a simple username-and-password authentication model.
By combining FortiGate IKEv2, FreeRADIUS EAP-TTLS, Asgardeo, and Google Authenticator TOTP, you can build a layered authentication architecture that provides protected credential transport, MFA, and group-based authorization. This FortiGate IPsec dial-up VPN with FreeRADIUS approach provides a practical way to strengthen remote VPN access while using Asgardeo for centralized identity validation and TOTP for an additional layer of security.
This setup was tested with both macOS and Windows clients. The detailed client configuration in this guide focuses on macOS, while Windows clients require additional configuration to enable EAP-TTLS/PAP for IKEv2 connections.
Overall, this architecture demonstrates how FortiGate IPsec dial-up VPN with FreeRADIUS can be combined with EAP-TTLS, Asgardeo, and TOTP-based MFA to provide secure, flexible, and centralized remote-access authentication without relying solely on traditional password-based VPN access.