
HashiCorp Vault is the industry-standard solution for secrets management, encryption as a service, and identity-based access. Running Vault in production requires more than just getting it started — it demands high availability, automatic unsealing, TLS everywhere, audit logging, and reliable backups.
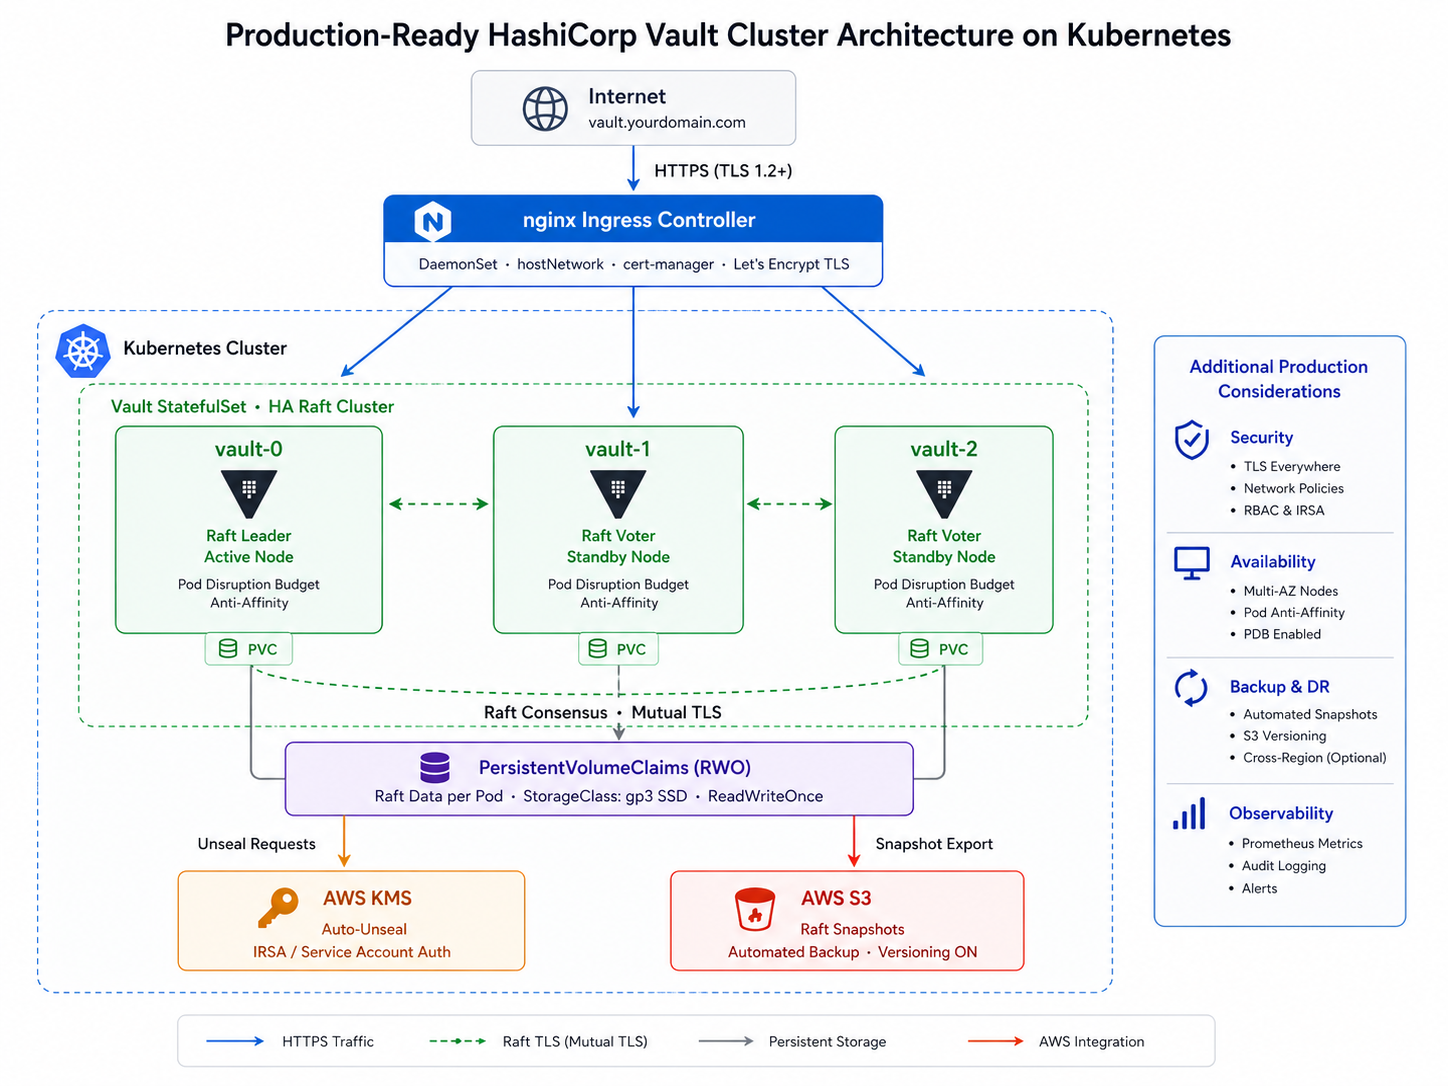
In this guide, you will build a fully production-ready HashiCorp Vault cluster on a bare Kubernetes cluster with:
- 3-Node Raft HA – survives a single node failure
- AWS KMS auto-unseal – no manual unseal after restarts
- Internal TLS via self-signed CA (cert-manager)
- External TLS via Let’s Encrypt (auto-renewing)
- File audit logging on persistent volumes
- Daily Raft snapshots to AWS S3
- Recovery keys stored in AWS Secrets Manager
HashiCorp Vault Architecture Overview
Prerequisites
Before starting, ensure you have:
- A Kubernetes cluster (4 node cluster, k8s v1.33, Longhorn CSI & Calico CNI)
- If you don’t have a Kubernetes cluster, you can deploy it via the Easy Way to Deploy a Kubernetes Cluster using kubeadm
kubectlconfigured and pointing to your clusterhelmv3 installedawsCLI installed and configured with an IAM user that has admin permissions- A domain name you control (for Let’s Encrypt TLS)
- Longhorn is installed on your cluster
- cert-manager is installed on your cluster
Step 1: Install cert-manager
cert-manager automates TLS certificate management inside Kubernetes. It handles both the internal self-signed CA for Vault’s Raft communication and the external Let’s Encrypt certificate for HTTPS.
Add the cert-manager Helm Repository
helm repo add jetstack https://charts.jetstack.io
helm repo update
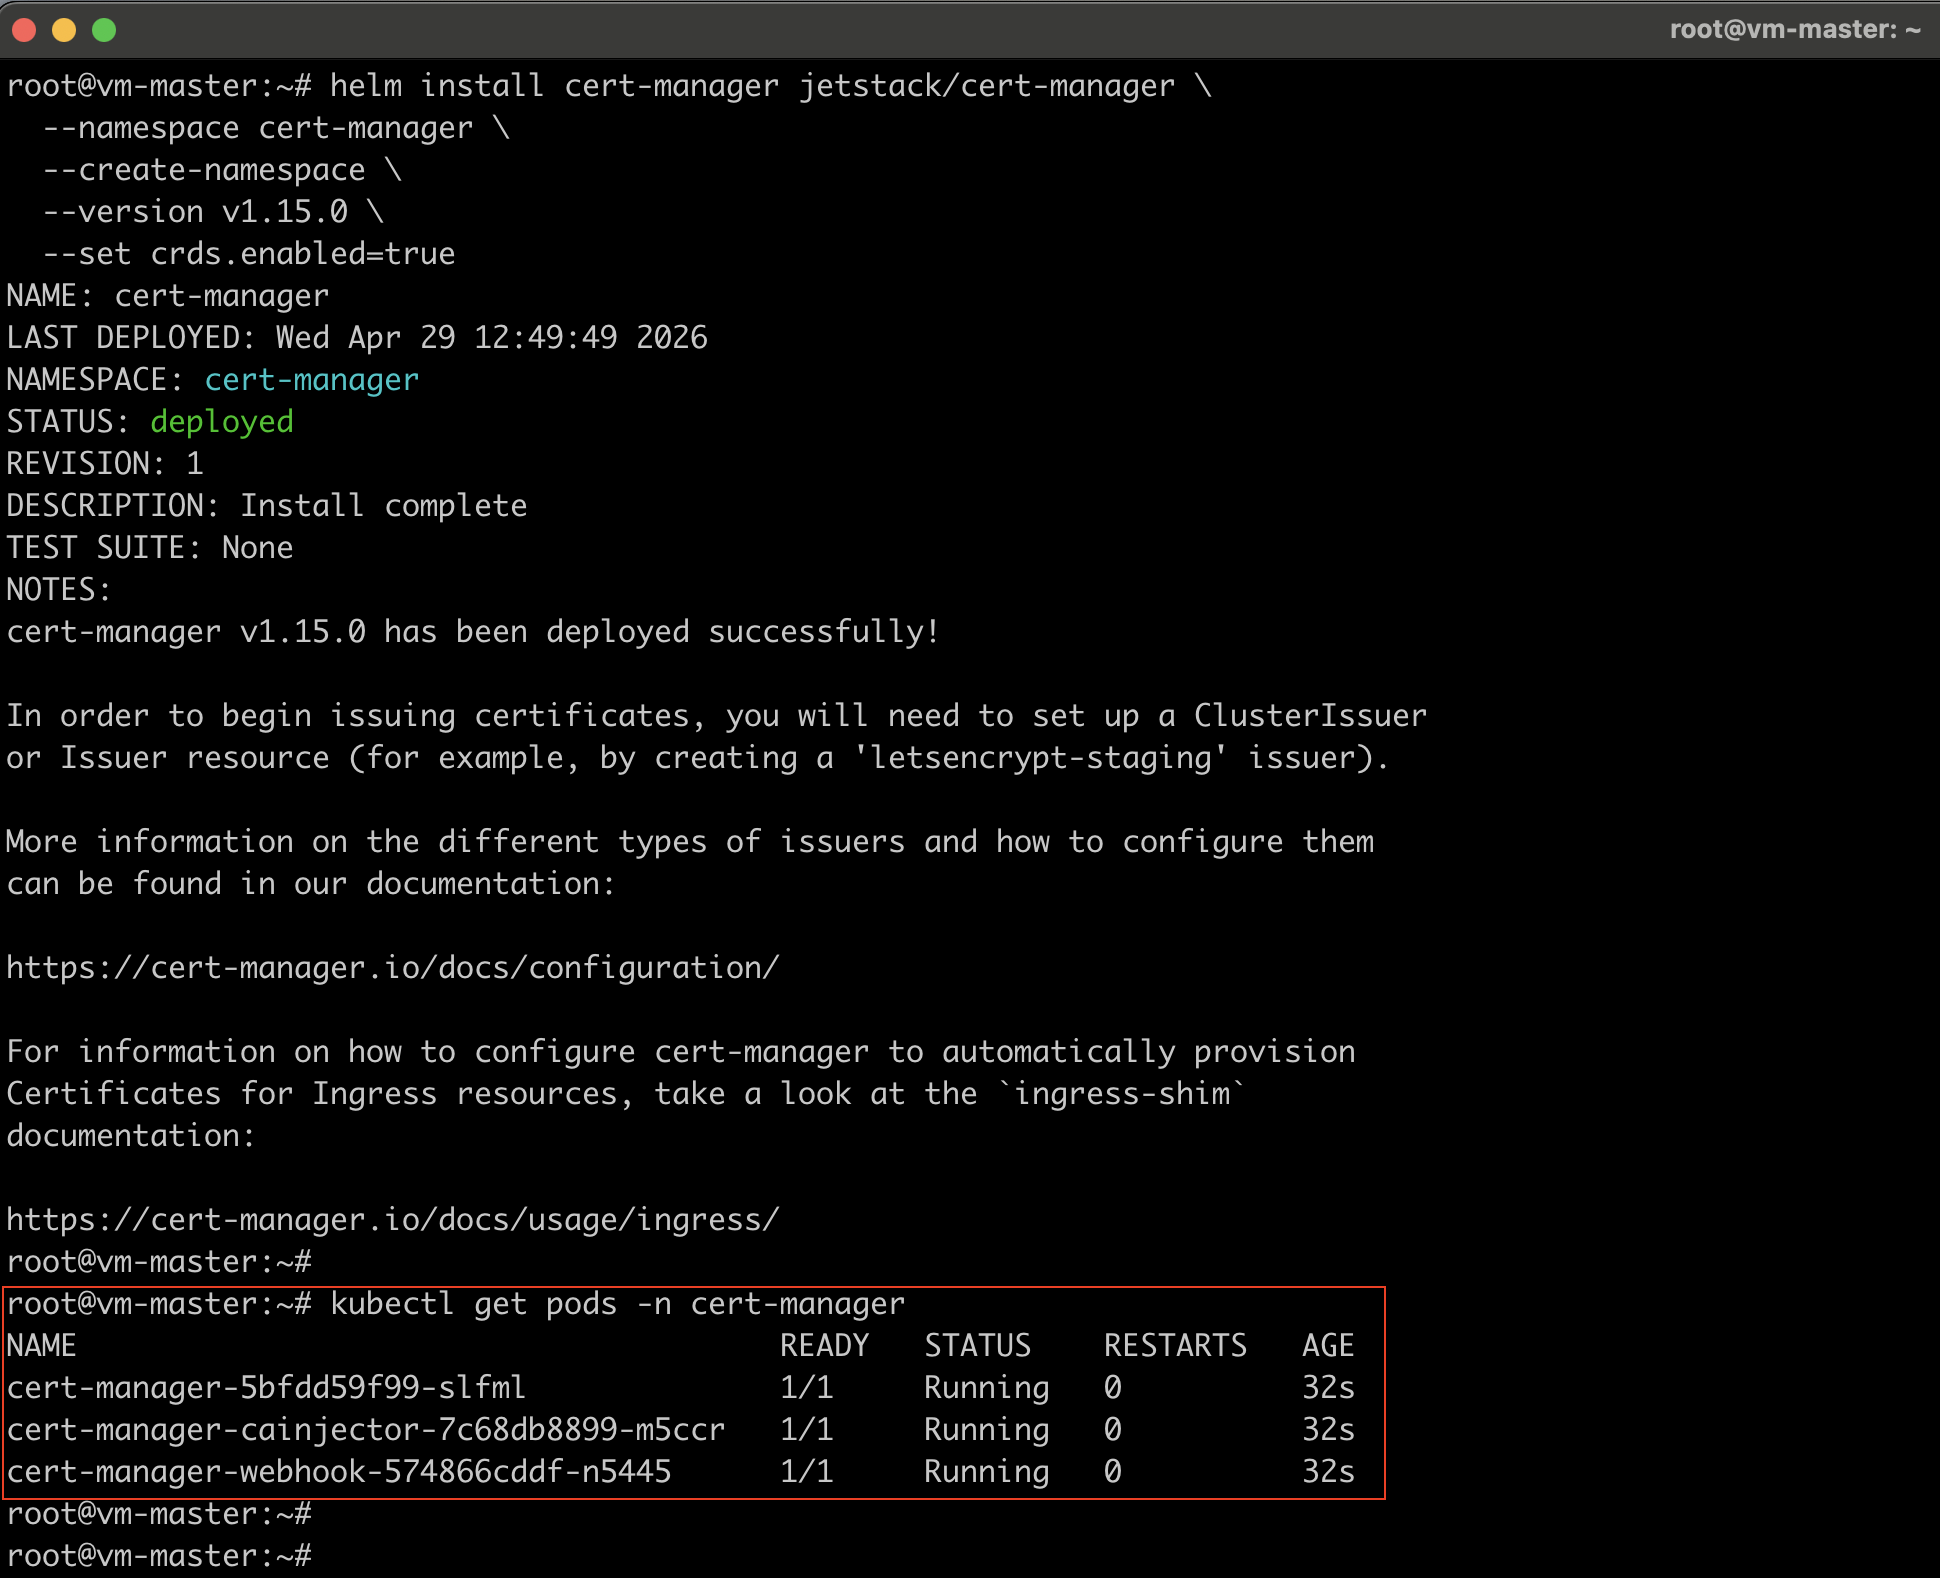
Install cert-manager with CRDs
helm install cert-manager jetstack/cert-manager \
  --namespace cert-manager \
  --create-namespace \
  --version v1.15.0 \
  --set crds.enabled=true
Note: The --set crds.enabled=true flag installs the required Custom Resource Definitions (CRDs) automatically. Without this, cert-manager will install, but none of the Certificate, Issuer, or ClusterIssuer resources will be available.
Verify cert-manager is running
kubectl get pods -n cert-manager
Step 2: AWS Resources Creation
Before deploying Vault, set up the AWS resources Vault needs: a KMS key for auto-unseal, an S3 bucket for snapshots, and an IAM user with the right permissions.
Create the IAM User & AWS KMS Key
#Create the IAM User
aws iam create-user --user-name vault-unseal-user

#Create access keys for this user:
aws iam create-access-key --user-name vault-unseal-user
#Save the `AccessKeyId` and `SecretAccessKey` from the output — you will need them later.

#Create the AWS KMS Key
aws kms create-key \
  --description "vault-unseal-key" \
  --region us-east-1

#Create a human-readable alias for the key:
aws kms create-alias \
  --alias-name alias/vault-unseal-key \
  --target-key-id <YOUR_KEY_ID> \
  --region us-east-1
Create the KMS IAM Policy
aws iam create-policy \
  --policy-name vault-kms-unseal-policy \
  --policy-document '{
    "Version": "2012-10-17",
    "Statement": [{
      "Effect": "Allow",
      "Action": [
        "kms:Encrypt",
        "kms:Decrypt",
        "kms:DescribeKey"
      ],
      "Resource": "arn:aws:kms:us-east-1:<YOUR_ACCOUNT_ID>:key/<YOUR_KEY_ID>"
    }]
  }'
Note the Policy.Arn from the output.
Attach the KMS Policy to the IAM User
aws iam attach-user-policy \
  --user-name vault-unseal-user \
  --policy-arn arn:aws:iam::<YOUR_ACCOUNT_ID>:policy/vault-kms-unseal-policy
Create the S3 Bucket for Raft Snapshots
#Replace `<ACCOUNT_ID>` with your AWS account ID
aws s3api create-bucket \
  --bucket vault-raft-snapshots-<ACCOUNT_ID> \
  --region us-east-1

#Enable Versioning on the S3 Bucket
aws s3api put-bucket-versioning \
  --bucket vault-raft-snapshots-<ACCOUNT_ID> \
  --versioning-configuration Status=Enabled

#Block All Public Access on the S3 Bucket
aws s3api put-public-access-block \
  --bucket vault-raft-snapshots-<ACCOUNT_ID> \
  --public-access-block-configuration \
 "BlockPublicAcls=true,IgnorePublicAcls=true,BlockPublicPolicy=true,RestrictPublicBuckets=true"
Set a 30-Day Lifecycle Policy on the S3 Bucket
aws s3api put-bucket-lifecycle-configuration \
  --bucket vault-raft-snapshots-<ACCOUNT_ID> \
  --lifecycle-configuration '{
    "Rules": [{
      "ID": "expire-old-snapshots",
      "Status": "Enabled",
      "Filter": { "Prefix": "snapshots/" },
      "Expiration": { "Days": 30 },
      "NoncurrentVersionExpiration": { "NoncurrentDays": 30 }
    }]
  }'
Create the S3 IAM Policy
aws iam create-policy \
  --policy-name vault-s3-snapshot-policy \
  --policy-document '{
    "Version": "2012-10-17",
    "Statement": [{
      "Effect": "Allow",
      "Action": [
        "s3:PutObject",
        "s3:GetObject",
        "s3:ListBucket"
      ],
      "Resource": [
        "arn:aws:s3:::vault-raft-snapshots-<ACCOUNT_ID>",
        "arn:aws:s3:::vault-raft-snapshots-<ACCOUNT_ID>/snapshots/*"
      ]
    }]
  }'
Attach the S3 Policy to the IAM User
aws iam attach-user-policy \
  --user-name vault-unseal-user \
  --policy-arn arn:aws:iam::<ACCOUNT_ID>:policy/vault-s3-snapshot-policy
Step 3: Kubernetes Namespace and Secrets
#Create the Vault Namespace
kubectl create namespace vault

#Store AWS Credentials as a Kubernetes Secret
kubectl create secret generic vault-aws-creds -n vault \
  --from-literal=AWS_ACCESS_KEY_ID=<YOUR_ACCESS_KEY_ID> \
  --from-literal=AWS_SECRET_ACCESS_KEY=<YOUR_SECRET_ACCESS_KEY>
Step 4: TLS Setup with cert-manager
Vault needs two types of TLS:
- External TLS — for the HTTPS endpoint users connect to (Let’s Encrypt)
- Internal TLS — for encrypted Raft communication between Vault pods (self-signed CA)
Create the Self-Signed Bootstrap ClusterIssuer
#selfsigned-issuer.yaml

apiVersion: cert-manager.io/v1
kind: ClusterIssuer
metadata:
  name: selfsigned-bootstrap
spec:
  selfSigned: {}
kubectl apply -f selfsigned-issuer.yaml
Create the Internal CA Certificate
This CA will sign all internal Raft TLS certificates.
#vault-internal-ca.yaml

apiVersion: cert-manager.io/v1
kind: Certificate
metadata:
  name: vault-internal-ca
  namespace: vault
spec:
  isCA: true
  commonName: vault-internal-ca
  secretName: vault-internal-ca-secret
  privateKey:
    algorithm: ECDSA
    size: 256
  issuerRef:
    name: selfsigned-bootstrap
    kind: ClusterIssuer
    group: cert-manager.io
kubectl apply -f vault-internal-ca.yaml
Create the Internal Issuer
This Issuer uses the CA created above to sign Raft TLS certs.
#vault-internal-issuer.yaml

apiVersion: cert-manager.io/v1
kind: Issuer
metadata:
  name: vault-internal-issuer
  namespace: vault
spec:
  ca:
    secretName: vault-internal-ca-secret
kubectl apply -f vault-internal-issuer.yaml
Create the Internal TLS Certificate for Raft
This certificate covers all Vault pod hostnames.
#vault-internal-cert.yaml

apiVersion: cert-manager.io/v1
kind: Certificate
metadata:
  name: vault-internal-tls
  namespace: vault
spec:
  secretName: vault-internal-tls
  issuerRef:
    name: vault-internal-issuer
    kind: Issuer
  commonName: vault.vault.svc.cluster.local
  dnsNames:
    - vault
    - vault.vault
    - vault.vault.svc
    - vault.vault.svc.cluster.local
    - vault-0.vault-internal
    - vault-1.vault-internal
    - vault-2.vault-internal
    - vault-0.vault-internal.vault.svc.cluster.local
    - vault-1.vault-internal.vault.svc.cluster.local
    - vault-2.vault-internal.vault.svc.cluster.local
kubectl apply -f vault-internal-cert.yaml
Verify the certificate is issued:
kubectl get certificate -n vault vault-internal-tls
kubectl describe certificate vault-internal-tls -n vault
Create the Let’s Encrypt Production ClusterIssuer
#letsencrypt-prod.yaml

apiVersion: cert-manager.io/v1
kind: ClusterIssuer
metadata:
  name: letsencrypt-prod
spec:
  acme:
    email: [email protected]
    server: https://acme-v02.api.letsencrypt.org/directory
    privateKeySecretRef:
      name: letsencrypt-prod-key
    solvers:
      - http01:
          ingress:
            class: nginx
kubectl apply -f letsencrypt-prod.yaml
Verify both issuers are Ready:
kubectl get clusterissuer
Step 5: Set up the Nginx Ingress Controller
Nginx Ingress is deployed as a DaemonSet with hostNetwork: true so it binds ports 80 and 443 directly on each node – this is required for Let’s Encrypt HTTP-01 challenges on bare-VM clusters.
Add the nginx Helm Repository
helm repo add ingress-nginx https://kubernetes.github.io/ingress-nginx
helm repo update
Install nginx Ingress as a DaemonSet
helm install ingress-nginx ingress-nginx/ingress-nginx \
  --namespace ingress-nginx \
  --create-namespace \
  --set controller.kind=DaemonSet \
  --set controller.hostNetwork=true \
  --set controller.service.type=ClusterIP
Step 6: Install HashiCorp Vault with Helm
Add the HashiCorp Helm Repository
helm repo add hashicorp https://helm.releases.hashicorp.com
helm repo update
Create the Vault Helm Values File
This is the most important configuration file in the entire deployment. Save as vault-values.yaml:
global:
  enabled: true
  tlsDisable: false

injector:
  enabled: true

server:
  image:
    tag: "1.17.0"

  # Resource requests/limits
  resources:
    requests:
      memory: "256Mi"
      cpu: "250m"
    limits:
      memory: "512Mi"
      cpu: "500m"

  # Liveness probe — IMPORTANT: must include uninitcode and sealedcode
  # Without these, Kubernetes will kill the pod before you can initialize Vault
  livenessProbe:
    enabled: true
    path: "/v1/sys/health?standbyok=true&uninitcode=204&sealedcode=204"
    initialDelaySeconds: 60

  readinessProbe:
    enabled: true
    path: "/v1/sys/health?standbyok=true"

  # Extra environment variables from the AWS credentials secret
  extraSecretEnvironmentVars:
    - envName: AWS_ACCESS_KEY_ID
      secretName: vault-aws-creds
      secretKey: AWS_ACCESS_KEY_ID
    - envName: AWS_SECRET_ACCESS_KEY
      secretName: vault-aws-creds
      secretKey: AWS_SECRET_ACCESS_KEY

  # Mount the internal TLS certificate
  extraVolumes:
    - type: secret
      name: vault-internal-tls
      mountPath: /vault/userconfig/vault-internal-tls

  # Vault configuration
  ha:
    enabled: true
    replicas: 3
    raft:
      enabled: true
      setNodeId: true   # Automatically sets unique node ID per pod — do NOT set node_id manually
      config: |
        ui = true

        listener "tcp" {
          tls_disable     = 0
          address         = "[::]:8200"
          cluster_address = "[::]:8201"
          tls_cert_file   = "/vault/userconfig/vault-internal-tls/tls.crt"
          tls_key_file    = "/vault/userconfig/vault-internal-tls/tls.key"
          tls_client_ca_file = "/vault/userconfig/vault-internal-tls/ca.crt"
        }

        storage "raft" {
          path = "/vault/data"

          retry_join {
            leader_tls_servername   = "vault-0.vault-internal"
            leader_api_addr         = "https://vault-0.vault-internal:8200"
            leader_ca_cert_file     = "/vault/userconfig/vault-internal-tls/ca.crt"
            leader_client_cert_file = "/vault/userconfig/vault-internal-tls/tls.crt"
            leader_client_key_file  = "/vault/userconfig/vault-internal-tls/tls.key"
          }

          retry_join {
            leader_tls_servername   = "vault-1.vault-internal"
            leader_api_addr         = "https://vault-1.vault-internal:8200"
            leader_ca_cert_file     = "/vault/userconfig/vault-internal-tls/ca.crt"
            leader_client_cert_file = "/vault/userconfig/vault-internal-tls/tls.crt"
            leader_client_key_file  = "/vault/userconfig/vault-internal-tls/tls.key"
          }

          retry_join {
            leader_tls_servername   = "vault-2.vault-internal"
            leader_api_addr         = "https://vault-2.vault-internal:8200"
            leader_ca_cert_file     = "/vault/userconfig/vault-internal-tls/ca.crt"
            leader_client_cert_file = "/vault/userconfig/vault-internal-tls/tls.crt"
            leader_client_key_file  = "/vault/userconfig/vault-internal-tls/tls.key"
          }
        }

        seal "awskms" {
          region     = "us-east-1"
          kms_key_id = "<YOUR_KMS_KEY_ID>"
        }

        service_registration "kubernetes" {}

  # Persistent storage
  dataStorage:
    enabled: true
    size: 10Gi
    storageClass: longhorn

  auditStorage:
    enabled: true
    size: 5Gi
    storageClass: longhorn

  # One Vault pod per node — required for true HA
  affinity: |
    podAntiAffinity:
      requiredDuringSchedulingIgnoredDuringExecution:
        - labelSelector:
            matchLabels:
              app.kubernetes.io/name: vault
              component: server
          topologyKey: kubernetes.io/hostname

  # Ingress — Let's Encrypt TLS
  ingress:
    enabled: true
    ingressClassName: nginx
    annotations:
      cert-manager.io/cluster-issuer: letsencrypt-prod
      nginx.ingress.kubernetes.io/backend-protocol: "HTTPS"
    hosts:
      - host: vault.yourdomain.com
        paths:
          - /
    tls:
      - secretName: vault-tls-letsencrypt
        hosts:
          - vault.yourdomain.com

ui:
  enabled: true
Note: Ensure your Kubernetes cluster has at least three worker nodes, as this Vault deployment requires three Vault nodes.
Install Vault
helm install vault hashicorp/vault \
  -n vault \
  -f vault-values.yaml
Verify All Pods Are Running
kubectl get pods -n vault
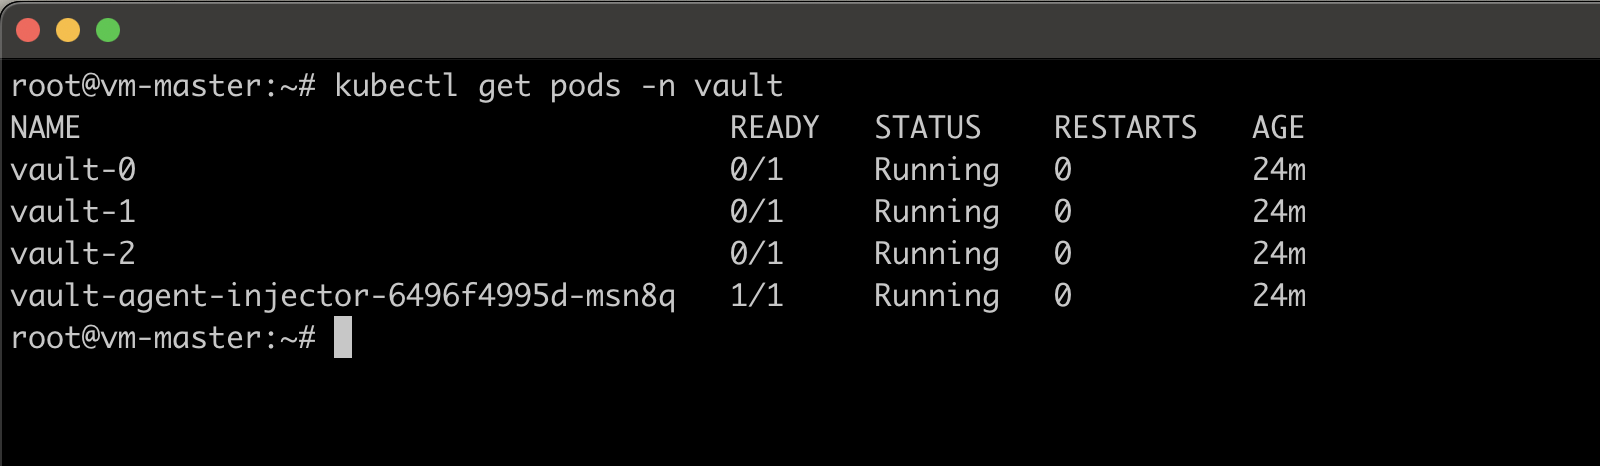
In this verification, you can see vault pods are running, but the readiness probe (/v1/sys/health?standbyok=true) returns HTTP 501 (because it is not initialized yet). This is expected behavior — Vault starts sealed/uninitialized and must be
bootstrapped. The label vault-sealed=true and vault-initialized=false on the pods confirm this.
Step 8: Initialize HashiCorp Vault & Verify
Vault only needs to be initialized once. Run this on vault-0:
kubectl exec -n vault vault-0 -- \
  sh -c "VAULT_ADDR=https://127.0.0.1:8200 VAULT_SKIP_VERIFY=true \
  vault operator init \
  -recovery-shares=5 \
  -recovery-threshold=3 \
  -format=json" > /tmp/vault-init-output.json
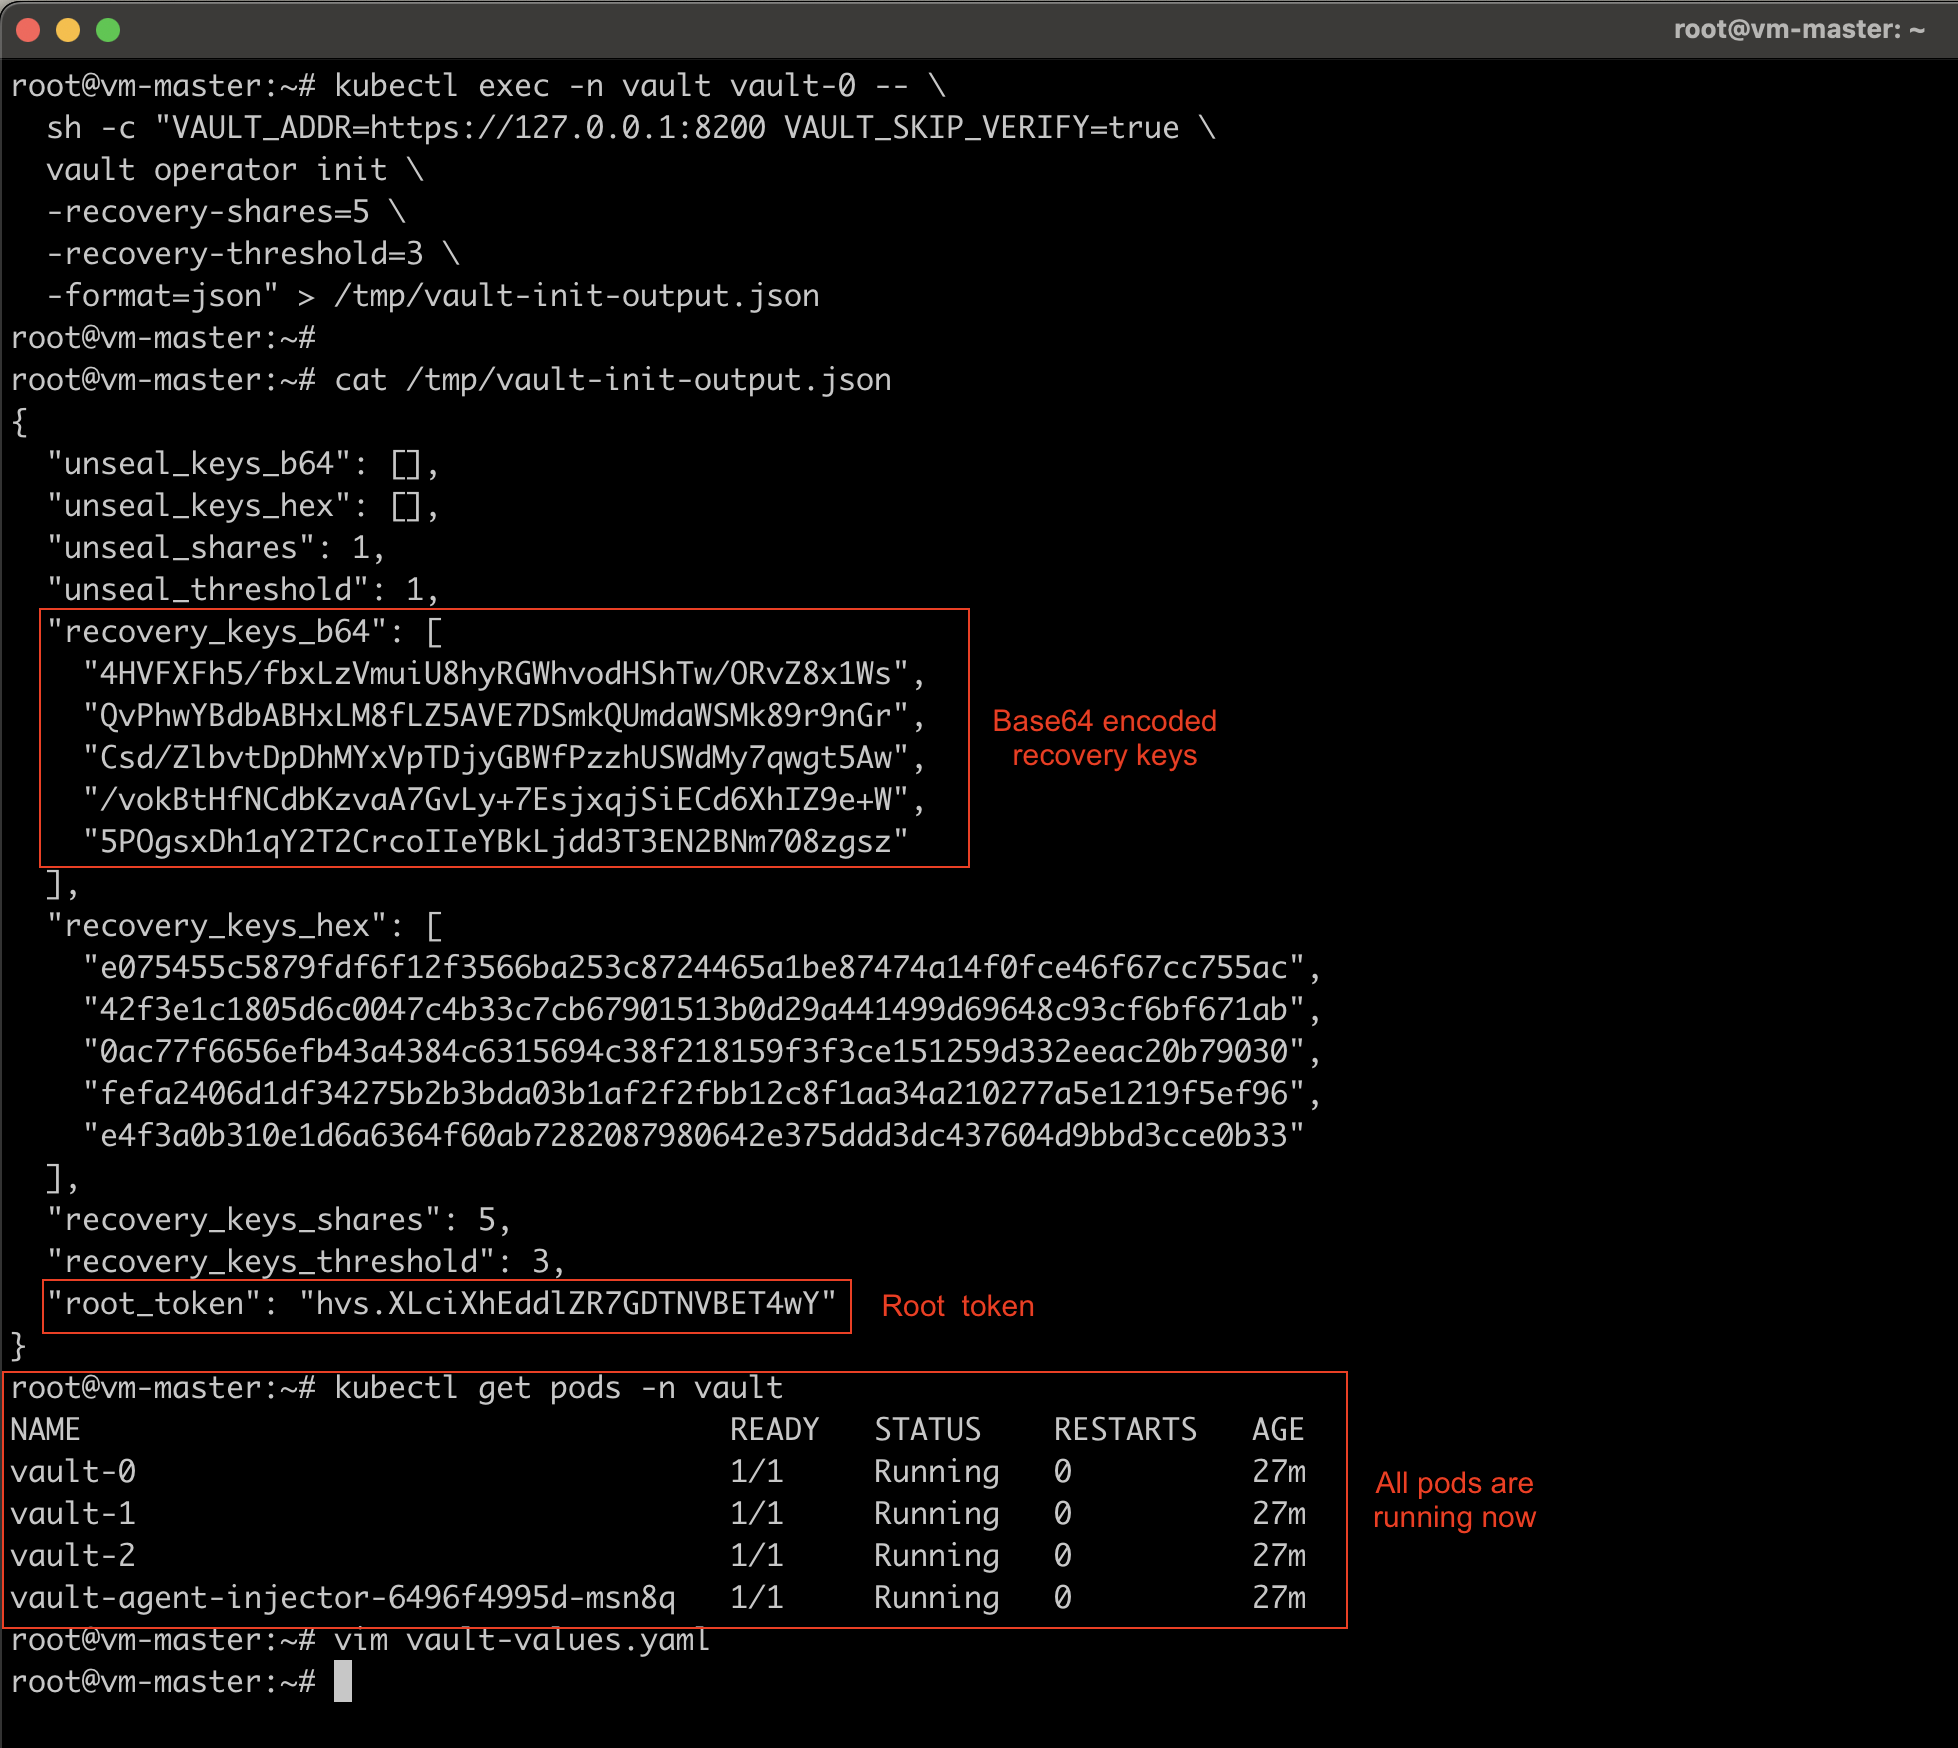
This outputs 5 recovery keys and a root token. With AWS KMS auto-unseal:
- Recovery keys are used only to generate a new root token (not to unseal)
- Root token is used for initial configuration
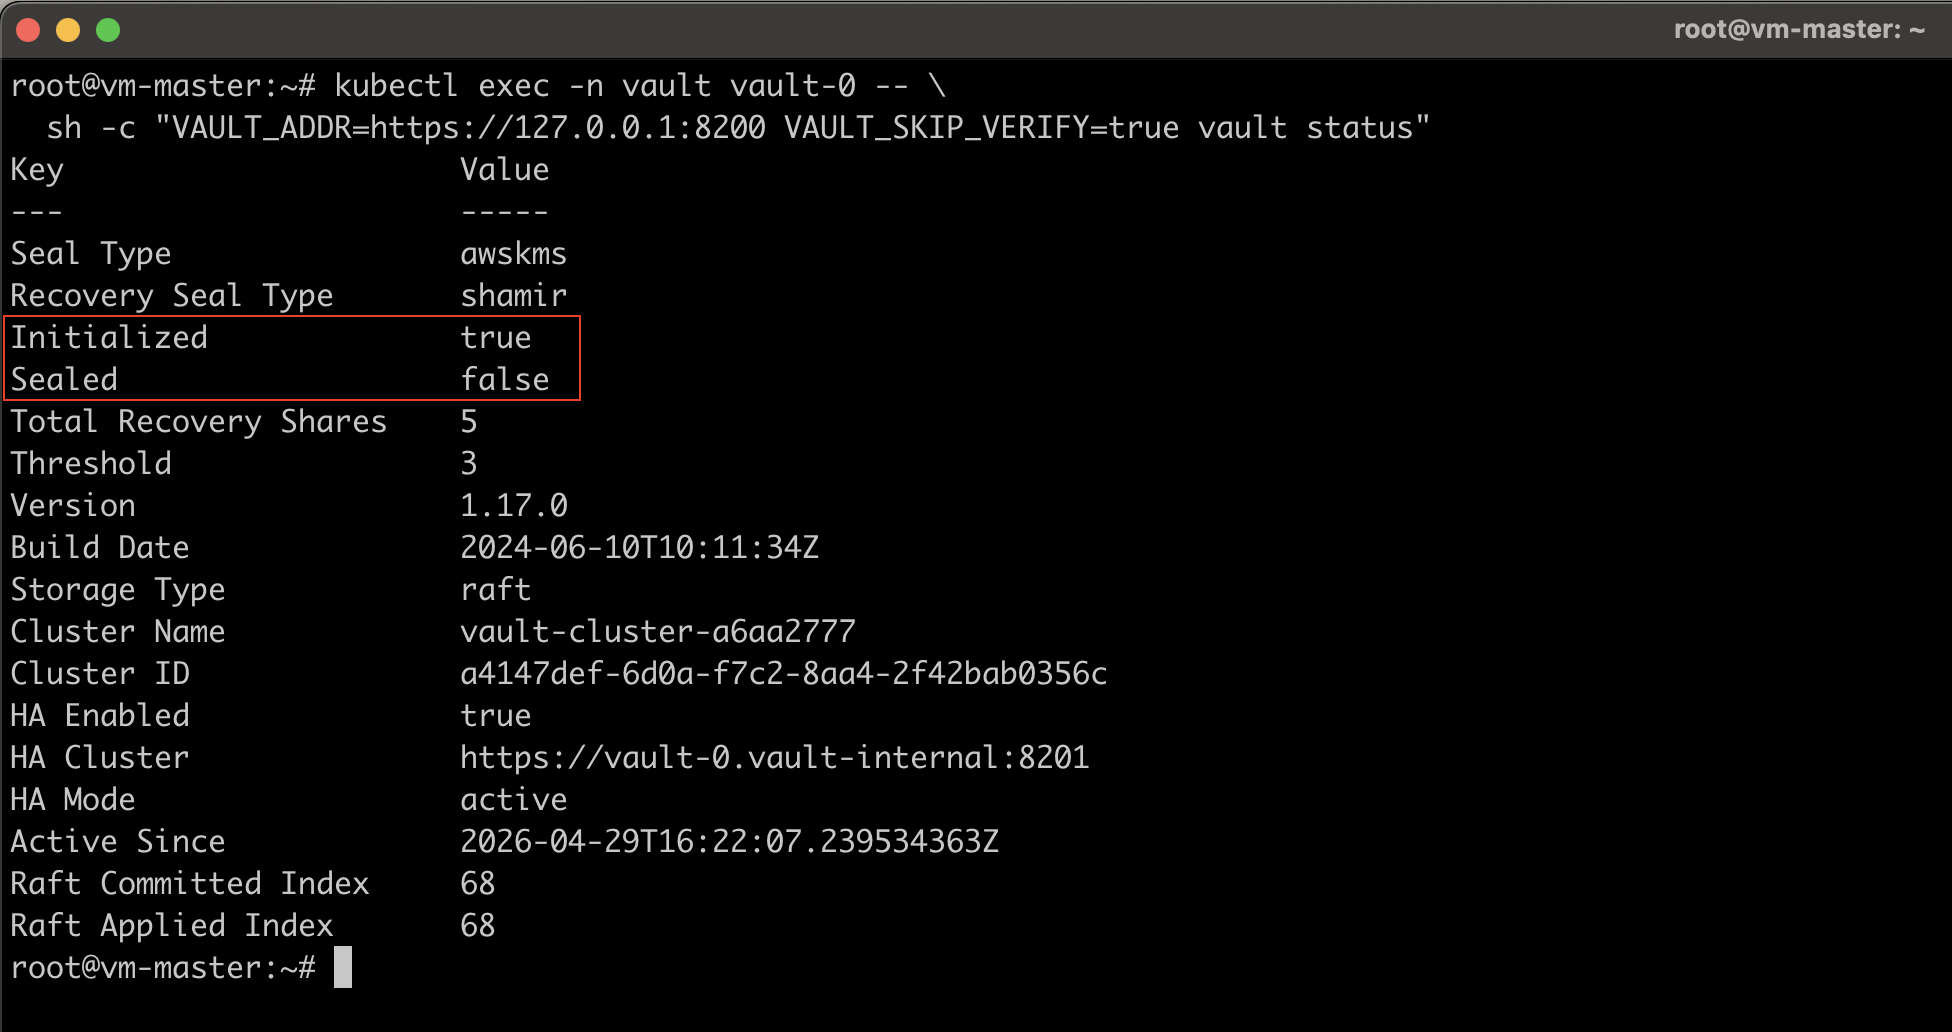
Verify Vault is Initialized and Unsealed
kubectl exec -n vault vault-0 -- \
  sh -c "VAULT_ADDR=https://127.0.0.1:8200 VAULT_SKIP_VERIFY=true vault status"
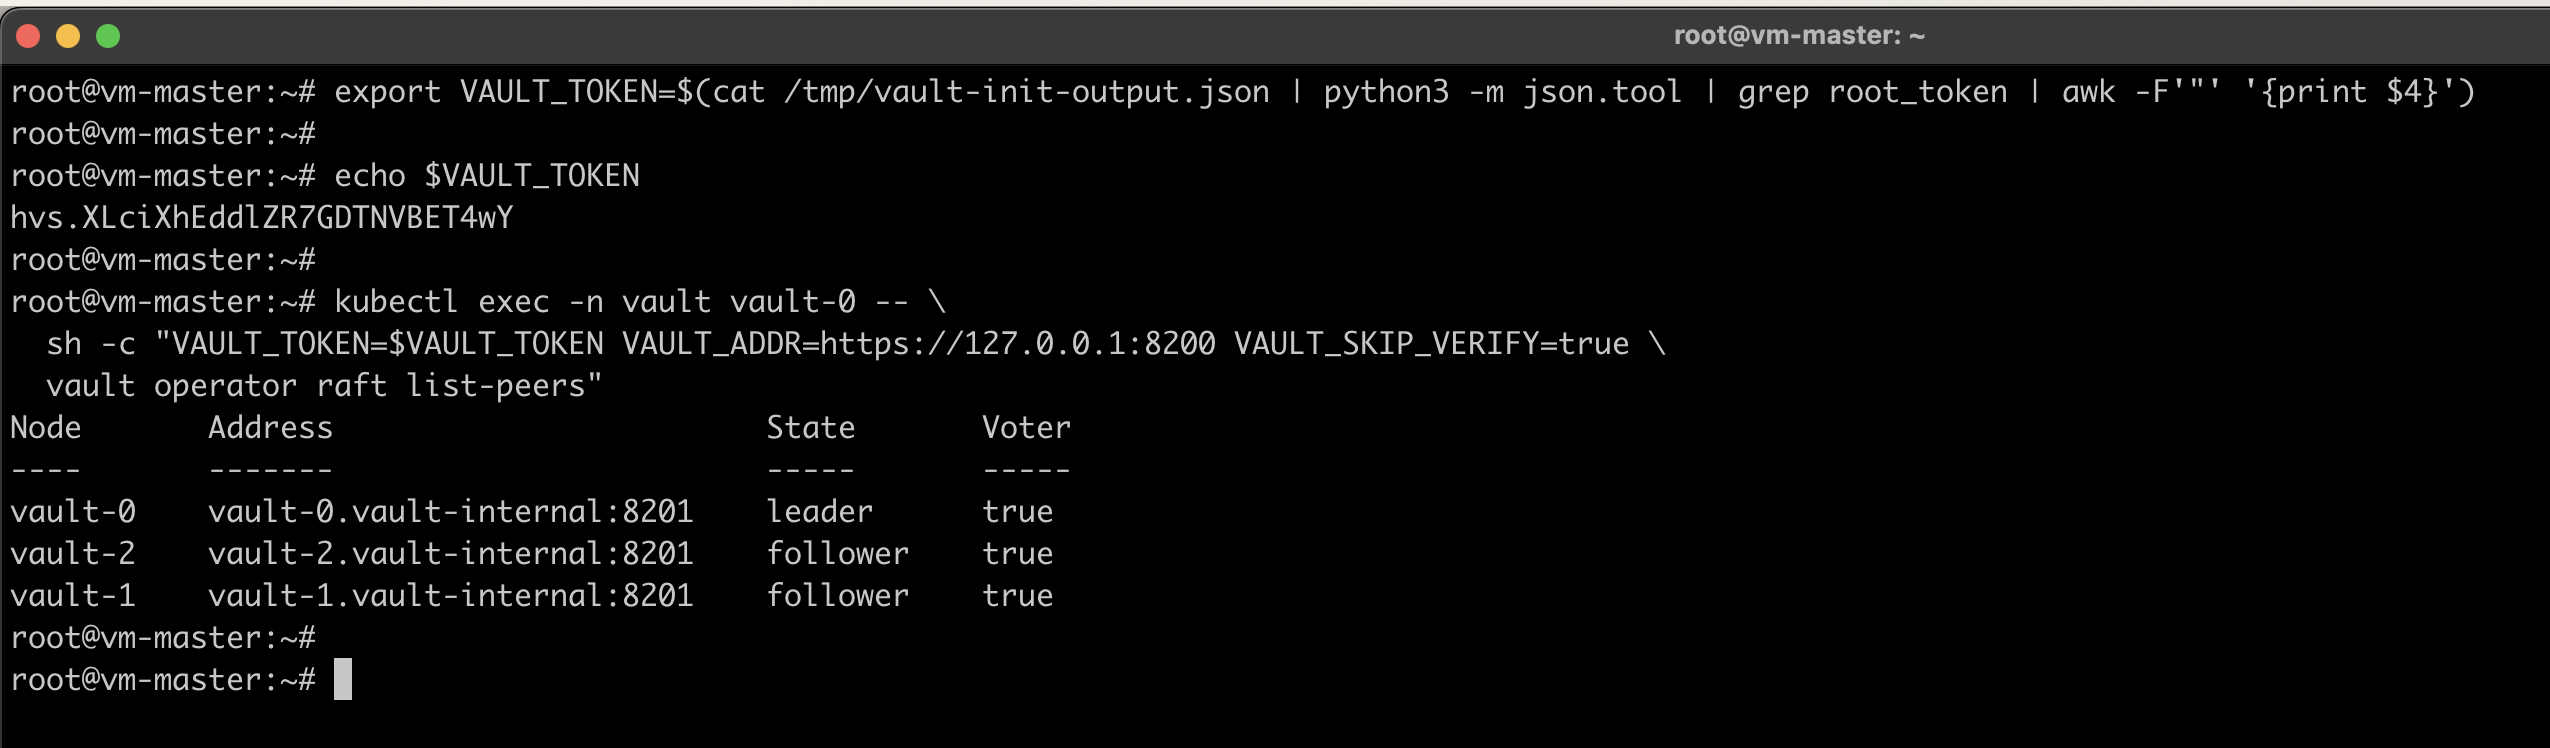
Verify All Nodes Joined the Raft Cluster
#Export the Root Token
export VAULT_TOKEN=$(cat /tmp/vault-init-output.json | python3 -m json.tool | grep root_token | awk -F'"' '{print $4}')

kubectl exec -n vault vault-0 -- \
  sh -c "VAULT_TOKEN=$VAULT_TOKEN VAULT_ADDR=https://127.0.0.1:8200 VAULT_SKIP_VERIFY=true \
  vault operator raft list-peers"
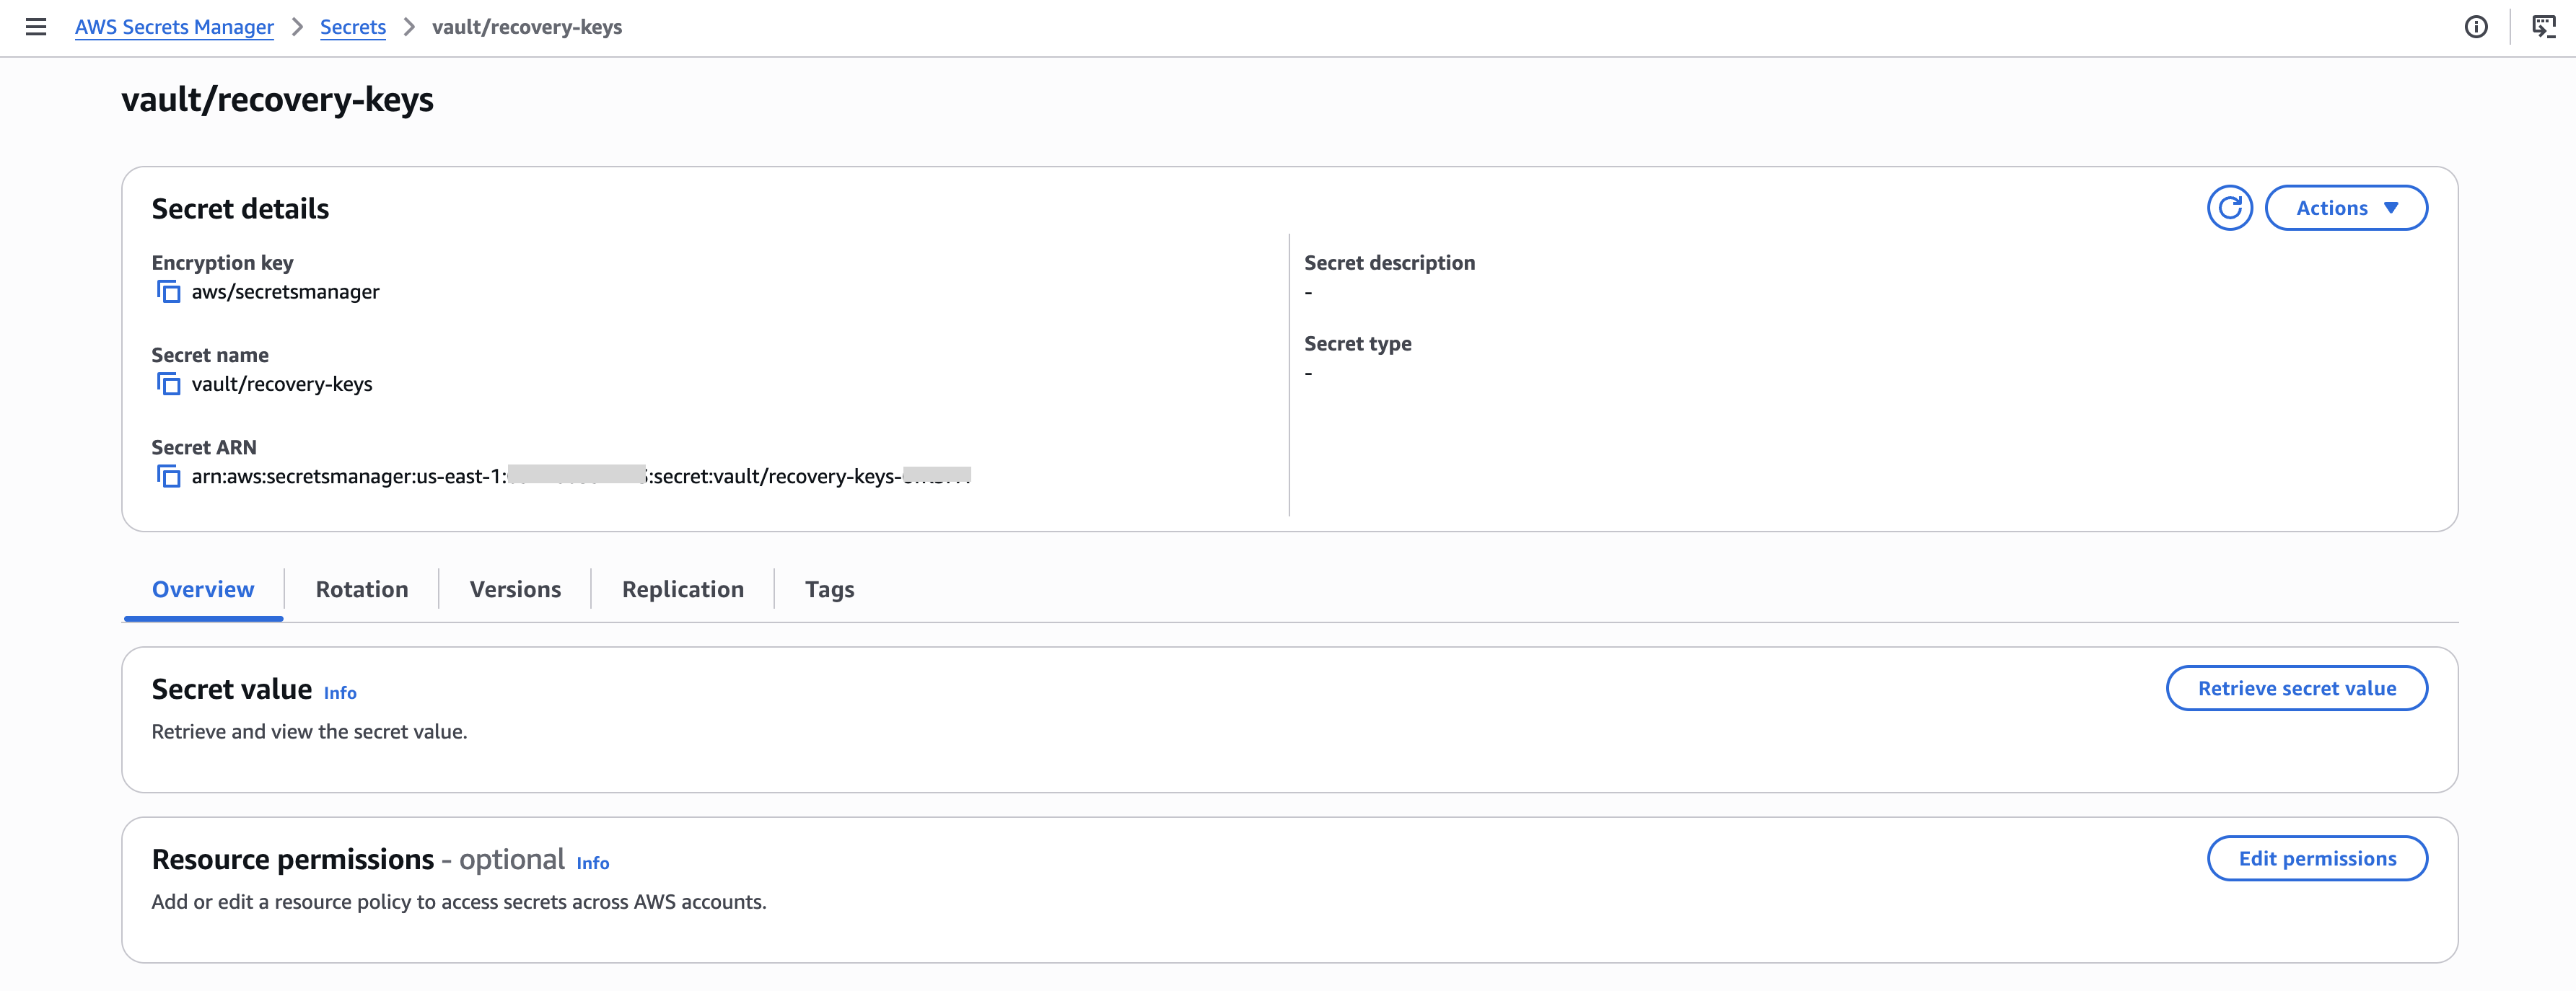
Store Recovery Keys in AWS Secrets Manager
Do this immediately. The /tmp/vault-init-output.json file contains your recovery keys and root token in plaintext.
aws secretsmanager create-secret \
  --name vault/recovery-keys \
  --description "Vault recovery keys and initial root token" \
  --secret-string file:///tmp/vault-init-output.json \
  --region us-east-1
Once you successfully store the key details on AWS Secrets Manager, you may proceed with the deletion of vault-init-output.json.
Step 9: Enable Vault Audit Device Logs
The audit device logs every request and response through Vault. It is a critical security requirement. Vault will refuse all requests if the audit device becomes unavailable, ensuring no operation goes unlogged.
Enable the Audit Device
kubectl exec -n vault vault-0 -- \
  sh -c "VAULT_TOKEN=$VAULT_TOKEN VAULT_ADDR=https://127.0.0.1:8200 VAULT_SKIP_VERIFY=true \
  vault audit enable file file_path=/vault/audit/vault-audit.log"
Verify the Audit Device is Active
kubectl exec -n vault vault-0 -- \
  sh -c "VAULT_TOKEN=$VAULT_TOKEN VAULT_ADDR=https://127.0.0.1:8200 VAULT_SKIP_VERIFY=true \
  vault audit list"
Audit logs are written to /vault/audit/vault-audit.log inside each pod and persisted on the auditStorage PVCs.
To tail audit logs:
kubectl exec -n vault vault-0 -- tail -f /vault/audit/vault-audit.log

Step 10: Configure Raft Snapshot CronJob
Daily snapshots protect against data loss. Snapshots are uploaded to S3 and retained for 30 days.
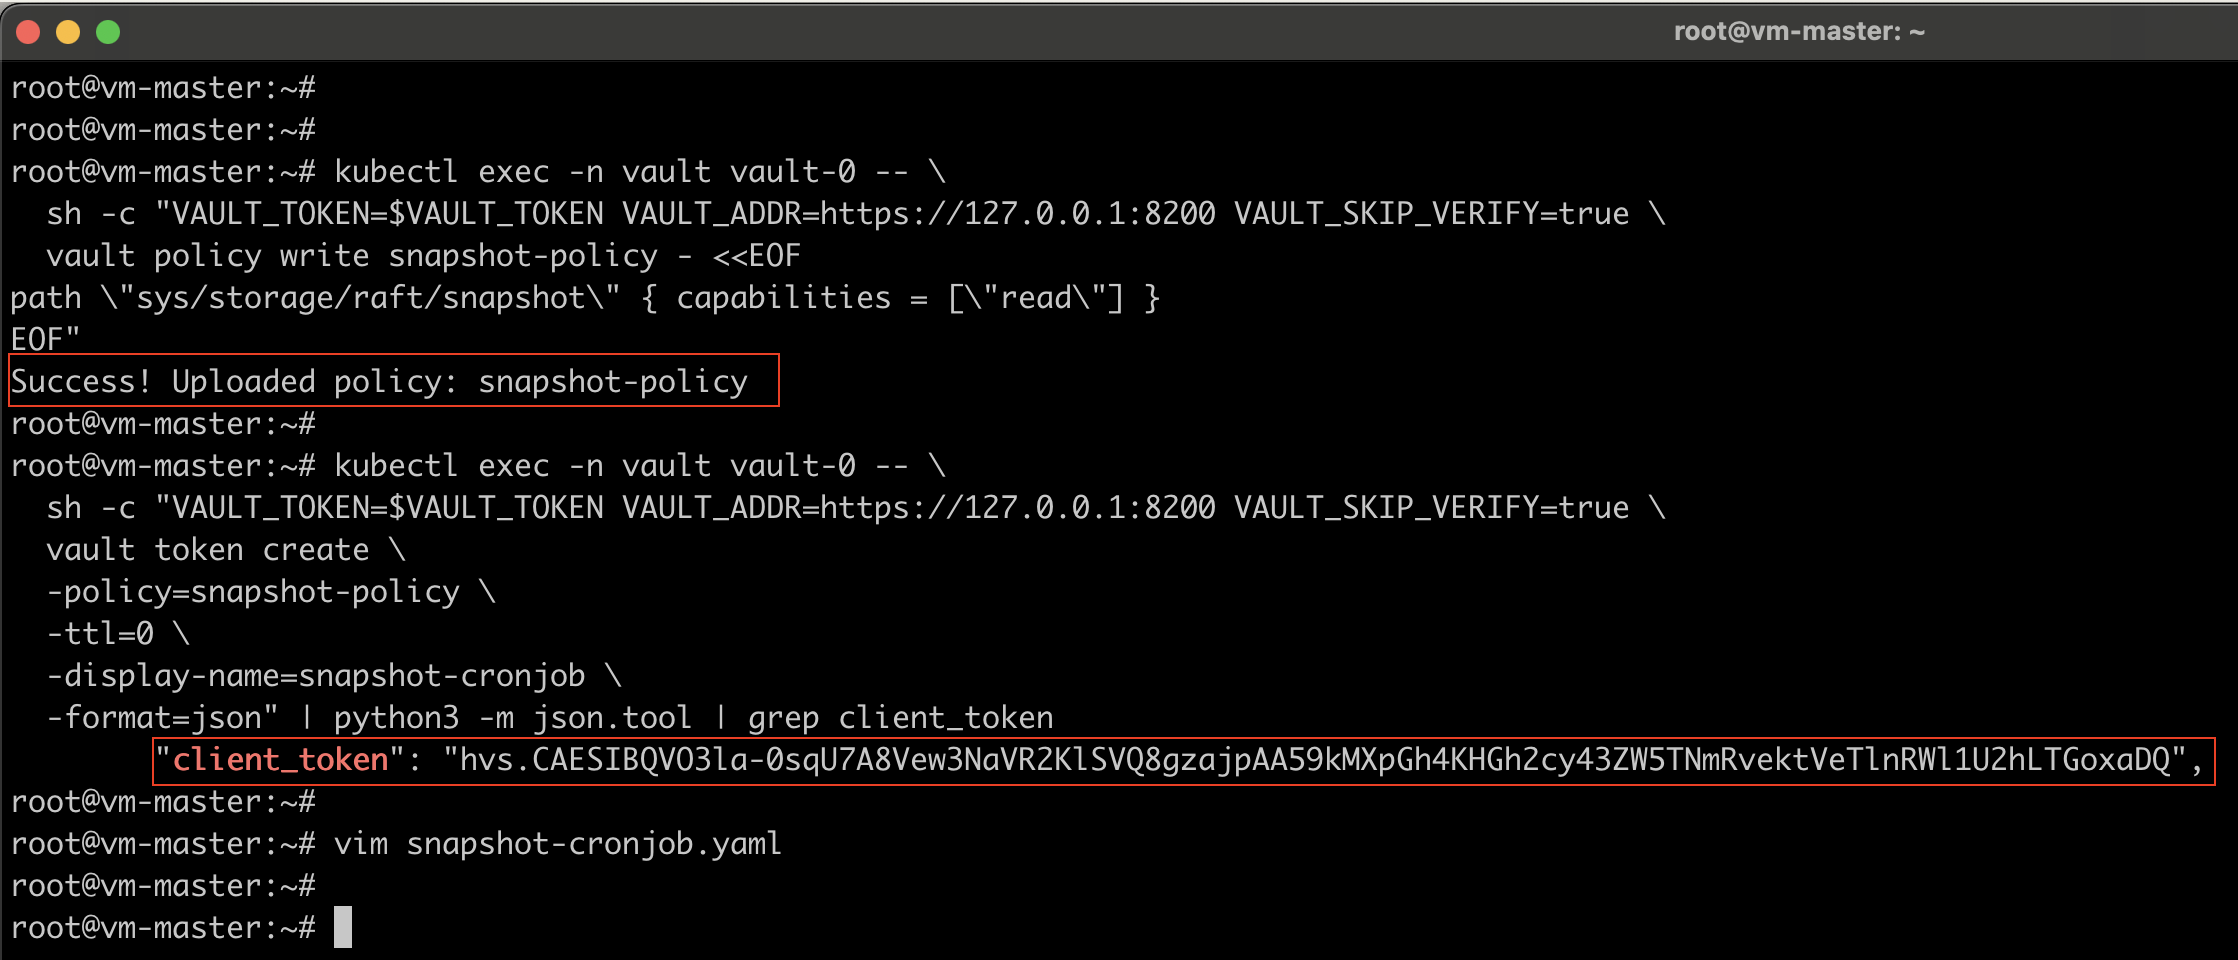
Create the Snapshot Vault Policy
kubectl exec -n vault vault-0 -- \
  sh -c "VAULT_TOKEN=$VAULT_TOKEN VAULT_ADDR=https://127.0.0.1:8200 VAULT_SKIP_VERIFY=true \
  vault policy write snapshot-policy - <<EOF
path \"sys/storage/raft/snapshot\" { capabilities = [\"read\"] }
EOF"
Create a Dedicated Non-Expiring Snapshot Token
kubectl exec -n vault vault-0 -- \
  sh -c "VAULT_TOKEN=$VAULT_TOKEN VAULT_ADDR=https://127.0.0.1:8200 VAULT_SKIP_VERIFY=true \
  vault token create \
  -policy=snapshot-policy \
  -ttl=0 \
  -display-name=snapshot-cronjob \
  -format=json" | python3 -m json.tool | grep client_token
Note: Save this token — it will be used in the next step.
Deploy the Snapshot CronJob
Save as snapshot-cronjob.yaml. Replace <SNAPSHOT_TOKEN>, <ACCOUNT_ID>, and <REGION>:
apiVersion: v1
kind: Secret
metadata:
  name: vault-snapshot-token
  namespace: vault
type: Opaque
stringData:
  VAULT_TOKEN: "<SNAPSHOT_TOKEN>"

---
apiVersion: v1
kind: ServiceAccount
metadata:
  name: vault-snapshot
  namespace: vault

---
apiVersion: batch/v1
kind: CronJob
metadata:
  name: vault-raft-snapshot
  namespace: vault
spec:
  schedule: "0 2 * * *"
  concurrencyPolicy: Forbid
  successfulJobsHistoryLimit: 3
  failedJobsHistoryLimit: 3
  jobTemplate:
    spec:
      template:
        spec:
          serviceAccountName: vault-snapshot
          restartPolicy: OnFailure
          containers:
            - name: snapshot
              image: alpine:3.20
              env:
                - name: VAULT_ADDR
                  value: "https://vault.vault.svc.cluster.local:8200"
                - name: VAULT_CACERT
                  value: /vault-tls/ca.crt
                - name: VAULT_TOKEN
                  valueFrom:
                    secretKeyRef:
                      name: vault-snapshot-token
                      key: VAULT_TOKEN
                - name: S3_BUCKET
                  value: "vault-raft-snapshots-<ACCOUNT_ID>"
                - name: AWS_REGION
                  value: "<REGION>"
                - name: AWS_ACCESS_KEY_ID
                  valueFrom:
                    secretKeyRef:
                      name: vault-aws-creds
                      key: AWS_ACCESS_KEY_ID
                - name: AWS_SECRET_ACCESS_KEY
                  valueFrom:
                    secretKeyRef:
                      name: vault-aws-creds
                      key: AWS_SECRET_ACCESS_KEY
              command:
                - /bin/sh
                - -c
                - |
                  set -e
                  apk add --no-cache aws-cli curl

                  # Find the active Vault node by checking each pod directly.
                  # This avoids a service redirect to a pod IP, which would fail TLS
                  # (no IP SANs in the cert) and trigger the SHA256SUMS.sealed error
                  # seen with AWS KMS auto-unseal when using the Vault CLI.
                  ACTIVE_ADDR=""
                  for i in 0 1 2; do
                    NODE_ADDR="https://vault-${i}.vault-internal.vault.svc.cluster.local:8200"
                    STATUS=$(curl -sL --cacert "${VAULT_CACERT}" -o /dev/null \
                      -w "%{http_code}" "${NODE_ADDR}/v1/sys/health" 2>/dev/null || echo "000")
                    if [ "${STATUS}" = "200" ]; then
                      ACTIVE_ADDR="${NODE_ADDR}"
                      echo "Active Vault node: vault-${i}.vault-internal"
                      break
                    fi
                  done

                  if [ -z "${ACTIVE_ADDR}" ]; then
                    echo "ERROR: Could not find active Vault node"
                    exit 1
                  fi

                  echo "Renewing Vault token..."
                  curl -fsSL -X POST \
                    -H "X-Vault-Token: ${VAULT_TOKEN}" \
                    --cacert "${VAULT_CACERT}" \
                    "${ACTIVE_ADDR}/v1/auth/token/renew-self" \
                    -o /dev/null

                  TIMESTAMP=$(date +%Y-%m-%dT%H-%M-%S)
                  SNAPSHOT_FILE="/tmp/vault-snapshot-${TIMESTAMP}.snap"

                  echo "Taking Raft snapshot..."
                  HTTP_CODE=$(curl -sL \
                    -H "X-Vault-Token: ${VAULT_TOKEN}" \
                    --cacert "${VAULT_CACERT}" \
                    -w "%{http_code}" \
                    "${ACTIVE_ADDR}/v1/sys/storage/raft/snapshot" \
                    -o "${SNAPSHOT_FILE}")

                  if [ "${HTTP_CODE}" != "200" ]; then
                    echo "ERROR: Snapshot API returned HTTP ${HTTP_CODE}"
                    exit 1
                  fi

                  echo "Uploading to s3://${S3_BUCKET}/snapshots/${TIMESTAMP}.snap ..."
                  aws s3 cp "${SNAPSHOT_FILE}" \
                    "s3://${S3_BUCKET}/snapshots/${TIMESTAMP}.snap" \
                    --region "${AWS_REGION}"

                  rm -f "${SNAPSHOT_FILE}"
                  echo "Snapshot complete: ${TIMESTAMP}"
              volumeMounts:
                - name: vault-internal-tls
                  mountPath: /vault-tls
                  readOnly: true
              resources:
                requests:
                  memory: "256Mi"
                  cpu: "100m"
                limits:
                  memory: "512Mi"
                  cpu: "500m"
          volumes:
            - name: vault-internal-tls
              secret:
                secretName: vault-internal-tls
kubectl apply -f snapshot-cronjob.yaml
Test the Snapshot Job Manually
kubectl create job --from=cronjob/vault-raft-snapshot vault-snapshot-test -n vault
Verify it by watching the pods and job logs.
#Watch the pod
kubectl get pods -n vault -l job-name=vault-snapshot-test -w

#Check logs
kubectl logs -n vault -l job-name=vault-snapshot-test
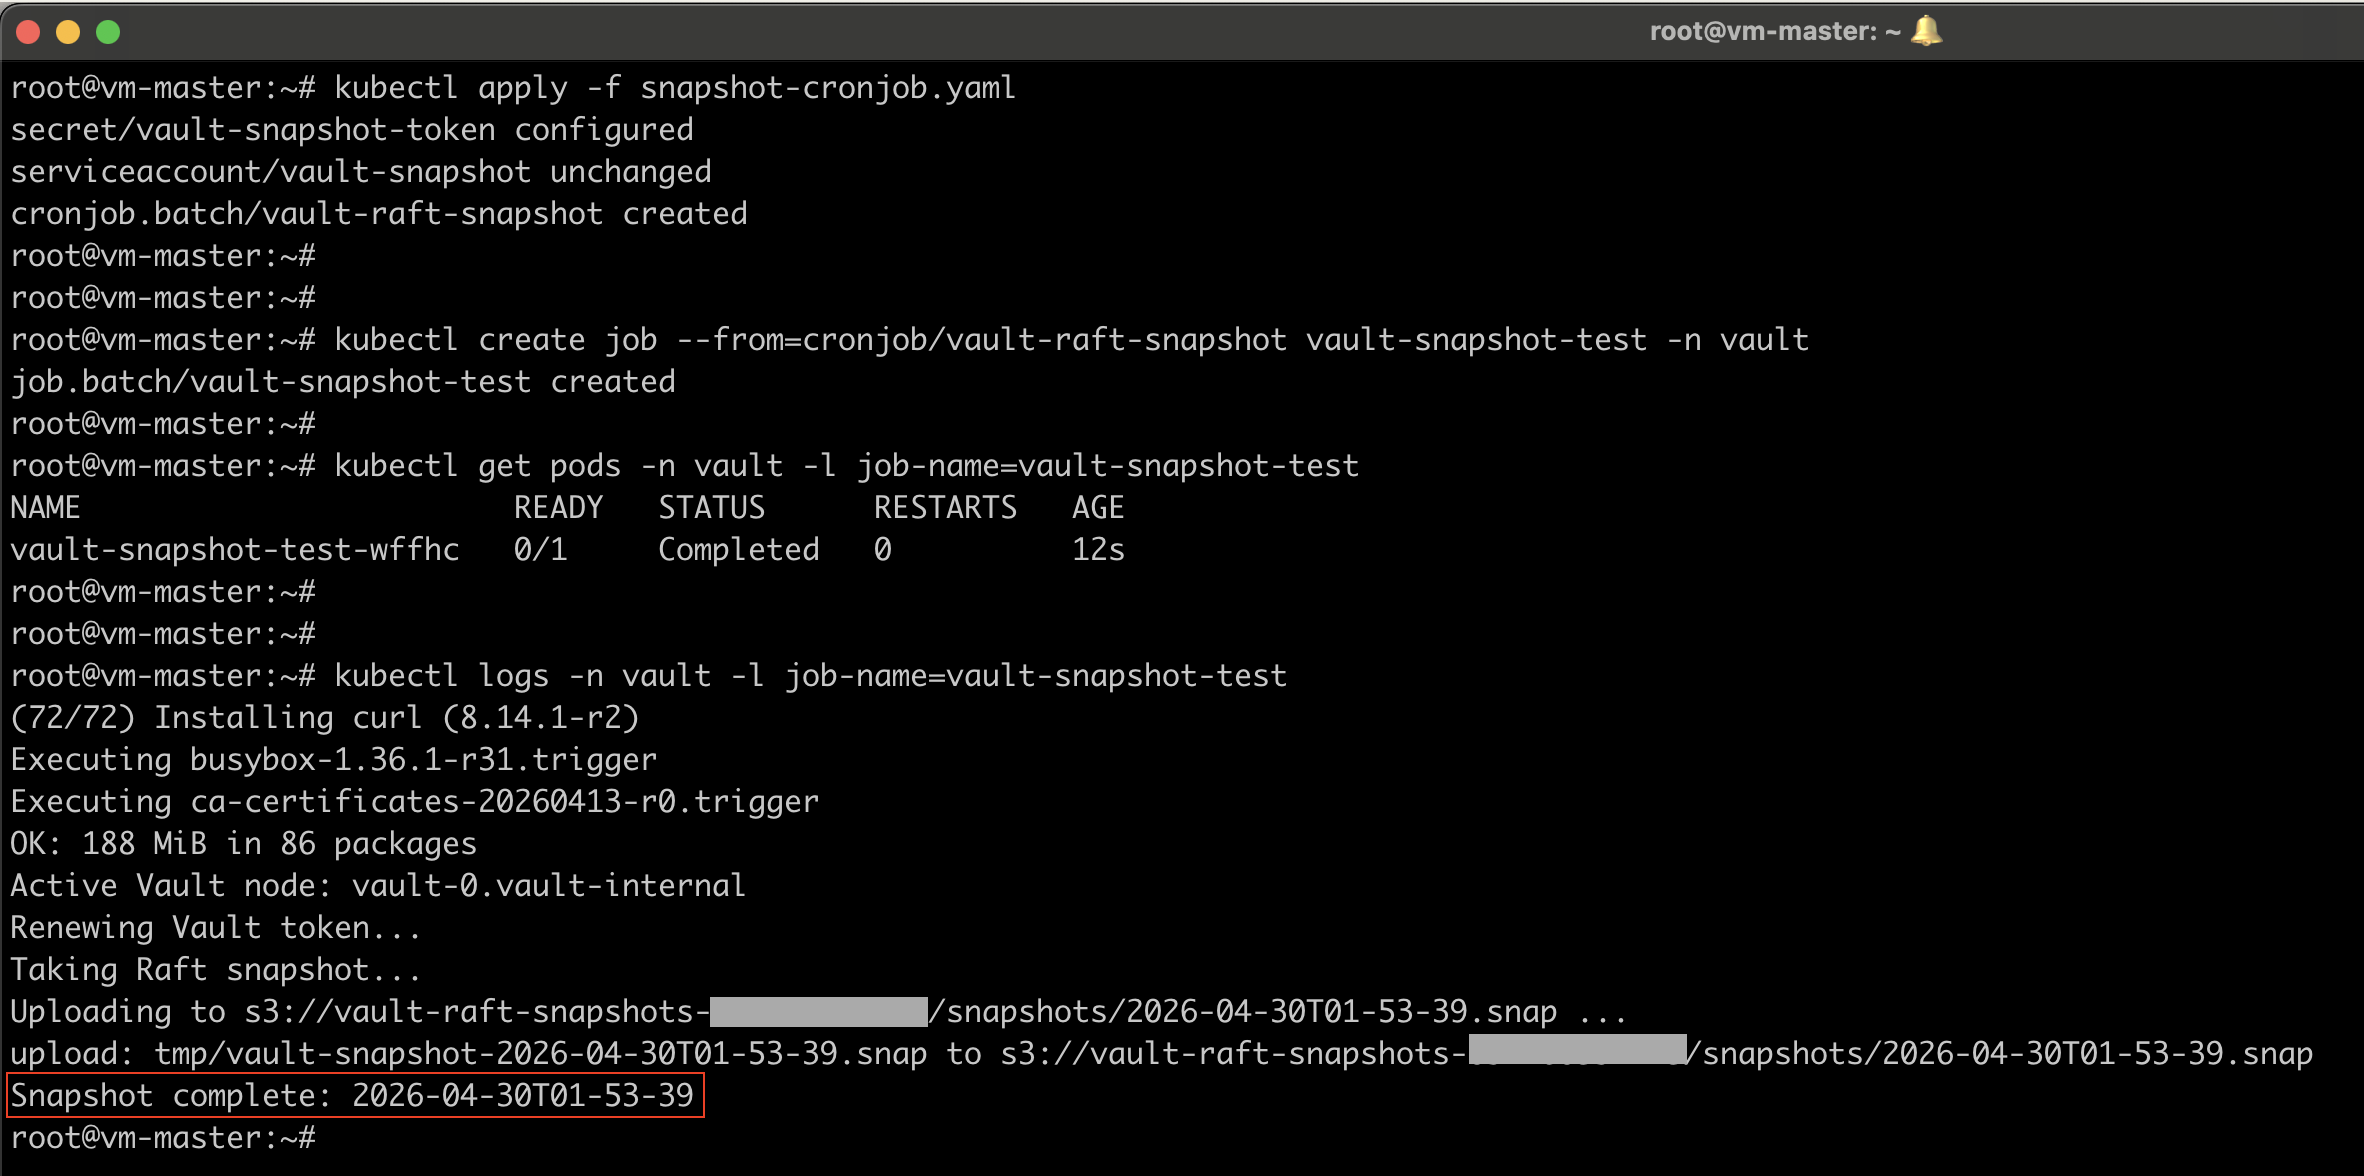
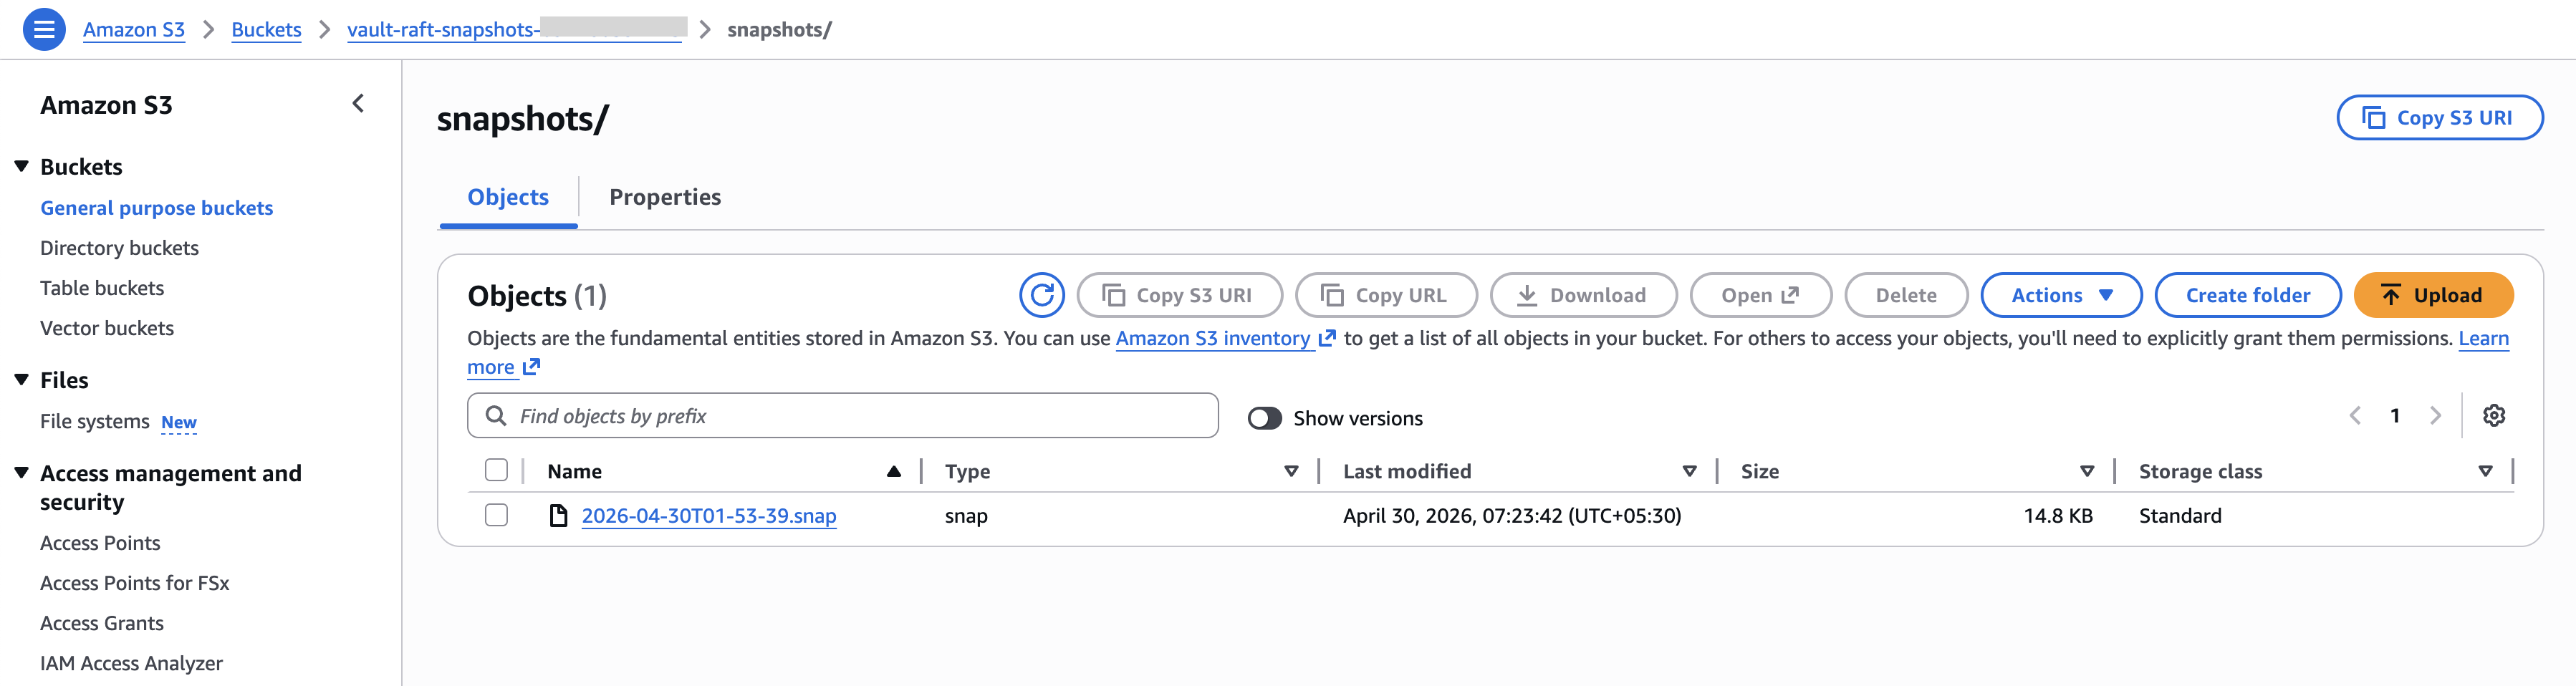
You should see Snapshot complete and a successful S3 upload. If it is successful, you can clean up the job.
kubectl delete job vault-snapshot-test -n vault
Step 11: External TLS Verification
Get the public IP of your master node and go to your DNS provider and create an A record for the “vault” subdomain. Then you can access the vault via web browser using https://vault.yourdomain.com

Watch the Certificate Issuance
cert-manager will automatically request the certificate once DNS is live: Wait until READY becomes True. This typically takes 1-2 minutes.
kubectl get certificate vault-tls-letsencrypt -n vault -w
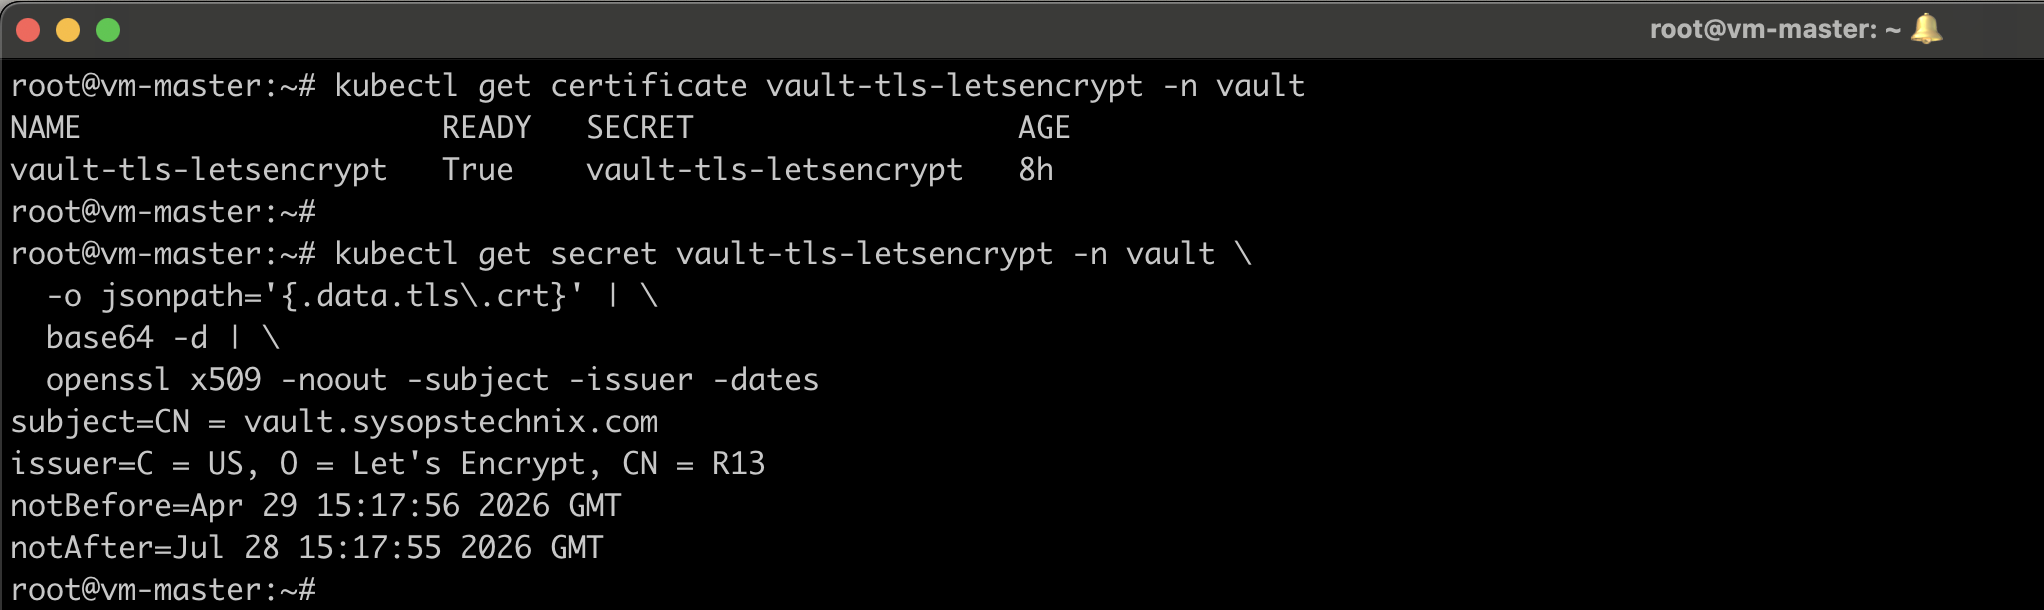
Verify the Let’s Encrypt Certificate
kubectl get secret vault-tls-letsencrypt -n vault \
  -o jsonpath='{.data.tls\.crt}' | \
  base64 -d | \
  openssl x509 -noout -subject -issuer -dates
Summary
You have built a fully production-ready HashiCorp Vault cluster with:
| Component | Implementation |
|---|---|
| High Availability | 3-node Raft cluster |
| Auto-Unseal | AWS KMS |
| Internal TLS | cert-manager self-signed CA |
| External TLS | Let’s Encrypt via cert-manager (auto-renews) |
| Persistent Storage | Longhorn PVCs (10Gi data, 5Gi audit per node) |
| Audit Logging | File device on dedicated PVCs |
| Backups | Daily Raft snapshots to S3 (30-day retention) |
| Recovery Keys | AWS Secrets Manager |
| Pod Disruption | PDB enforces max 1 pod unavailable |
This cluster will survive node failures, auto-unseal after reboots, automatically renew TLS certificates, and back up your data daily – all with zero manual intervention once deployed.