
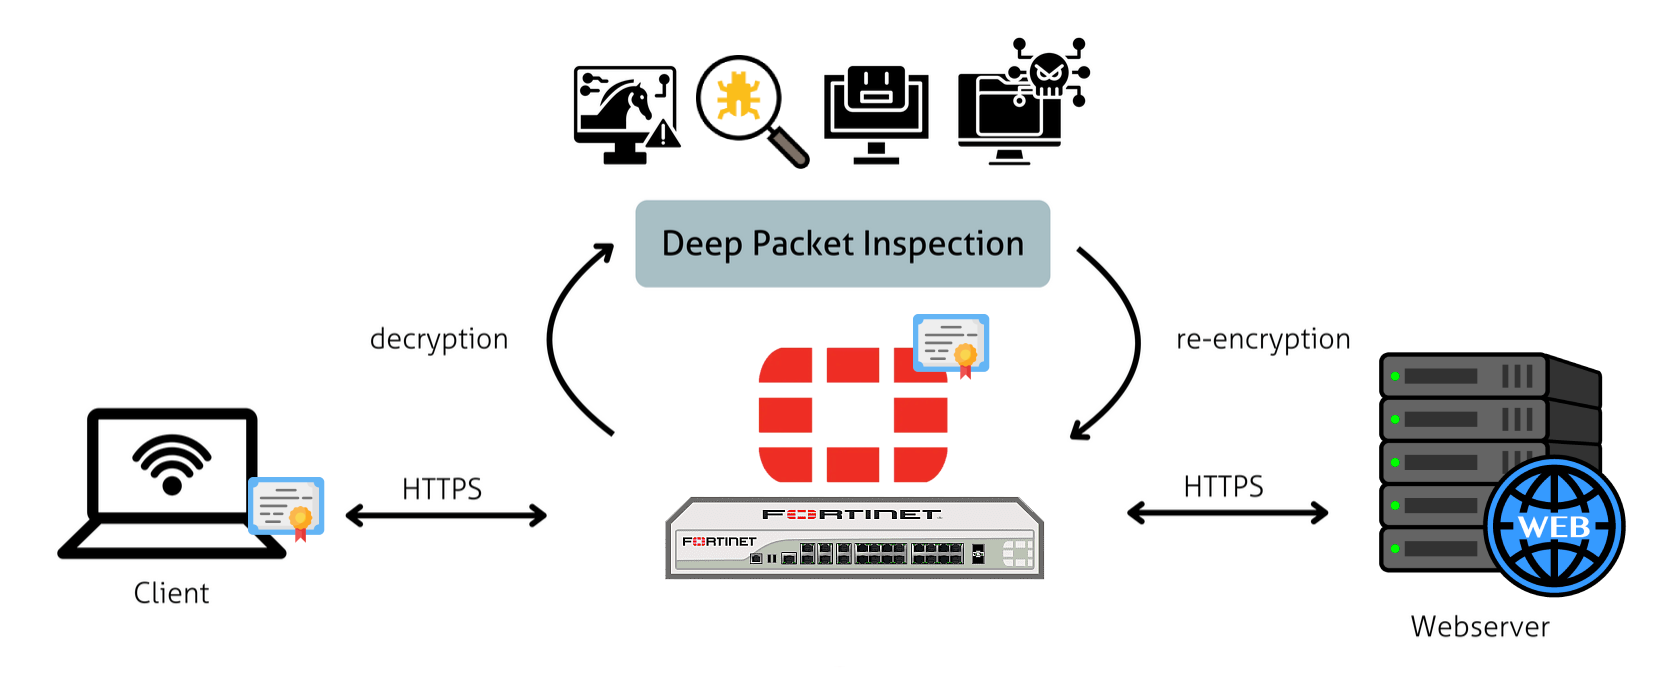
Deep Packet Inspection (DPI), also known as SSL/TLS Inspection, has become an essential security mechanism for modern enterprise networks, enabling organizations to examine, classify, and control network traffic with exceptional granularity of detail. Next-gen firewalls like FortiGate offer some of the most sophisticated DPI capabilities in the industry, allowing administrators to inspect encrypted traffic, detect advanced threats, and enforce granular security policies.
This comprehensive guide will walk you through implementing DPI on a FortiGate firewall with a custom self-signed certificate, deploying across multiple operating systems.
Why Deep Packet Inspection Matters
As over 90% of internet traffic is encrypted, threat actors increasingly exploit encrypted channels to bypass security controls. DPI enables:
- Inspect HTTPS traffic without breaking apps.
- Enforce advanced threat protection and content filtering.
- Block malware and phishing attempts hidden in encrypted traffic.
Understanding FortiGate Deep Packet Inspection
As you may know, most basic firewalls only inspect packet headers, such as IP addresses, ports, and protocols. In contrast, DPI goes beyond traditional packet filtering by examining the actual content and context of network traffic. DPI analyzes payload data, application signatures, and behavioral patterns to make more intelligent and informed security decisions.
FortiGate’s DPI engine provides several key capabilities:
- Application Control: Identifies and controls applications regardless of port or protocol used.
- Intrusion Prevention: Detects and blocks malicious traffic patterns and exploit attempts.
- Web Filtering: Categorizes and controls web traffic based on content and reputation.
- SSL/TLS Inspection: Decrypts and inspects encrypted traffic for hidden threats.
Setting Up Deep Packet Inspection on FortiGate Firewall
Prerequisites
- FortiGate firewall running FortiOS 7.4 or later.
- Appropriate licensing for advanced security features.
- Administrative access to the FortiGate management interface.
Option 01: Generate a Custom CA Certificate for DPI
FortiGate supports importing your own Certificate Authority (CA) certificate for DPI. Here’s how to create a CA-signed cert and key using OpenSSL:
Recommended Fortinet Guidelines for DPI CA Certificates
| Requirement | Status in Your Config? | Notes |
|---|---|---|
| X.509 v3 Format | ✅ Yes | FortiGate expects standard X.509 v3 CA certificates. |
CA:TRUE in Basic Constraints | ✅ Yes (basicConstraints) | Required to designate it as a Certificate Authority. |
Key Usage: keyCertSign | ✅ Yes (keyUsage) | Must be present for the cert to be valid as a CA cert. |
| 2048-bit RSA Key Minimum | ✅ Yes (or increase to 4096) | 2048 is accepted; 4096 is recommended for higher security. |
| SHA256 or better signature | ✅ Yes (default_md = sha256) | SHA256 is standard and secure. |
| Private key in PEM format | ✅ Yes | FortiGate accepts unencrypted .key files in PEM format. |
| .crt or .pem format for cert | ✅ Yes | Use .crt for certificate; it must be in PEM format. |
| Not encrypted key | ✅ Yes (encrypt_key = no) | Encrypted keys cannot be used in DPI certs on FortiGate. |
Note: Fortinet does not recommend using encrypted private keys for DPI certificates primarily due to FortiGate would need a human to enter the password every time it boots or restarts, which is not practical or supported.
Prepare a CA Certificate Configuration File
Open a new file FORTINET_DPI_CA.cnf and paste the certificate configuration below.
[ req ]
default_bits       = 4096
default_md         = sha256
default_keyfile    = FORTINET_DPI_CA.key
encrypt_key        = no
prompt             = yes
distinguished_name = dn
x509_extensions    = v3_ca

[ dn ]
# These are shown as prompts when generating the certificate
C  = Country Name (2 letter code)
ST = State or Province Name (full name)
L  = Locality Name (eg, city)
O  = Organization Name (eg, company)
OU = Organizational Unit Name (eg, section)
CN = Common Name (e.g. "FortiGate DPI Root CA")

[ v3_ca ]
subjectKeyIdentifier = hash
authorityKeyIdentifier = keyid:always,issuer
basicConstraints = CA:true
keyUsage = critical, keyCertSign, cRLSign
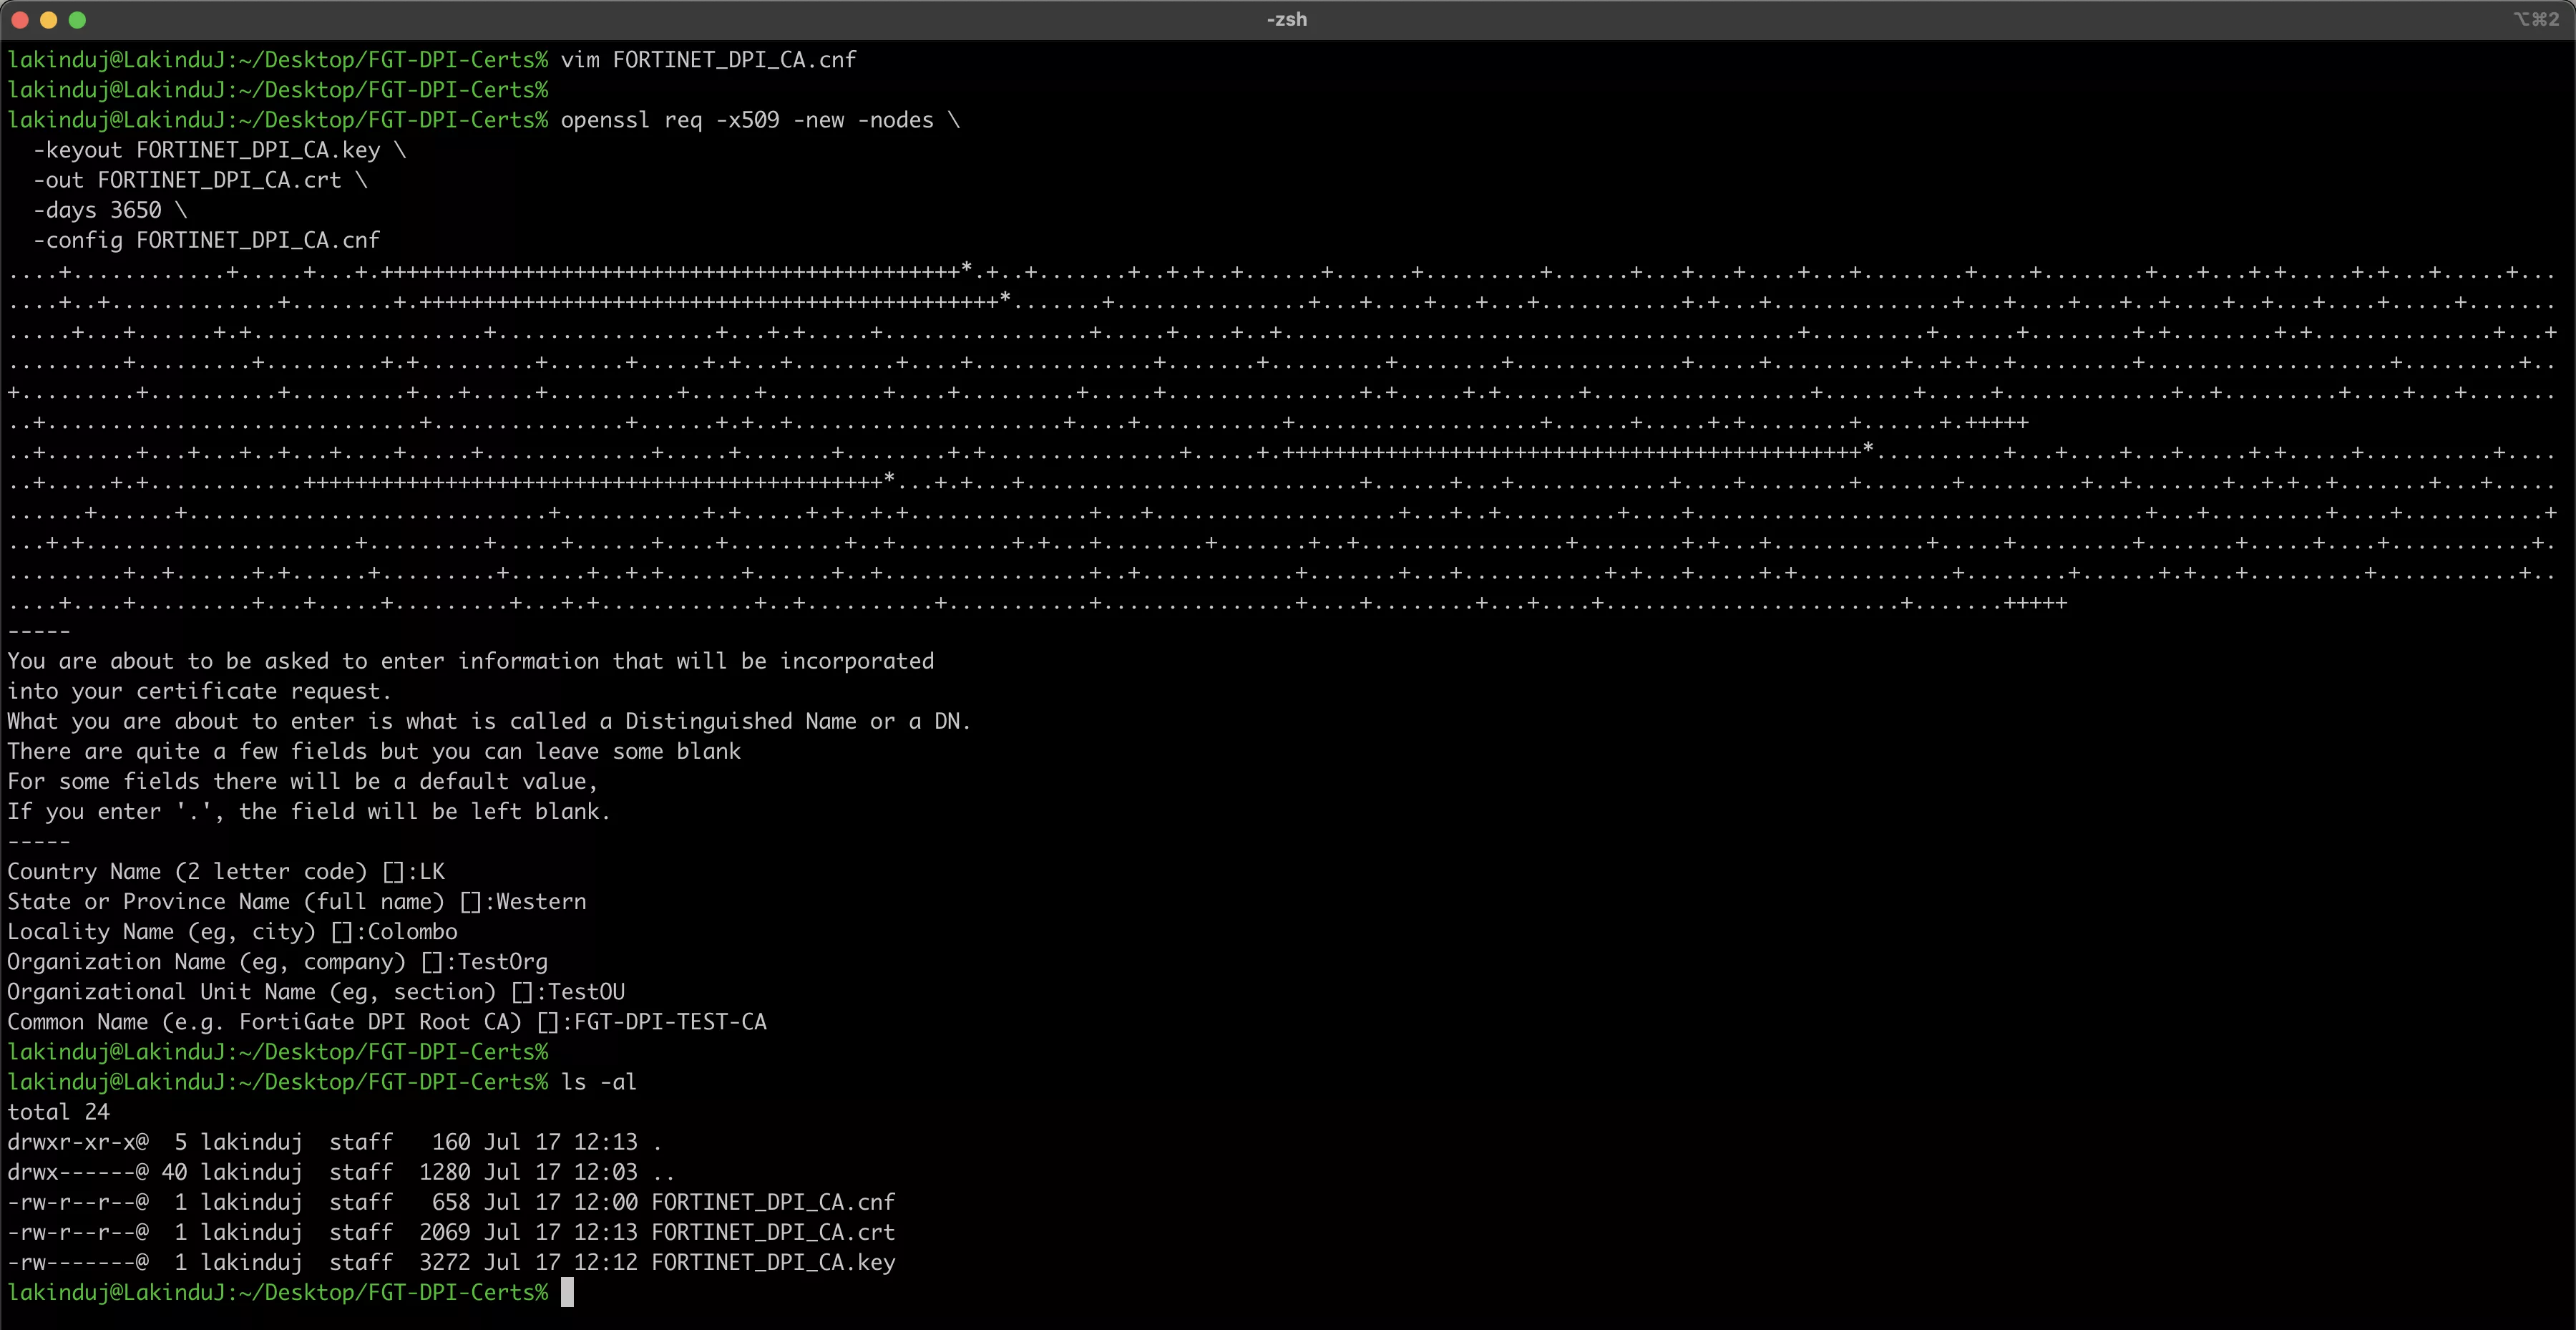
Generating the CA Certificate File
Run the following command to generate the certificate and key file based on the configurations provided above.
openssl req -x509 -new -nodes \
  -keyout FORTINET_DPI_CA.key \
  -out FORTINET_DPI_CA.crt \
  -days 3650 \
  -config FORTINET_DPI_CA.cnf
After running the above command, you will notice two additional files have been generated: the key file and the certificate file.
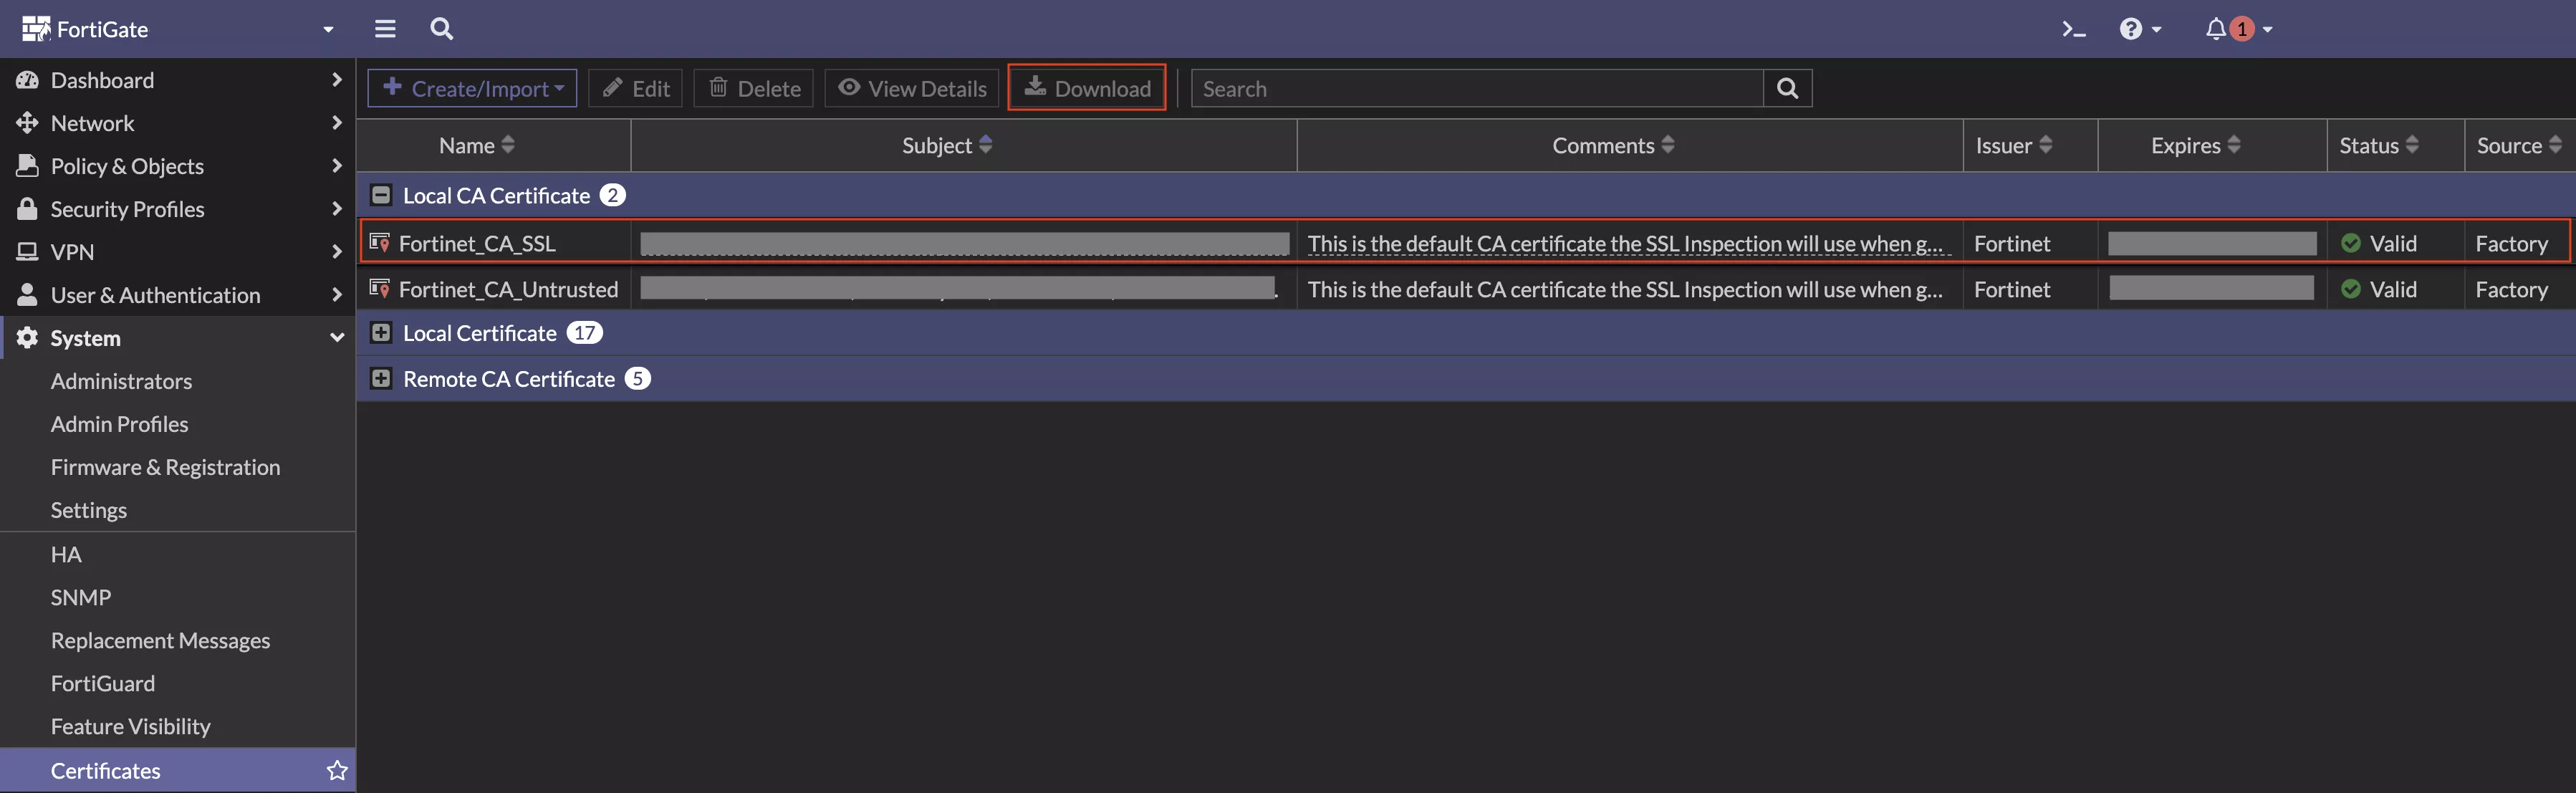
Option 02: Use the built-in Fortinet_CA_SSL
The Fortinet_CA_SSL is pre-installed on FortiGate firewall devices and works out of the box for inspection. But it’s not trusted by default on clients, causing certificate warnings. If you want to trust this cert on client devices, export it from the GUI and deploy it using an internally managed PKI infrastructure or via the MDM tool.
Go to System → Certificates → Find Fortinet_CA_SSL → Download it.
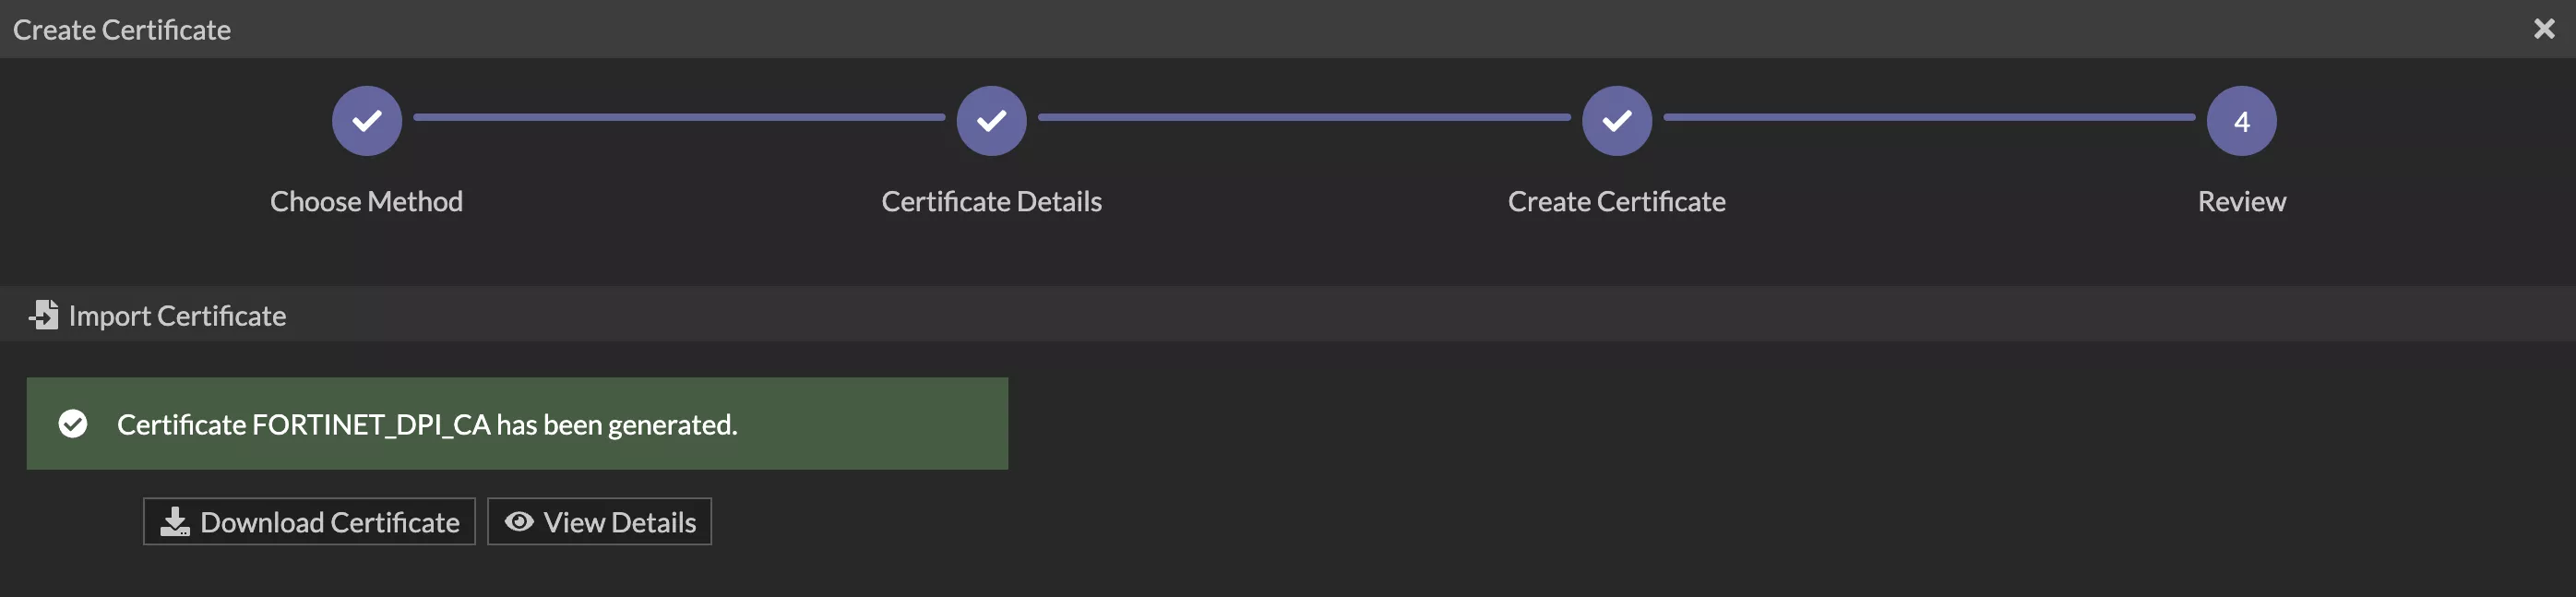
Import CA Certificate to FortiGate Firewall
Using Web UI, Go to System → Certificates → Create/Import → Import Certificate

Upload FORTINET_DPI_CA.crt and the matching unencrypted FORTINET_DPI_CA.key. Make sure to keep blank on password fields.

After a successful import, the certificate will appear as shown below. You can verify it by checking the certificate details.
Let’s Deploy CA Certificate to Client Devices
To ensure seamless DPI and avoid certificate warnings, it’s essential to deploy your custom CA certificate to all client devices within the network. This step allows endpoints to trust the FortiGate firewall when it intercepts and inspects encrypted traffic.
Deployment methods vary by platform — using MDM solutions like Workspace ONE UEM for Windows and macOS, or shell scripts and trusted certificate stores for Linux. Proper deployment ensures secure, uninterrupted browsing and enables effective Deep Packet Inspection without triggering browser security alerts.
For MacOS Endpoints
Log in to Workspace ONE UEM Console and navigate to Resources > Profiles & Baselines > Profiles. Then add a macOS device profile.
Add a Credentials payload as follows, and click the Attach Certificate button.
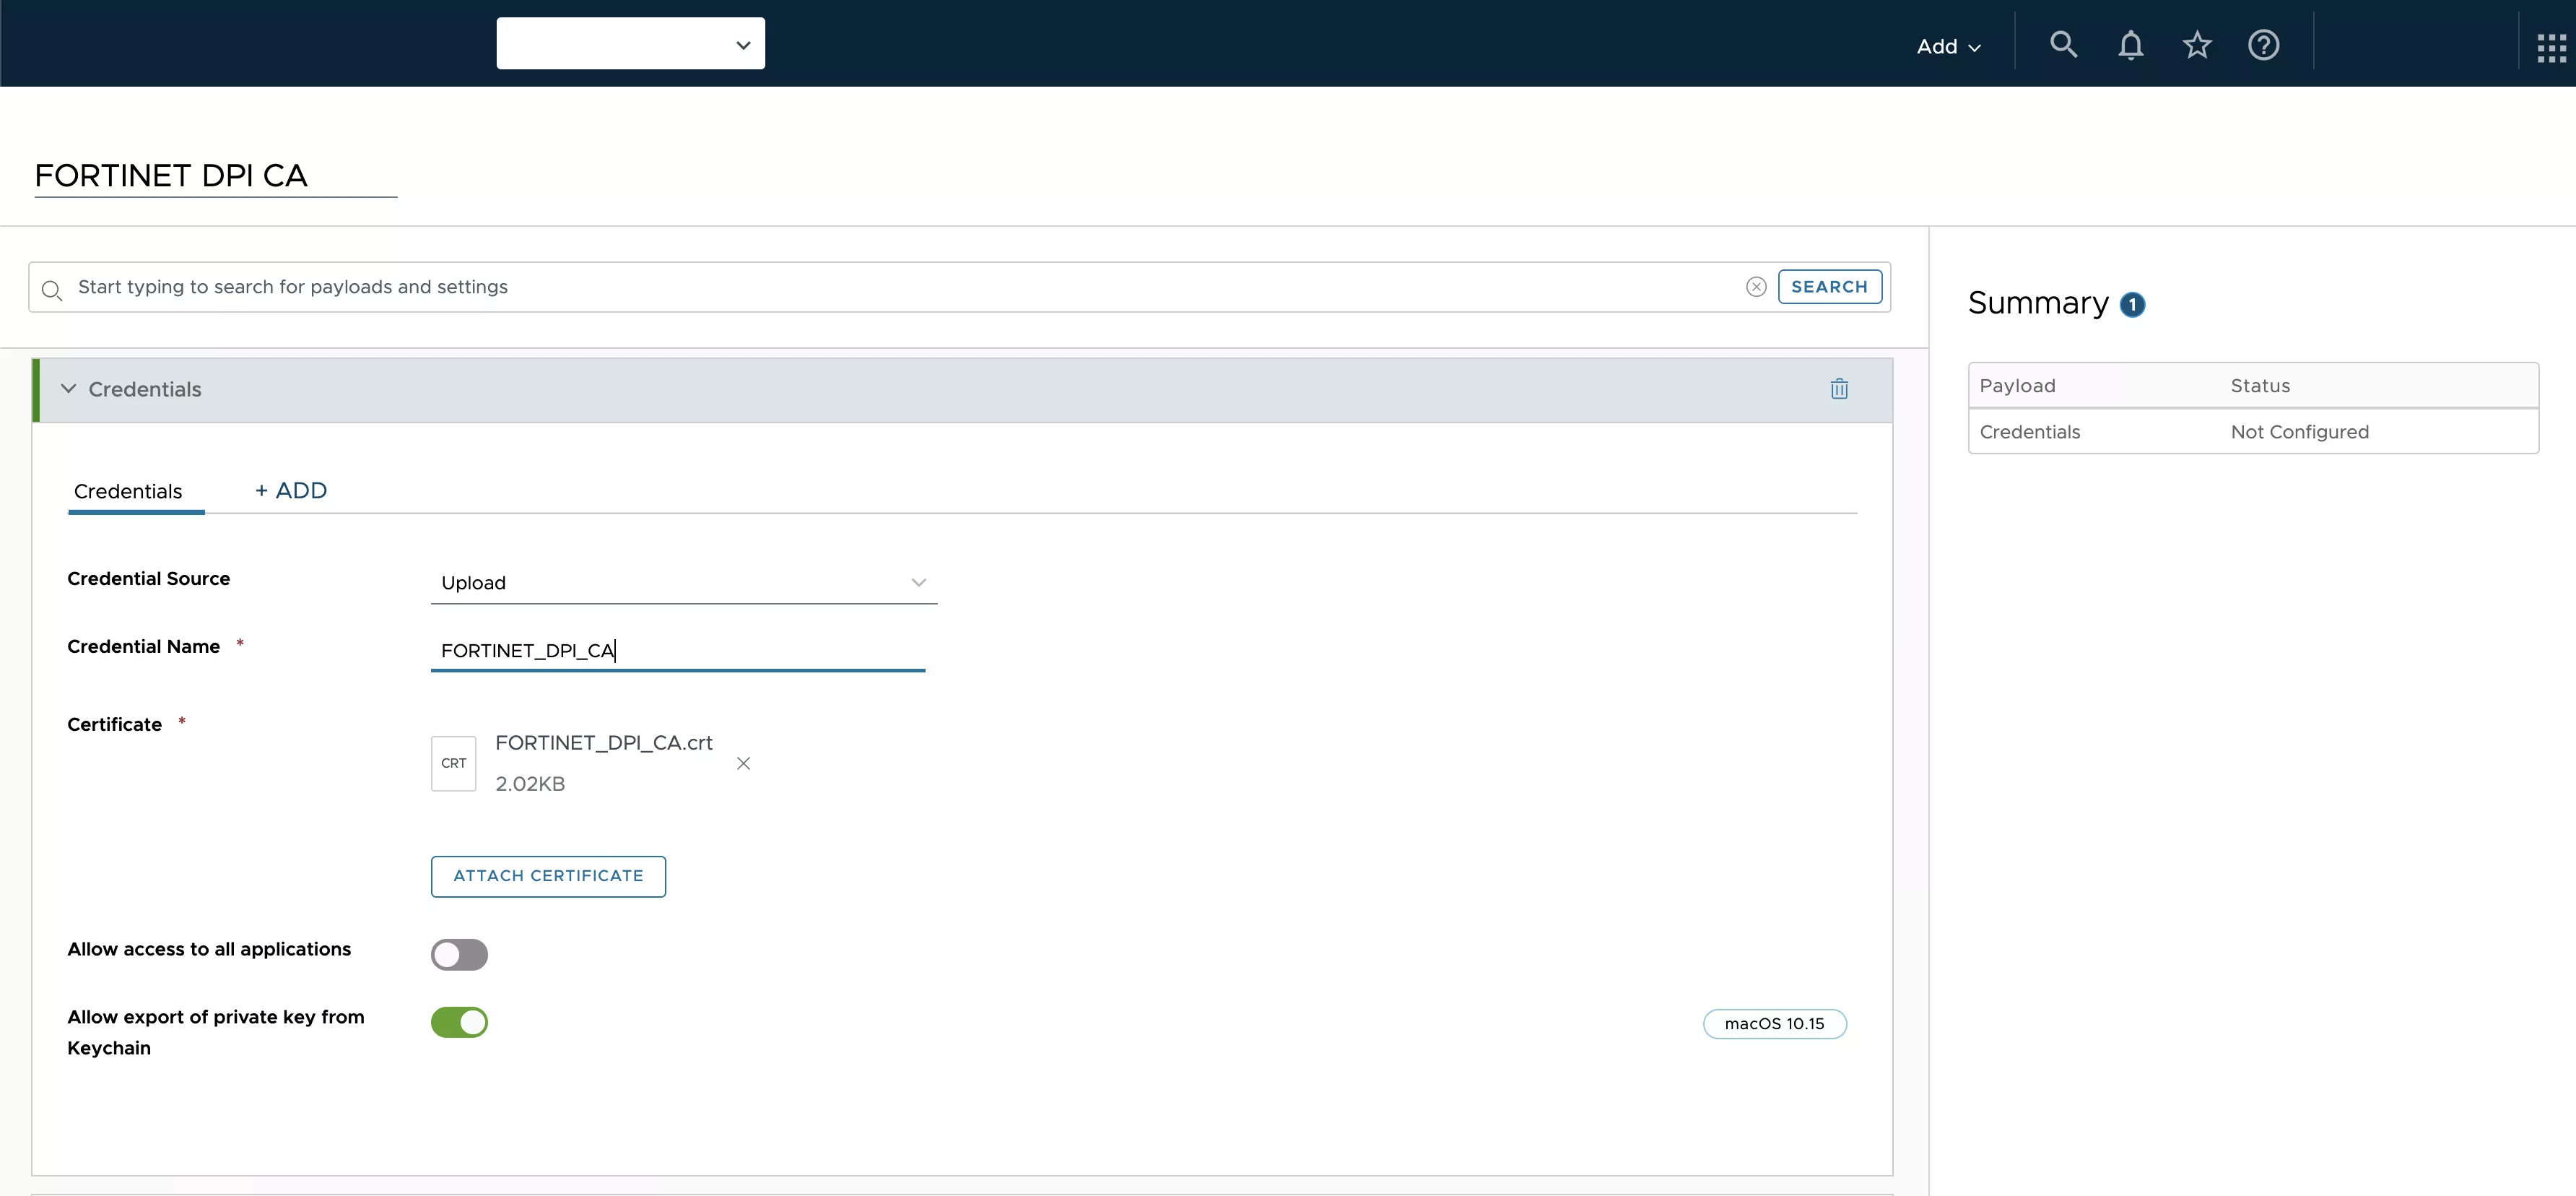
As with any configuration profile, you can deploy it to the assignment group containing your target macOS devices.
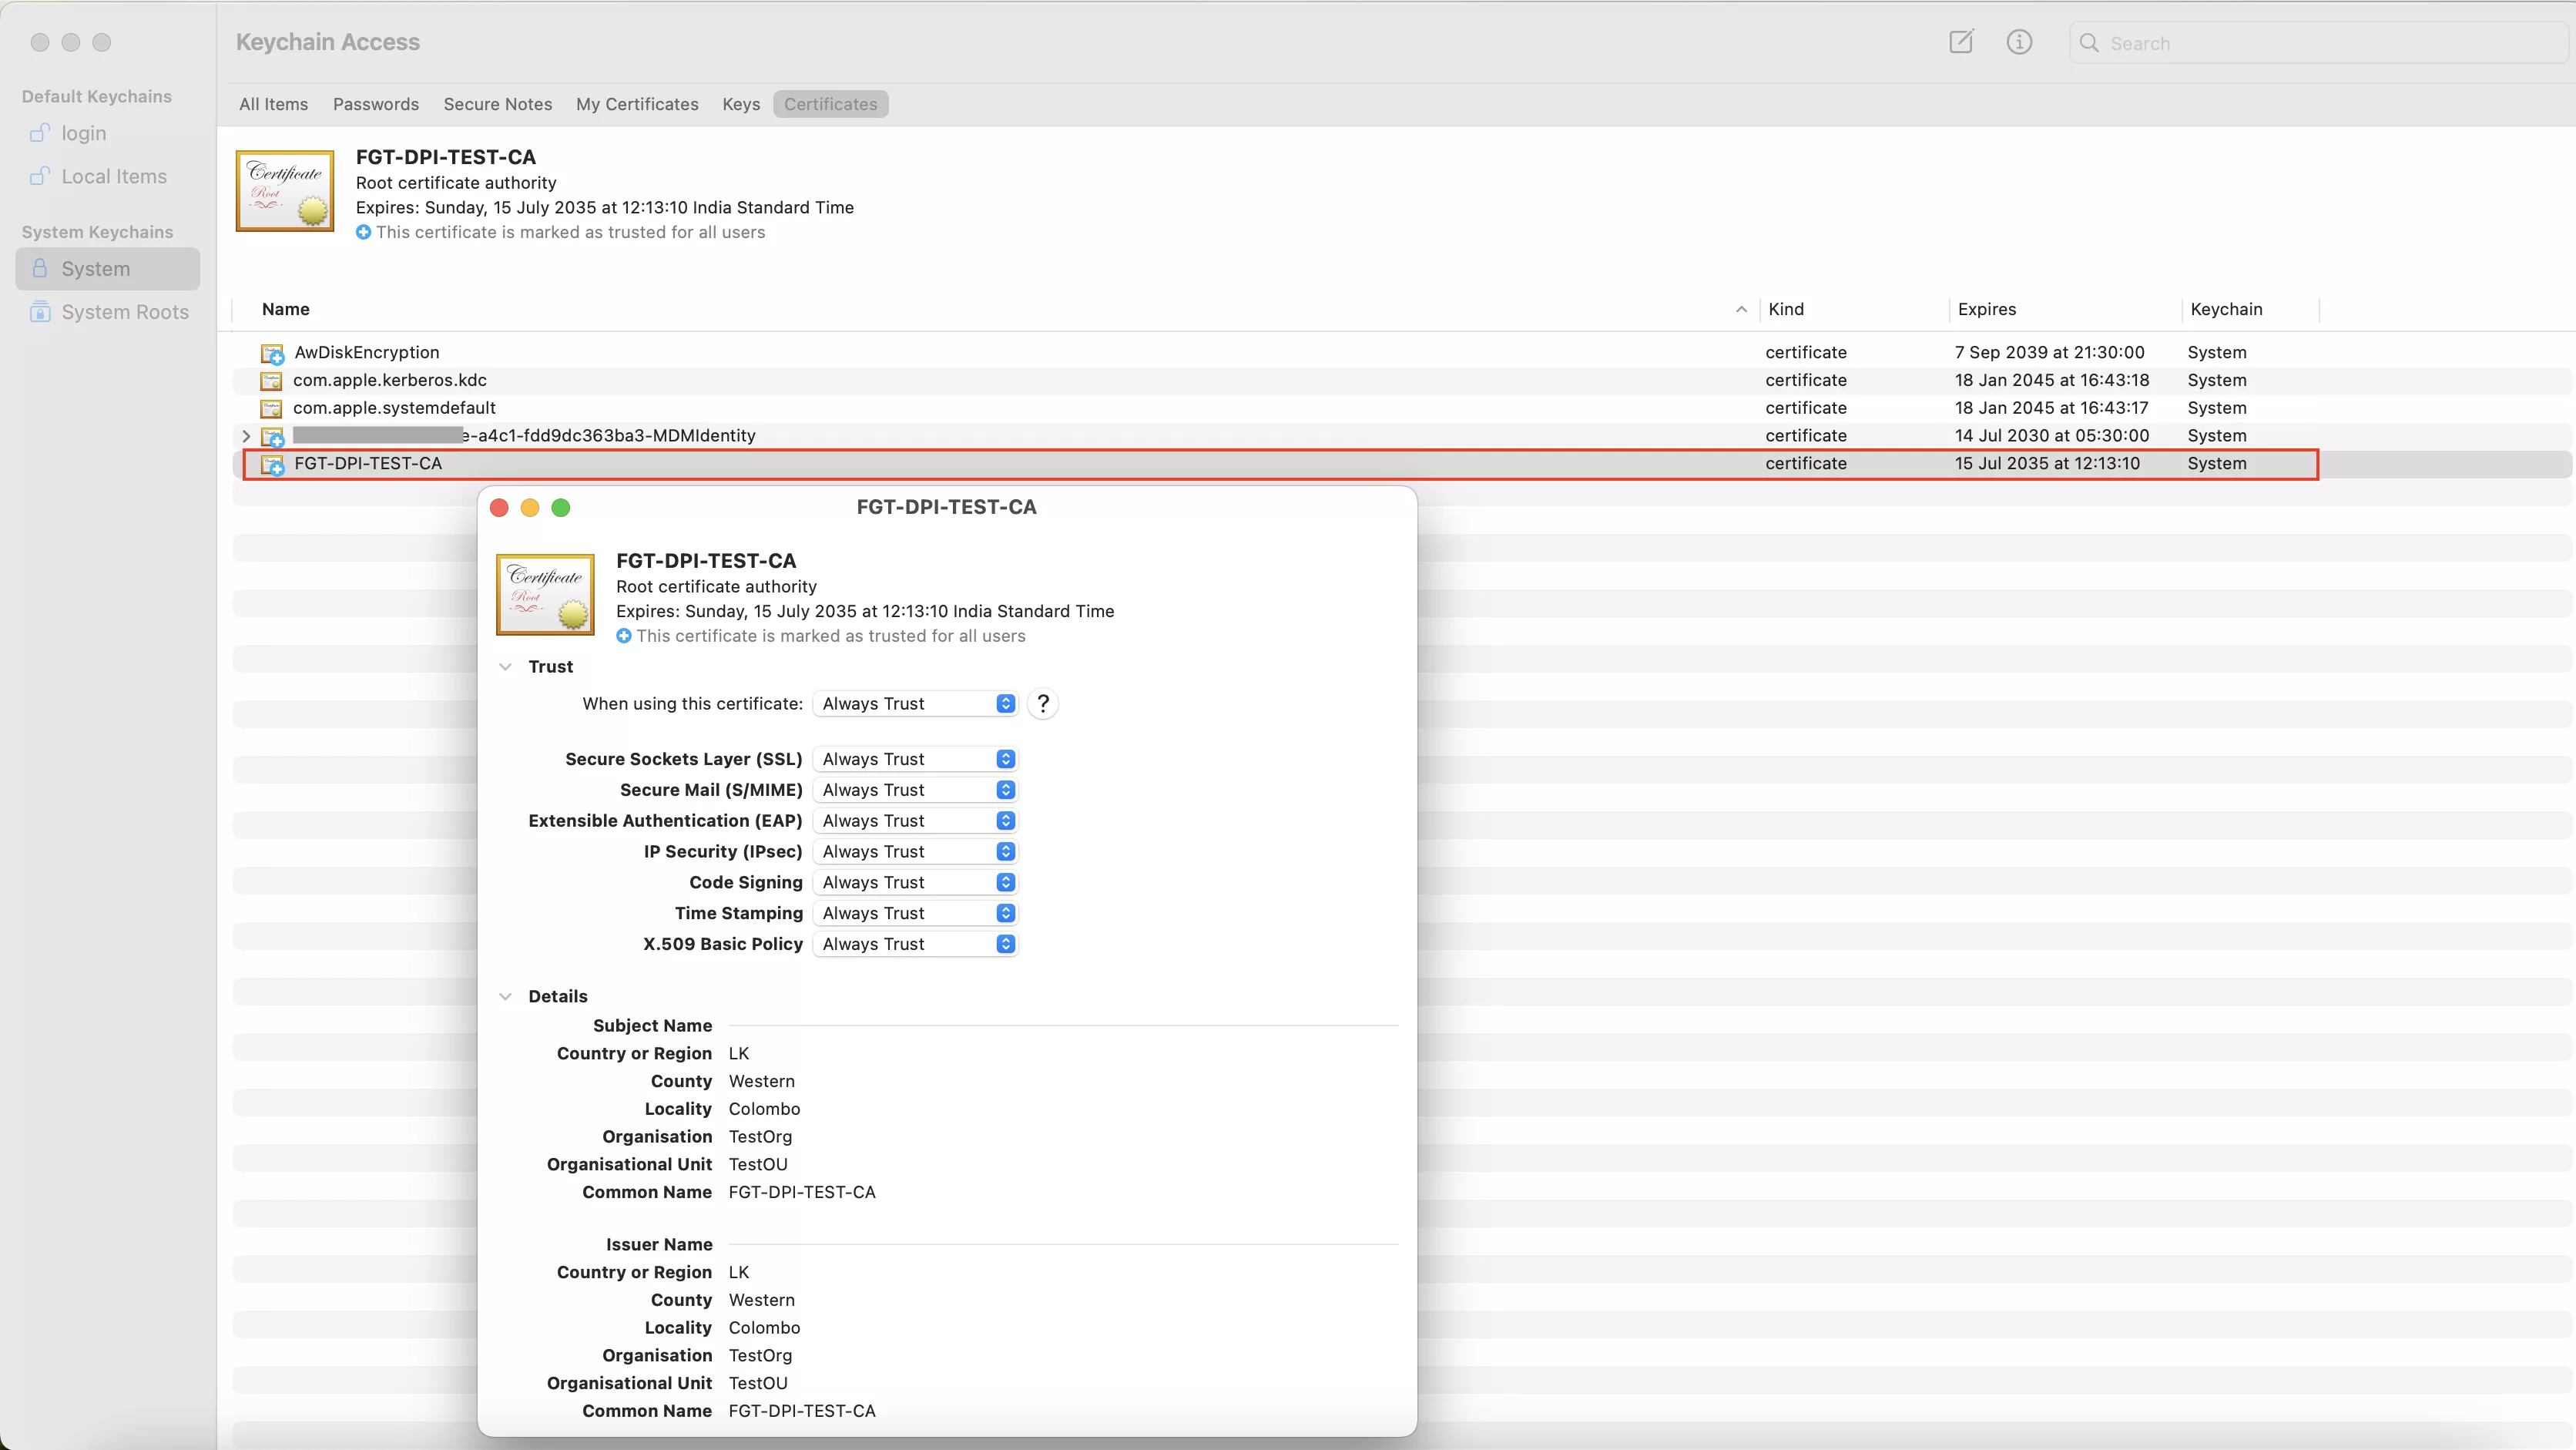
Once the profile is successfully deployed via Workspace ONE UEM, you can verify the certificate deployment by opening Keychain Access on the end-user device and navigating to System Keychains > System > Certificates, where the deployed CA certificate should be visible.
For Windows Endpoints
Log in to Workspace ONE UEM Console and navigate to Resources > Profiles & Baselines > Profiles. Then add a Windows device profile.
In the General section, provide a name for the profile and select the target Windows device group.
Then add a new credential payload to the profile and upload the generated CA file.
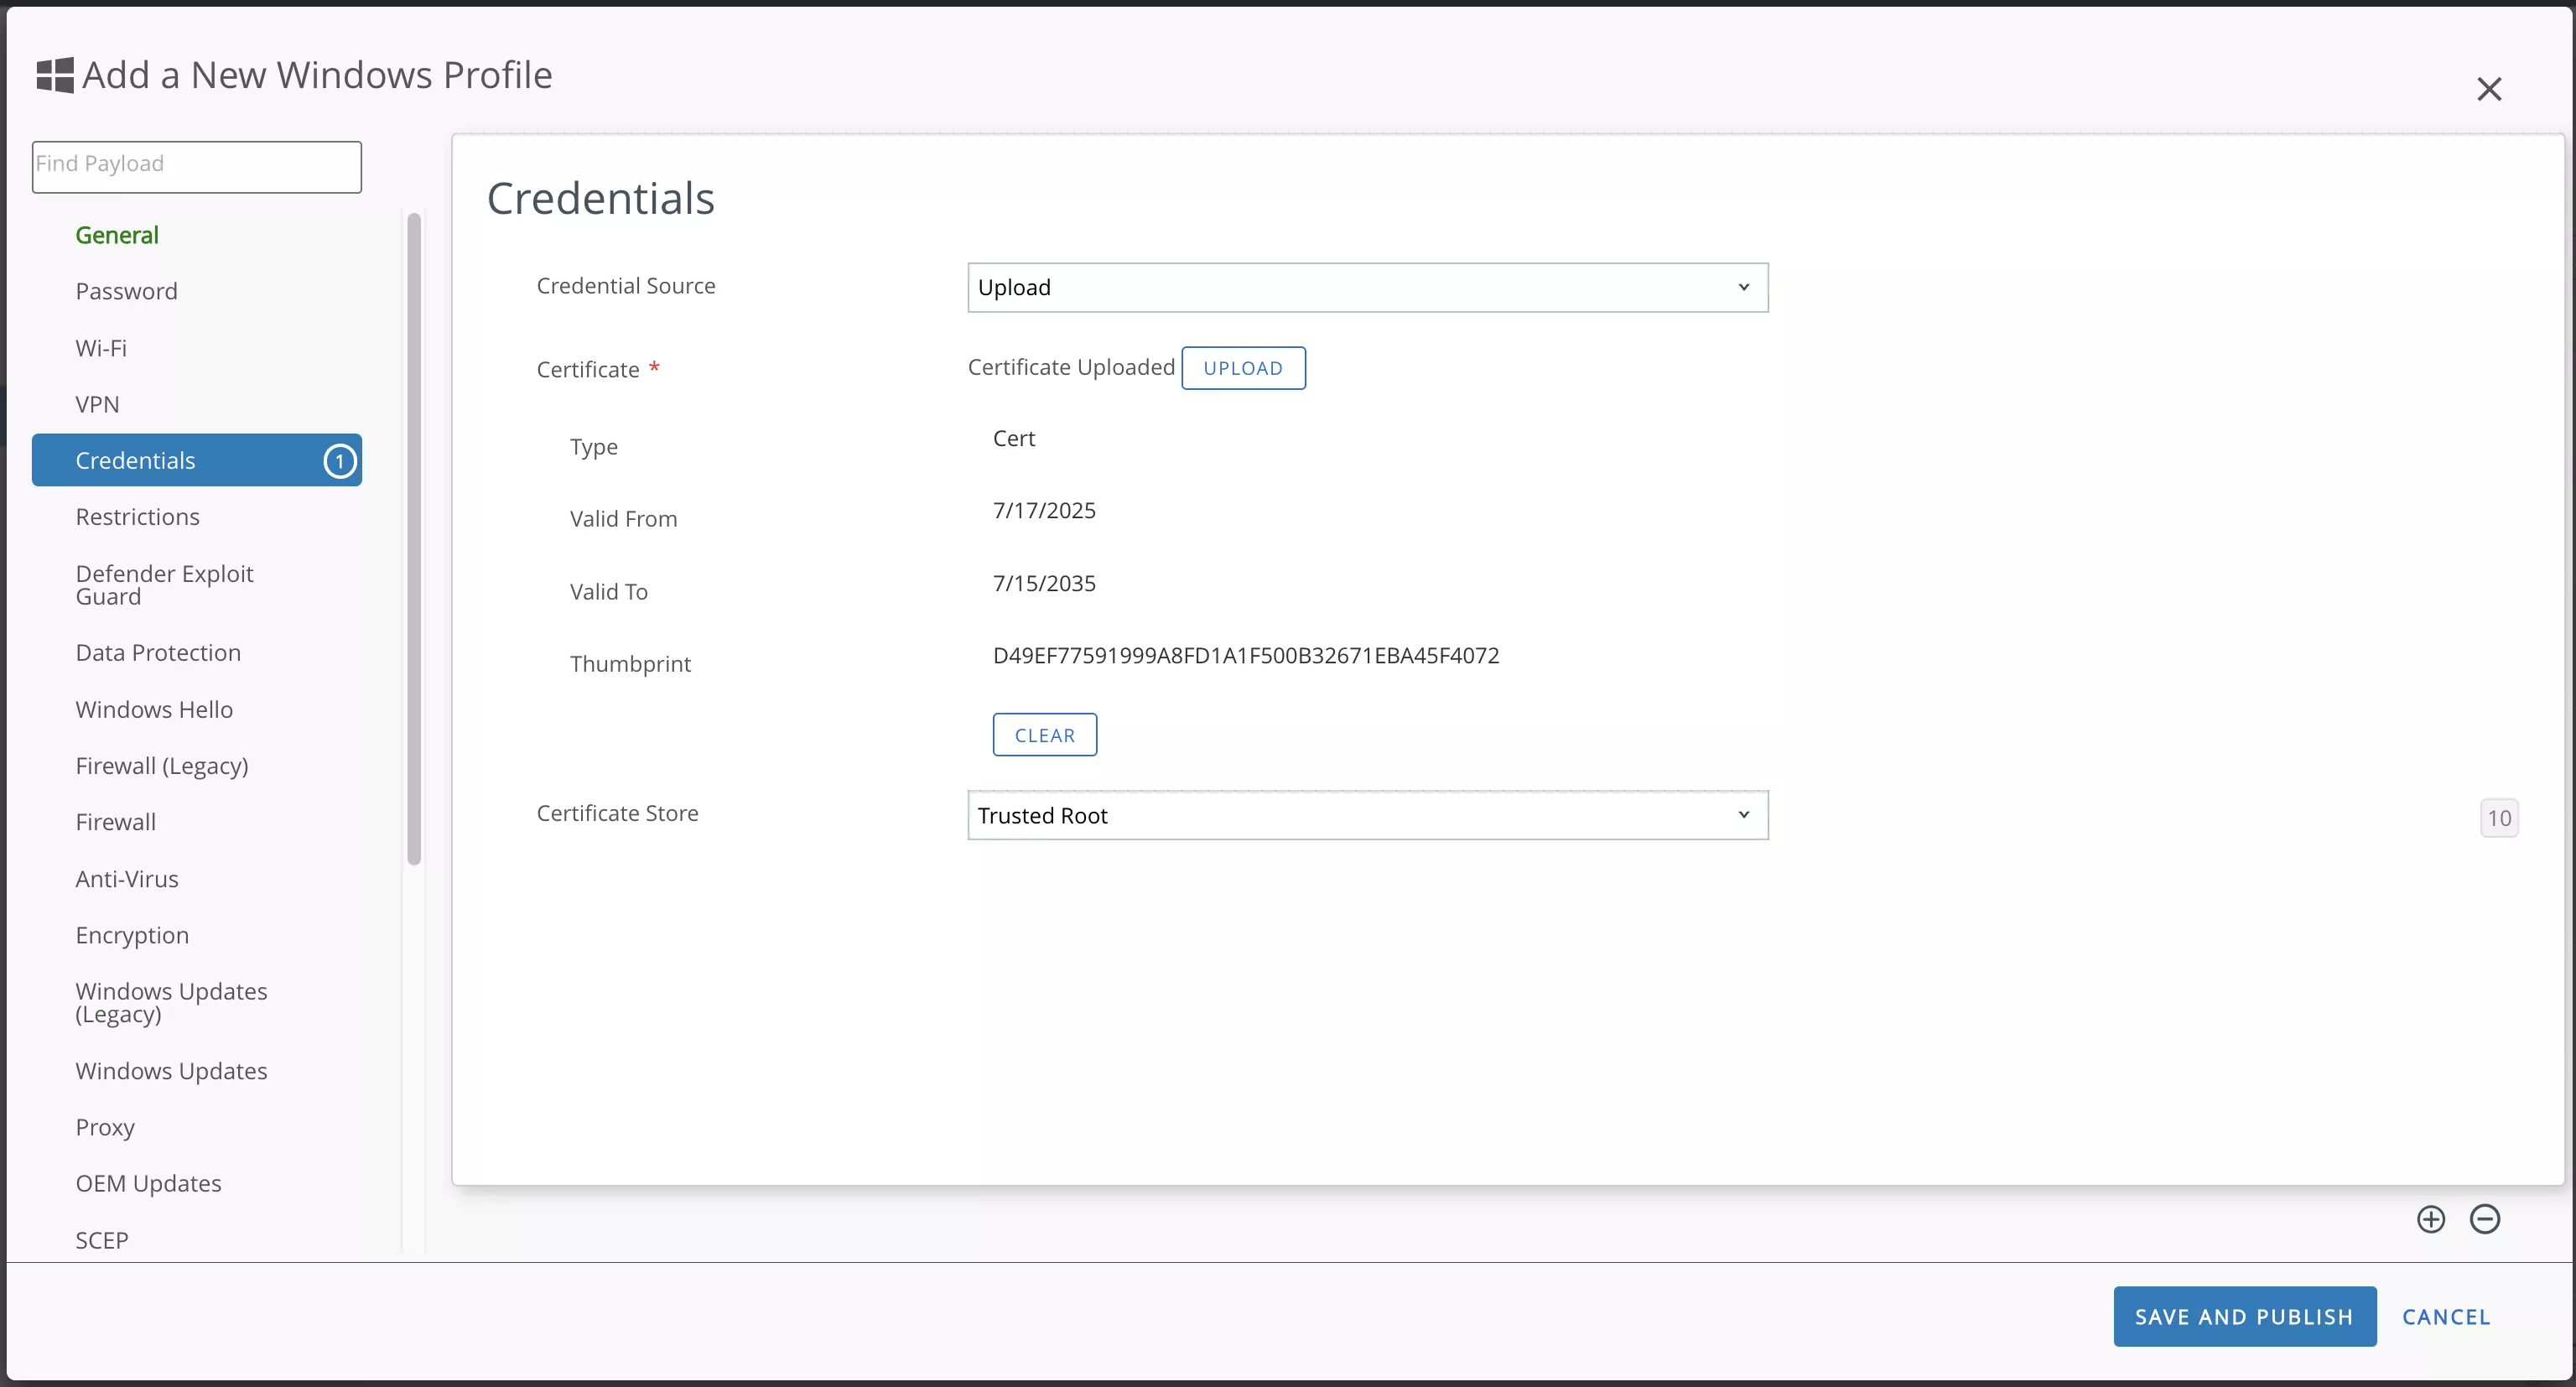
Finally, click the Save and Publish button to deploy it to the profile on client devices.
To verify the CA certificate deployment on Windows devices, follow these steps:
- Open the Run dialog (press Win + R) or use the Windows Search, then type mmc and press Enter to launch the Microsoft Management Console (MMC).
- In MMC, go to File > Add/Remove Snap-in.
- From the list of available snap-ins, select Certificates, click Add, and choose Computer account when prompted. Click Next, then select Local computer and click Finish.
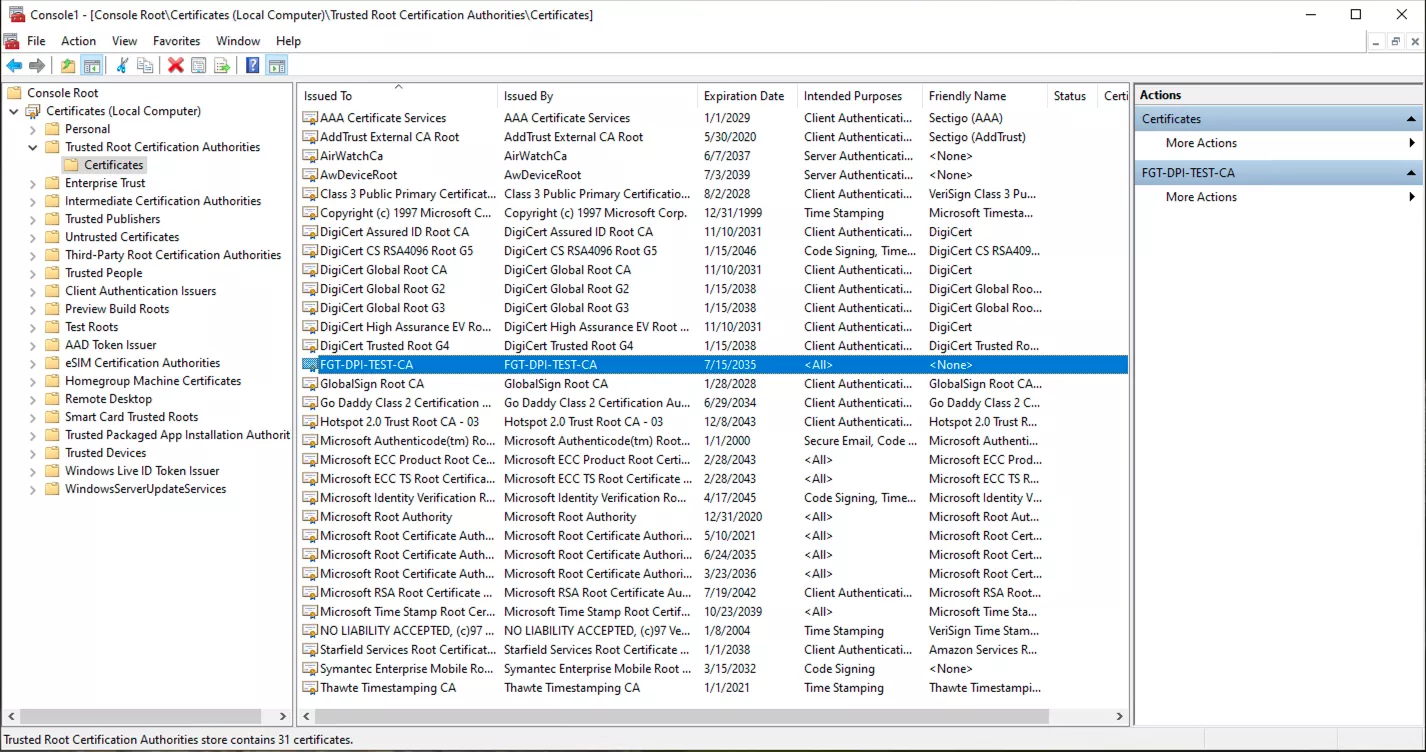
- Once the snap-in is added, expand Certificates (Local Computer) > Trusted Root Certification Authorities > Certificates.
- Look through the list to confirm that your deployed CA certificate is present.
This confirms that the CA certificate has been successfully installed under the trusted root authorities for the system.
If you’re new to Workspace ONE deployments, I recommend checking out my article: Deploying SentinelOne using VMware Workspace ONE UEM for macOS
Configuring FortiGate Firewall Policy for DPI
Once you’ve generated and installed your custom CA certificate on the FortiGate device and deployed it to client systems, the next critical step is to configure a firewall policy that enables DPI. This allows FortiGate to inspect encrypted traffic without compromising security or performance.
Step-by-Step: FortiGate DPI Firewall Policy Configuration
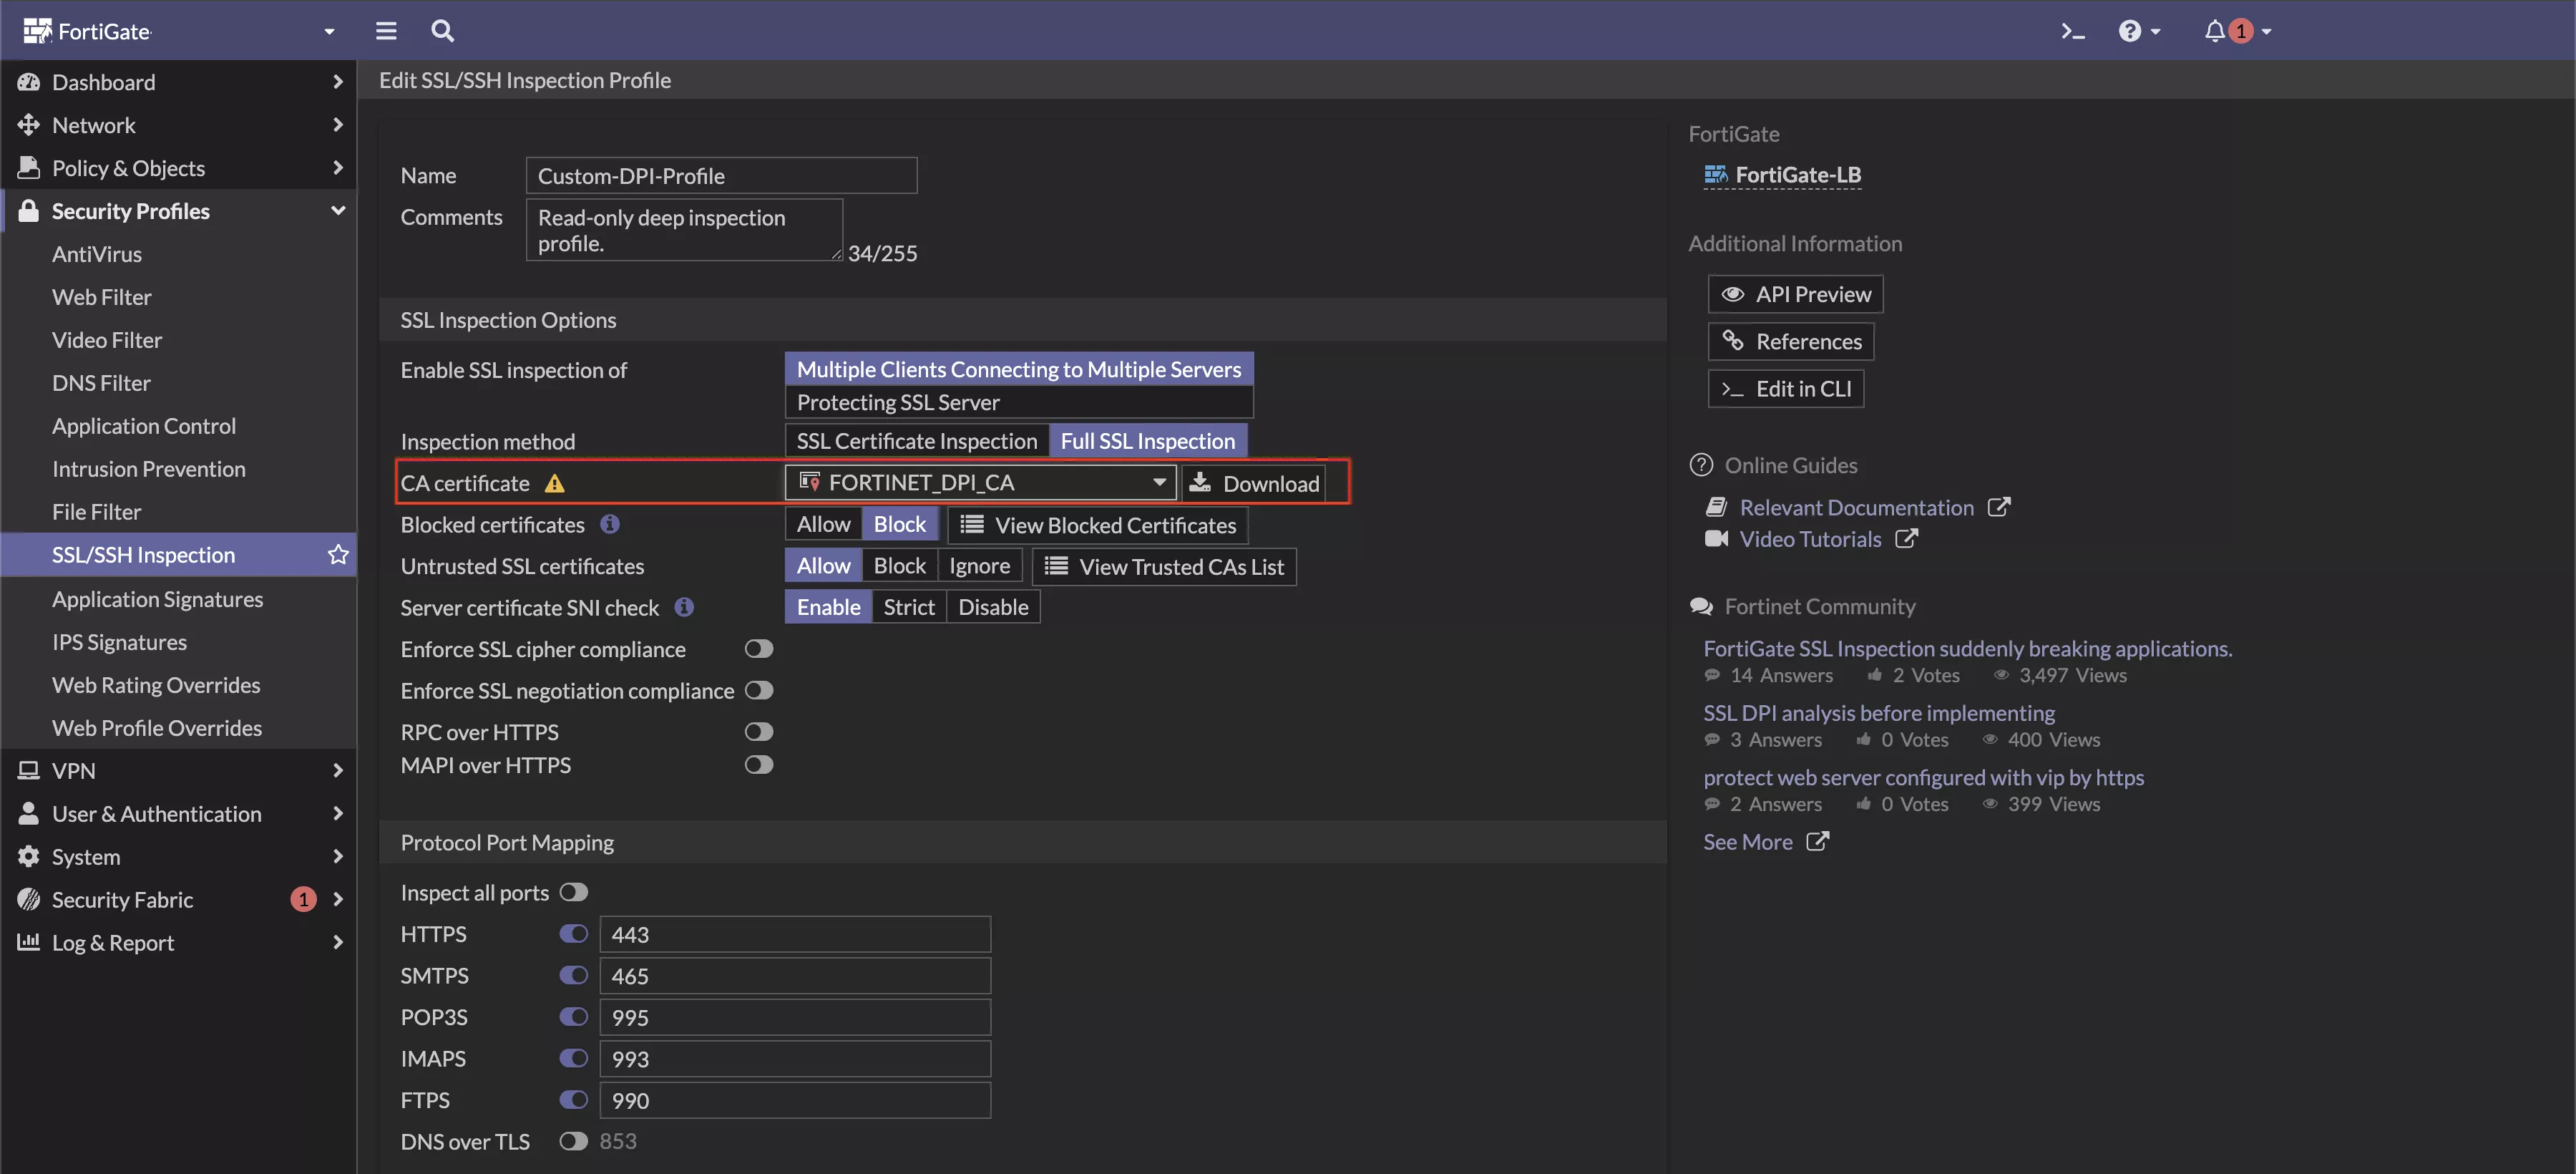
Step 1: Create a Custom SSL/TLS Inspection Profile
- Log in to the FortiGate Web UI and navigate to the Security Profiles > SSL/SSH Inspection.
- Find the built-in profile named “deep-inspection” and right-click it, and click Clone.
- Under CA Certificate, select your custom CA certificate that you uploaded earlier.
- Then keep the other settings as it is and create the profile.
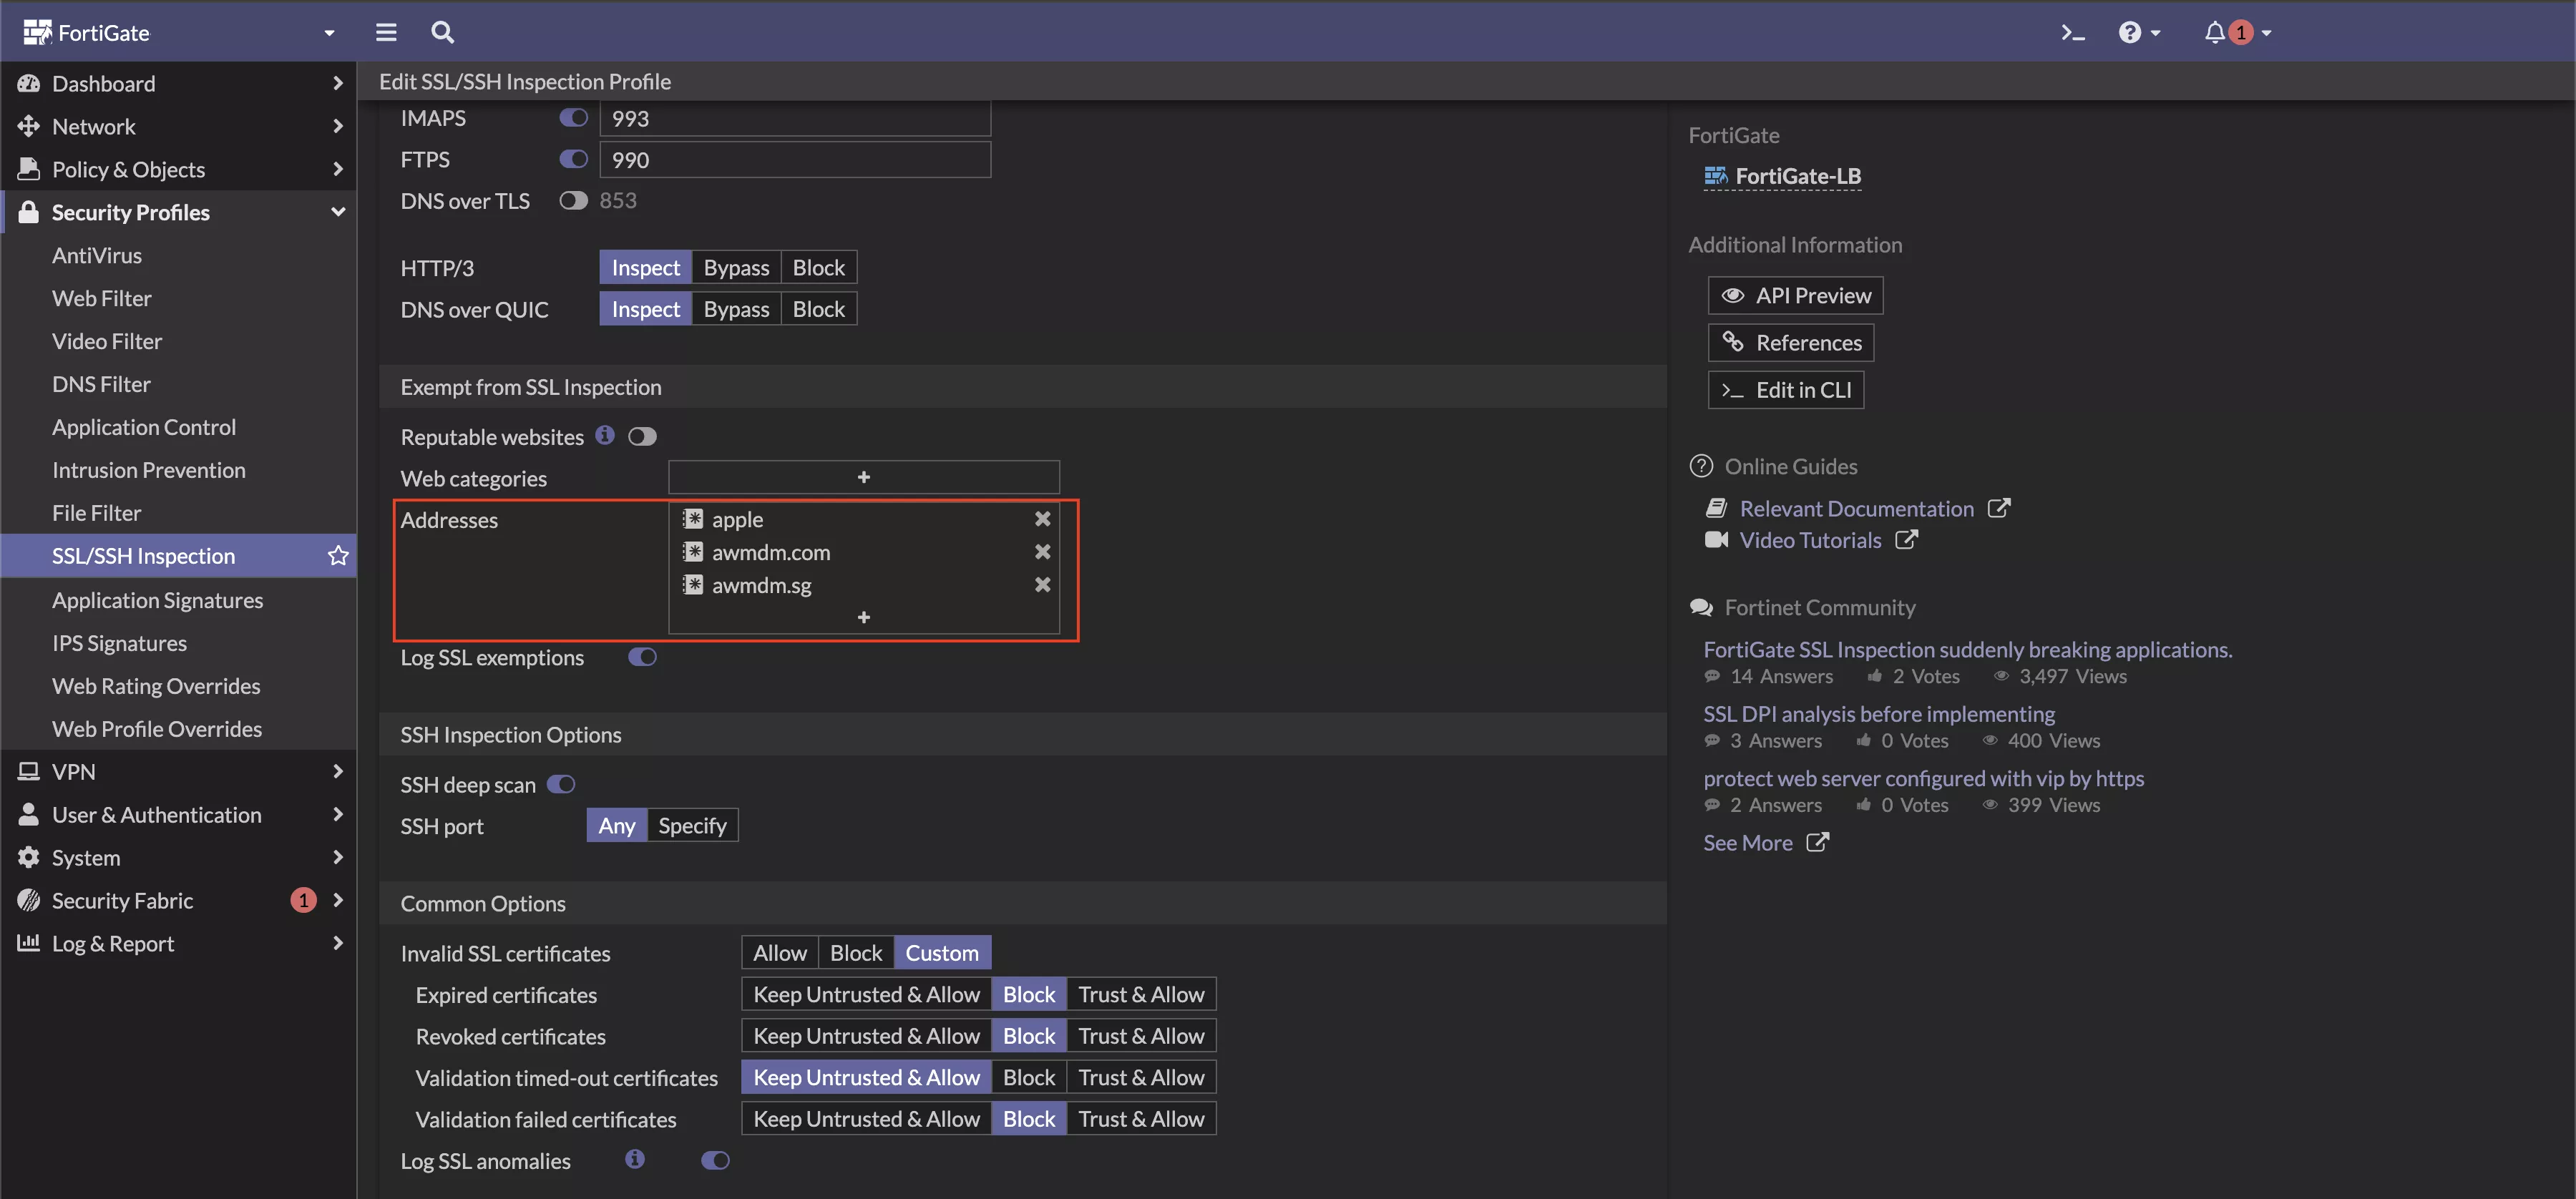
When using an MDM solution to deploy the CA certificate to endpoints, it is important to exclude all MDM-related URLs (ex: awmdm.com) from SSL/TLS inspection. This ensures the MDM tool can successfully sync and deploy configurations, including the CA certificate, without being blocked or triggering certificate warnings during initial communication.
Additionally, consider exempting well-known and trusted domains, such as Apple, Microsoft, and Google services, to avoid unnecessary inspection-related issues and maintain seamless connectivity. You can also configure SSL inspection exemptions based on category for more granular control.
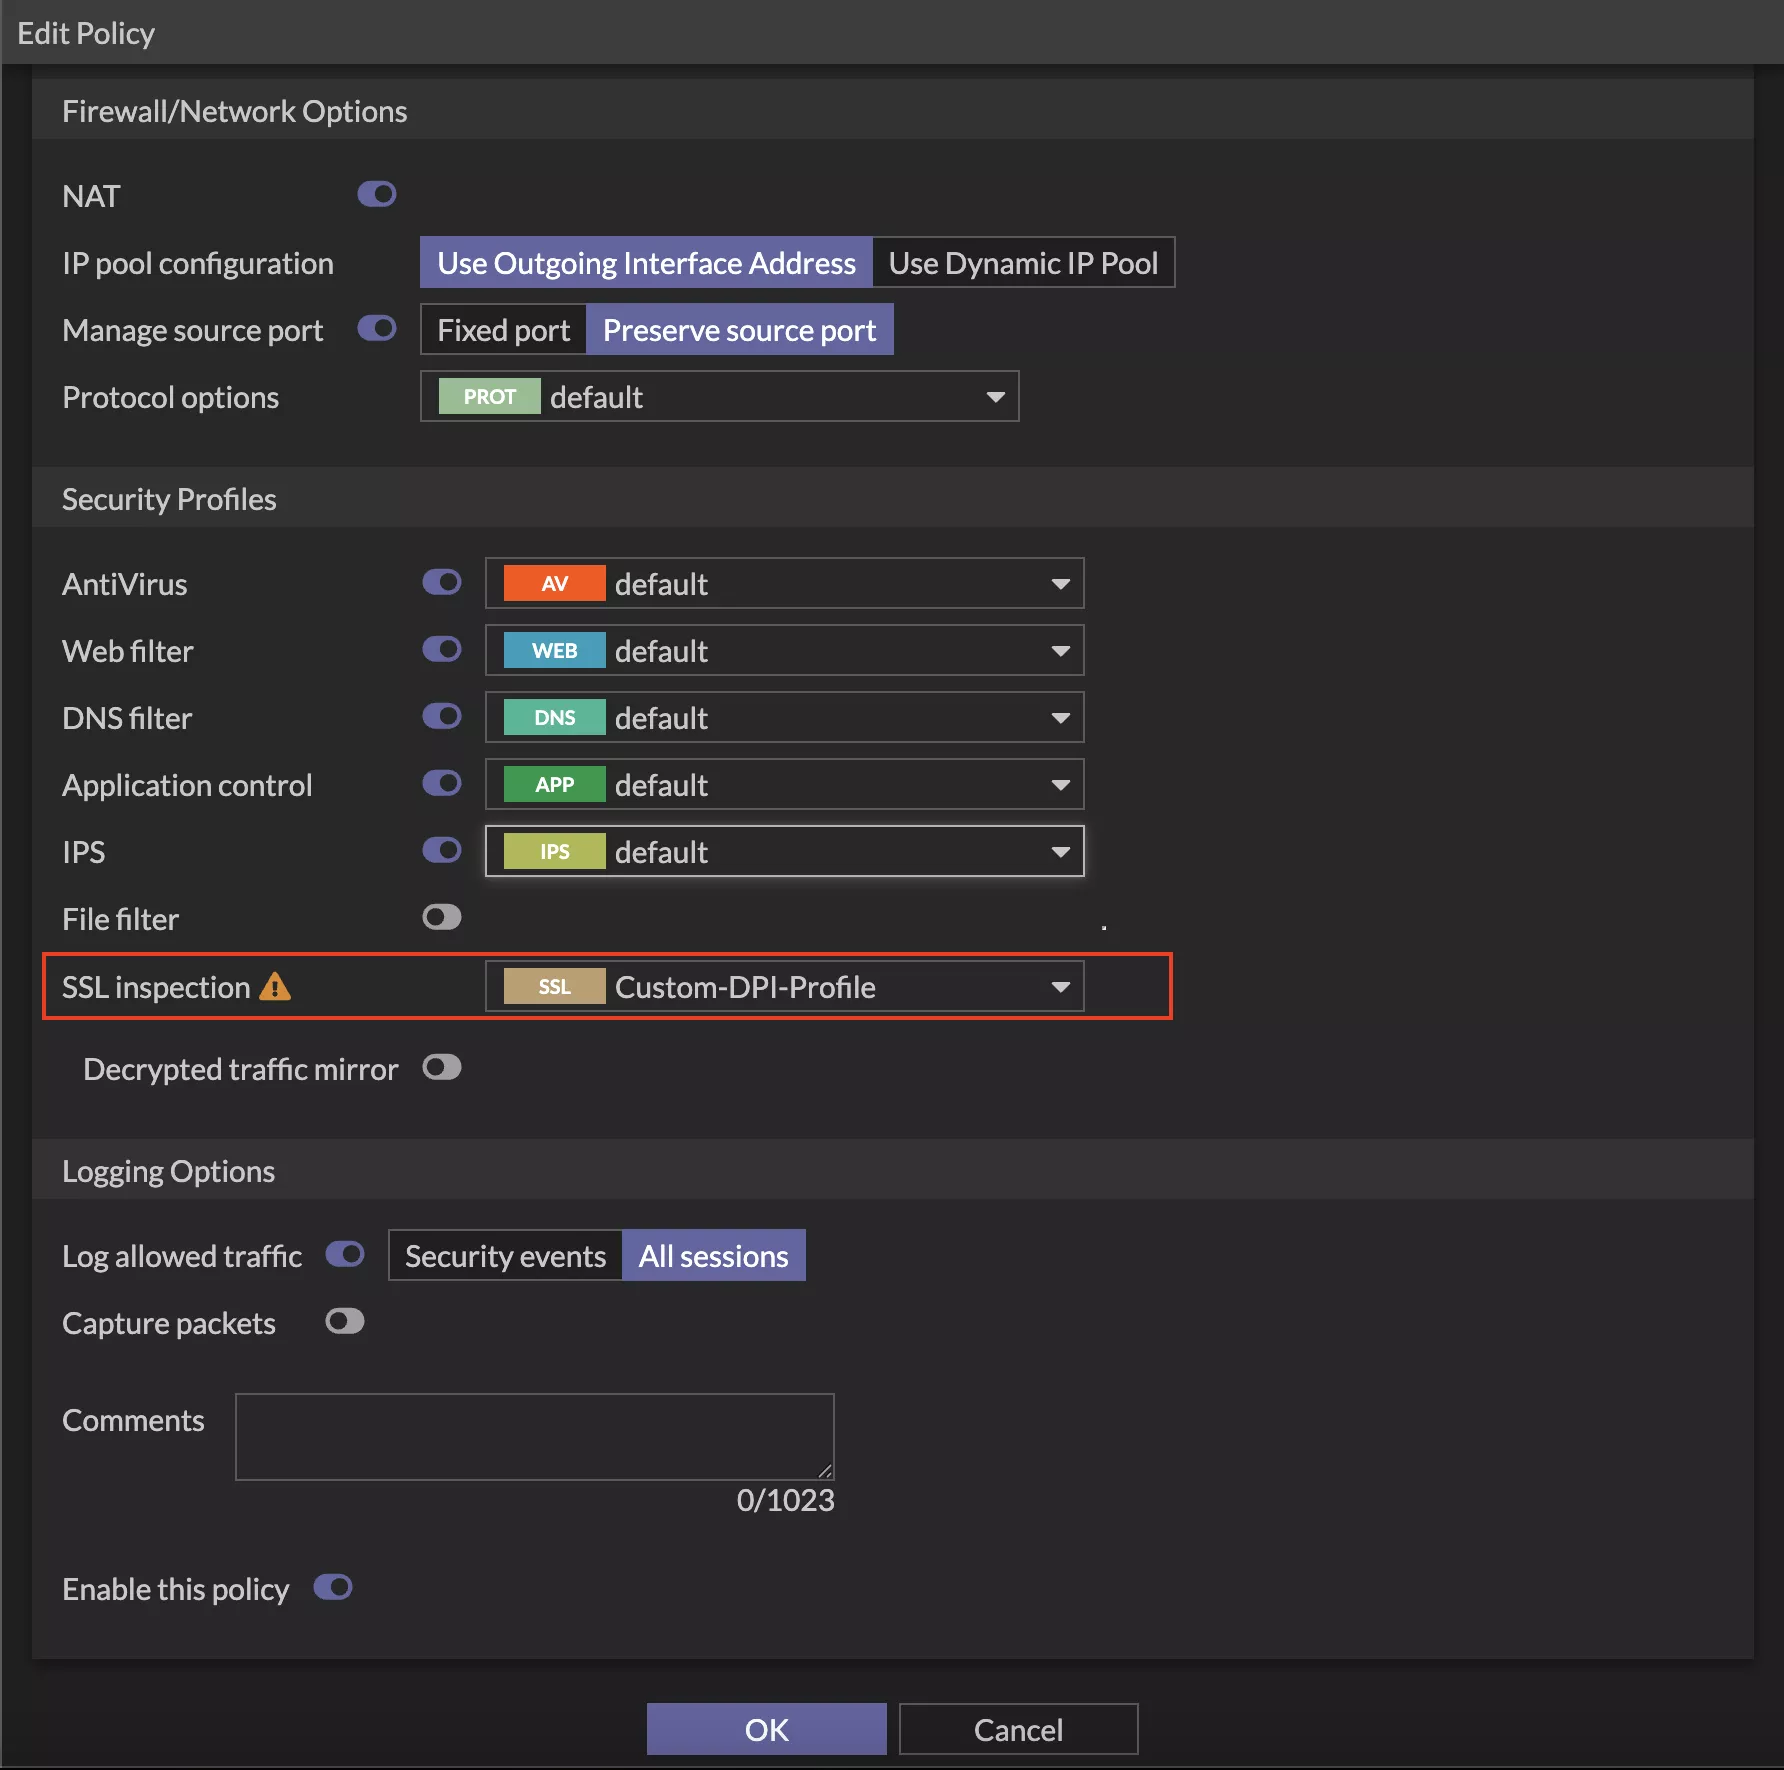
Step 2: Create or Modify the Firewall Policy
Go to Policy & Objects > Firewall Policy, then click Create New or edit an existing LAN-to-WAN policy. In the policy settings, update the SSL Inspection security profile by selecting your newly created profile, Custom-DPI-Profile.
Step 3: Verify DPI is Working
On the Firewall:
- Go to
Log & Report>Forward Traffic - Look for decrypted HTTPS traffic. You should see application-layer visibility like domains, URLs, and actions taken.
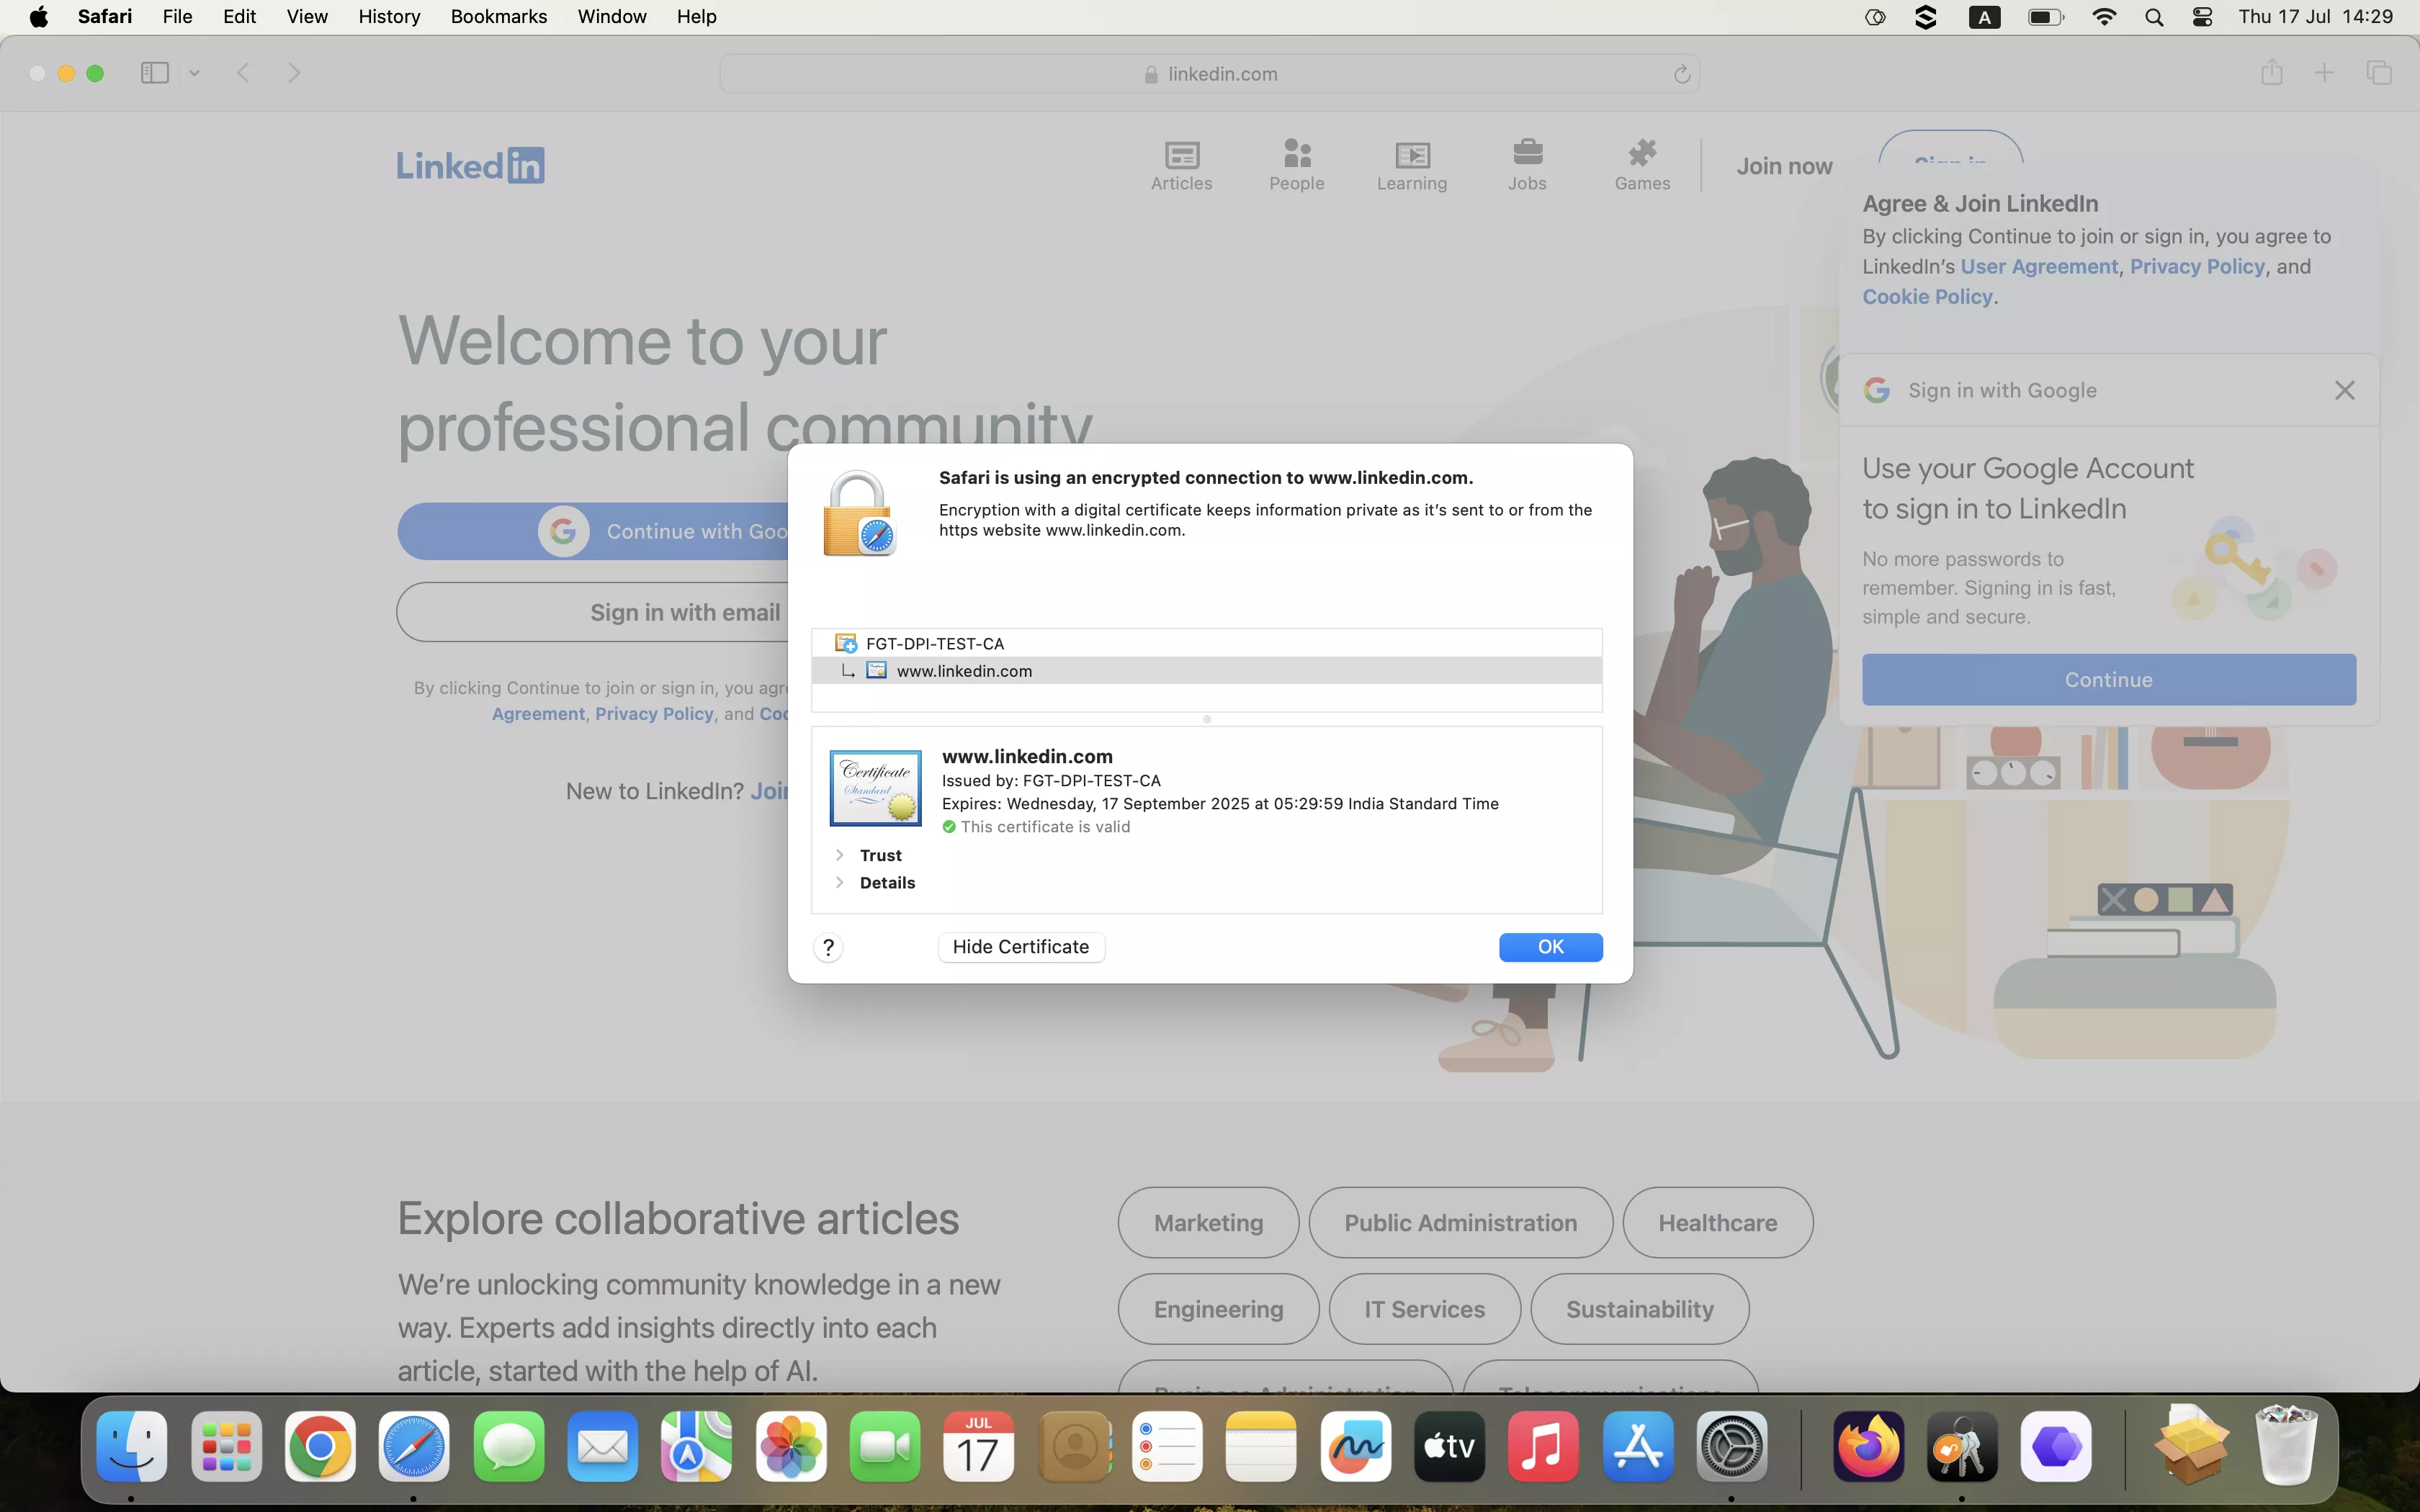
On Endpoints:
- Visit any HTTPS website.
- You should not see any certificate warnings if the FortiGate CA cert is properly installed in the trusted root store (System Keychain for macOS, Local Computer store for Windows, and
/usr/local/share/ca-certificates/for Linux).
Best Practices for Implementing DPI on Enterprise Networks
Implementing DPI on an enterprise network requires a careful, well-planned approach to balance security, performance, and user experience, while also respecting privacy and compliance requirements.
Let’s see some best practices for implementing DPI on an enterprise network:
Define a Clear DPI Policy
Develop and document a formal policy that outlines why DPI is being used, what types of traffic are inspected, who has access to the data, and under what circumstances. This sets expectations and accountability.
Communicate Transparently with Employees
Inform employees that DPI is in place. Explain what data may be inspected, what is excluded, and how this helps improve security while respecting personal privacy.
Scope and Minimize What’s Inspected
Apply DPI selectively. Inspect only business-critical or high-risk traffic. Avoid DPI for known personal or sensitive services (like banking, health apps, or personal email) by using custom SSL inspection exemptions.
Ensure Legal and Regulatory Compliance
Verify that your DPI practices align with data protection laws like GDPR, CCPA, or India’s DPDP Act. If legally required, get explicit consent and document your justification for processing personal data.
Limit and Secure the Collected Data
Avoid logging or storing unnecessary sensitive data. Where logging is necessary, mask, anonymize, or encrypt any personally identifiable information (PII). Limit access to only authorized personnel through role-based access controls.
Apply Sensible Data Retention Policies
Don’t keep DPI logs indefinitely. Define and enforce data retention timelines based on security, audit, or compliance needs, and automatically delete data once it’s no longer required.
Conduct Regular Audits and Reviews
Regularly review what DPI captures, who accessed it, and whether policies were followed. Use these audits to improve configurations and ensure privacy is maintained alongside security.
Conclution
Deep Packet Inspection (DPI) is a powerful capability within FortiGate firewalls that enables organizations to gain granular visibility and control over network traffic. By understanding how DPI works, implementing effective certificate management through tools like Workspace ONE UEM, and following best practices for deployment, IT teams can strike the right balance between security, performance, and user experience.