
Workspace ONE UEM is a sophisticated all-in-one solution that manages and centrally controls the elements of an organization’s IT workloads like compliance management, applications deployments, OS patch management, endpoint security, and various other automation tasks on end-user devices. In modern IT organizations, this UEM (Unified Endpoint Management) solution helps us to reduce costs, increase productivity, and deliver a great employee experience with this UEM tool.
In this article, I’m going to show you how to easily deploy SentinelOne Endpoint Security Platform for MacOS devices using this VMware Workspace ONE UEM.
Brief About SentinelOne
Comprehensive and feature-rich enterprise security platform that provides threat detection, hunting, and AI-assisted prevention features to protect IT operations and end-user devices.

Prerequisites for Deploying SentinelOne for MacOS
Get the Site or Group Token
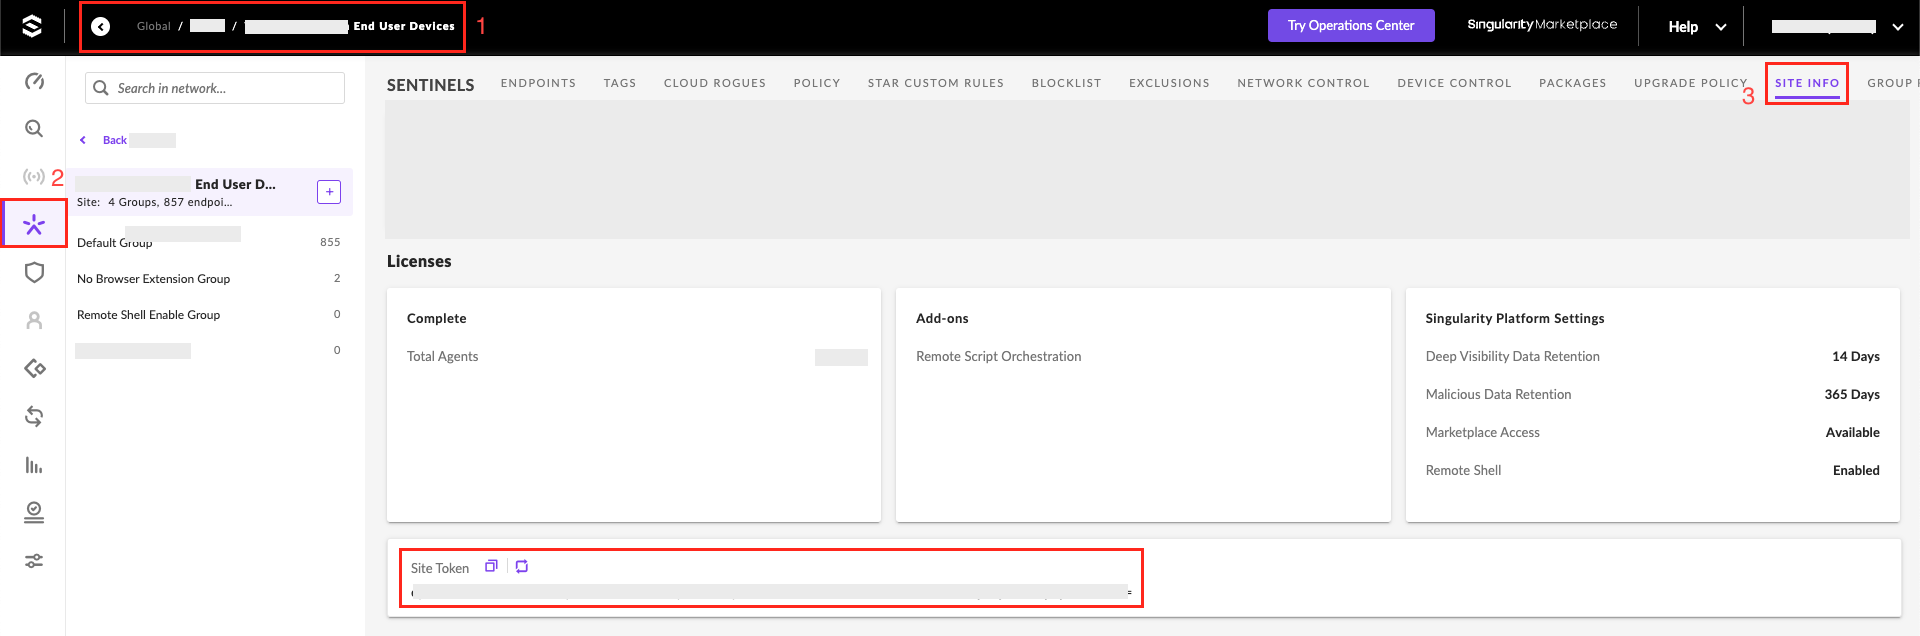
During Agent installation, you must add Agents to a Site with the Site Token or to a Group with a Group Token. Therefore first you need to log in to the SentinelOne console and find the token.
At the top left of the Console, select your site. Then from the left side menu, select the “Sentinels” and then select the Site Info. From the Site Token section copy and note down the site token.
Similarly, if you are required to get the Group token, Select the required group from the left side and then click the Group Info section.
Creating a Configuration Profile
Before installing the SentinelOne agent on macOS, it’s essential to set up specific prerequisites to ensure proper access permissions. This entails creating a new profile to deploy the necessary permissions for SentinelOne before installation.
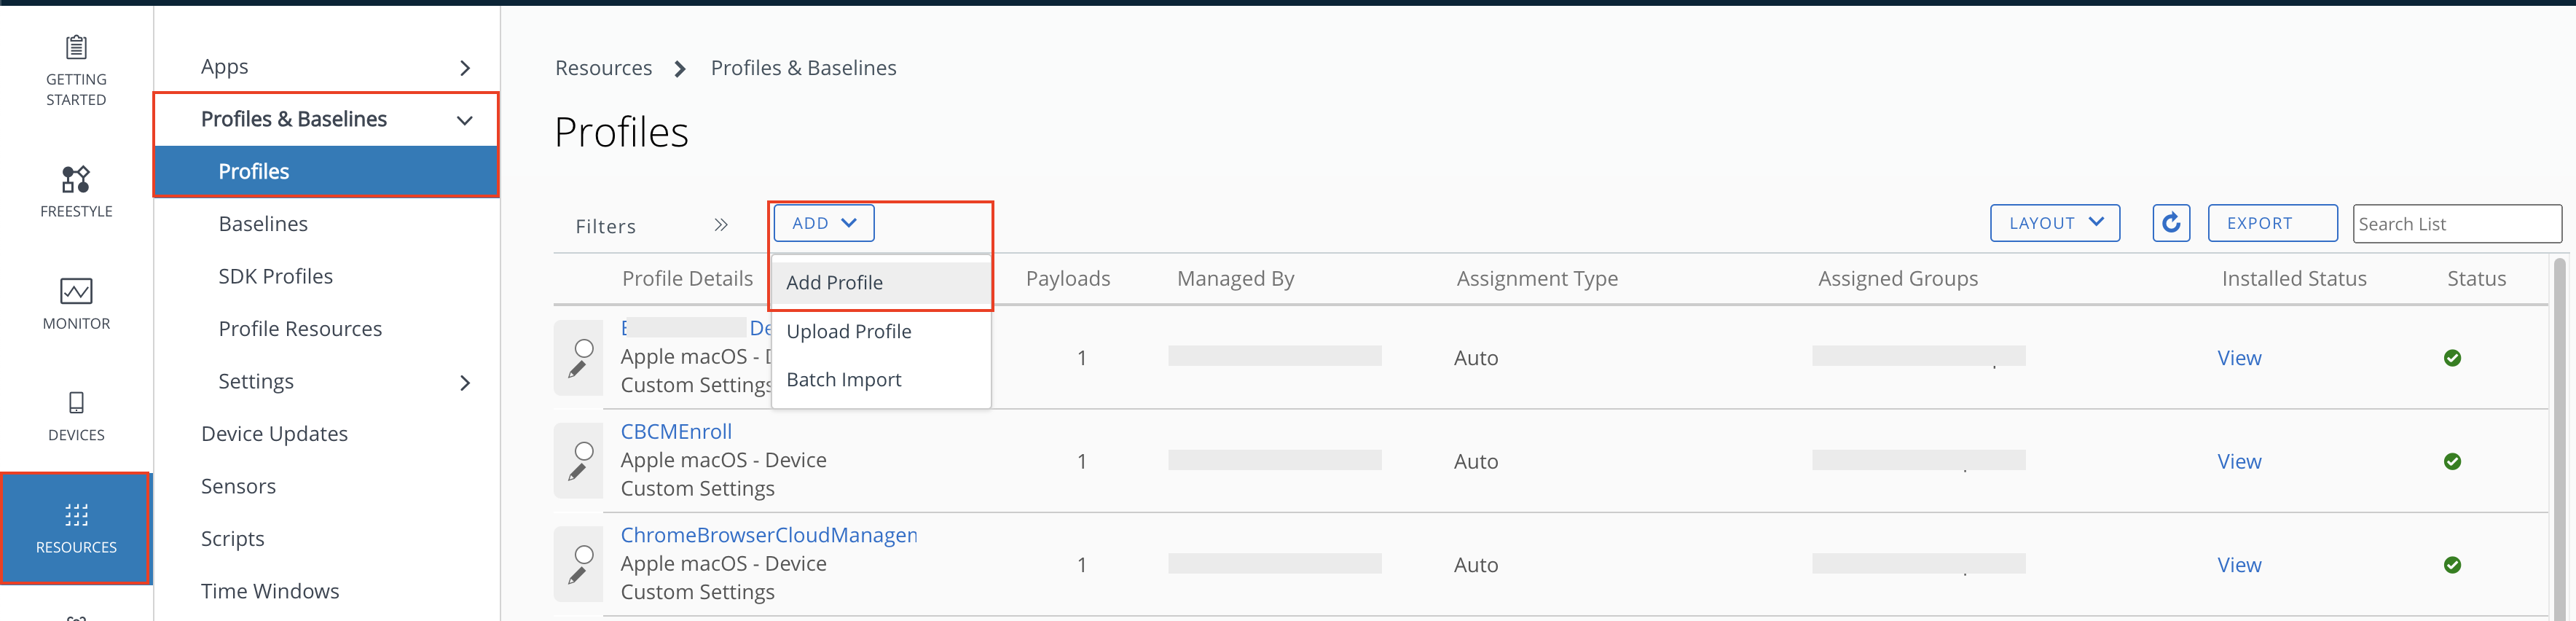
From the WorkspaceOne UEM console, navigate to Resources > Profiles & Baselines > Profiles. Then Click Add and add a new Profile.
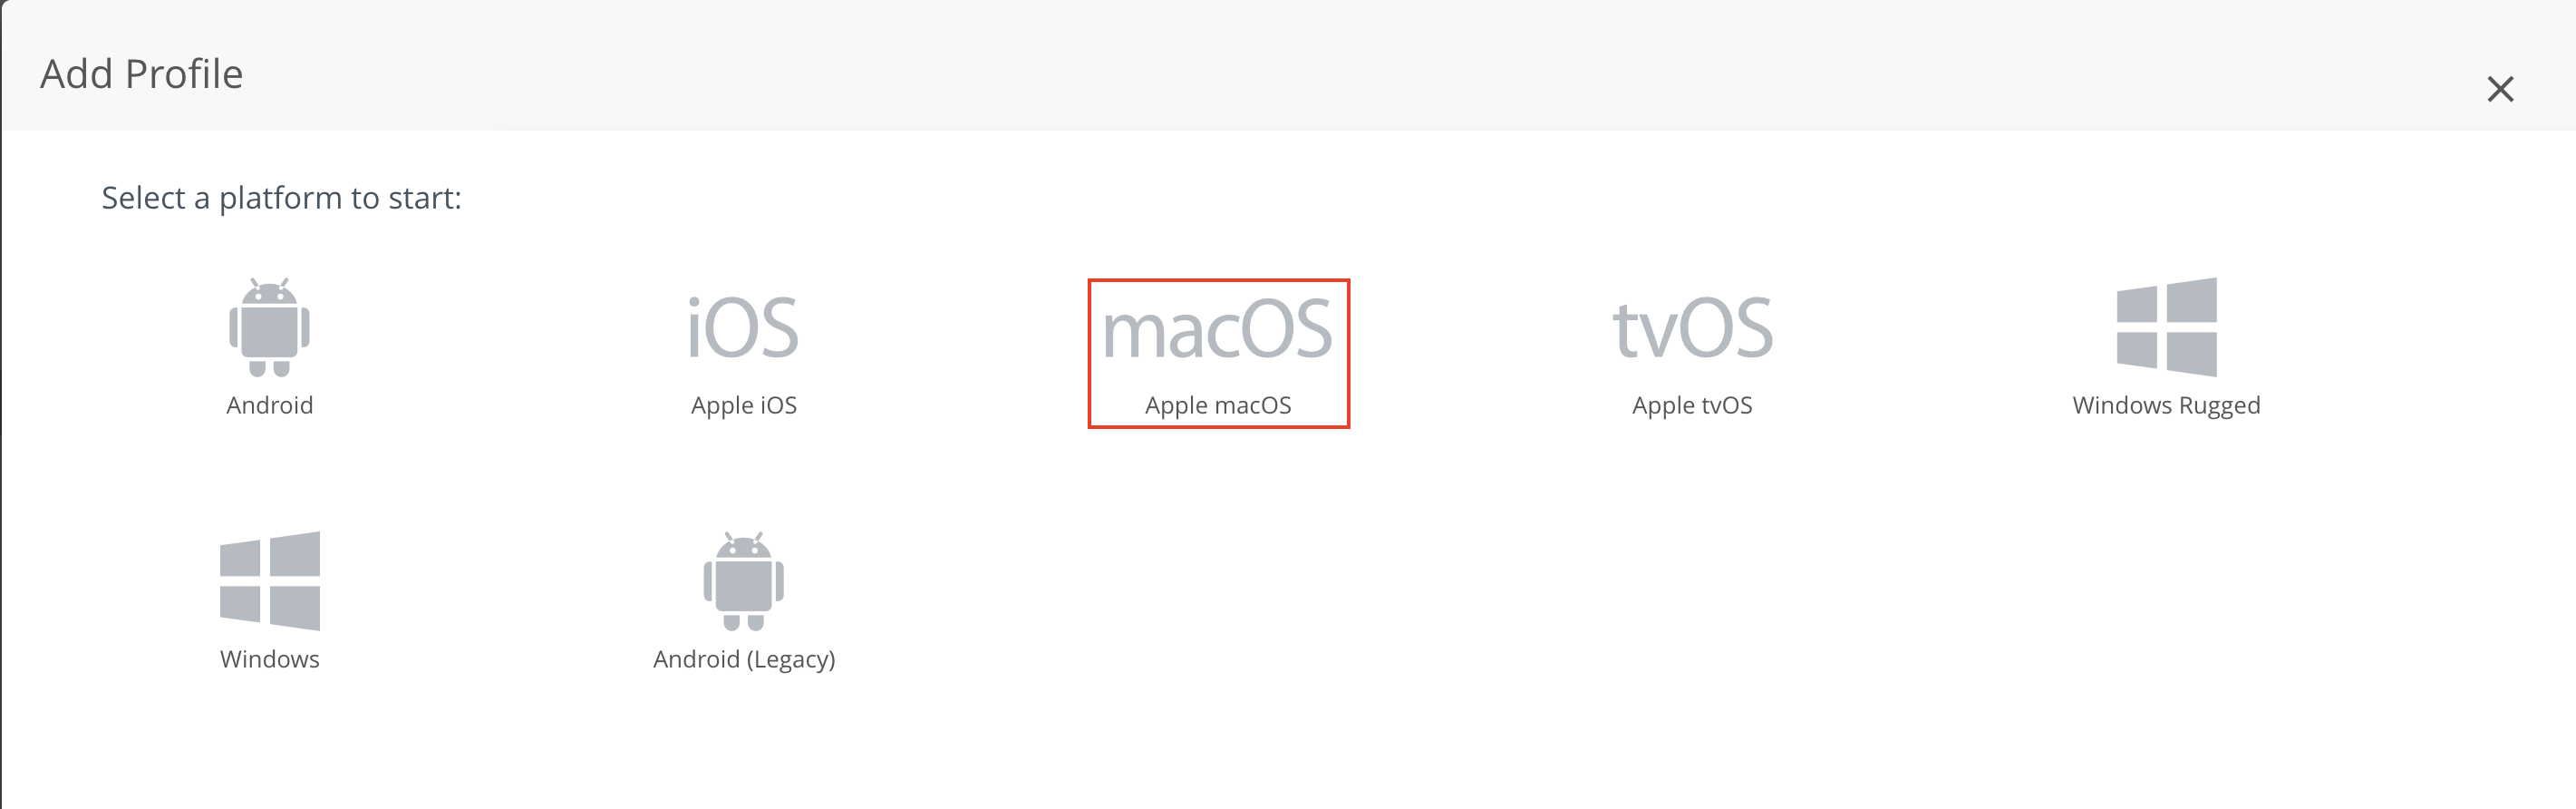
Select “Apple macOS” from the Add Profile window and then select “Device Profile“.
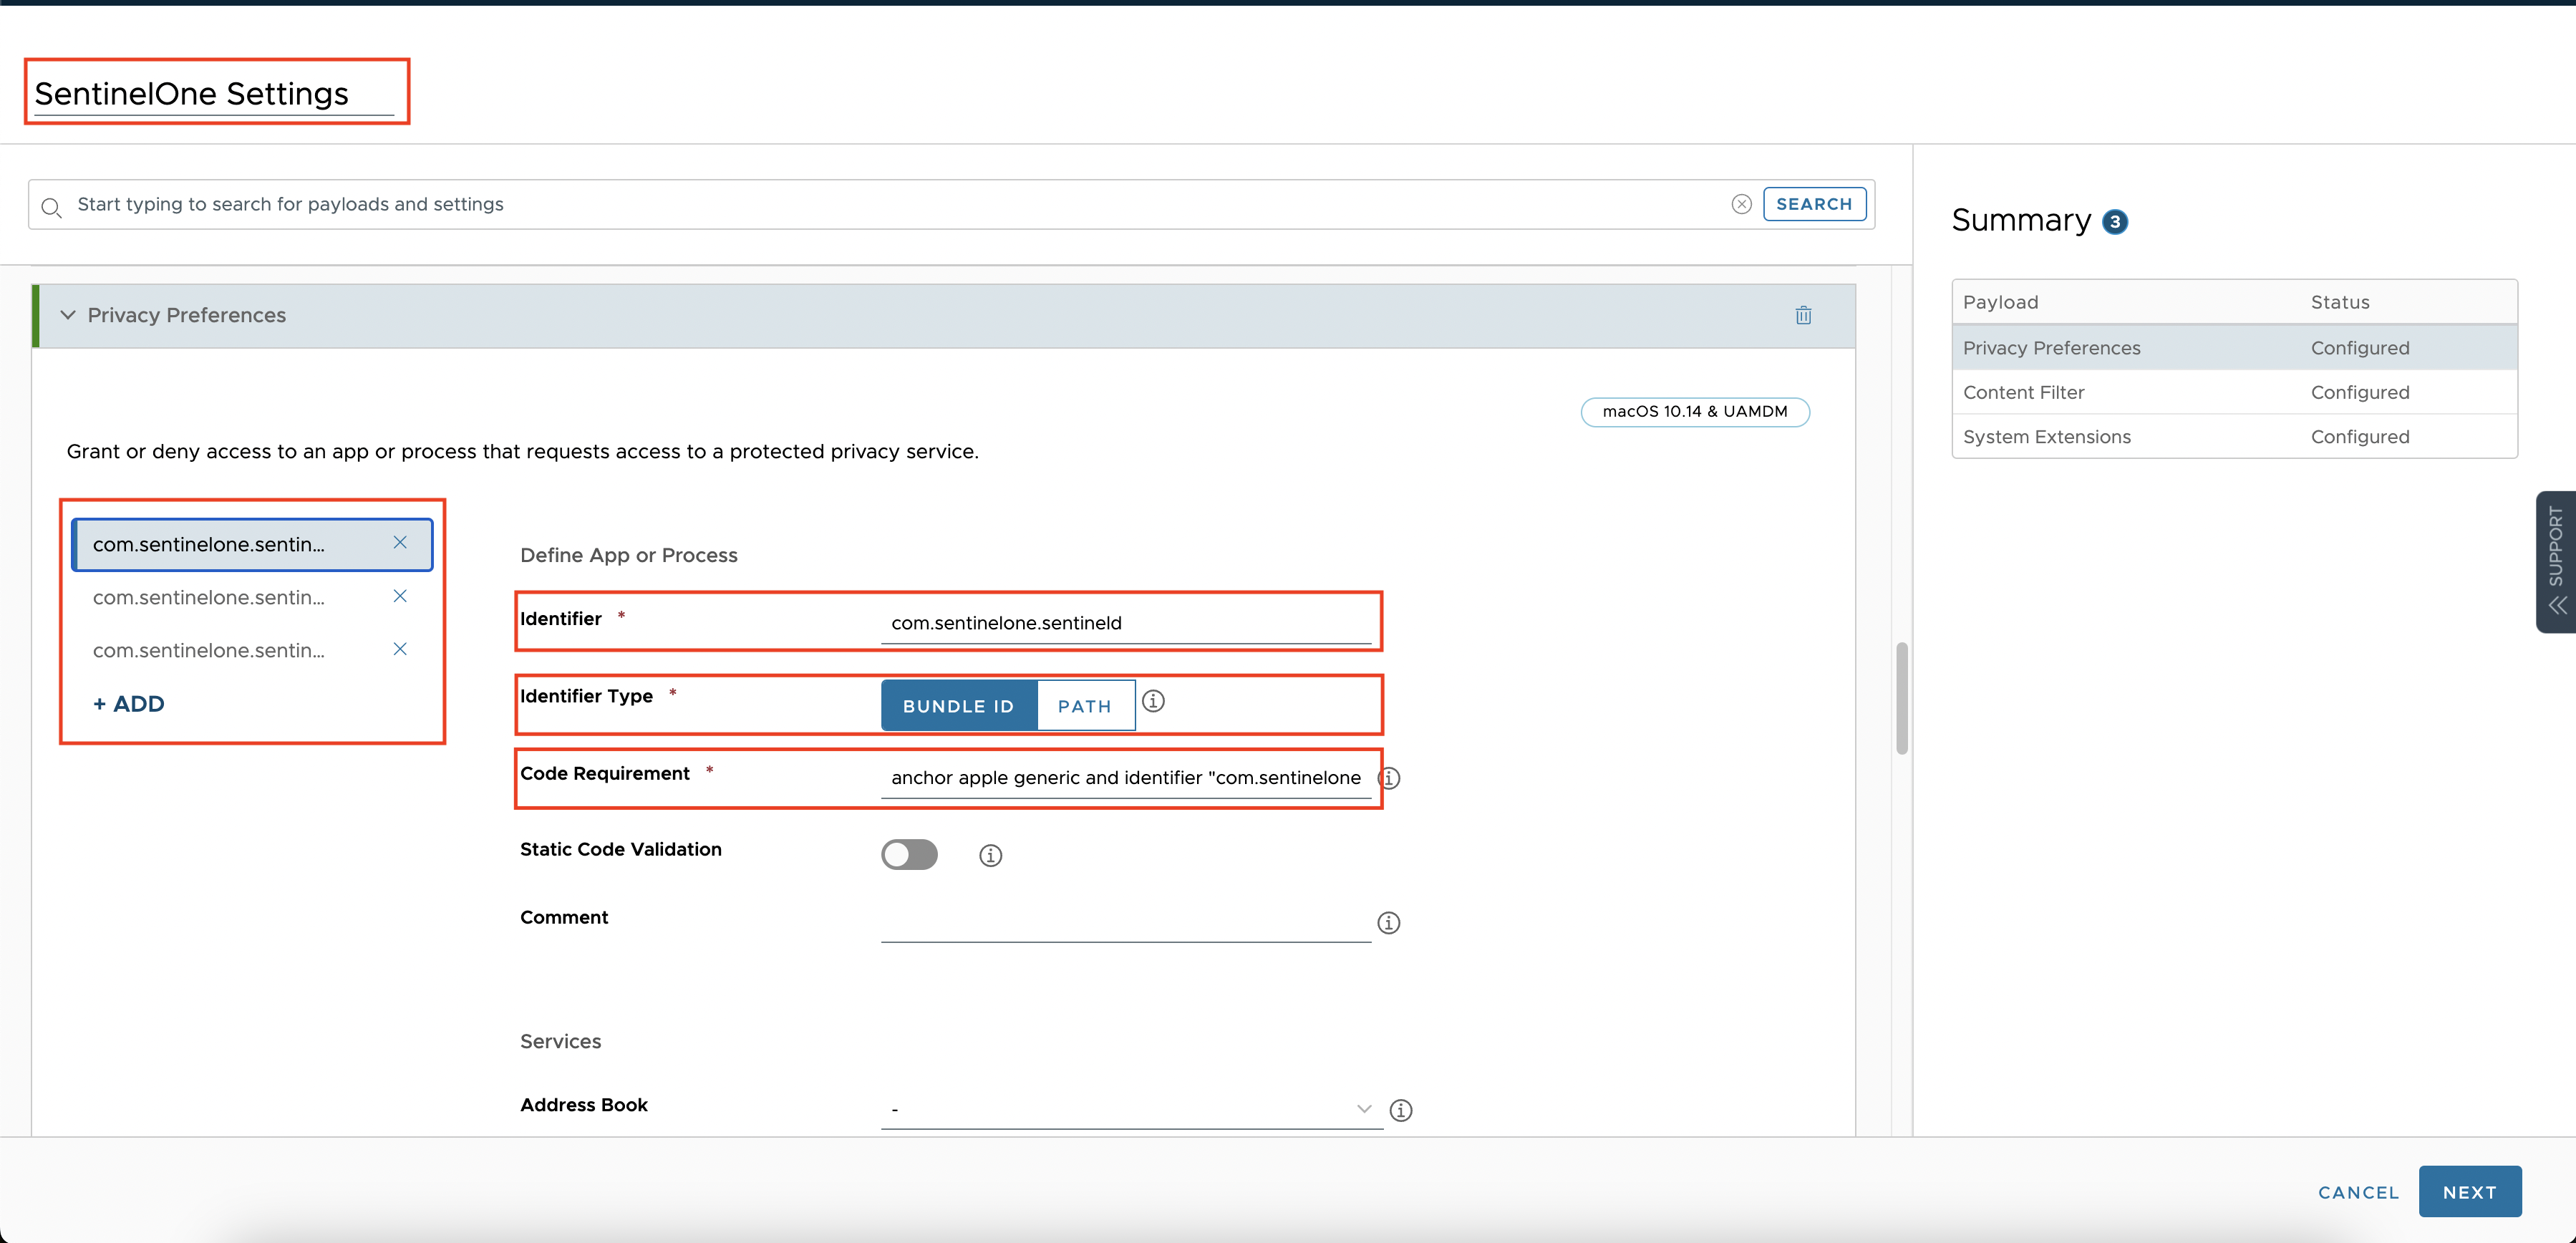
Provide a name for the profile, such as “SentinelOne Settings”. You have the flexibility to choose any name you prefer.
Configure Privacy Preferences Payload
Find and select the Privacy Preferences and click ADD to configure it. Then add the following 3 apps according to the following settings.
com.sentinelone.sentineld
- Identifier: com.sentinelone.sentineld
- Identifier Type: Bundle ID
- Code Requirement:
anchor apple generic and identifier "com.sentinelone.sentineld" and (certificate leaf[field.1.2.840.113635.100.6.1.9] /* exists */ or certificate 1[field.1.2.840.113635.100.6.2.6] /* exists */ and certificate leaf[field.1.2.840.113635.100.6.1.13] /* exists */ and certificate leaf[subject.OU] = "4AYE5J54KN")
- System Policy All Files: Allow
Similarly, configure the other two applications within the Privacy Preferences Payload section of the same profile.
com.sentinelone.sentineld-helper
- Identifier: com.sentinelone.sentineld-helper
- Identifier Type: Bundle ID
- Code Requirement:
anchor apple generic and identifier "com.sentinelone.sentineld-helper" and (certificate leaf[field.1.2.840.113635.100.6.1.9] /* exists */ or certificate 1[field.1.2.840.113635.100.6.2.6] /* exists */ and certificate leaf[field.1.2.840.113635.100.6.1.13] /* exists */ and certificate leaf[subject.OU] = "4AYE5J54KN")
- System Policy All Files: Allow
com.sentinelone.sentineld-shell
- dentifier: com.sentinelone.sentineld-shell
- Identifier Type: Bundle ID
- Code Requirement:
anchor apple generic and identifier "com.sentinelone.sentineld-shell" and (certificate leaf[field.1.2.840.113635.100.6.1.9] or certificate 1[field.1.2.840.113635.100.6.2.6] and certificate leaf[field.1.2.840.113635.100.6.1.13] and certificate leaf[subject.OU] = "4AYE5J54KN")
- System Policy All Files: Allow
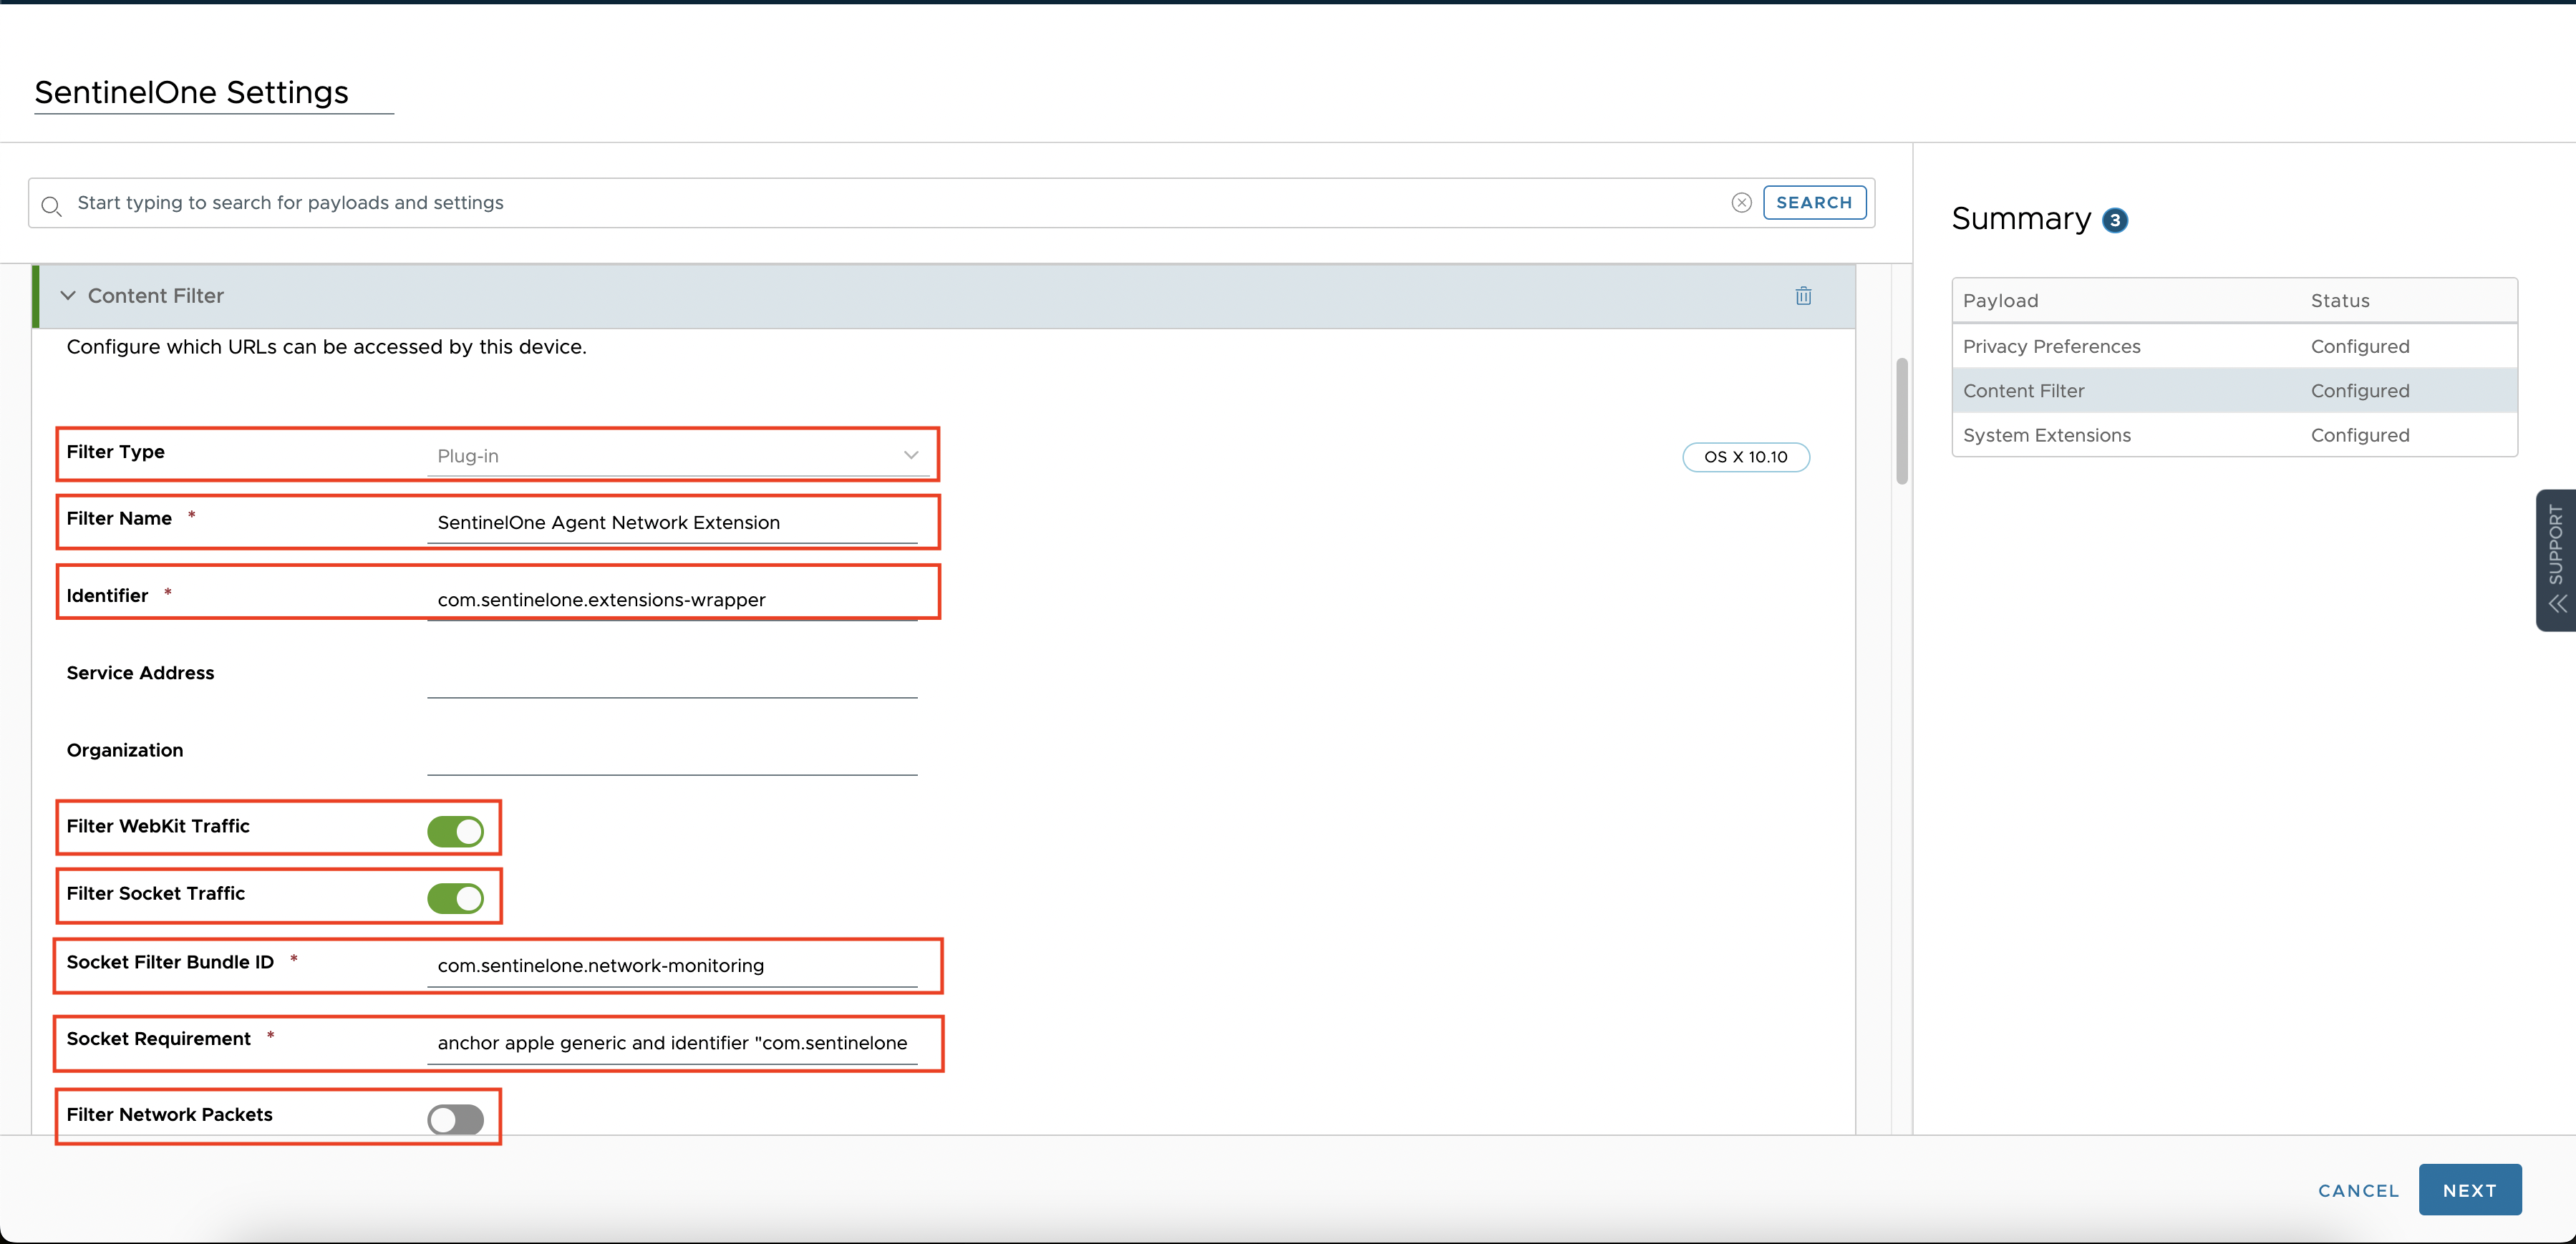
Configure Content Filter Payload
The SentinelOne Agent Network Extension is used for Deep Visibility of IP network events and Firewall Control. Grant access to this policy for Firewall Control and Deep Visibility network events features:
In the same profile, select the “Content Filter” and configure the settings as below.
- Filter Type: Select Plugin
- Filter Name: SentinelOne Agent Network Extension
- Identifier: com.sentinelone.extensions-wrapper
- Select: Filter WebKit Traffic and Filter Socket Traffic
- Key: com.sentinelone.network-monitoring
- Value:
anchor apple generic and identifier "com.sentinelone.network-monitoring" and (certificate leaf[field.1.2.840.113635.100.6.1.9] or certificate 1[field.1.2.840.113635.100.6.2.6] and certificate leaf[field.1.2.840.113635.100.6.1.13] and certificate leaf[subject.OU] = "4AYE5J54KN")
- Filter Network Packets: Turn Off
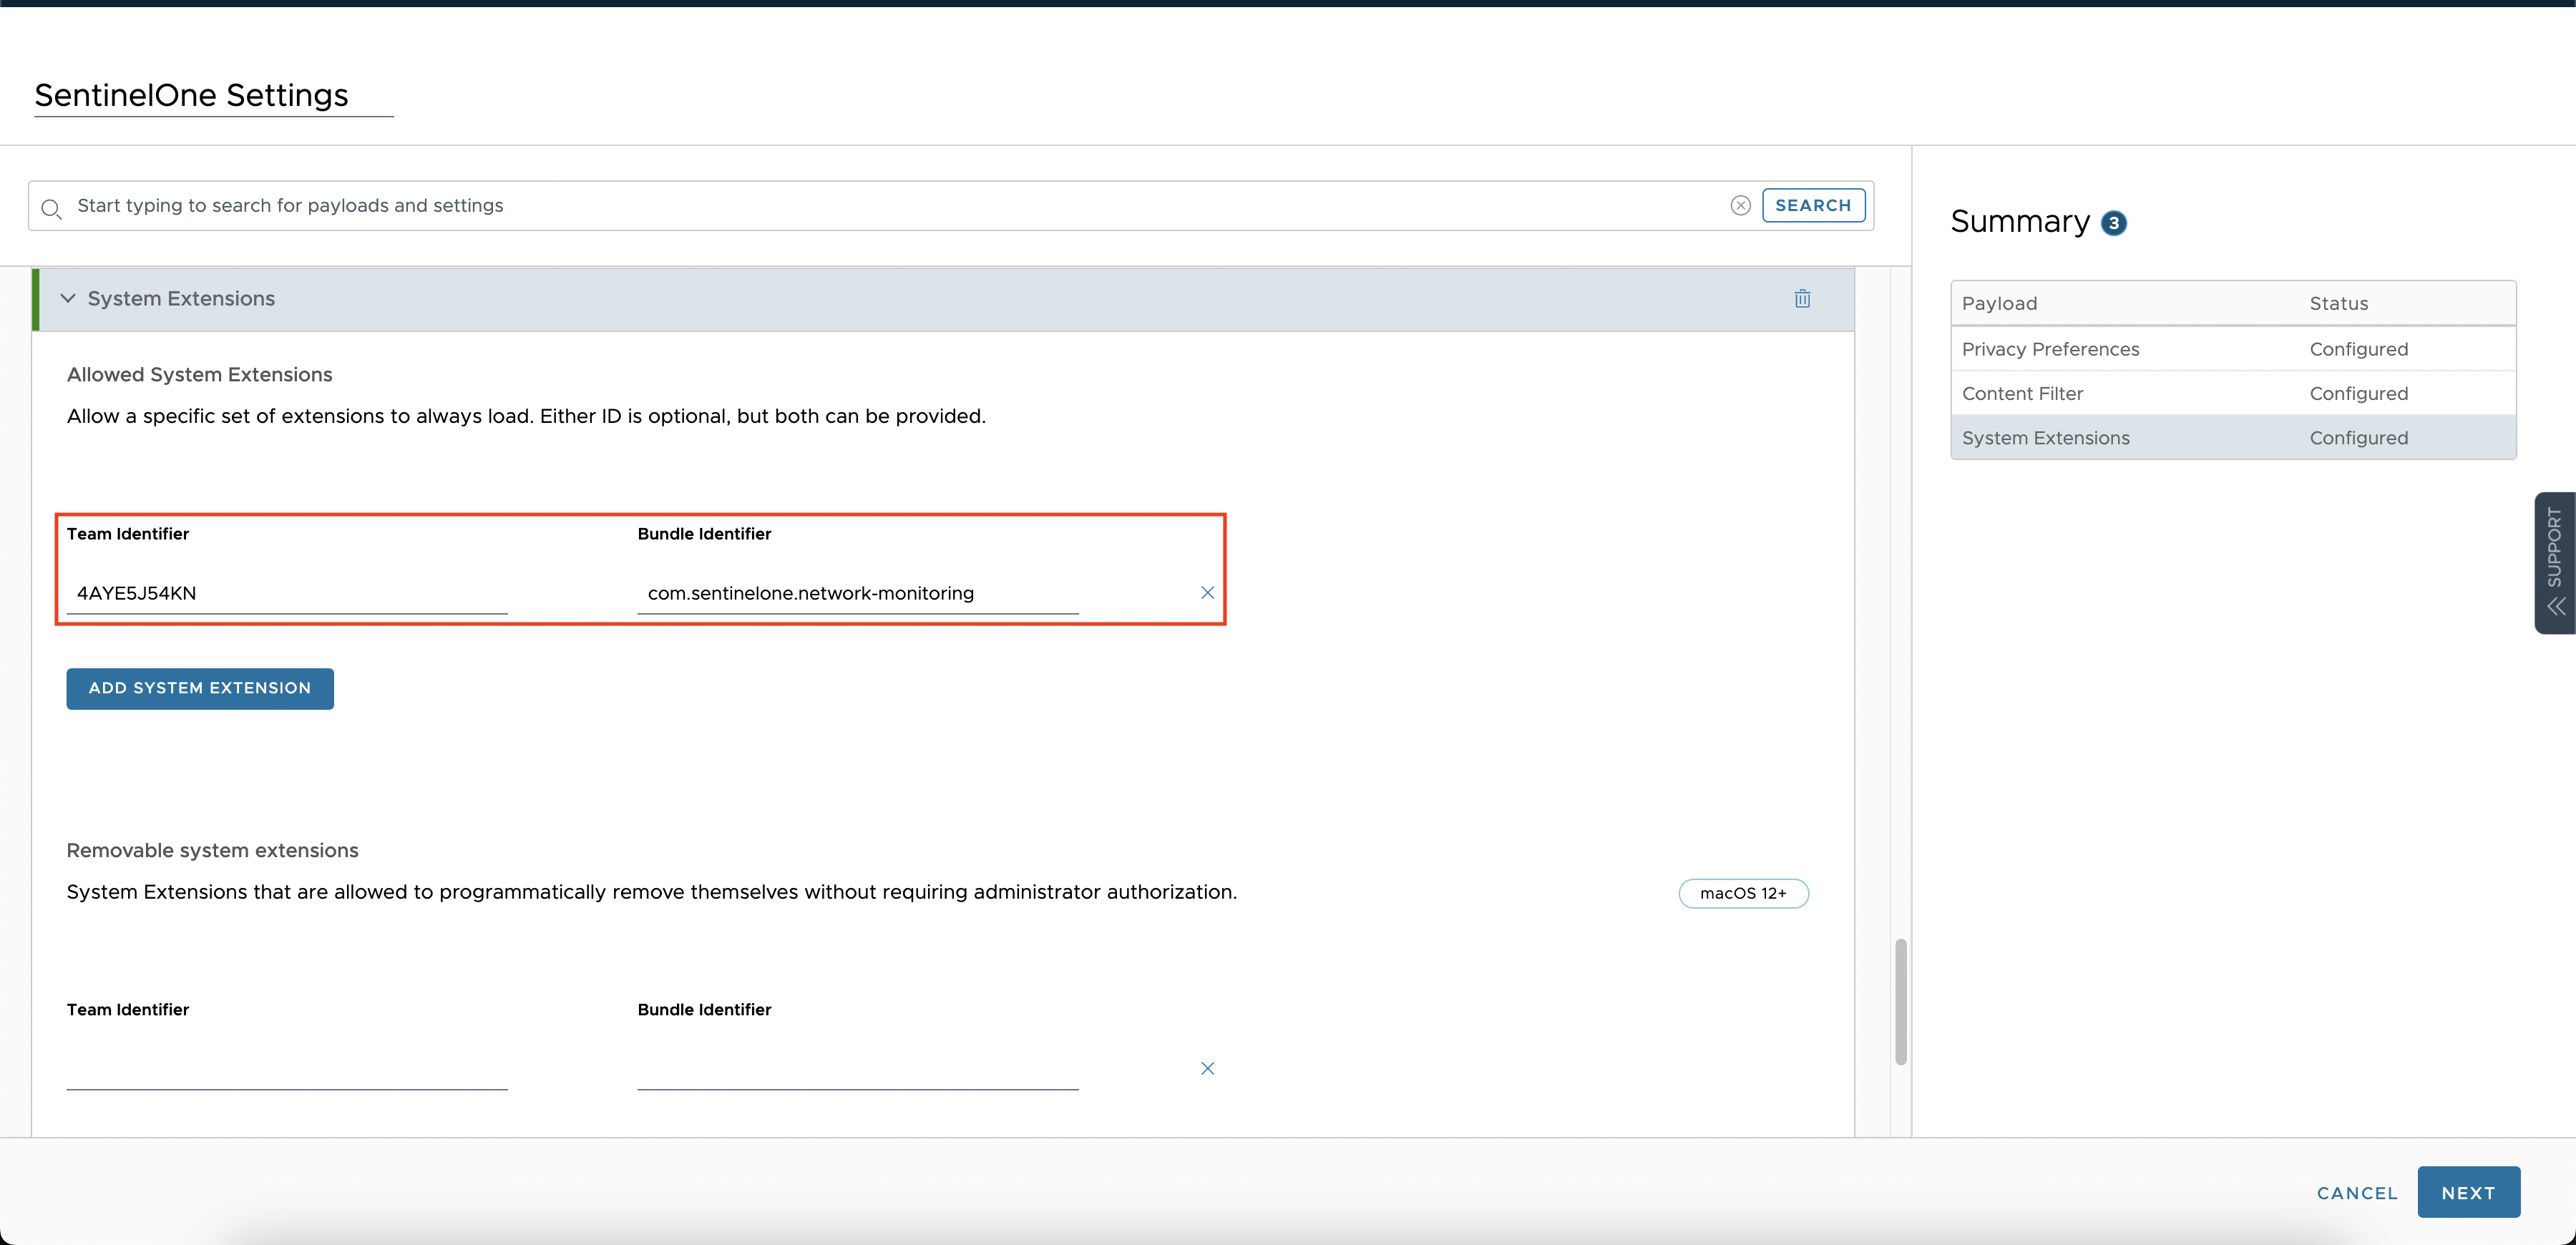
Configure System Extensions Payload
In the same profile, select “System Extensions” and configure the settings as below.
- Team Identifier: 4AYE5J54KN
- Bundle Identifier: com.sentinelone.network-monitoring
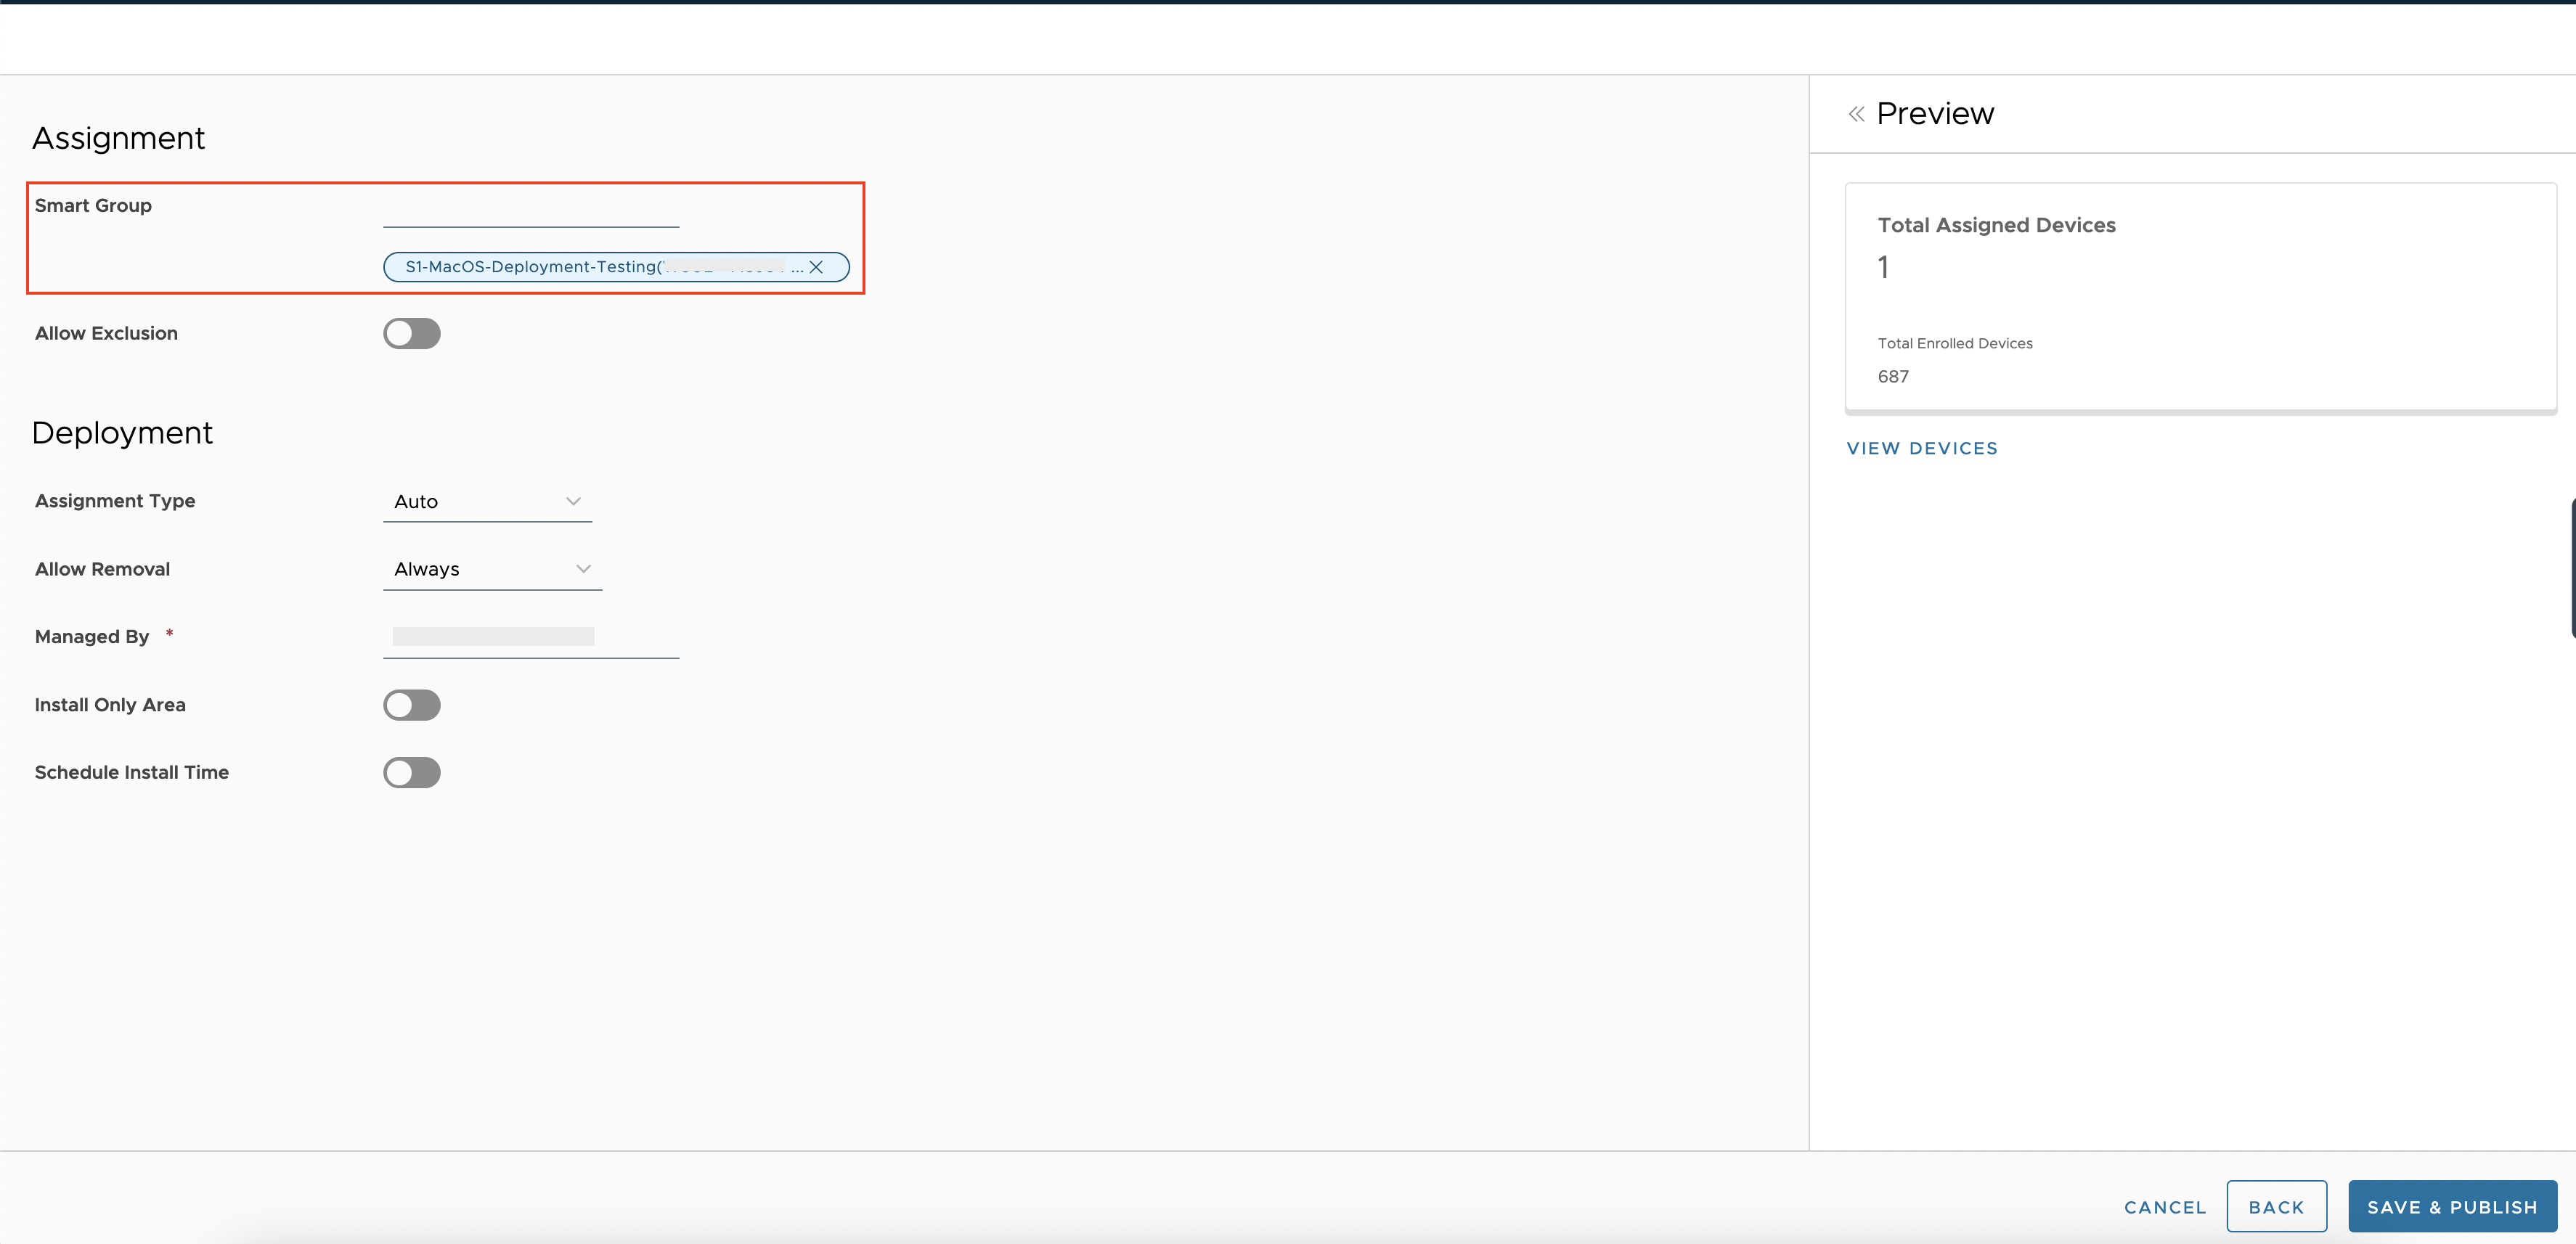
Once you configure all the above payloads you are ready to Publish the Profile. Select the required smart group and Click Save and Publish to proceed.
Deploying SentinelOne Agent as a Managed Application
Once you are ready with the above prerequisites, now it is time to deploy the SentinelOne Agent using WorkspaceOne UEM as a managed application.
Gather Metadata on SentinelOne Installer
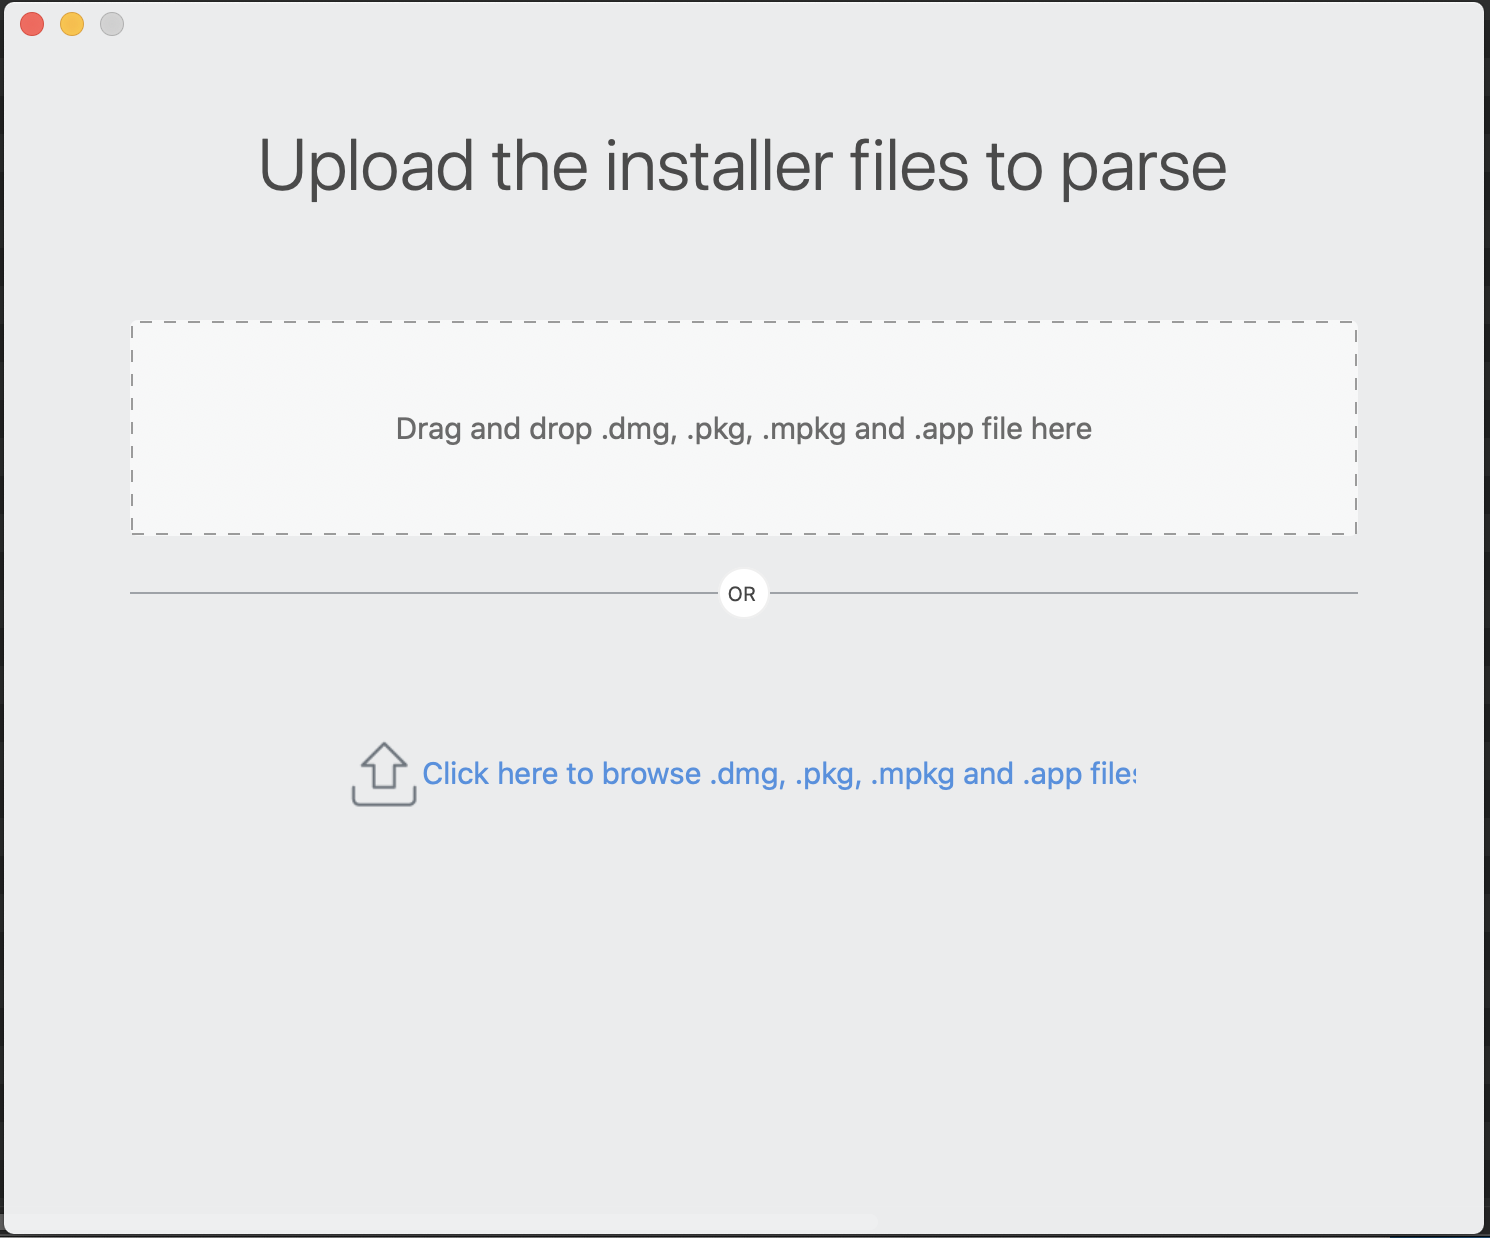
First, we need to gather some metadata about the installer file which we are going to deploy. For that, you need to download and install the Workspace ONE Admin Assistant for macOS to generate metadata on the installer.
Open the Workspace ONE Admin Assistant app, and drag and drop your SentinelOne Agent installation file.
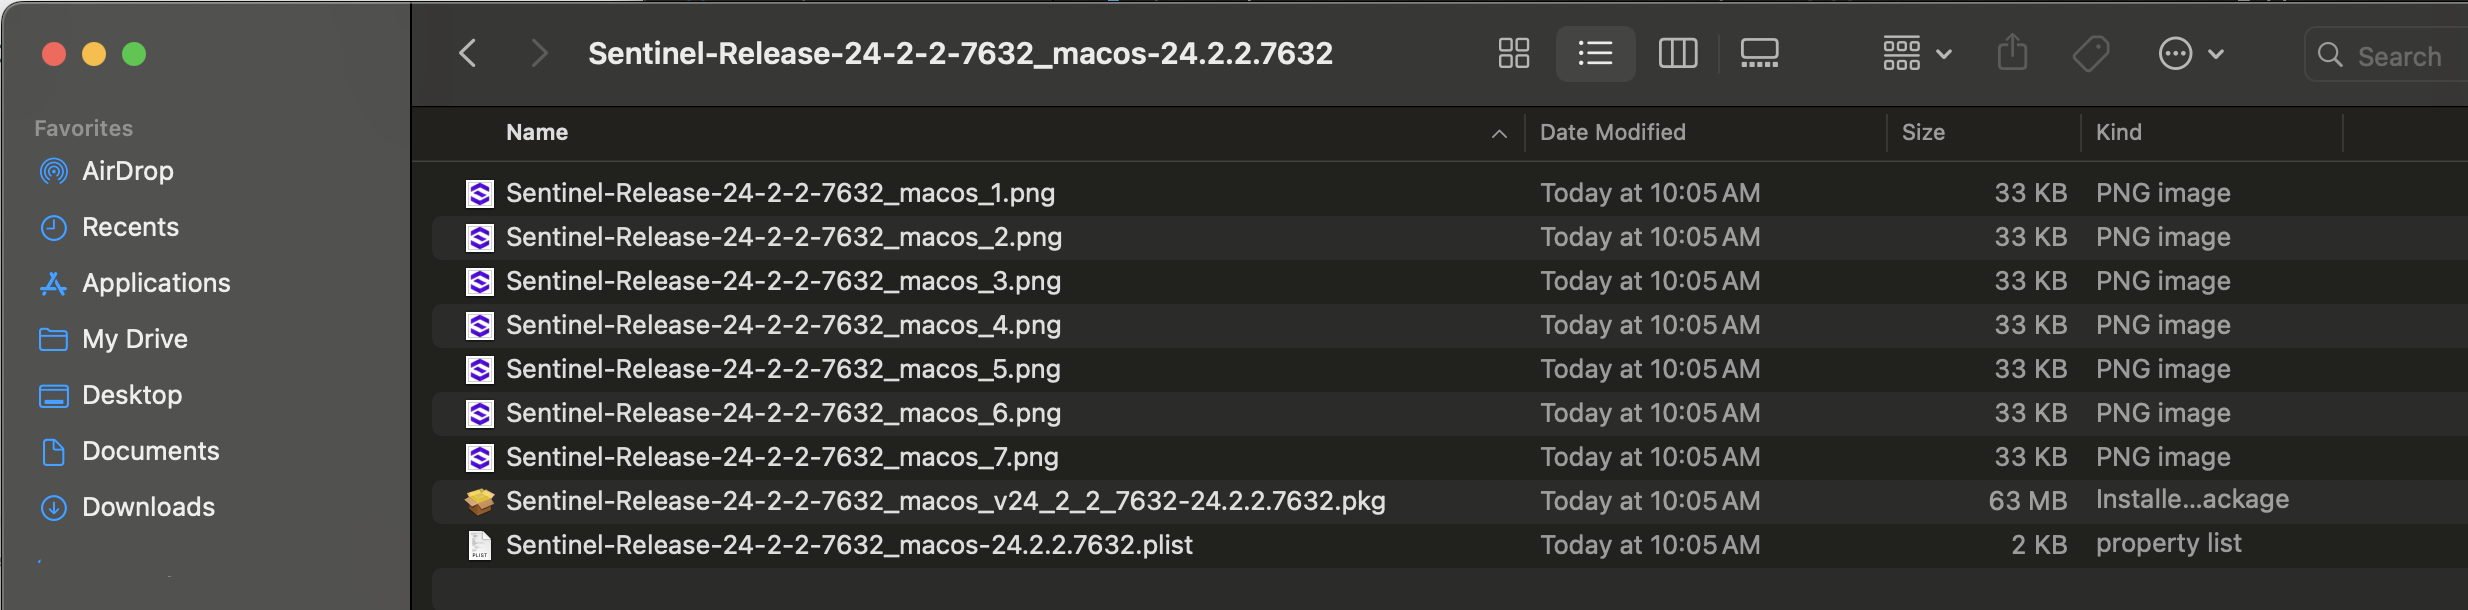
Once the parsing is done, you can reveal it in the Finder.
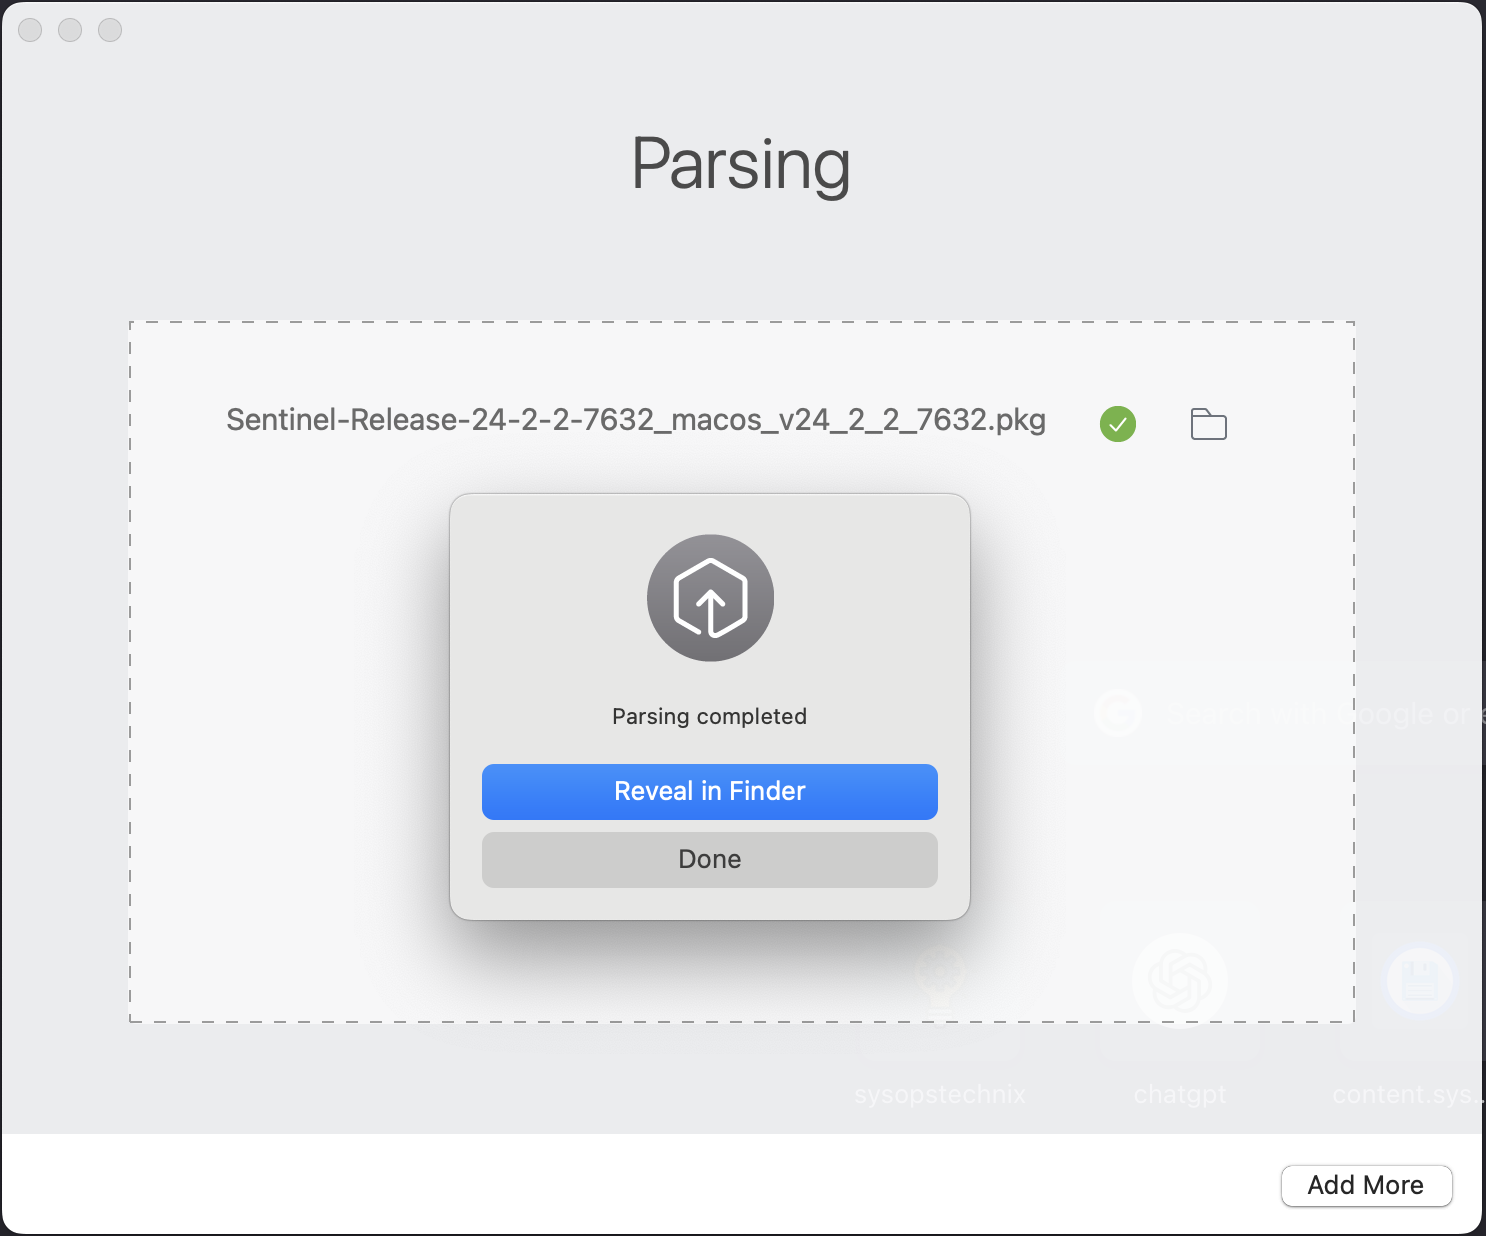
As you can see the metadata file with file extension .plist. That file contains details allowing Workspace ONE to determine if the managed application is installed and if the installed application is the correct version.
Additionally if required, you can open that file in any text editor and do some additional modifications to the metadata (PLIST) file before deployment.
Create and Configure Application Deployment on the UEM Console
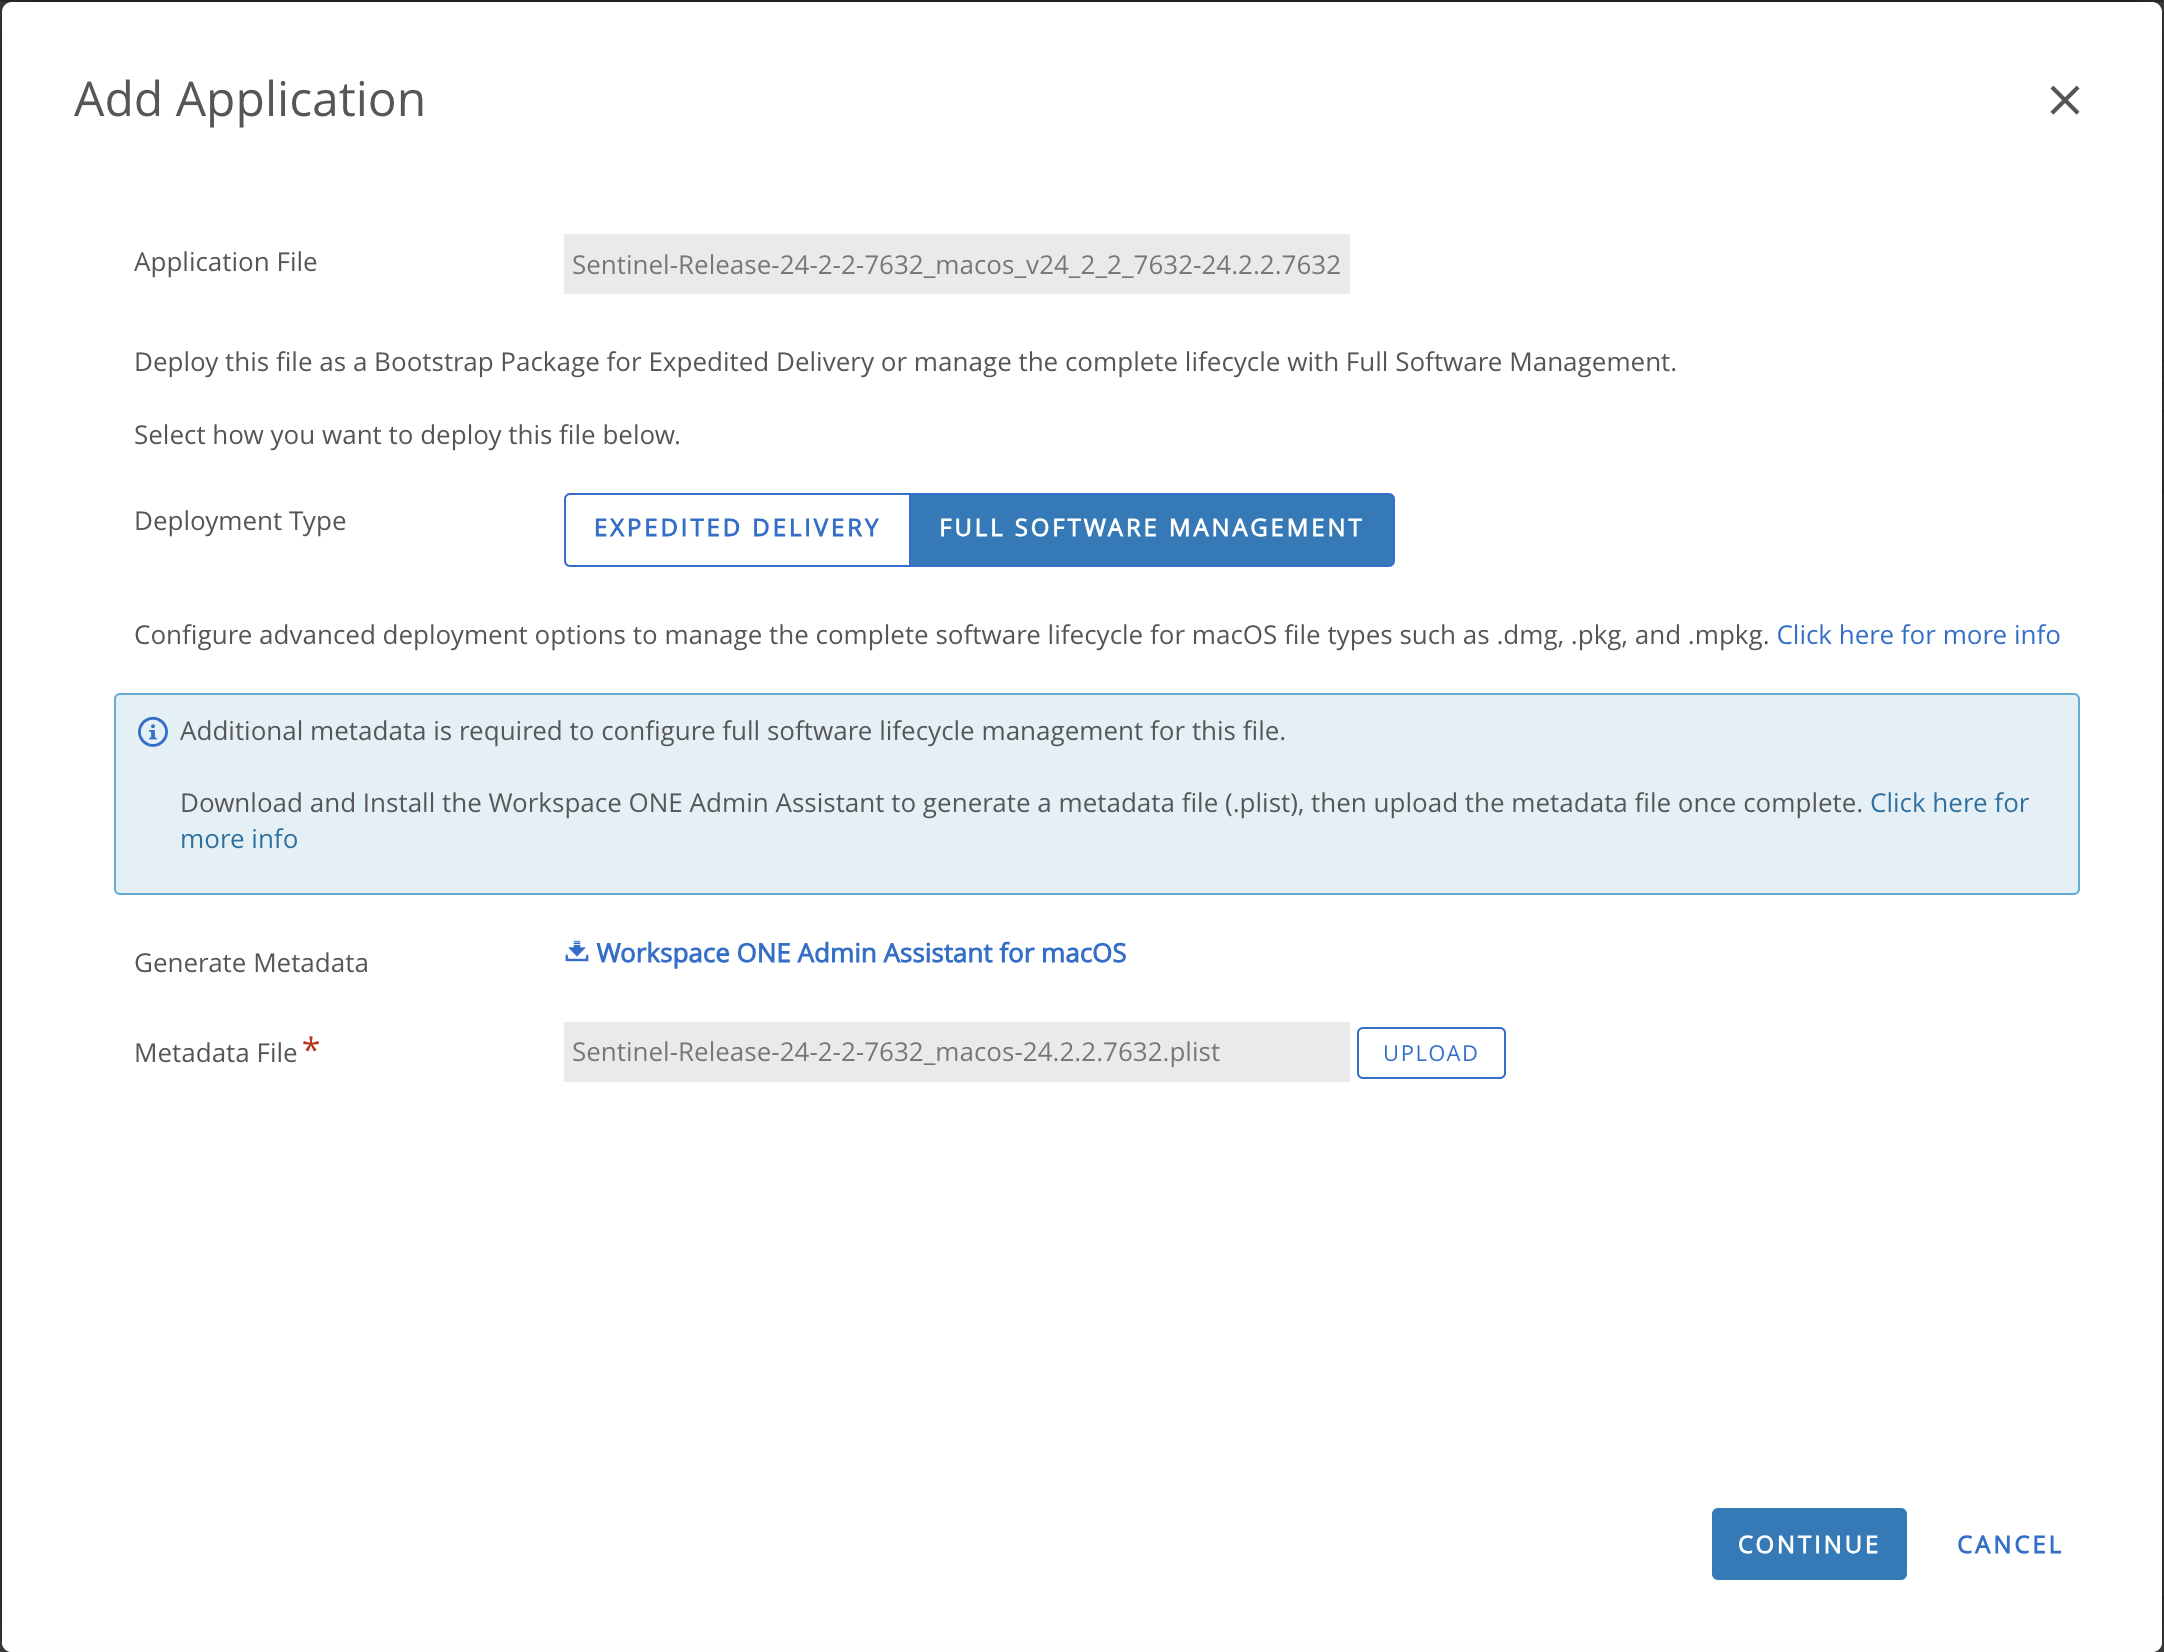
In the Workspace ONE UEM admin console, navigate to Resources > Apps > Native > Add Application File.
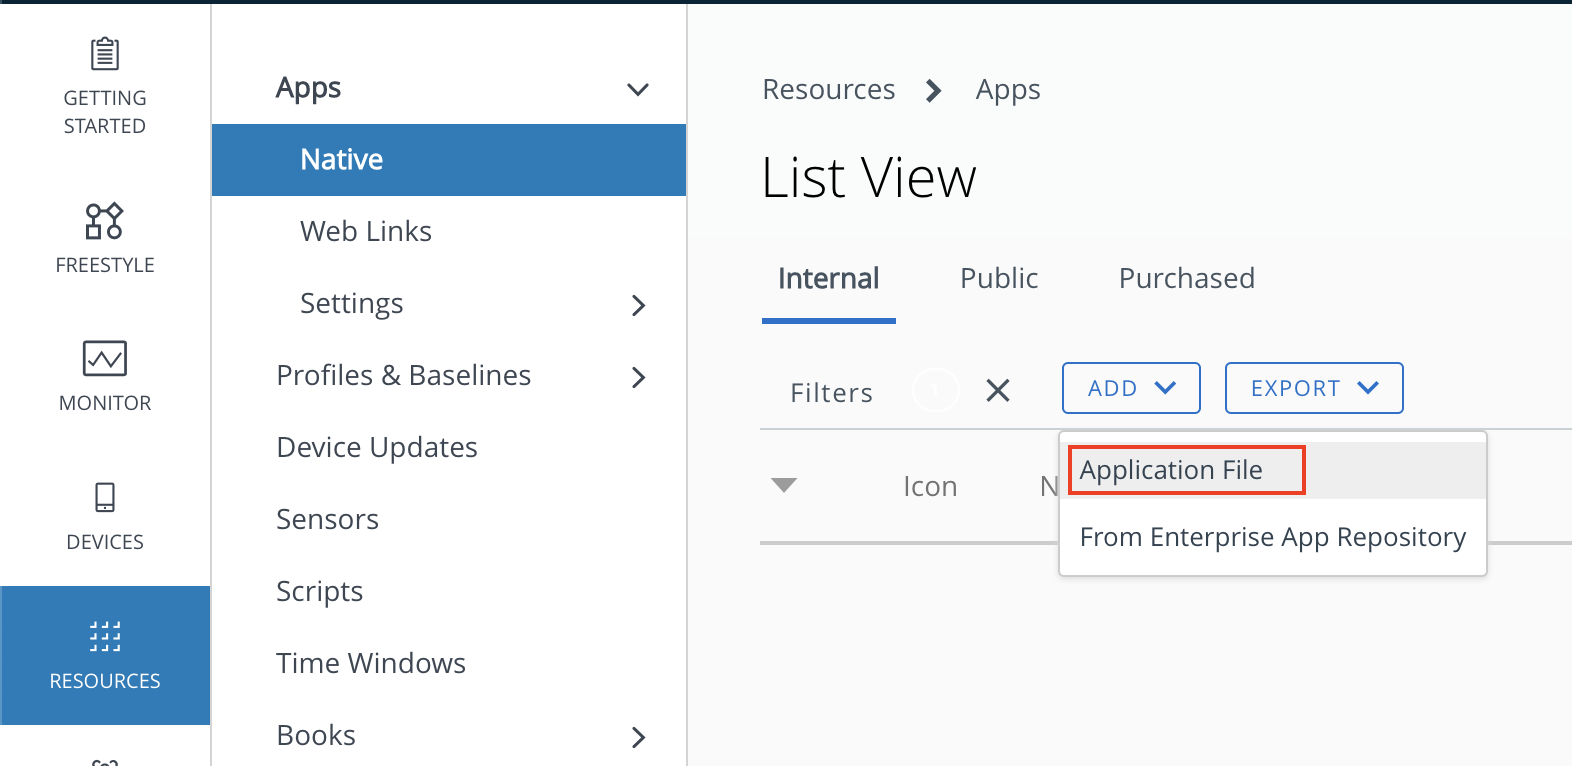
In the Add Application window, upload the SentinelOne agent installer file and click Continue.
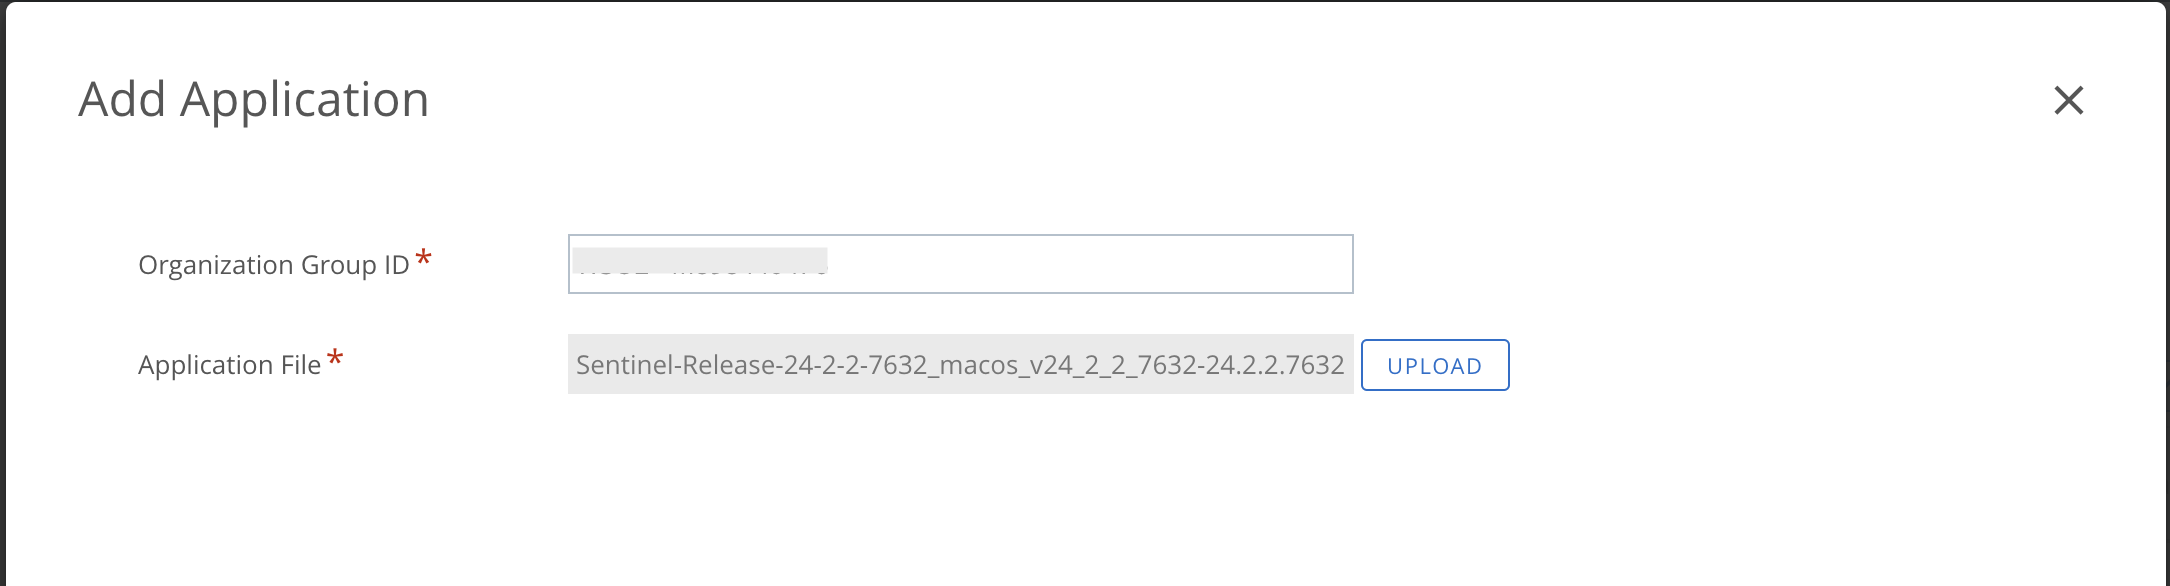
Next, upload the .plist file which we generated by the Workspace ONE Admin Assistant tool, and click Continue.
Now you can see Application Details and if required you can modify it accordingly.
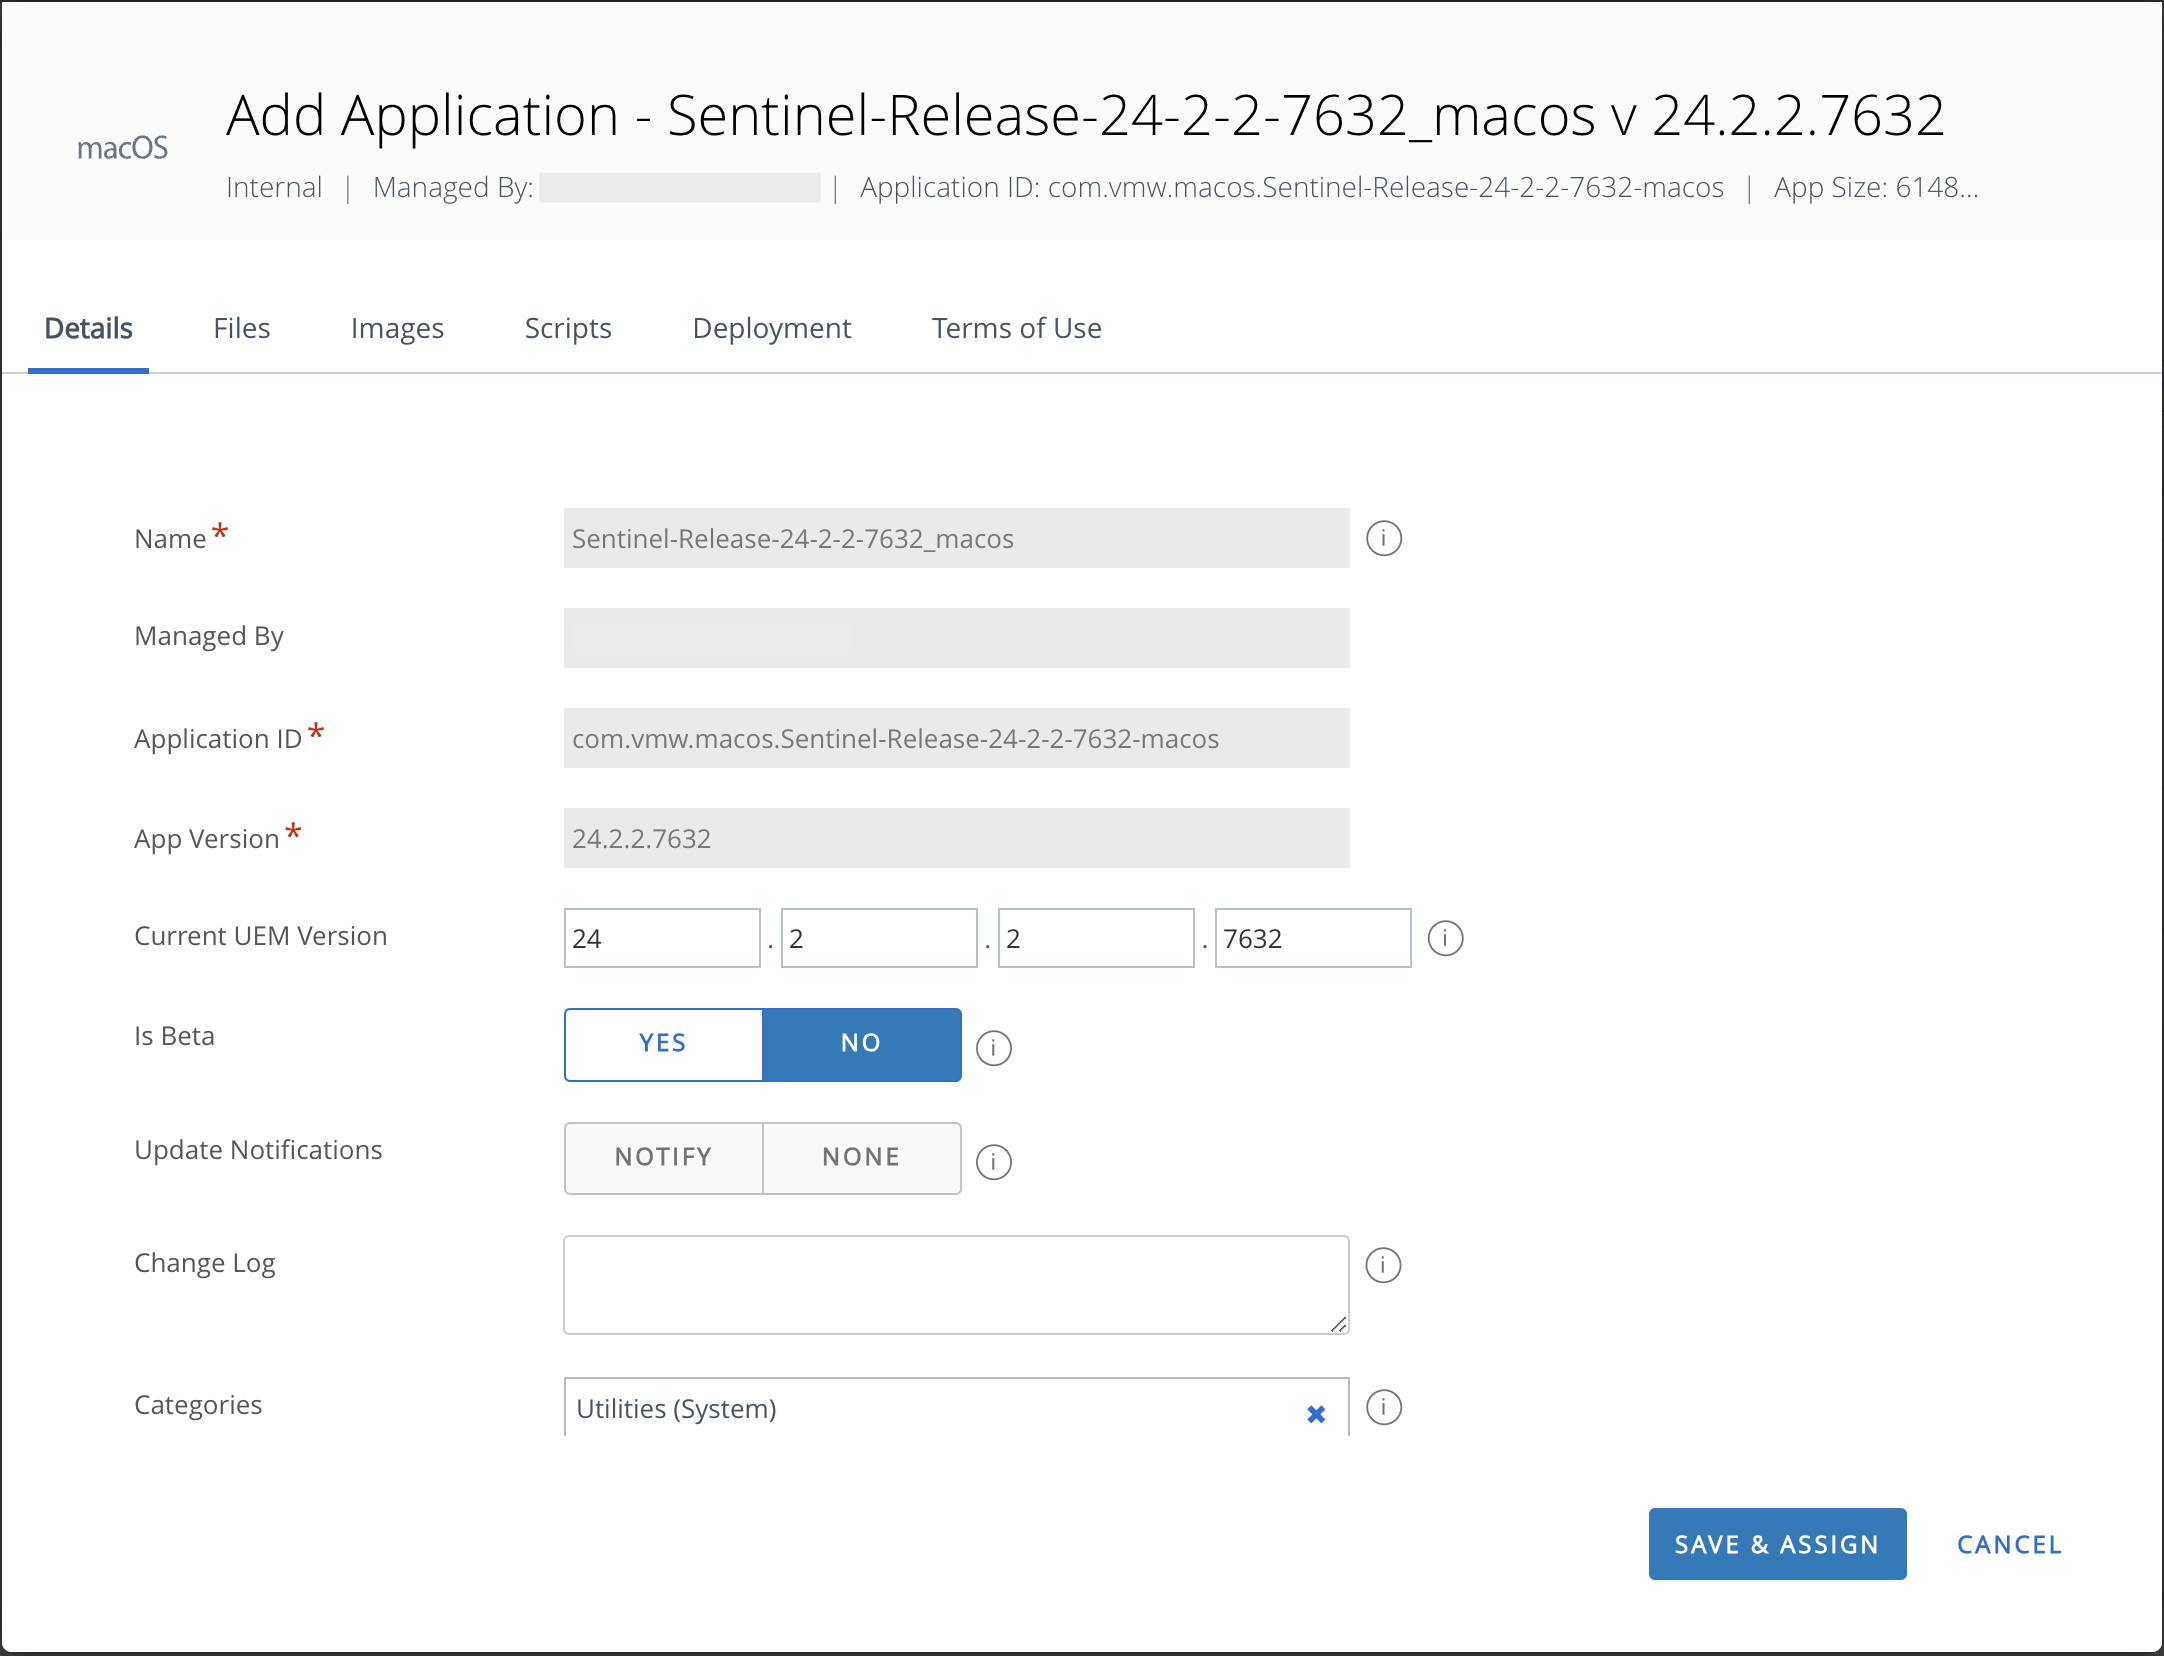
Add an icon for the Application.
Add Pre-Install and Post-Install Scripts.
Pre-Install Script
This script is designed to provide the SentinelOne registration token during the installation phase. It should be named “com.sentinelone.registration-token” and must be placed alongside the installation file. Also, ensure to substitute “<SentinelOneSiteToken>” with the token, you recorded in the initial step.
#!/bin/bash
echo "<SentinelOneSiteTokenHere>" > /Library/Application\ Support/AirWatch/Data/Munki/Managed\ Installs/Cache/com.sentinelone.registration-token
Post-Install Script
This script will remove the SentinelOne Registration token once the installation is done.
#!/bin/bash
rm -rf /Library/Application\ Support/AirWatch/Data/Munki/Managed\ Installs/Cache/com.sentinelone.registration-token
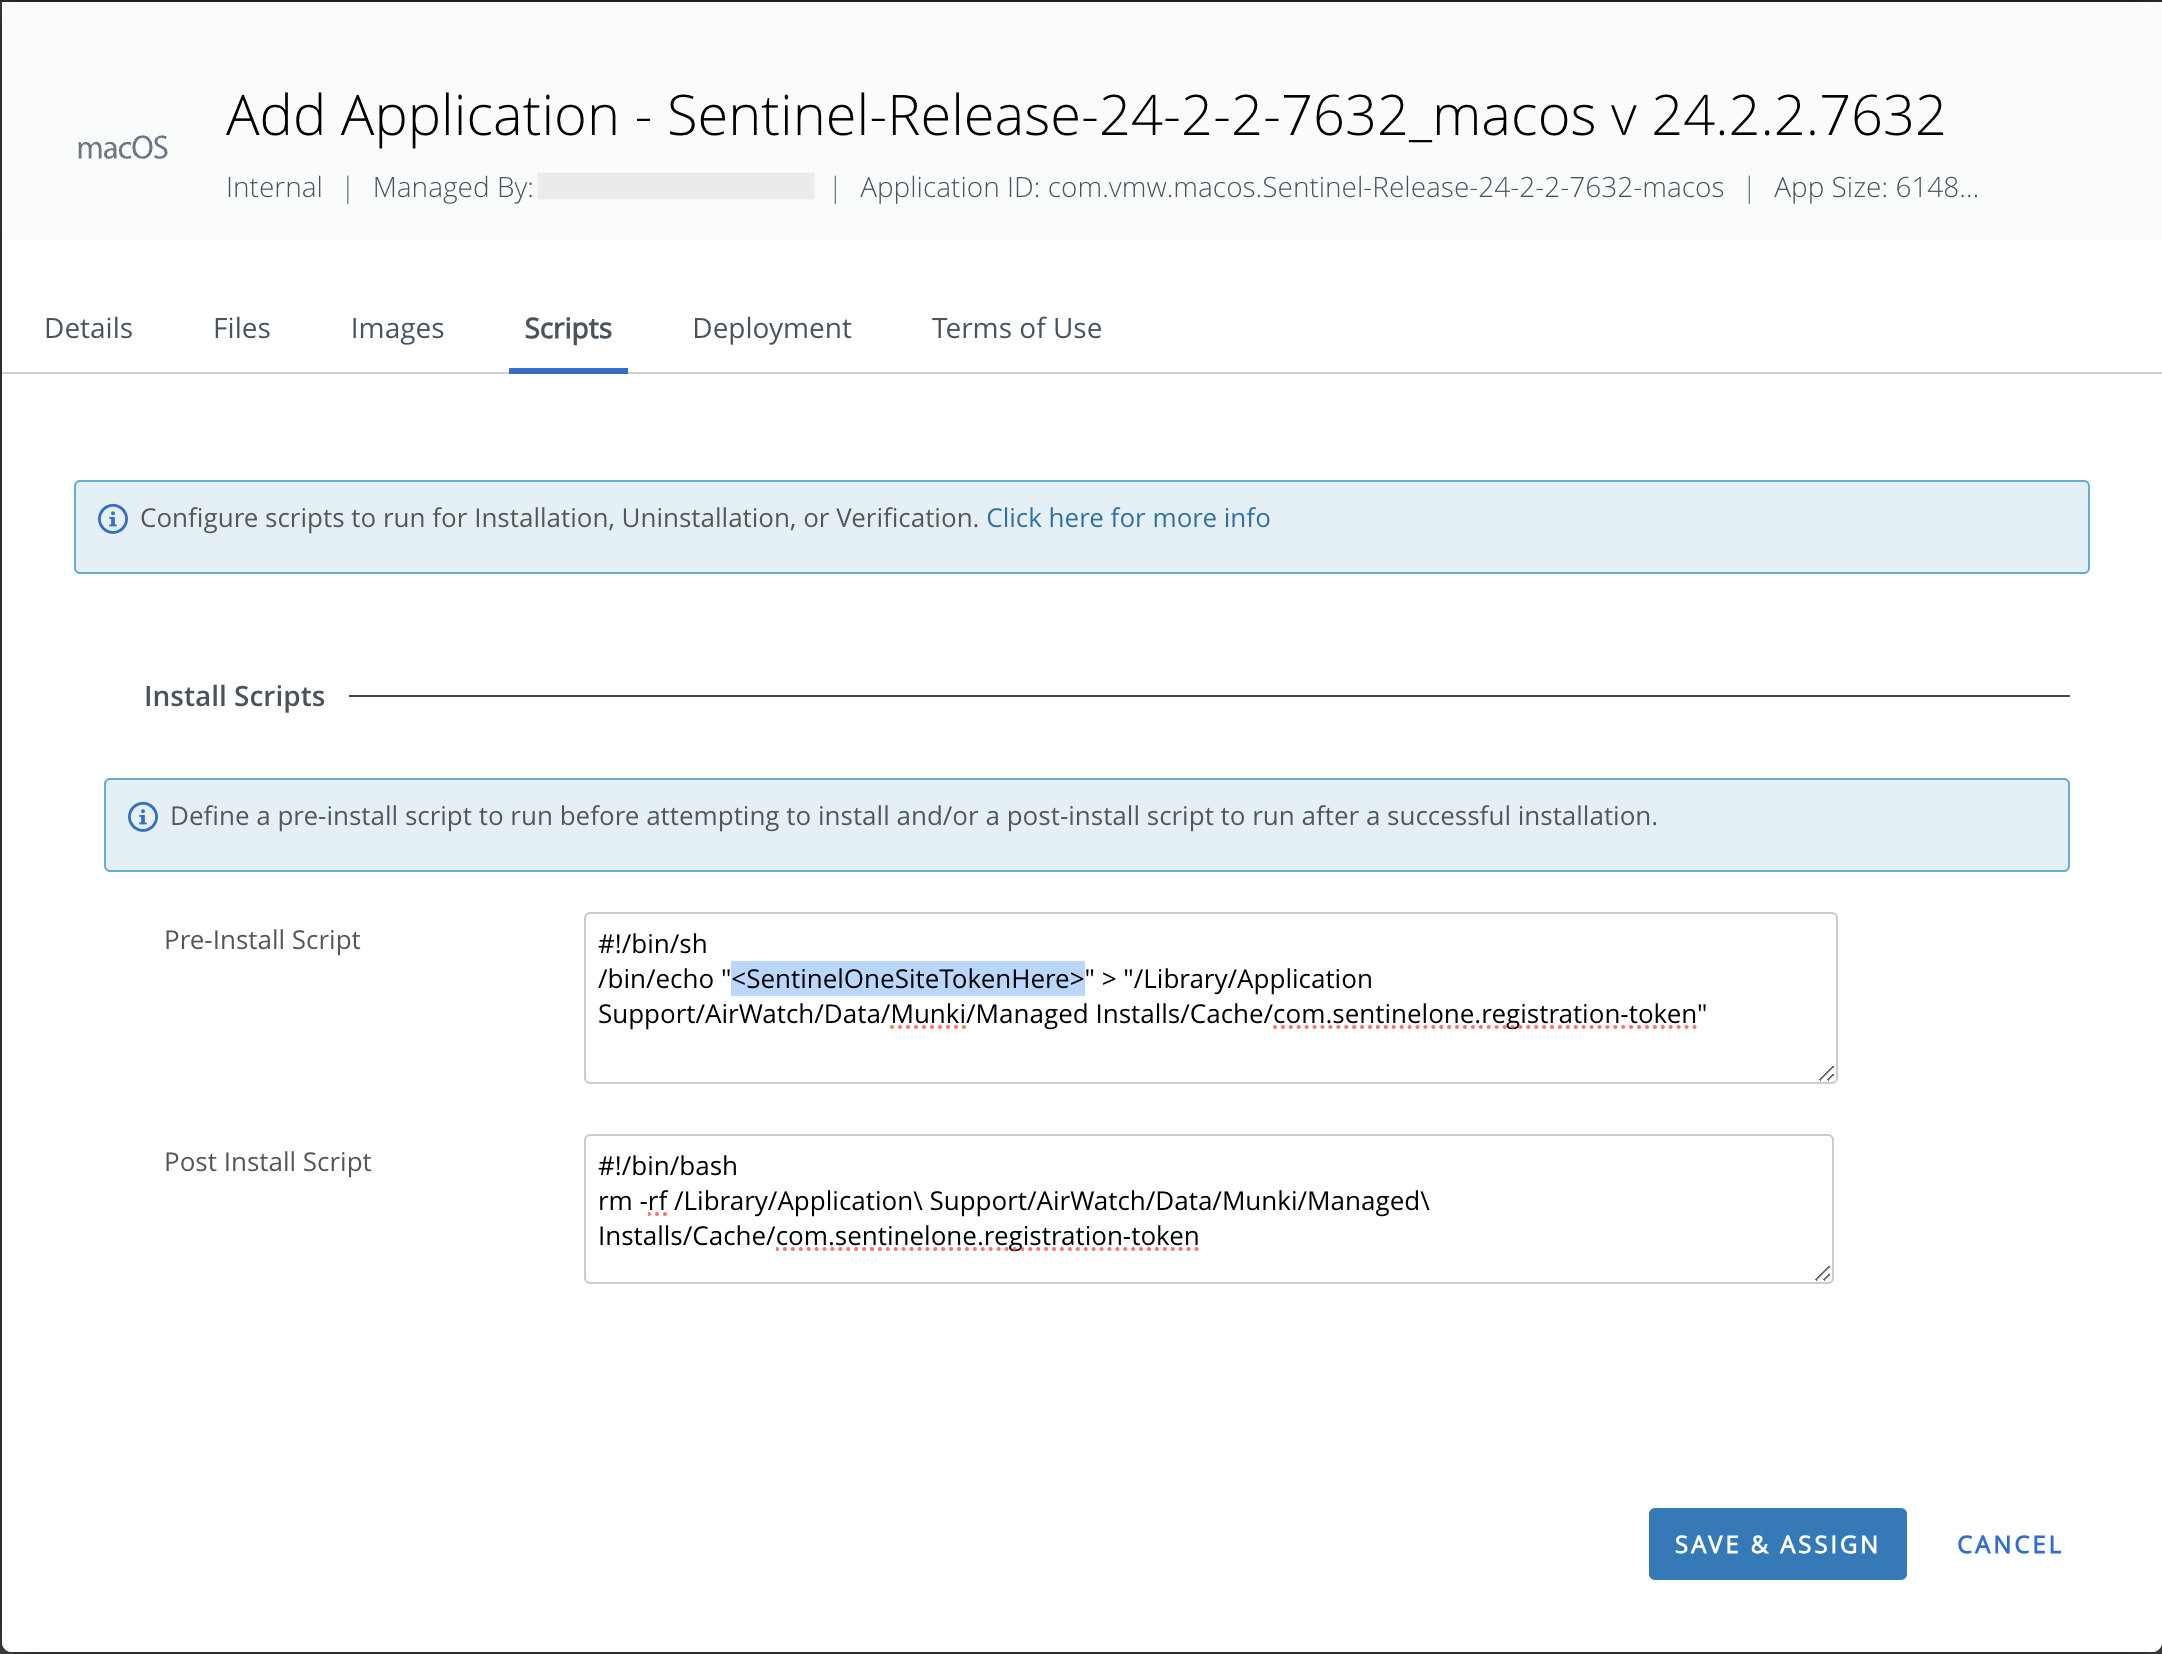
Note: If required, you can add the uninstallation script at the bottom of the same screen. In this case, I’m only focusing on the installation part.
Once you done with the above mandatory settings, you can click the Save & Assign to proceed with distribution.
- Assignment Groups – Select an assignment group you want to deploy this app.
- App Delivery Method – Here you can select automatically deploy or make it available in the app catalog.
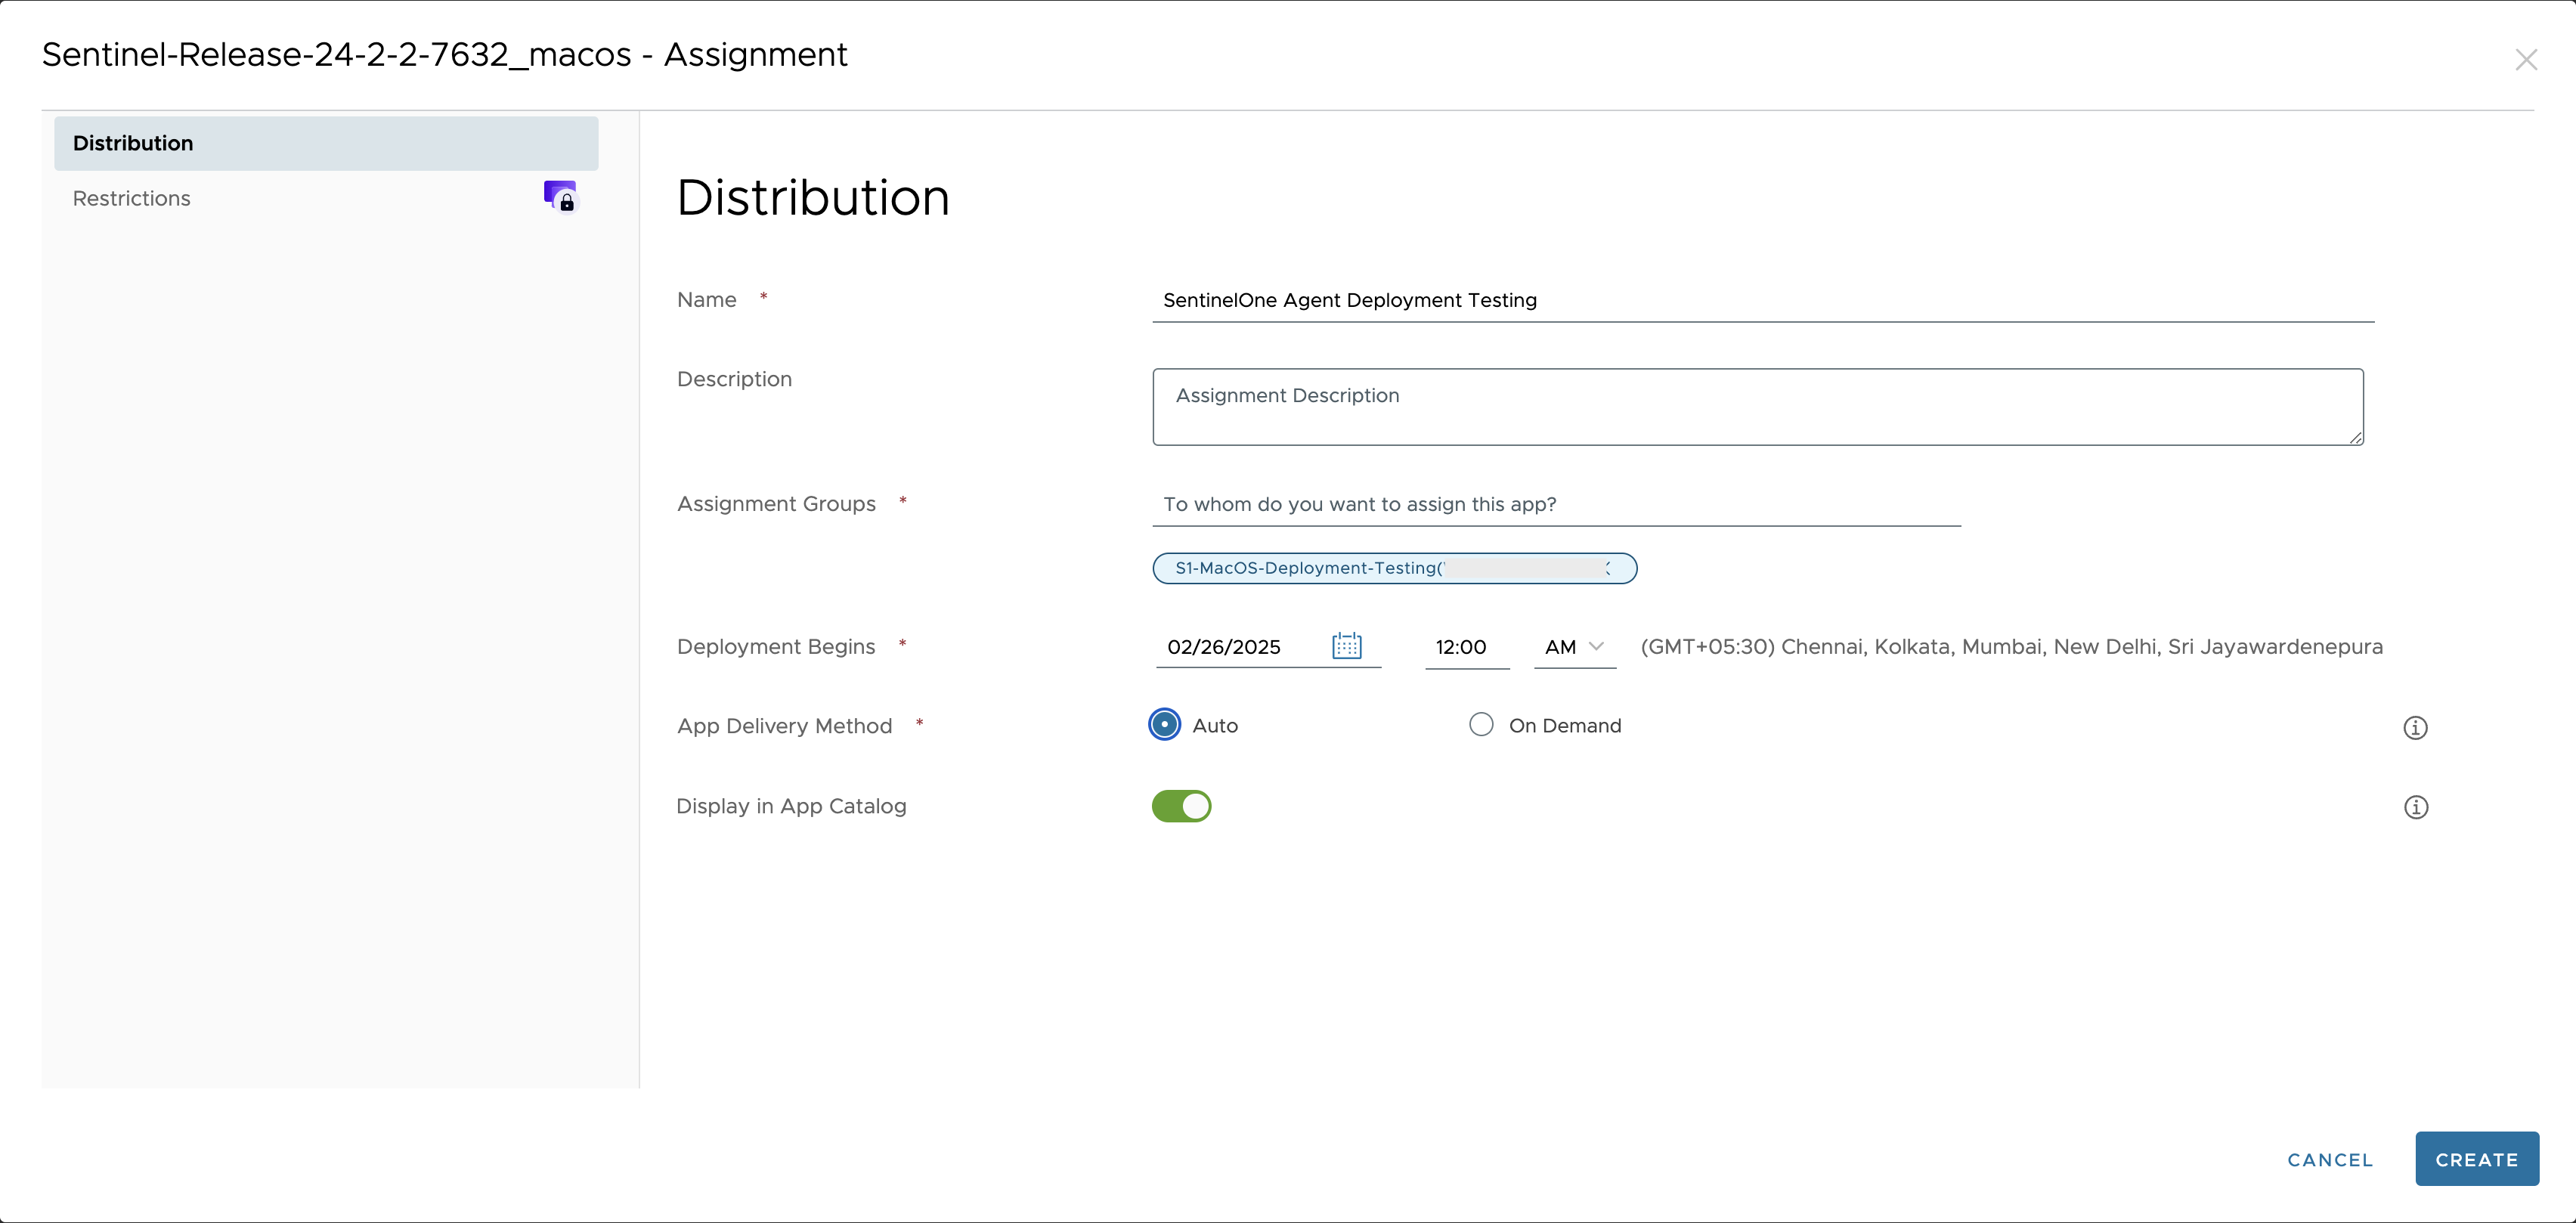
Once you save the distribution creation, you will see as below.
Review the assignment Preview and click Publish.

Confirming SentinelOne Agent Installation
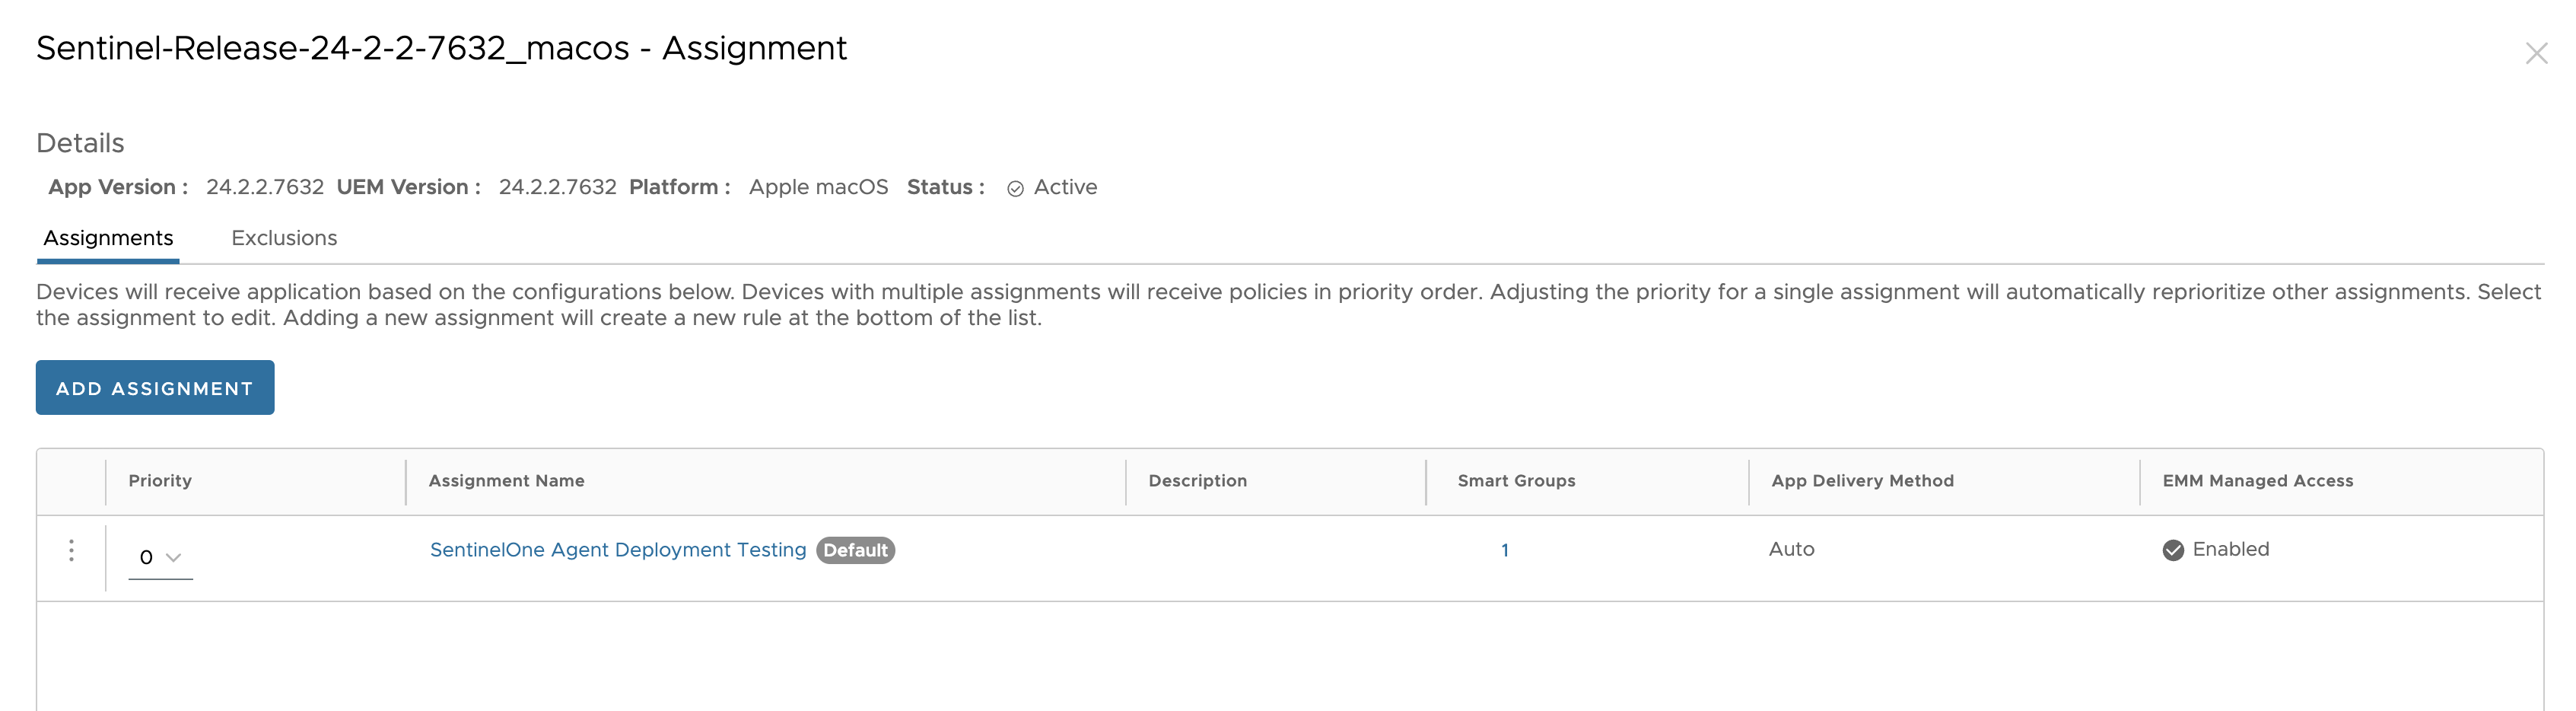
You use the Workspace ONE UEM Admin Console to confirm that the sensor was installed as a managed application on assigned devices.
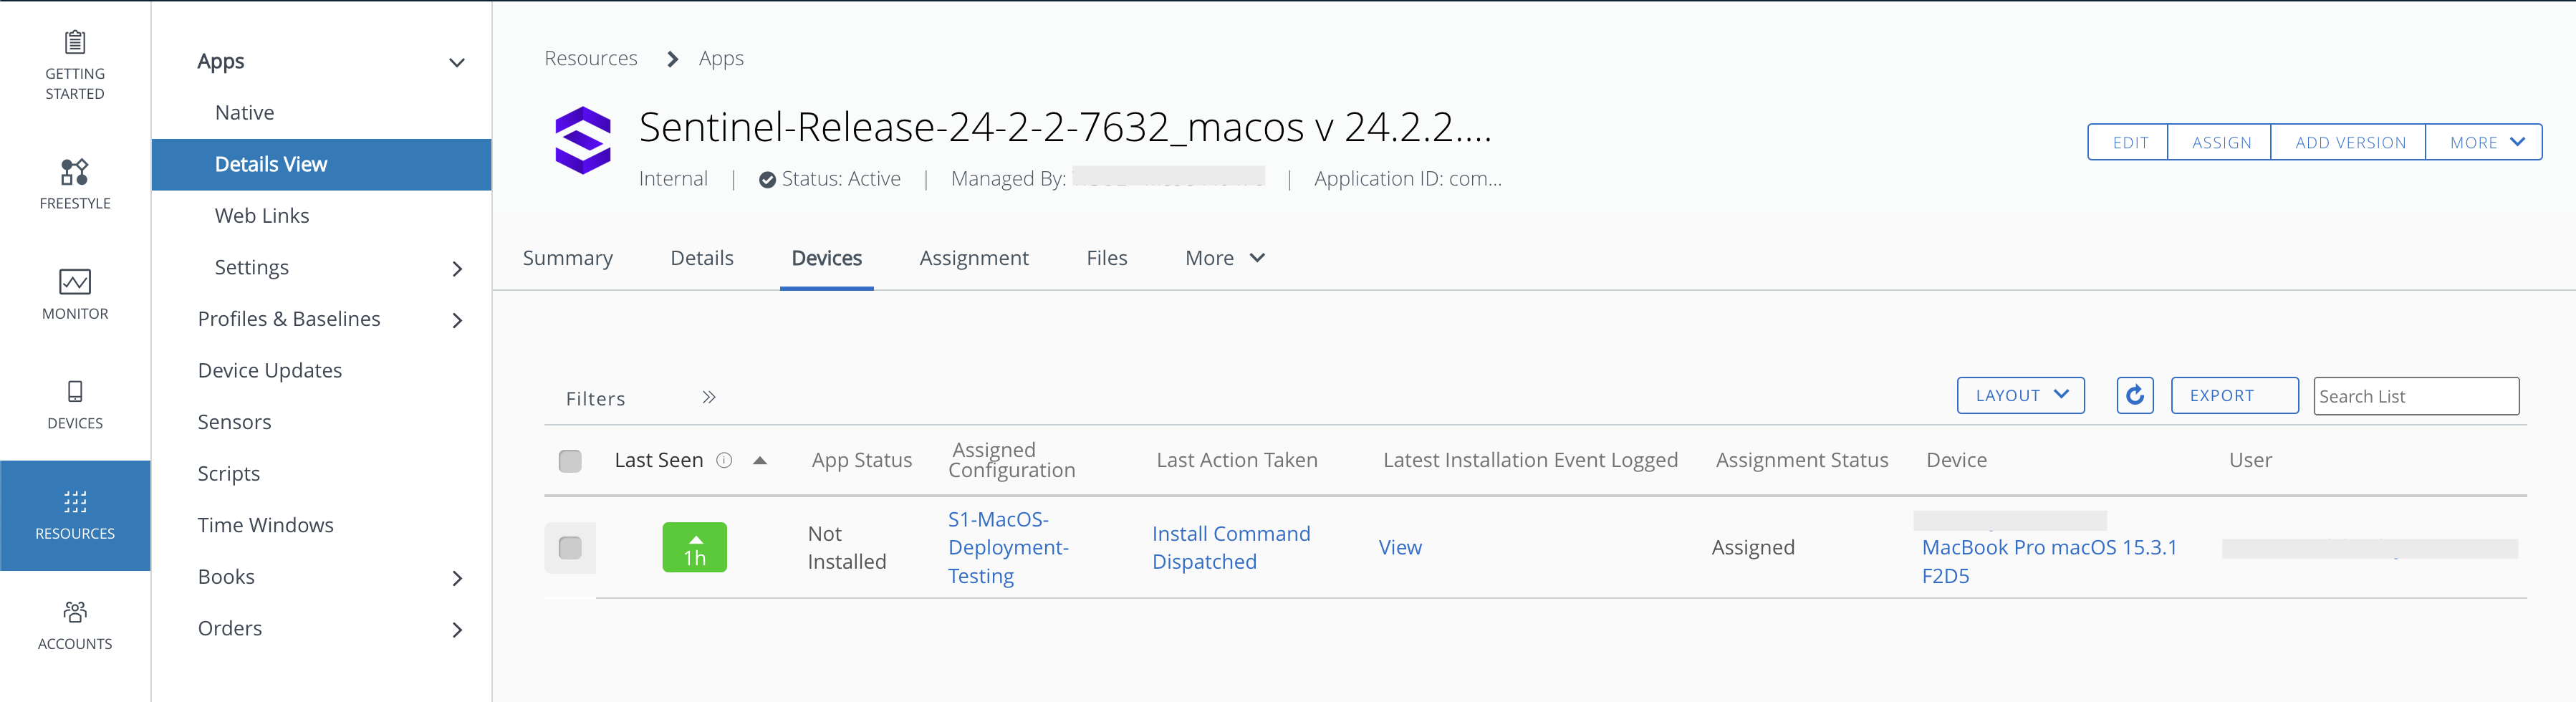
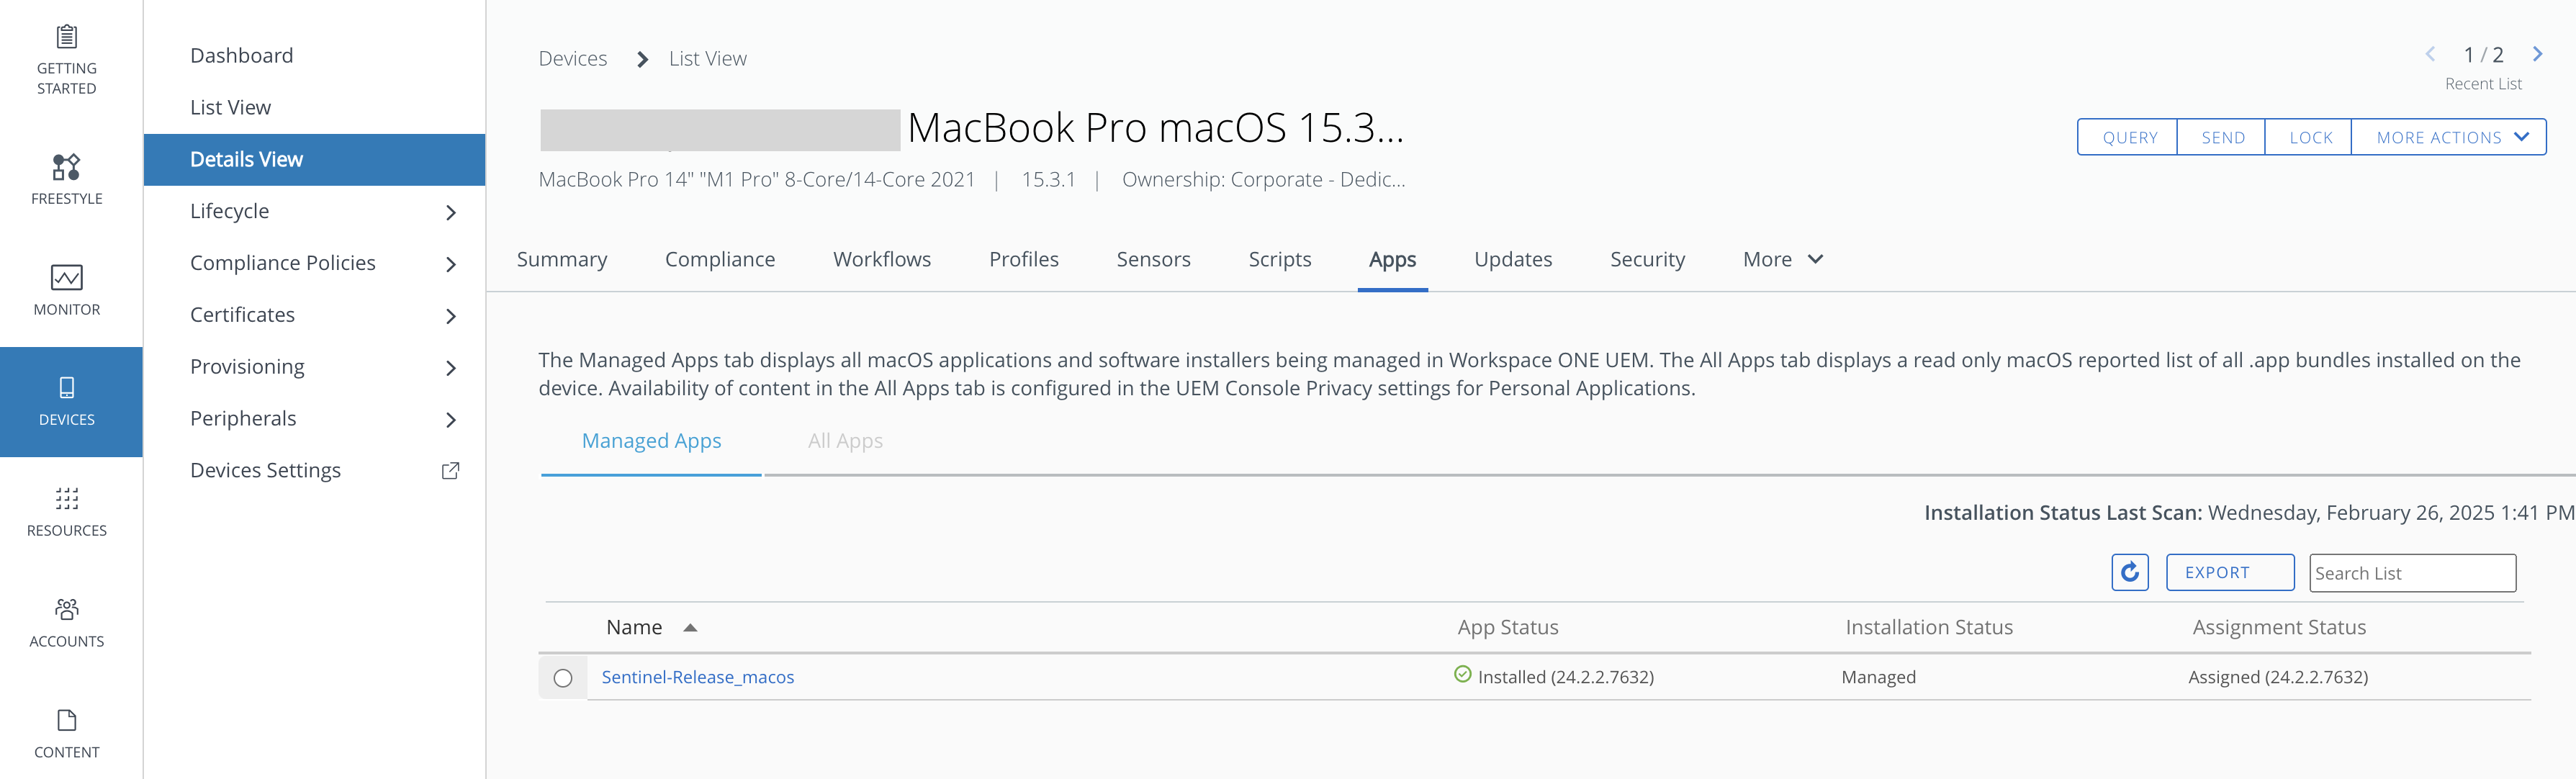
Confirm SentinelOne Agent is Installed as a Managed Application from the device end.
Troubleshooting Logs
Open a Terminal from the endpoint device and enter the following command to check the application deployment logs.
tail -f /Library/Application\ Support/AirWatch/Data/Munki/Managed\ Installs/Logs/ManagedSoftwareUpdate.log
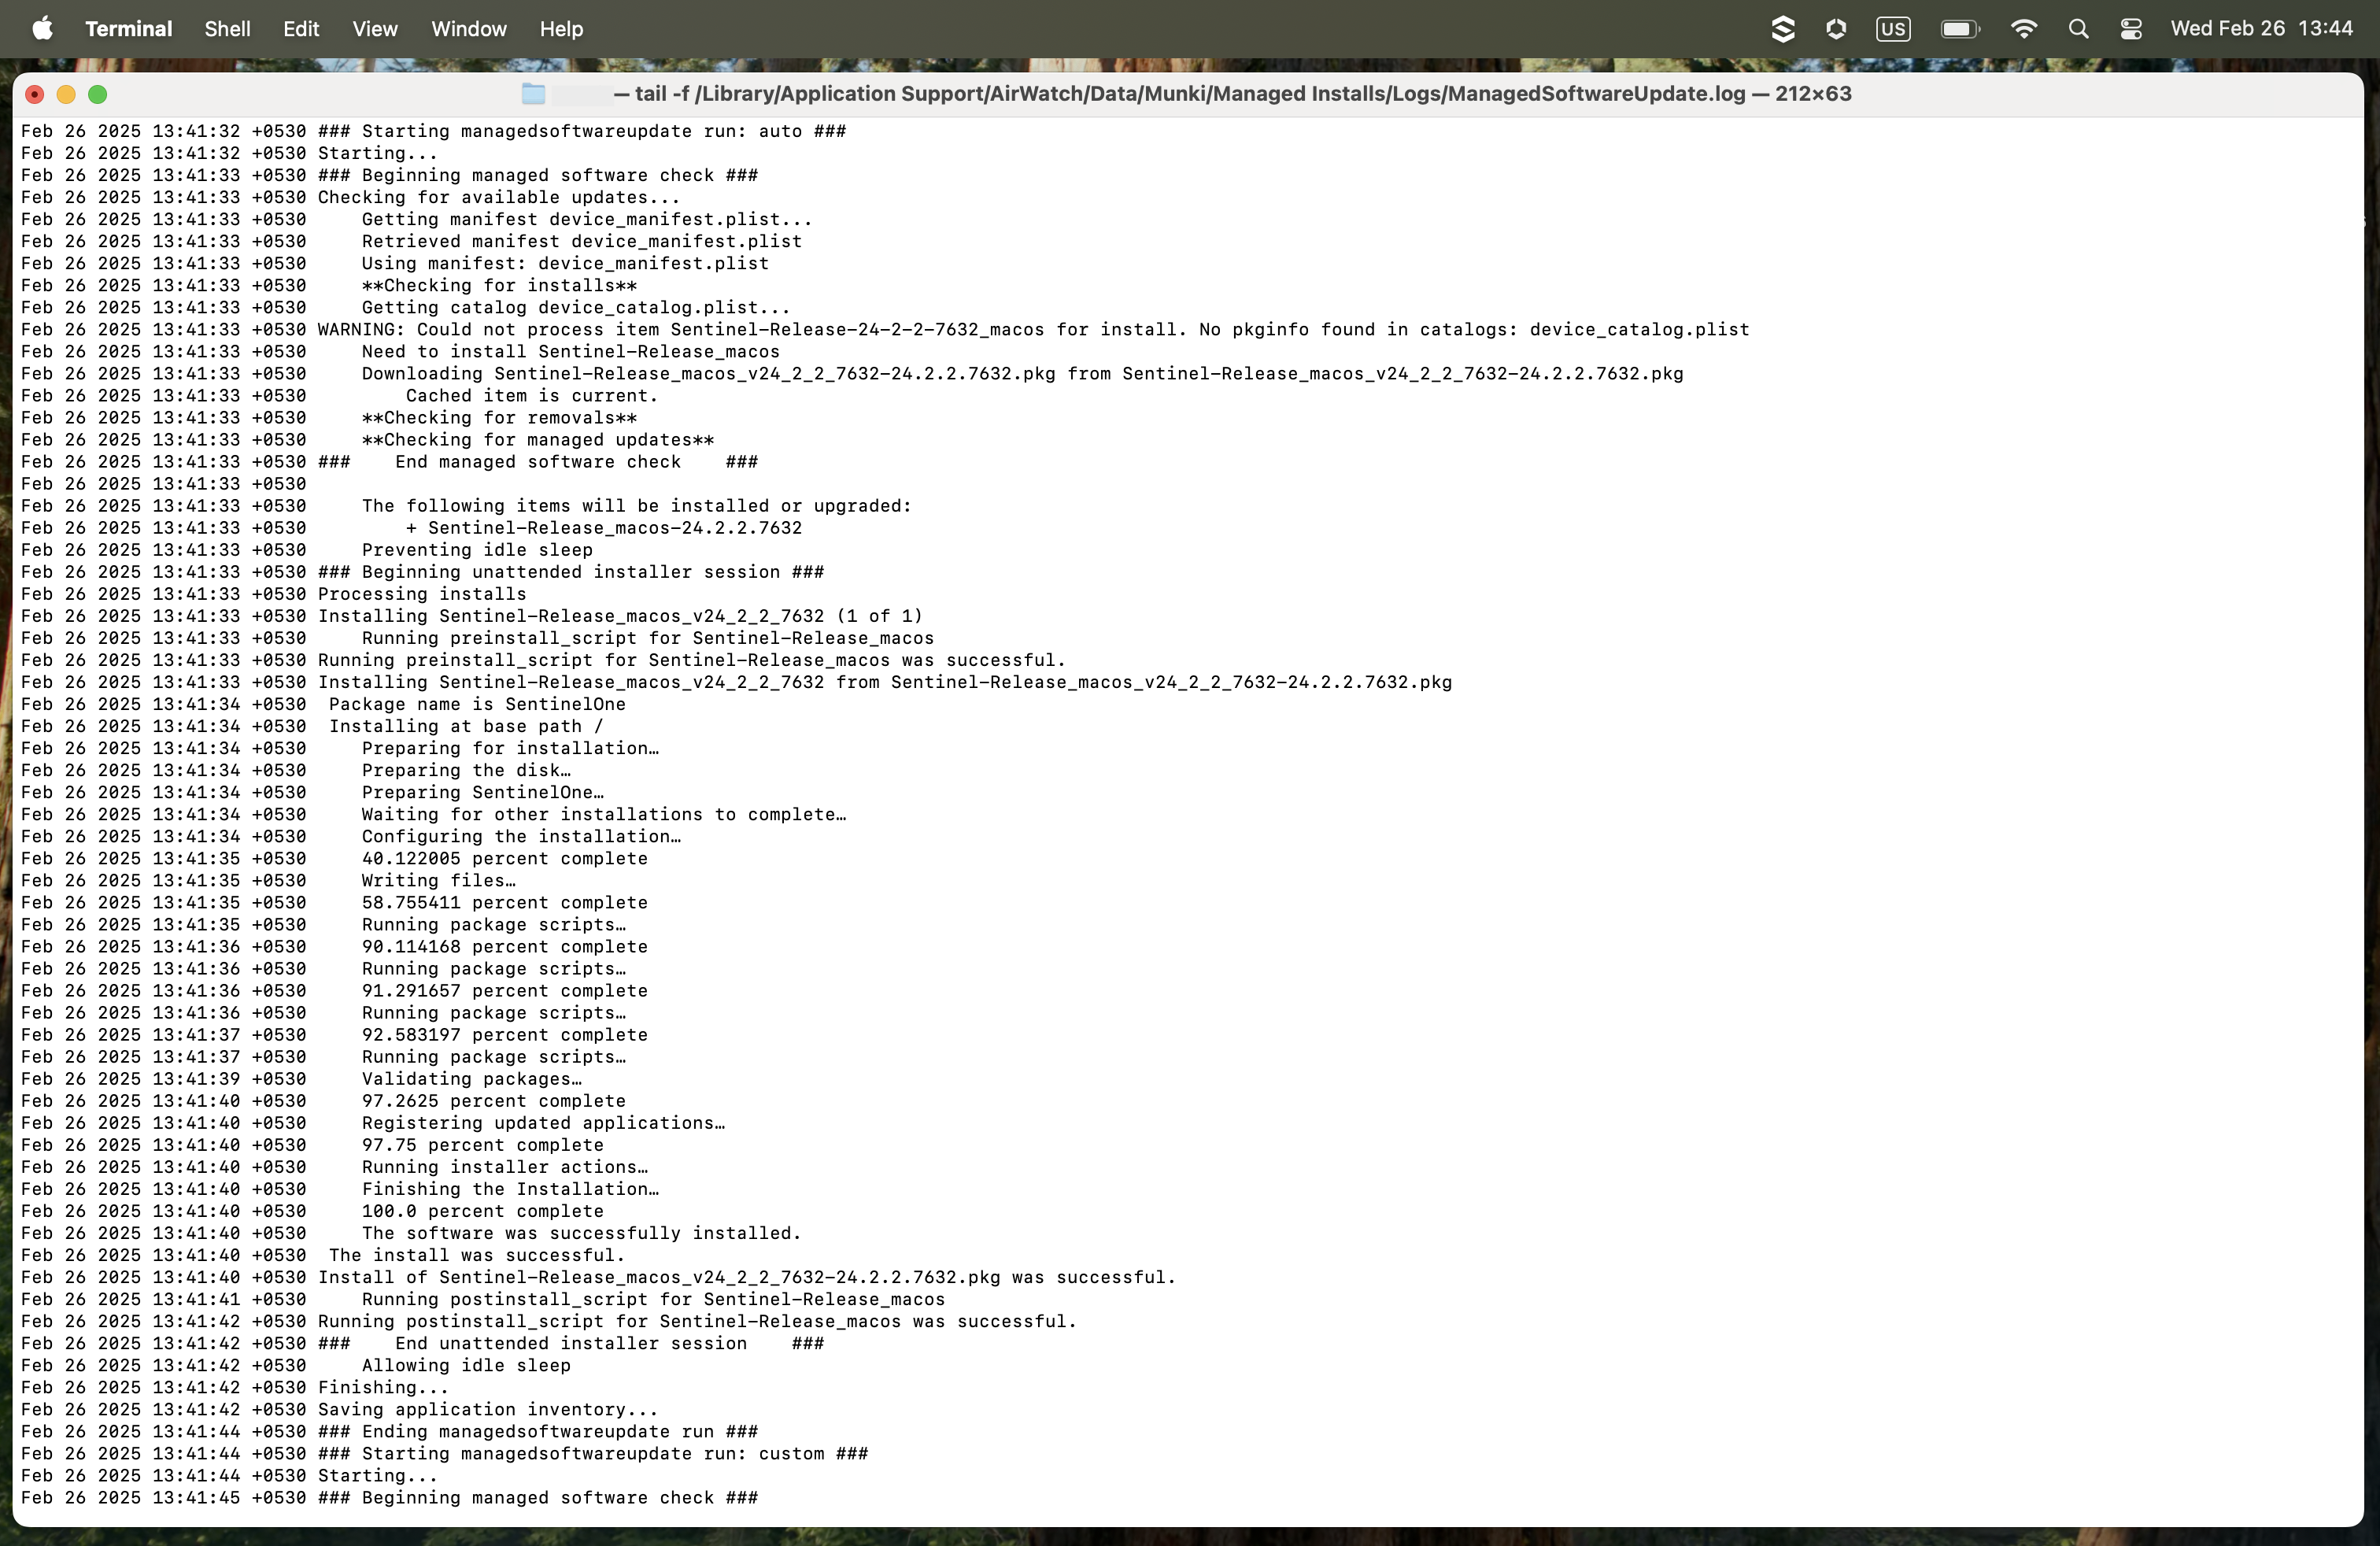
In the above log if you continuously getting the following warning message, just try to rename the .pkg and .plist files as follows and modify the content of the .plist file as follows.
WARNING: Could not process
item Sentinel-Release-24-2-2-7632_macos for install. No pkginfo found in catalogs: device_catalog.plist
Rename “Sentinel-Release-24-2-2-7632_macos-24.2.2.7632.plist” file as “Sentinel-Release_macos-24.2.2.7632.plist“
Rename “Sentinel-Release-24-2-2-7632_macos_v24_2_2_7632-24.2.2.7632.pkg” file as “Sentinel-Release_macos_v24_2_2_7632-24.2.2.7632.pkg“
Then modify the following sections of Sentinel-Release_macos-24.2.2.7632.plist file.
<key>display_name</key>
<string>Sentinel-Release_macos_v24_2_2_7632</string>

<key>installer_item_location</key>
<string>Sentinel-Release_macos_v24_2_2_7632-24.2.2.7632.pkg</string>

<key>name</key>
<string>Sentinel-Release_macos</string>
Conclusion
This article provided steps on how to easily deploy of SentinelOne Endpoint Security Platform for MacOS devices as a managed application with Workspace ONE UEM.
6 comments
I tried to deploy to the latest sentinelone 22.3.x version that can support macOS 13.0 ventura through workspace one, but it failed.
Is there a case of distributing sentinel to ventura’s OS device through workspaceone?
Did you get an error when deploying it (in the error log file ManagedSoftwareUpdate.log)?
Even if S1 deploys to the Ventura version, the deployment fails on the macOS device. Are there any cases like this?
An issue I ran into doing this deployment is AirWatch more specifically Munki will incorrectly parse hyphens in the package name and plist (data in plist also). So rename the package, plist, and the associated names of these items in the plist itself.
Did you solve this problem? Can I ask you how to solve it?
Is there a way to make it so it does not pop up and ask the end user to “allow” or “block” filtering network data?