
Upgrading a Kubernetes cluster is a critical operational task that ensures security patches, bug fixes, and access to new features. When clusters are deployed using kubeadm, the upgrade process becomes predictable, structured, and well-supported.
In this article, we’ll walk through how to upgrade a Kubernetes cluster using kubeadm, explain version skew rules, discuss upgrade strategies, and provide a hands-on step-by-step upgrade example from Kubernetes 1.33 to 1.34.
🔗 Prerequisites: Kubernetes Installation Using kubeadm
Before proceeding with this Kubernetes cluster upgrade guide, it is recommended that you are already familiar with installing Kubernetes using kubeadm.
If you haven’t installed Kubernetes yet, or if you want a refresher on how the cluster was originally bootstrapped, please refer to our detailed guide below:
👉 How to Install Kubernetes Cluster Using kubeadm (Step-by-Step Guide)
Once your Kubernetes cluster is up and running with kubeadm, you can safely continue with the cluster upgrade process described below.
Understanding Kubernetes Version Skew Policy
Before upgrading, it’s important to understand how Kubernetes components can coexist across versions. Kubernetes does not require all components to be on the exact same version. However, strict version-skew rules apply.
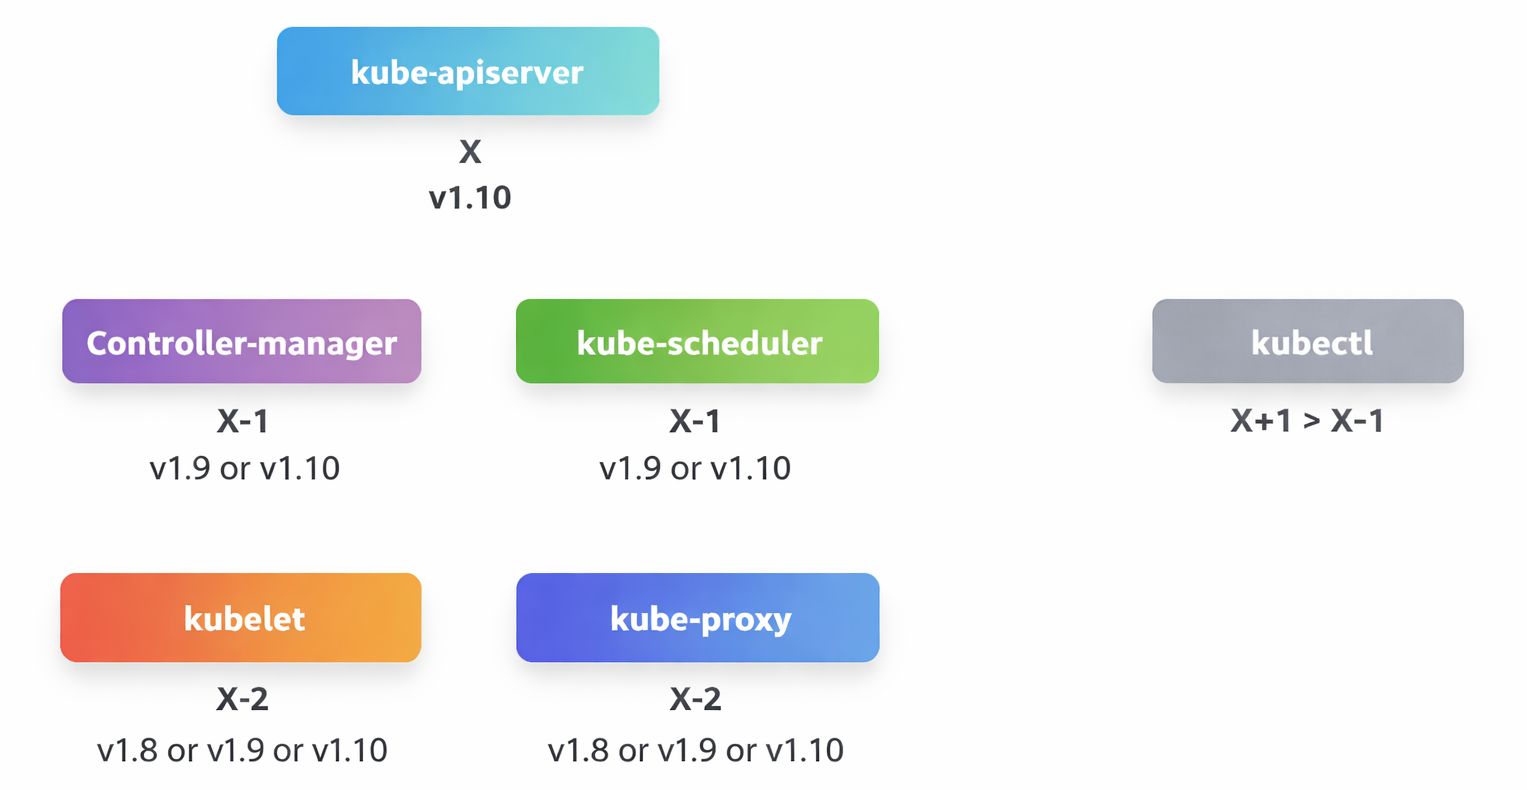
Control Plane Version Rules
- The kube-apiserver is the primary control plane component.
- No component may run a higher version than the kube-apiserver.
- Other components may lag behind within supported limits.
Supported Version Skew
| Component | Supported Version |
| kube-apiserver | Version X |
| controller-manager | X or X-1 |
| kube-scheduler | X or X-1 |
| kubelet | X-2 |
| kube-proxy | X-2 |
Example: If the kube-apiserver is at version 1.10:
- Controller Manager & Scheduler → 1.10 or 1.9
- Kubelet & Kube-proxy → 1.8 or 1.9 or 1.10
- None of them could be at a version higher than the kube-api server, like 1.11.
Recommended Kubernetes Upgrade Strategy
Kubernetes officially recommends upgrading one minor version at a time. Skipping minor versions is not supported.
Example: 1.10 → 1.11 and then 1.11 → 1.12 and then 1.12 → 1.13
Kubeadm and Version Compatibility
The kubeadm utility follows the same versioning policy as Kubernetes components. It can be used in the following version combinations with the kube-apiserver:
- One version lower than kube-apiserver
- The same version as kube-apiserver
- One version higher than kube-apiserver
If you deployed your cluster using tools such as kubeadm, the tool can assist you with planning and performing cluster upgrades. However, if you built your cluster from scratch, you will need to manually upgrade each component of the cluster. In this article, we will focus on the upgrade options provided by kubeadm.
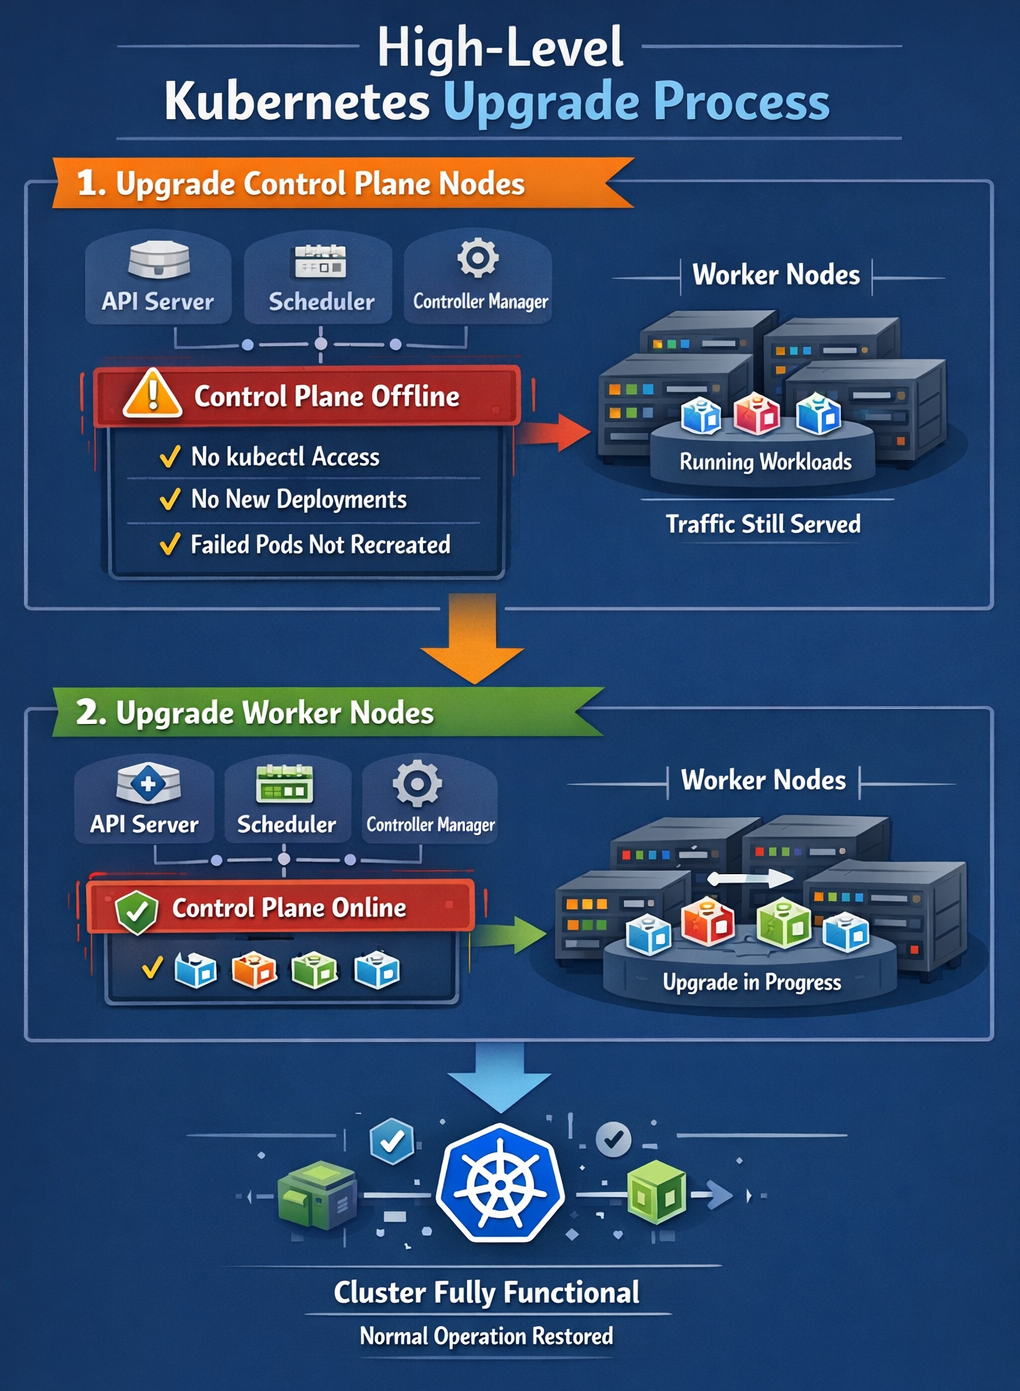
High-Level Kubernetes Upgrade Process
Kubernetes Upgrade Demo: 1.33 → 1.34
In this demo, I will demonstrate how to upgrade a Kubernetes cluster from version 1.33 to 1.34 using the kubeadm utility.
Step 1: Configure Kubernetes Package Repositories (All Nodes)
Change the version in the URL to the next available minor release, in this case 1.34.
echo "deb [signed-by=/etc/apt/keyrings/kubernetes-apt-keyring.gpg] https://pkgs.k8s.io/core:/stable:/v1.34/deb/ /" | sudo tee /etc/apt/sources.list.d/kubernetes.list

curl -fsSL https://pkgs.k8s.io/core:/stable:/v1.34/deb/Release.key | sudo gpg --dearmor -o /etc/apt/keyrings/kubernetes-apt-keyring.gpg

sudo apt update
Step 2: Choose the Exact Patch Version
Determine the target version for the upgrade: Identify which specific version within the 1.34 minor release you want to upgrade to.
You can verify the available versions by running the following command on any node.
apt-cache madison kubeadm
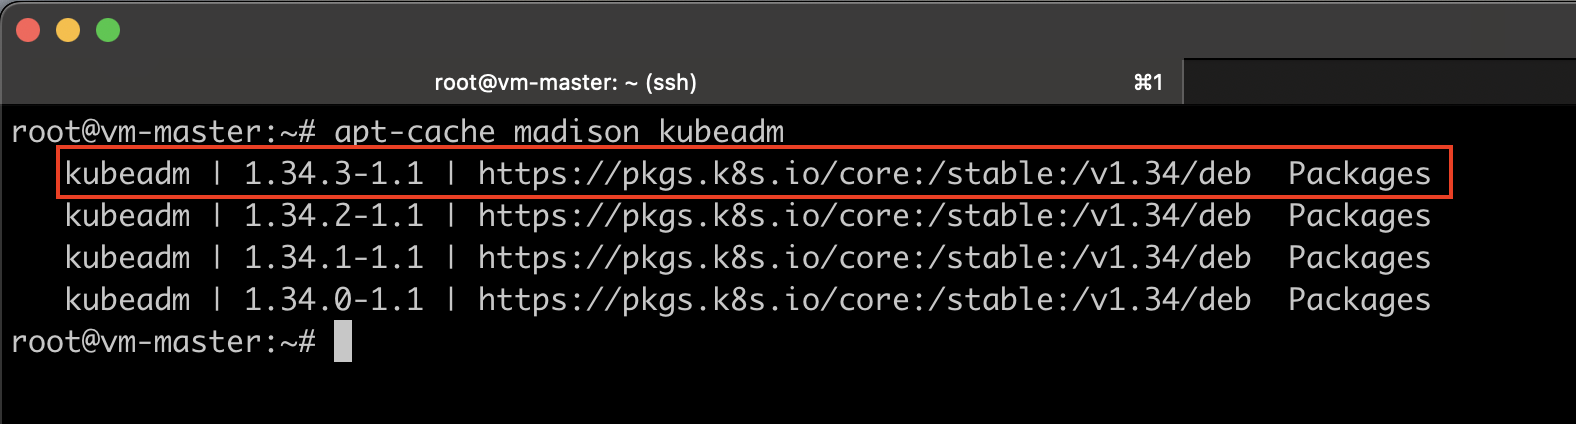
Make a note of the exact version, including the minor release. For this demo, I will be using version 1.34.3-1.1.
Upgrading the Control Plane Nodes (One node at a time)
Step 3: Upgrade kubeadm (on Control Plane)
sudo apt-mark unhold kubeadm && \
sudo apt-get update && \
sudo apt-get install -y kubeadm=1.34.3-1.1 && \
sudo apt-mark hold kubeadm
Let’s verify that it actually got upgraded.
kubeadm version
Step 4: Plan the Upgrade
The kubeadm upgrade plan command guides you through the available upgrade paths for your cluster and checks for any potential compatibility issues. It helps identify problems that may occur if you attempt to upgrade to a specific version. Essentially, it acts as a dry run to ensure everything is compatible before performing the actual upgrade.
kubeadm upgrade plan v1.34.3
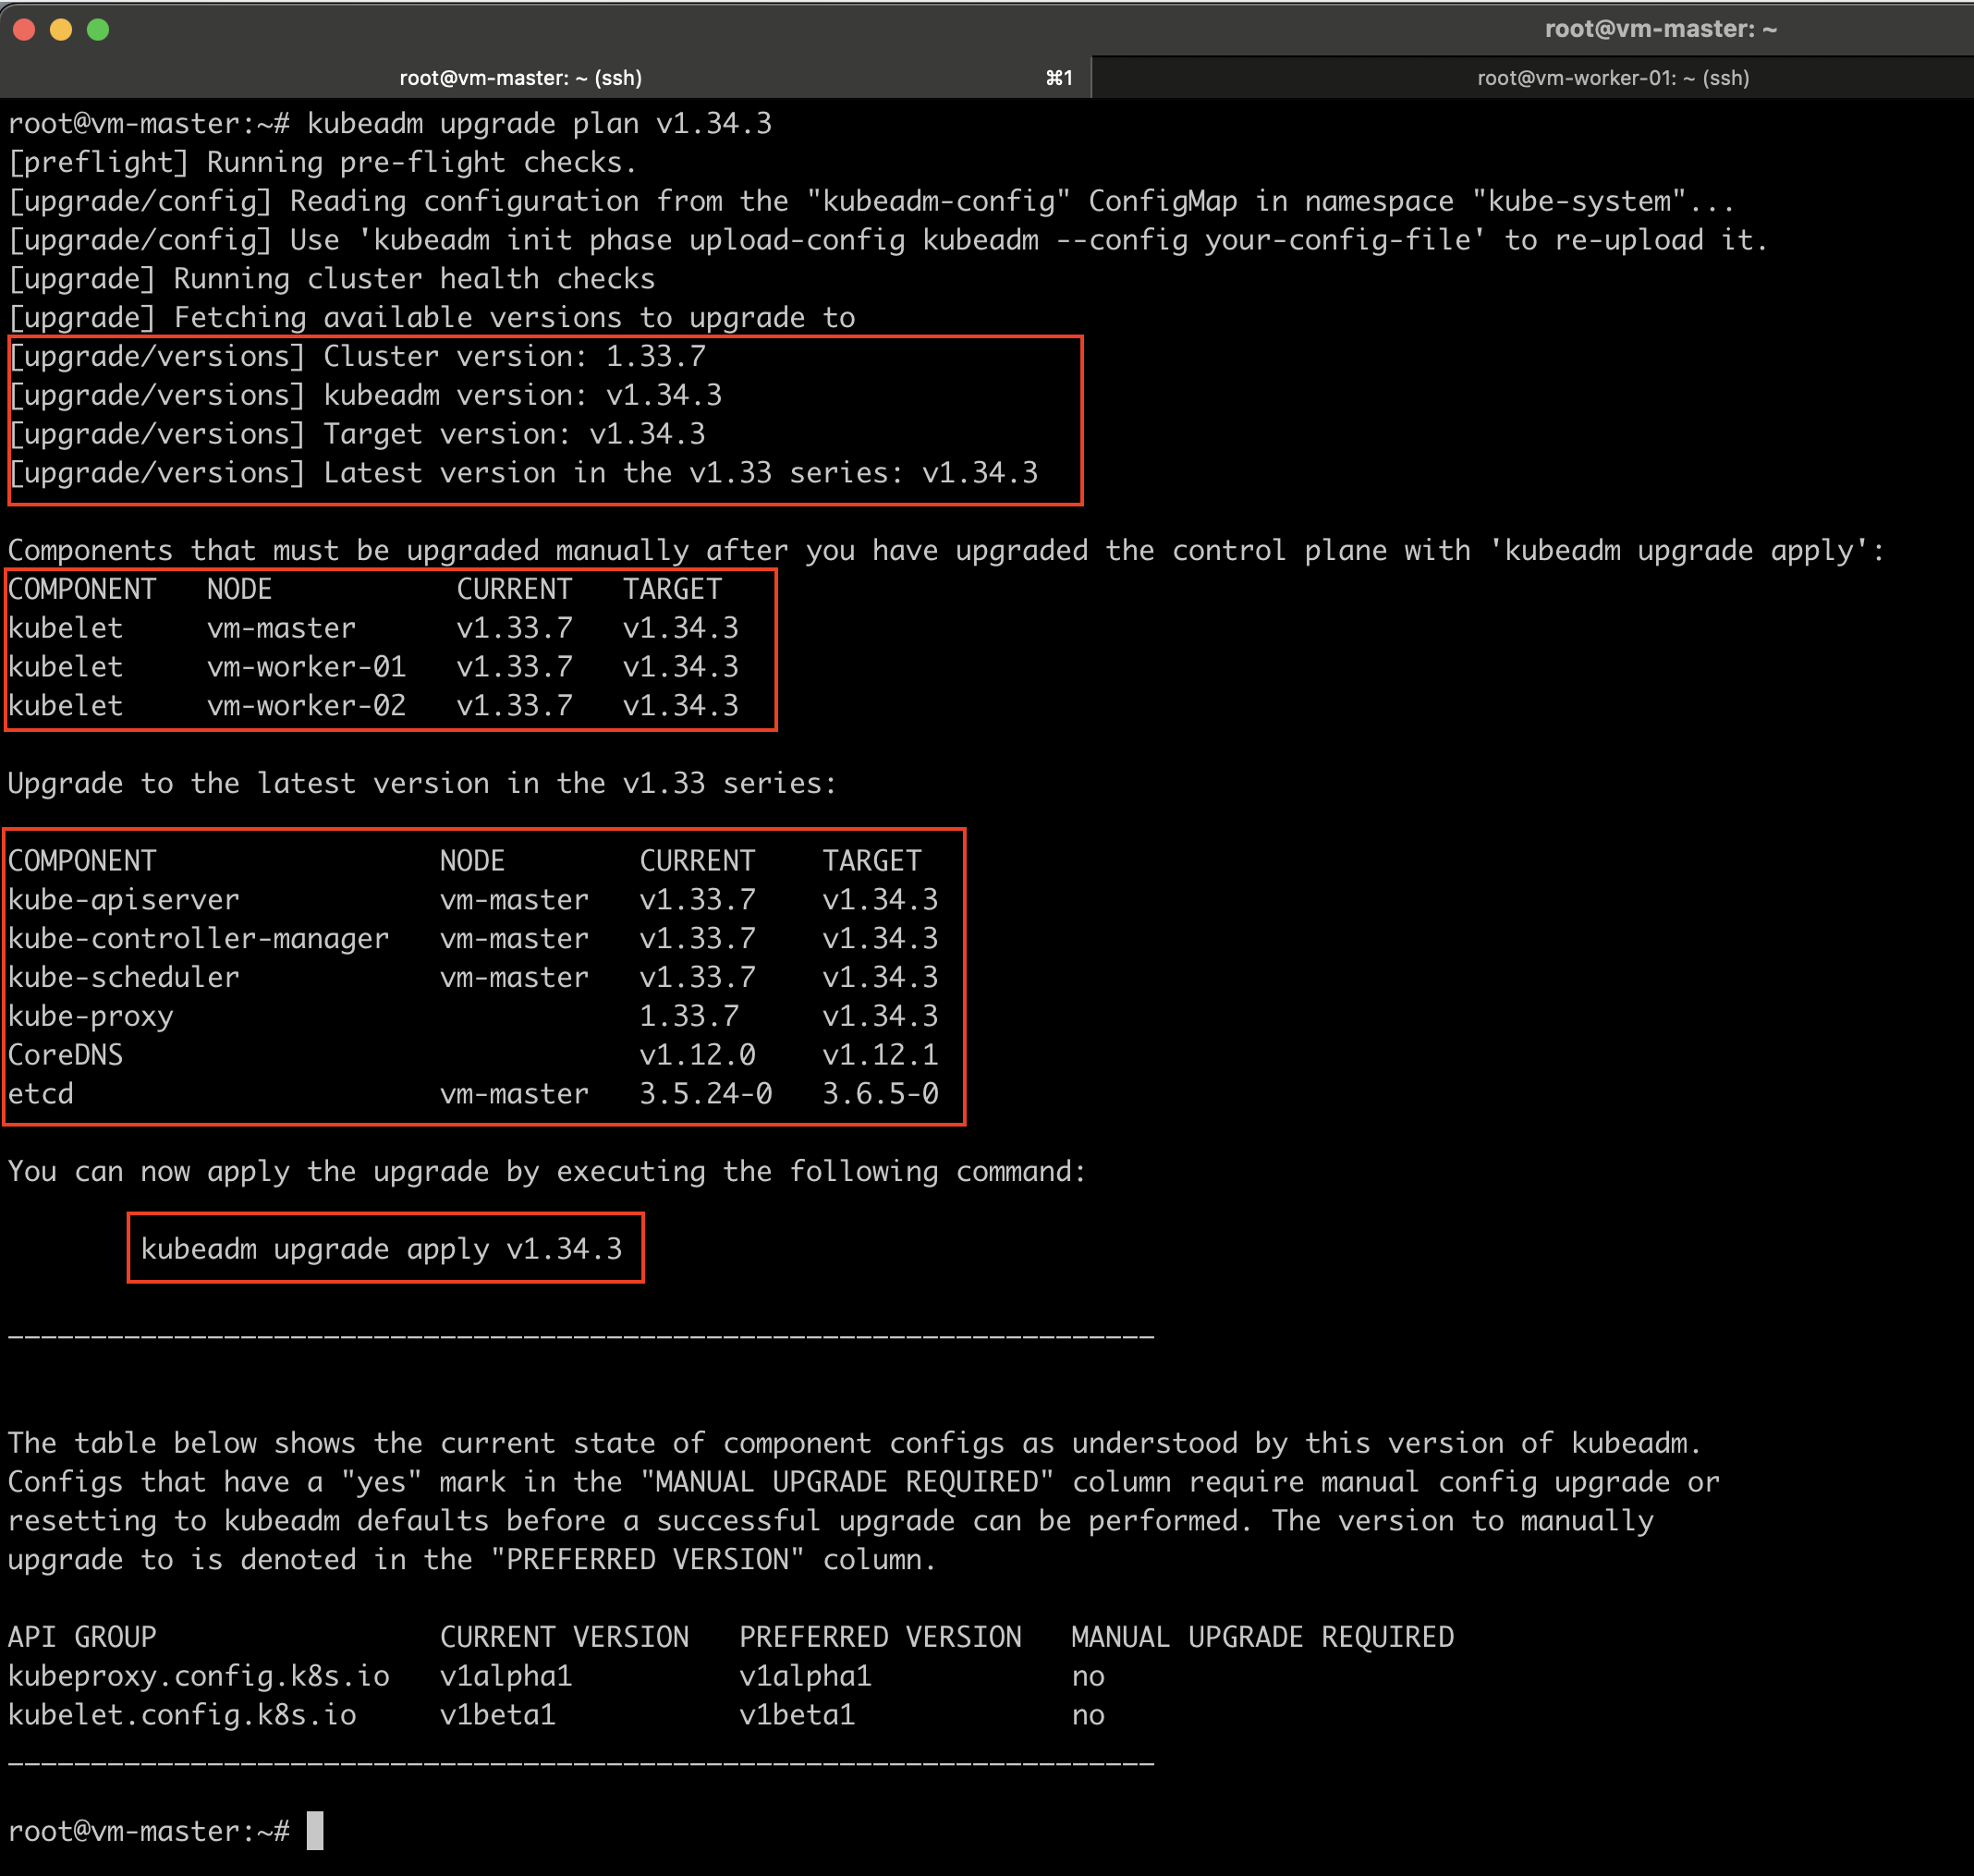
This command provides detailed information, including:
- The current cluster version.
- The version of the kubeadm tool.
- The latest stable Kubernetes version.
- A list of all control plane components, their current versions, and the versions they can be upgraded to.
- A reminder that after upgrading the control plane components, the Kubelet on each node must be upgraded manually.
- The exact command required to perform the cluster upgrade.
This output allows you to review the upgrade process in advance and proceed with confidence.
Step 5: Apply the Upgrade
kubeadm upgrade apply v1.34.3
Once it is successful, you will get the following output.
[upgrade] SUCCESS! A control plane node of your cluster was upgraded to "v1.34.3".

Note: The next thing that we have to do is, if we do need to upgrade the CNI provider plugin (Optional)
Multiple Control Plane Nodes (Optional)
If you are running multiple control plane nodes in this case, I have only one, but if there were more, then the upgrade process would be slightly different. Instead of running the kubeadm upgrade apply command on each additional control plane node, you would run the following command:
kubeadm upgrade node
Upgrading kubelet on Control Plane Node
If you run the kubectl get nodes command at this stage, you will still see the master node listed with the older version. This is because the output of this command reflects the version of the Kubelet running on each node as registered with the API server, not the version of the API server itself.
Therefore, the next step is to upgrade the Kubelet on the master nodes.
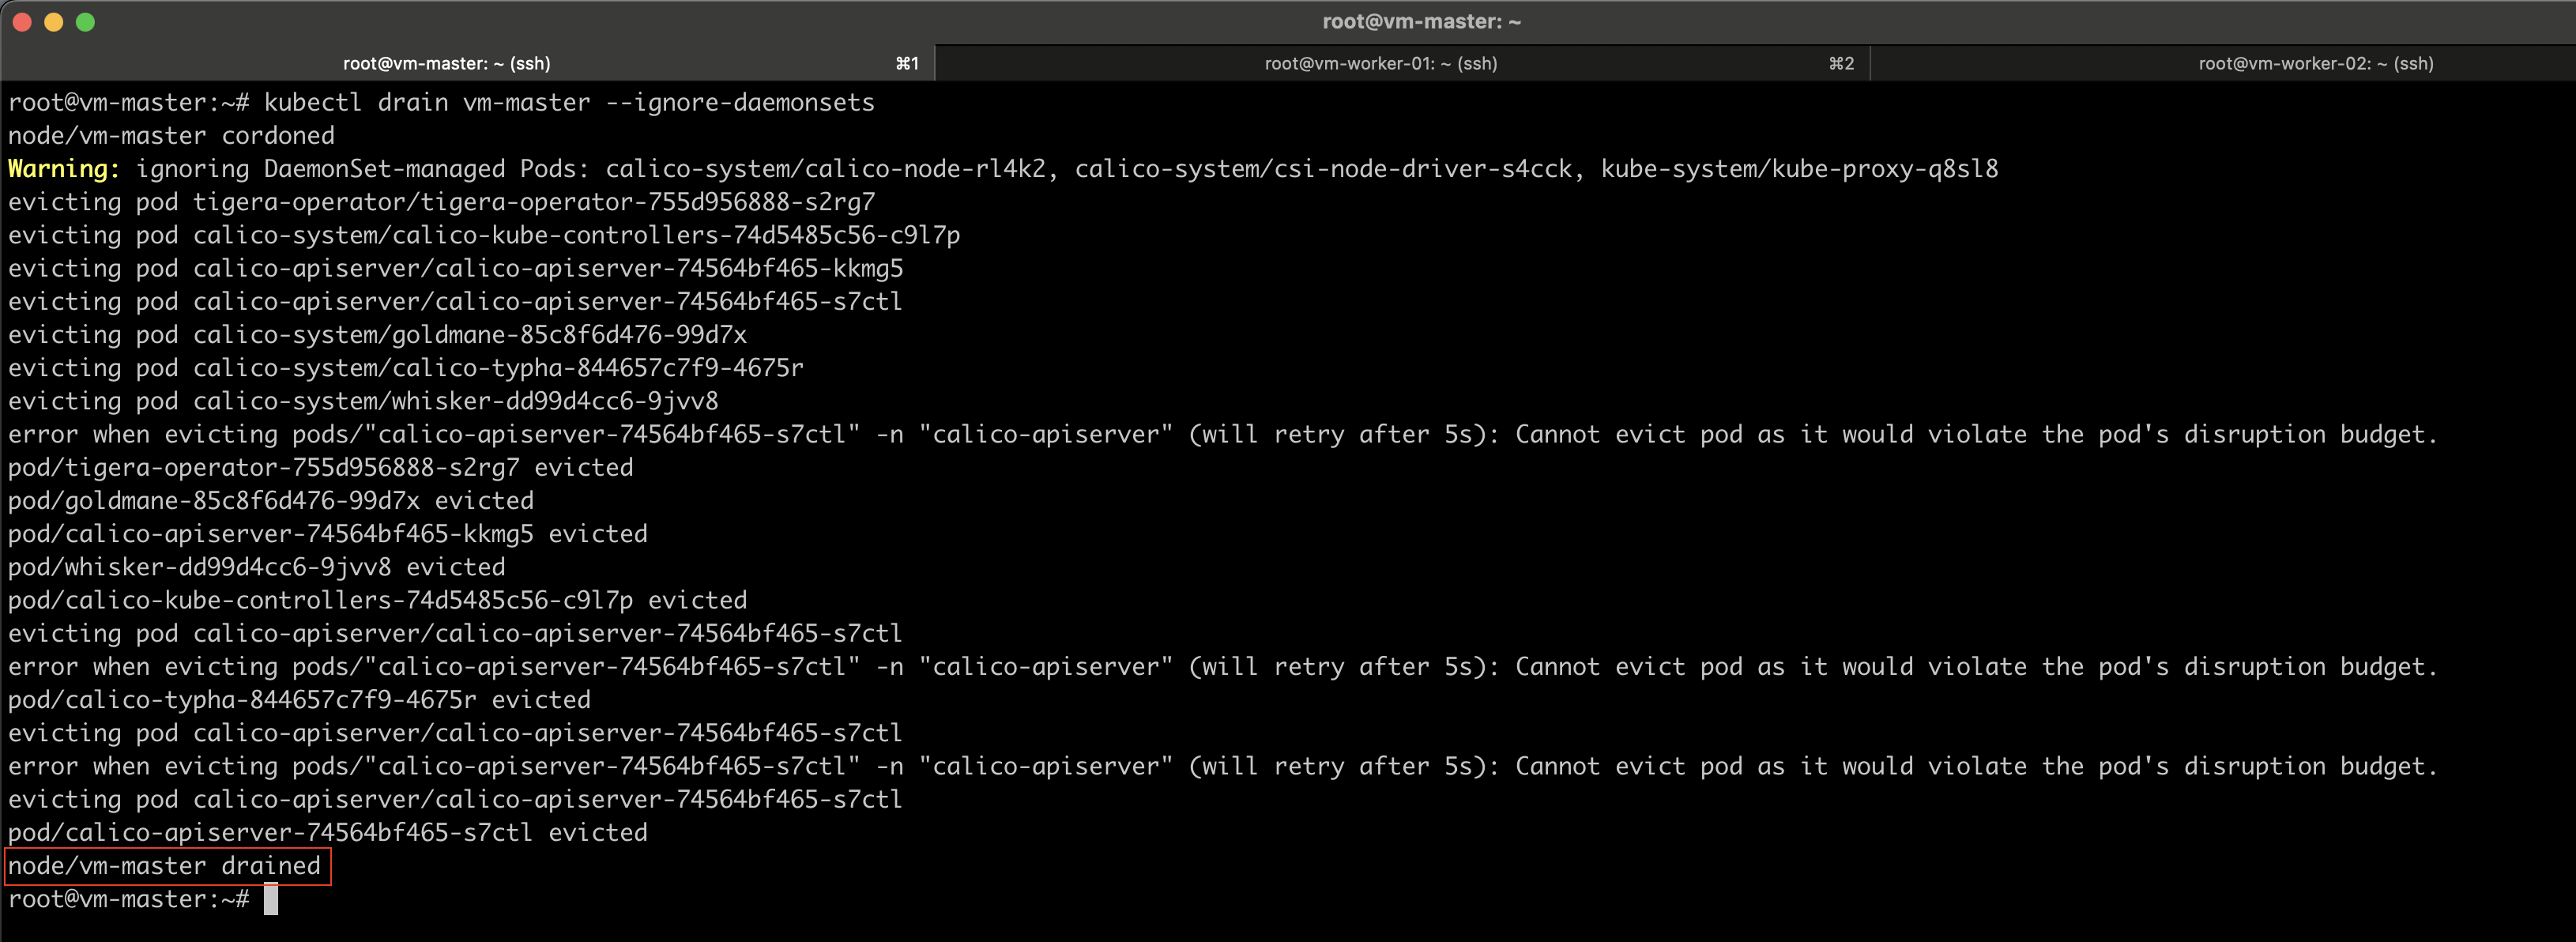
Step 6: Drain the Control Plane Node
Before upgrading the kubelet on control plane nodes, make sure to drain the node first.
Draining the node gracefully shuts down the pods running on it and recreates them on other available nodes. It also cordons the node and marks it as unschedulable, which means no new pods will be scheduled on the node until it is explicitly uncordoned.
kubectl drain vm-master --ignore-daemonsets
Step 7: Upgrade kubelet and kubectl
Make sure to change the kubelet and kubectl version number accordingly.
sudo apt-mark unhold kubelet kubectl && \
sudo apt-get update && \
sudo apt-get install -y kubelet=1.34.3-1.1 kubectl=1.34.3-1.1 && \
sudo apt-mark hold kubelet kubectl

sudo systemctl daemon-reload
sudo systemctl restart kubelet
#Verify:
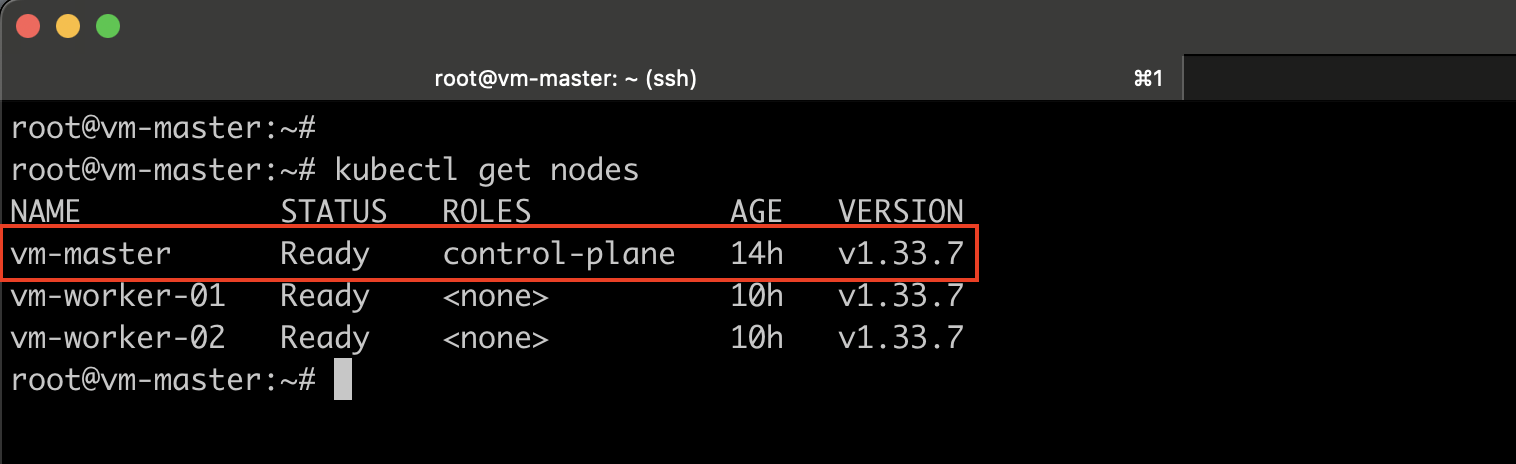
kubectl get nodes

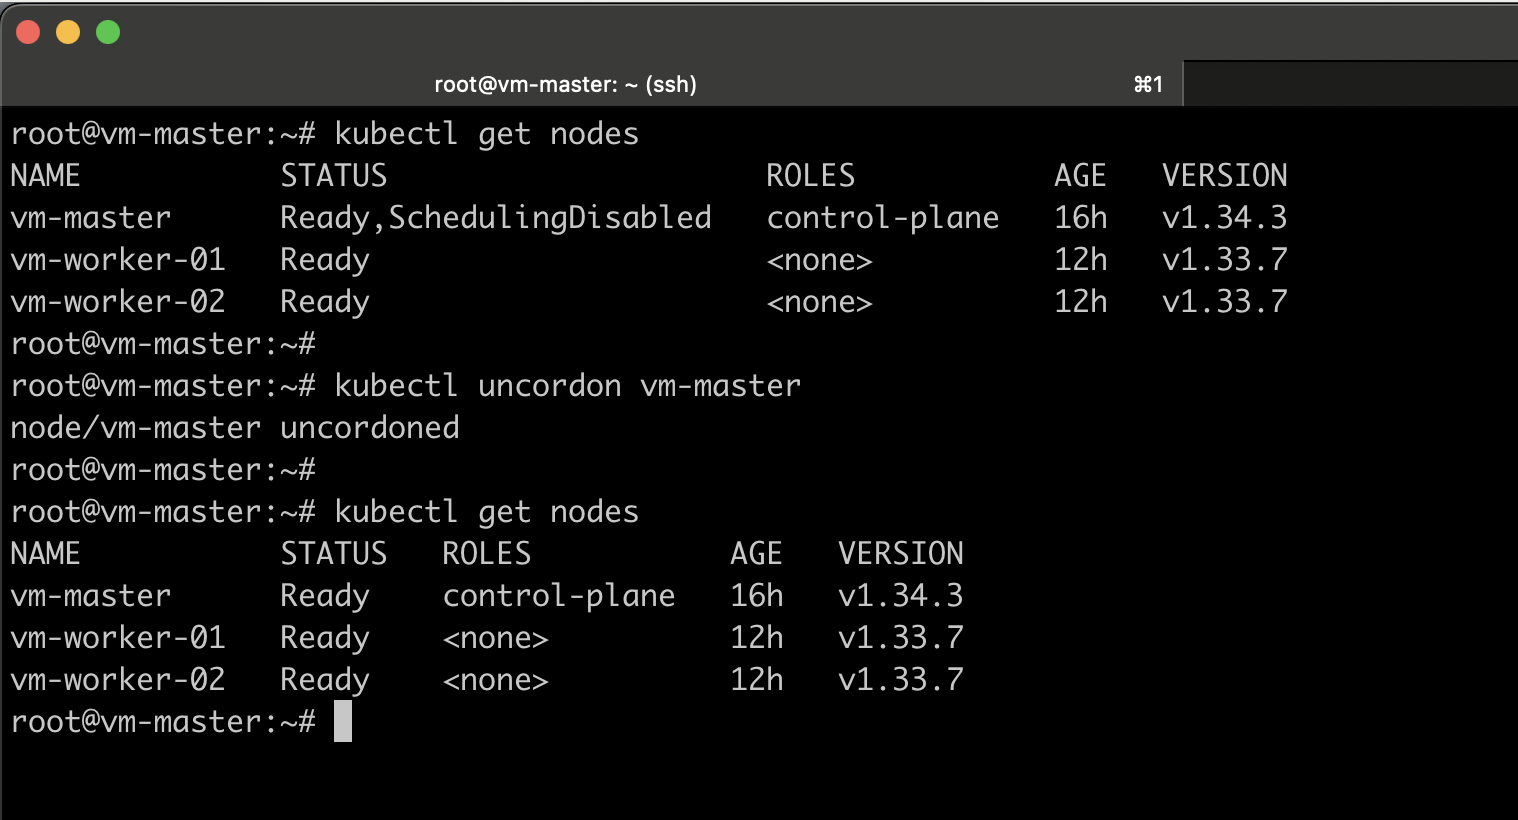
Step 8: Uncordon the Node
When we drain the node, it is automatically marked as ShedulingDisabled.
After completing the upgrade, we need to unmark it by running the following kubectl command on the node to make it schedulable again.
kubectl uncordon vm-master
It is now time to upgrade the worker nodes.
Worker Node Upgrade Strategies
There are several strategies available for upgrading worker nodes.
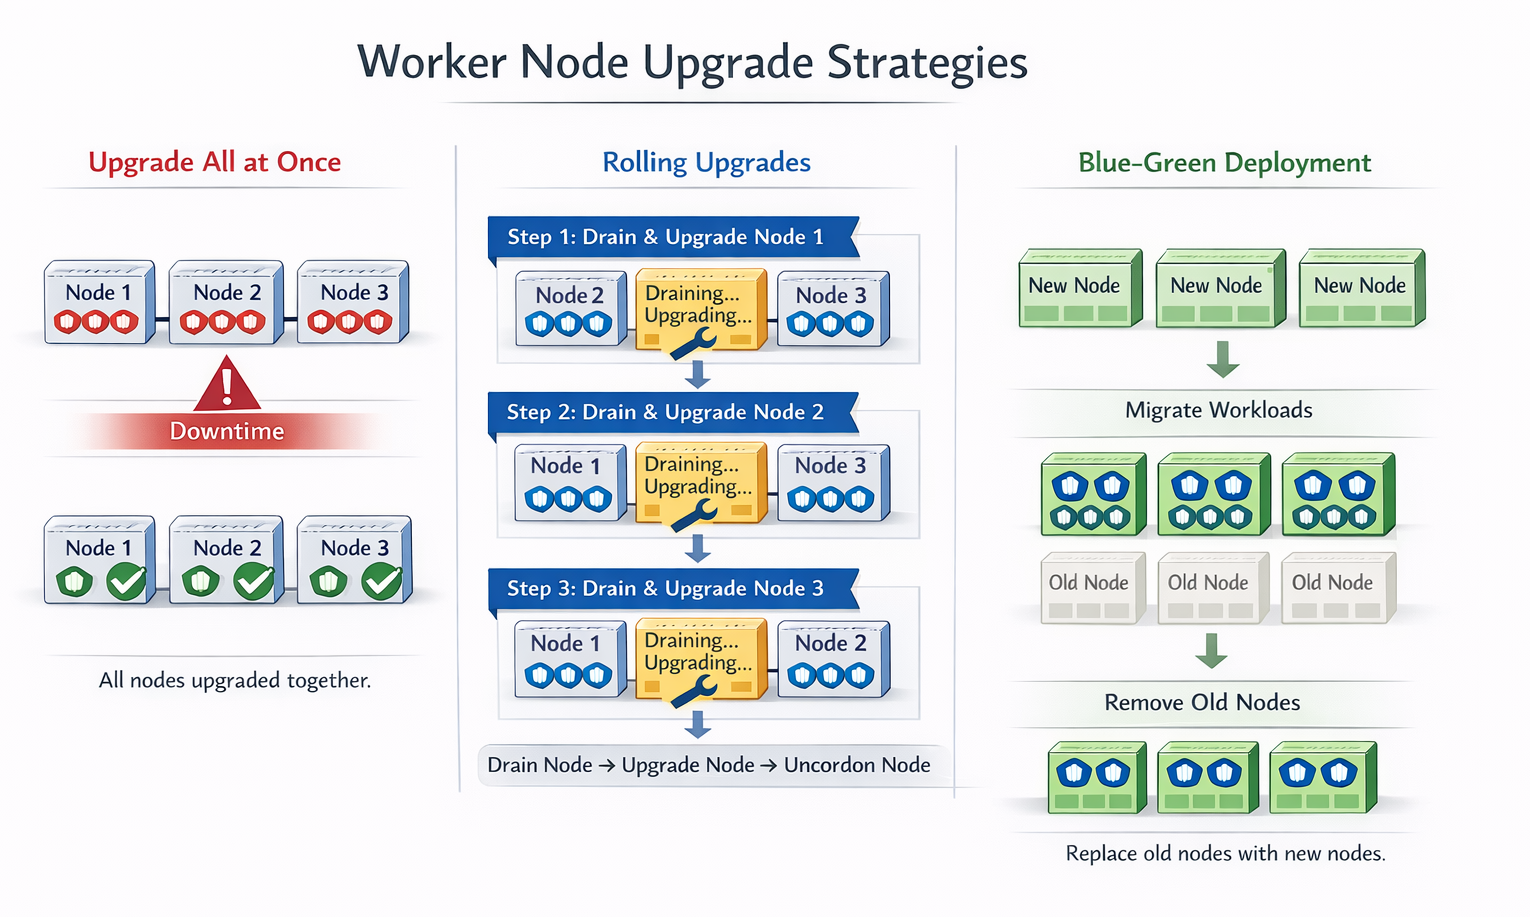
One approach is to upgrade all worker nodes at once. However, this results in downtime, as all pods will go down and users will temporarily lose access to applications. Once the upgrade is completed, the nodes come back online, new pods are scheduled, and users can resume access. This strategy is simple but requires planned downtime.
A second strategy is to upgrade the nodes one at a time.
For example, in a three-node worker cluster, you would first upgrade the first node while its workloads are moved to the second and third nodes. After the first node is upgraded and back online, you proceed to upgrade the second node, with workloads shifting to the first and third nodes. Finally, the third node is upgraded while workloads are handled by the first two nodes. This rolling upgrade approach minimizes disruption and avoids complete downtime.
A third strategy is to add new nodes to the cluster that are already running the newer software version. Workloads are gradually moved to the new nodes, and the old nodes are removed one by one until all nodes in the cluster are running the updated version. This method is especially convenient in cloud environments, where new nodes can be easily provisioned and old ones decommissioned.
Upgrading Worker Nodes (Rolling Upgrade)
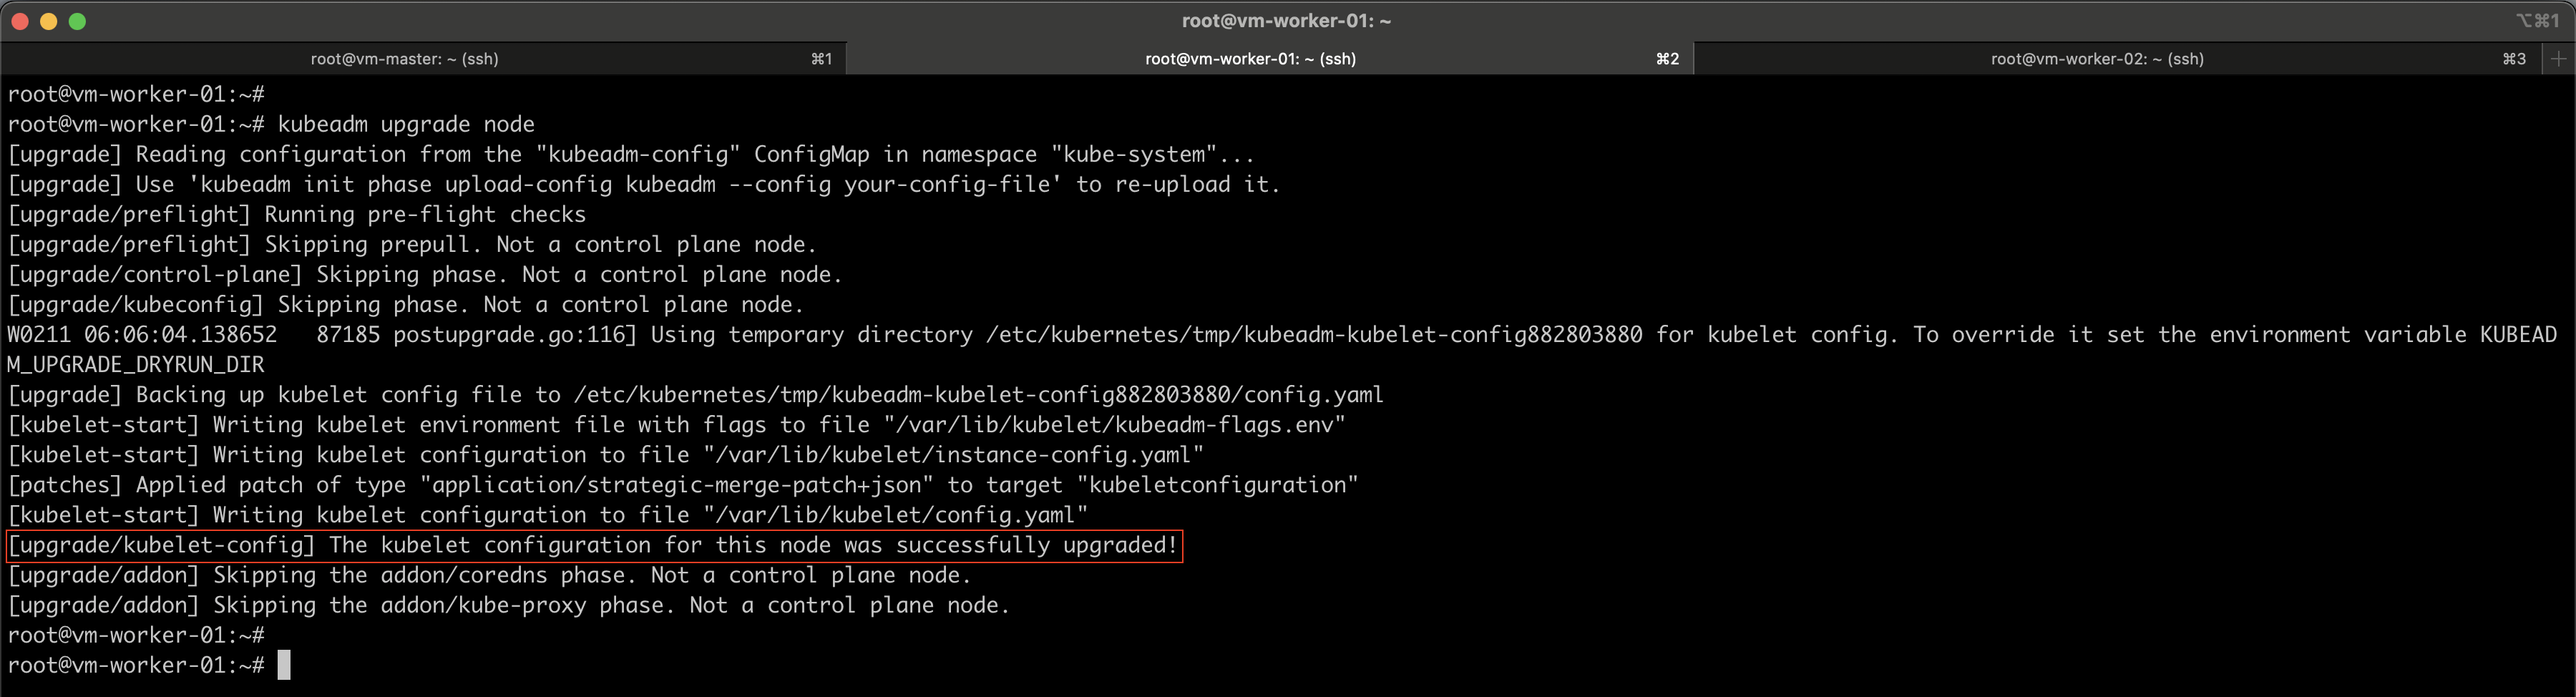
Step 9: Upgrade kubeadm on Worker Nodes
Make sure to change the kubeadm version number accordingly.
sudo apt-mark unhold kubeadm && \
sudo apt-get update && \
sudo apt-get install -y kubeadm=1.34.3-1.1 && \
sudo apt-mark hold kubeadm
kubeadm upgrade node
Step 10: Drain Worker Node
Log in to the control plane node and drain vm-worker-01.
kubectl drain vm-worker-01 --ignore-daemonsets

Step 11: Upgrade kubelet and kubectl
Make sure to change the kubelet and kubectl version number accordingly.
sudo apt-mark unhold kubelet kubectl && \
sudo apt-get update && \
sudo apt-get install -y kubelet=1.34.3-1.1 kubectl=1.34.3-1.1 && \
sudo apt-mark hold kubelet kubectl

sudo systemctl daemon-reload
sudo systemctl restart kubelet
Step 12: Uncordon the Node
Log in to the control plane node and drain vm-worker-01.
kubectl uncordon vm-worker-01

#Verify
kubectl get nodes
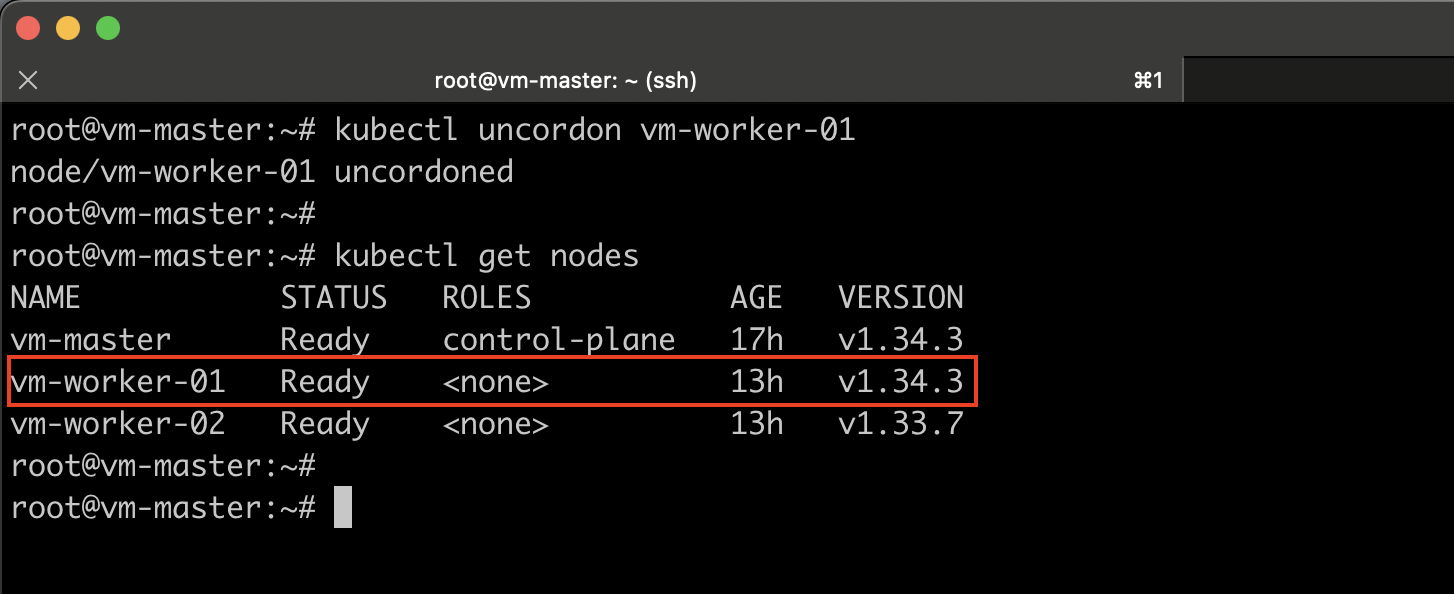
After completing the upgrade of the first worker node, simply repeat the same steps for each remaining worker node.
Conclusion
Upgrading a Kubernetes cluster using kubeadm is a structured and reliable process when performed correctly. In this guide, we covered the complete workflow for upgrading a Kubernetes cluster step by step, from understanding version compatibility rules to safely upgrading both control plane and worker nodes.
By following this kubeadm-based upgrade method, administrators can keep their Kubernetes clusters up to date with the latest features, security patches, and performance improvements while maintaining stability and minimizing service interruptions.
Upgrading Kubernetes doesn’t have to be complex. With proper planning and the right procedure, it becomes a straightforward operational task.